- Shortcut для linux mint 19
- 3. Manage Windows and Workspaces
- 4. Current Application Window
- 5. Session
- 6. Screenshots and Screen Recording
- 7. Troubleshooting
- 8. Accessibility
- 11 Comments for ‘Linux Mint ‘ [post comment in main thread]
- Comment #11 by ThomasRoth Oct 7, 2021 at 05:38 am Reply
- Comment #10 by EspiFreelancer Jul 30, 2021 at 09:26 pm Reply
- Comment #9 by Human Obstacle Dec 12, 2019 at 02:12 pm Reply
- Reply #1 Max Apr 15, 2021 at 10:56 pm
- Comment #8 by shudan54 Feb 8, 2019 at 09:39 pm Reply
- Comment #7 by ajeet4u1989 Aug 6, 2018 at 08:39 am Reply
- Comment #6 by esdegan Jul 13, 2018 at 12:35 am Reply
- Reply #1 esdegan Jul 13, 2018 at 04:31 am
- Comment #5 by mrodent Jul 6, 2017 at 02:33 pm Reply
- Reply #1 admin Jul 7, 2017 at 03:51 pm
- Comment #4 by PJP Dec 23, 2016 at 09:52 am Reply
- Comment #3 by nick fox Dec 11, 2015 at 09:19 am Reply
- Reply #1 admin Dec 12, 2015 at 05:06 pm
- Comment #2 by David M Oct 24, 2015 at 09:50 pm Reply
- Comment #1 by David M Oct 24, 2015 at 09:46 pm Reply
- Reply #1 Moem Apr 24, 2017 at 07:06 am
- Shotcut
- Возможности
- Установка
- Установка Shotcut в Ubuntu Linux
- Проблема с зависимостями
- Установка через Flatpak
- Установка через Snap
- Установка в Ubuntu (LinuxMint)
- Установка в ArchLinux (Manjaro)
- Установка в openSuse
- Установка в Gentoo
- Разработка
- How to Create File/Folder Shortcut in Linux Mint 19.3 with One Click (Nemo)
- Create File/Folder Shortcut in Nemo
- Create Shortcuts in terminal
- Check and Follow Shortcut
Shortcut для linux mint 19
Ctrl + = / — OR Ctrl + Mousewheel
Increase / decrease icon size
2.5 Toggle Side Pane, Split View, and Terminal
Toggle Extra Pane (split view that shows two folder side by side)
Toggle Terminal in top pane (require the Nemo Terminal plugin)
Edit b ookmarks (Opens a dialog where you can sort, rename, and delete the shortcuts that appear in the left pane)
Add bookmark (a shortcut in the left pane)
Cycle focus between panes
Resize panes. Press F8 to cycle through the separators between panes (the selected one will be highlighted). Then use the arrow keys to resize the separator.
Ctrl + Shift + Page Up / Page Down
3. Manage Windows and Workspaces
Cycle through open windows on current Workspace
Cycle through open windows of the same application on ANY Workspace
Ctrl + Alt + Arrow Down / Alt + Esc
Toggle Scale view (display all windows on current Workspace)
Toggle Expo view (display all Workspaces)
Ctrl + Alt + Arrow Left / Arrow Right
Move to left / right workspace
Ctrl + Alt + Shift + Arrow Left / Arrow Right
Move current window to left /right workspace
Move current window to different monitor (left/right/up/down)
4. Current Application Window
Toggle maximize / unaximize window
Snap window to left/right/top/bottom half of screen. Use in combination to snap to corners, e.g. right then up. Key back toward the middle of the screen to unsnap (e.g., for a right-snapped window, push super+arrow left)
Tile window to the left/right/top/bottom half of the screen. Other maximized windows will fill in the remaining space.
5. Session
Open the Shut Down menu (Suspend / Restart / Shut Down)
6. Screenshots and Screen Recording
By default, screenshots are saved to the Pictures folder in your Home directory
Copy a screenshot to the clipboard
Take a screenshot of the current window
Copy a screenshot of the current window to the clipboard
Toggle desktop recording (video will be saved to your Home folder)
7. Troubleshooting
Launch Linux Mint online help
Restart Cinnamon, preserving all applications and windows (version 2.6+)
Toggle l ooking glass debugging tool
Restart the X server (WARNING: this will close all running applications!)
8. Accessibility
Alt + Win + = / — or Alt + Mousewheel
Zoom desktop in or out (Note: Zoom must be enabled in Universal Access settings)
Created by rsking84 on 7/14/2015. Last updated by admin on 12/12/2015
11 Comments for ‘Linux Mint ‘ [post comment in main thread]
Comment #11 by ThomasRoth Oct 7, 2021 at 05:38 am Reply
What keyboard shortcut is used to hangs primary display when signing in to and external display
Comment #10 by EspiFreelancer Jul 30, 2021 at 09:26 pm Reply
File Manager (Nemo) Selecting Items Ctrl+Arrow Up OR Ctrl+Arrow Down to move around the files. Then, Ctrl+Space to select or deselect the file on which the cursor is.
Comment #9 by Human Obstacle Dec 12, 2019 at 02:12 pm Reply
For the love of god I just can’t figure out what is and how to disable the super(win)+space keyboard shortcut on 19.2. Tina. The shortcut switches between little previews of open windows in the panel. If anyone could help me I would be very great full.
Reply #1 Max Apr 15, 2021 at 10:56 pm
See here in cause you or anyone else is looking for the answer https://forums.linuxmint.com/viewtopic.php?t=291898
Comment #8 by shudan54 Feb 8, 2019 at 09:39 pm Reply
Newbie here. Context: My OS is Linux Mint 17.3. I’m also a Linux newbie. I want to become a freelance transcriptionist. The industry standard media player (Express Scribe), which purports to override MS Word’s function keys with its own definitions so you can control the player while typing in Word, doesn’t work with LibreOffice Writer. I’ve found no comparable player that works and I came across your site. .. I entered the desired function key definitions/assignments for the Linux LibreOffice Media Player, then saved and submitted the file for approval. But I don’t understand how my definitions will translate to the desired functionality. Do you — or someone else — write code to accomplish this? E.g., I want F3 to rewind the media file 5 seconds. How will this happen? .. Or do I need to figure out how to write my own macros within LibreOffice?
Comment #7 by ajeet4u1989 Aug 6, 2018 at 08:39 am Reply
The shortcut keys make you more faster. By using these shortcut keys you will be able to do work faster without using mouse and touch pad. I am going to mention this post on my post https://windowsclassroom.com/shortcut-keys-microsoft-word/
Comment #6 by esdegan Jul 13, 2018 at 12:35 am Reply
Hi Buddy, how to disable ALT+` I’m on Mint 19 Cinnamon I can’t found it at System Setting > Keyboard > Shortcut Thank you very much.
Reply #1 esdegan Jul 13, 2018 at 04:31 am
I got it, hehehe. https://superuser.com/questions/1338522/disable-alt-keyboard-shortcut-in-linux
Comment #5 by mrodent Jul 6, 2017 at 02:33 pm Reply
very useful. amazingly difficult to find such a comprehensive list . could I just make a plea for you to make the «printer friendly» version a bit more printer friendly: perhaps just a simple table, able to be printed on one page, and using black font only (no greys)?
Reply #1 admin Jul 7, 2017 at 03:51 pm
thanks for letting m know, i am aware of that and your post lifts this higher in my very long to-do list. major point i need to fix.
Comment #4 by PJP Dec 23, 2016 at 09:52 am Reply
Shift-del (at least 18.1) permanent delete. thx, very useful!
Comment #3 by nick fox Dec 11, 2015 at 09:19 am Reply
Hi Im using mint 17.3 and the nemo preview is shift+space rather than just space thanks
Reply #1 admin Dec 12, 2015 at 05:06 pm
Comment #2 by David M Oct 24, 2015 at 09:50 pm Reply
To clarify since previous message removed special character, that was Alt CTRL Shift + R. I am looking to take screen multiple screen shots ( one for each time the hotkey is hit ).
Comment #1 by David M Oct 24, 2015 at 09:46 pm Reply
Thanks for such a wonderful collection of Linux Mint Shortcuts, in particular the +R. which saves automatically to filename with date / time. Question: Is there an equivalent to take screen shot ? I would really like to hit a hotkey and have a timestamped filename same a screen shot without any window popping up. David M
Reply #1 Moem Apr 24, 2017 at 07:06 am
David, that is an interesting question because that is already how screenshots work for me, without any customizing, just by pressing the PtrSc button. A screenshot is taken and sent to my Pictures folder and the filename contains a time stamp.
Shotcut
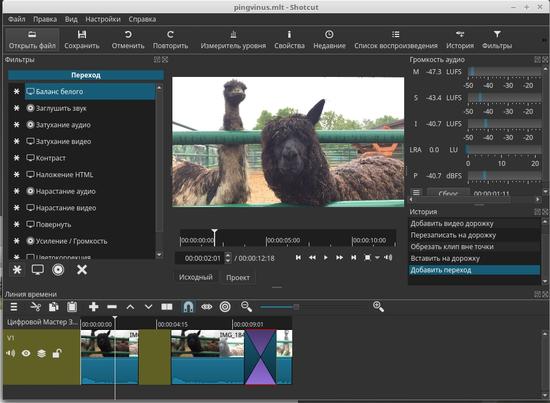
Shotcut — бесплатная программа для нелинейного видео-монтажа под Linux.
Программа обладает большим количеством возможностей и позволяет создавать видео-ролики различной степени сложности. Если сравнивать Shotcut с другими программами видео-монтажа под Linux, то Shotcut однозначно будет занимать верхние строчки по своим возможностям и удобству.
Интерфейс Shotcut выполнен довольно удобно и функционально. Вы можете включать и отключать различные интерфейсные док-панели. В целом интерфейс похож на стиль программ видео-монтажа и не должен вызывать сложностей. Есть область просмотра, шкала времени (аудио и видео дорожки) и множество дополнительных подключаемых панелей (все панели можно включить через меню Вид). Через меню Настройки->Тема можно выбрать темную или светлую тему.
Возможности
Полный список возможностей программы можно посмотреть на официальном сайте. Выборочно отметим:
- Программа поддерживает все основные форматы видео, аудио и файлов изображений (используются библиотеки FFmpeg).
- Поддерживается 4K видео.
- Раздельное редактирование аудио и видео дорожек. Различные инструменты для работы со звуковыми дорожками.
- Позволяет захватывать видео или звук с внешнего источника.
- Имеет встроенные генераторы шума, цвета и счетчиков.
- Имеет большой набор различных видео-фильтров, а также переходов.
- Поддерживается изменение скорости видео и аудио, авто-поворот, а также разворачивание (reverse).
- Поддерживается экспорт в различные видео-форматы, а также покадровый экспорт в виде файлов изображений.
- Работа с несколькими мониторами.
- И многое другое.
Установка
Установка Shotcut в Ubuntu Linux
Есть несколько способов установить (запустить) Shotcut в Ubuntu — использовать уже готовый архив (tar.bz2) с программой или, например, установить программу со всеми зависимостями через snapd («менеджер» управления пакетами).
Проблема с зависимостями
(проблема не актуальна) У меня при запуске программы из архива (shotcut-linux-x86_64-180602.tar.bz2) возникали ошибки вида:
. [Info ] OpenGL renderer "Chromium" OpenGL Warning: glXCreatePbuffer not implemented by Chromium [Info ] OpenGL threaded? false [Info ] OpenGL ES? false Segmentation fault (core dumped)Или ошибки об отсутствующих зависимостях:
./bin/shotcut: error while loading shared libraries: libmlt++.so.3: cannot open shared object file: No such file or directory ./bin/shotcut: error while loading shared libraries: libQt5QuickWidgets.so.5: cannot open shared object file: No such file or directory ./bin/shotcut: error while loading shared libraries: libQt5Multimedia.so.5: cannot open shared object file: No such file or directory ./bin/shotcut: error while loading shared libraries: libQt5WebSockets.so.5: cannot open shared object file: No such file or directory . Быстро найти полный список зависимостей мне не удалось, поэтому я установил программу через snapd.
Чтобы выполнить установку Shotcut в Ubuntu через snapd выполните в терминале последовательно команды, описанные ниже.
Сначала нужно установить сам snapd, если он еще не установлен:
sudo snap install --classic shotcutУ меня в процессе установки возникли следующие сообщения:
. Настраивается пакет snapd (2.32.9) … Job for snapd.seeded.service failed because the control process exited with error code. See "systemctl status snapd.seeded.service" and "journalctl -xe" for details. snapd.seeded.service couldn't start. snapd.snap-repair.service is a disabled or a static unit, not starting it.Они означают, что snapd не запустился, поэтому запускаем его самостоятельно, для этого выполните команду (нужно будет ввести пароль):
systemctl start snapd.seeded.serviceТеперь можно установить Shotcut:
sudo snap install --classic shotcutПрограмму можно запустить через главное меню в разделе Аудио и Видео. Если вдруг она там не появилась, нужно выйти и войти в систему (или перезагрузить компьютер).
Установка через Flatpak
flatpak install flathub org.shotcut.Shotcutflatpak run org.shotcut.ShotcutУстановка через Snap
sudo snap install shotcut --classicУстановка в Ubuntu (LinuxMint)
Установка в ArchLinux (Manjaro)
Установка в openSuse
sudo zypper install shotcutУстановка в Gentoo
sudo emerge -a media-video/shotcutРазработка

Open Source (открыт)

Qt
How to Create File/Folder Shortcut in Linux Mint 19.3 with One Click (Nemo)
There are two ways of creating shortcut in Linux Mint:
Create File/Folder Shortcut in Nemo
To create a shortcut using the file explorer, simply follow the steps below:
- Open Nemo
- Select the file or the folder
- Press CTRL + Shift
- Drag and drop the selected file or folder
A new shortcut file with the name pattern — Link to is created in the same location.
The shortcut can be moved to another folder or the Desktop.
Create Shortcuts in terminal
If you want to create a shortcut(symlink) in the terminal you can use the next command.
To create create a symbolic link of folder /home/Documents which is at /mnt/docs :
ln -s /home/Documents /mnt/docs If you like to find more about command ln check:
Note: Using command ln will create a shortcut with the same name as the original folder.
Check and Follow Shortcut
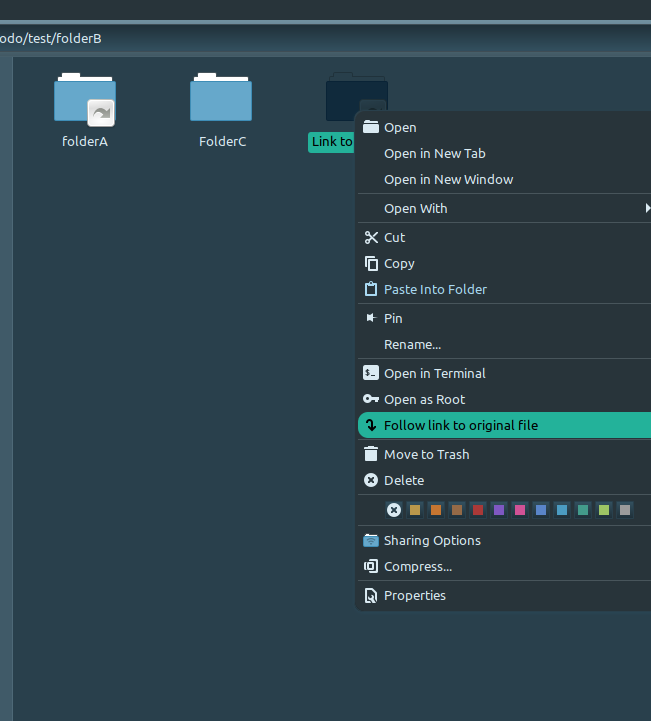
Once the shortcut is create it can be followed from the context menu:
- Right Click on Shortcut ( it will appear arrow in the right bottom corner)
- Follow link to original file
The Shortcuts are displayed differently from folders:
By using SoftHints — Python, Linux, Pandas , you agree to our Cookie Policy.