How to view unallocated free space on a hard disk through terminal [closed]
Closed. This question does not meet Stack Overflow guidelines. It is not currently accepting answers.
This question does not appear to be about a specific programming problem, a software algorithm, or software tools primarily used by programmers. If you believe the question would be on-topic on another Stack Exchange site, you can leave a comment to explain where the question may be able to be answered.
I want to view the unallocated free space on my hard disk through terminal. I’ve burned my brains searching the internet for a possible solution, but all in vain. I used all sorts of commands like df , du , fdisk , parted , etc. It tells me about the disks that are mounted and unmounted, but what about the unallocated space that I’ve left free? Of course I can view it using the ‘Disk Utility’ app provided by Fedora, but since I LOVE being in the terminal I’d like to view in it. Can anyone please help me with a solution?
You might have a misunderstanding about free space. Don’t forget overhead, and do remember that open(2) -ed but unlink(2) -ed files still use disk space.
This may be considered off-topic for Stack Overflow. You might want to ask about this on Unix.SE or Super User (but search for it there first!).
13 Answers 13
Use GNU parted and print free command:
root@sandbox:~# parted GNU Parted 2.3 Using /dev/sda Welcome to GNU Parted! Type 'help' to view a list of commands. (parted) print free Model: VMware Virtual disk (scsi) Disk /dev/sda: 64.4GB Sector size (logical/physical): 512B/512B Partition Table: msdos Number Start End Size Type File system Flags 32.3kB 1049kB 1016kB Free Space 1 1049kB 256MB 255MB primary ext2 boot 256MB 257MB 1048kB Free Space 2 257MB 64.4GB 64.2GB extended 5 257MB 64.4GB 64.2GB logical lvm 64.4GB 64.4GB 1049kB Free Space The command to use/reclaim that free space depends on where that free space is located, between existing partitions, and what kind of partitions you have (primary, extended) and also if you use LVM or not. It’s not trivial to just run a simple command that will read your mind and know what you want to actually do with that free space 🙂
# parted /dev/sda unit TB print free | grep ‘Free Space’ | tail -n1 | awk »
# parted /dev/sda unit GB print free | grep ‘Free Space’ | tail -n1 | awk »
# parted /dev/sda unit MB print free | grep ‘Free Space’ | tail -n1 | awk »
# parted /dev/sda unit B print free | grep ‘Free Space’ | tail -n1 | awk »
# parted /dev/sda unit ‘%’ print free | grep ‘Free Space’ | tail -n1 | awk »
# parted /dev/sda unit s print free | grep ‘Free Space’ | tail -n1 | awk »
Change /dev/sda to whatever device you are trying to find the information about. If you are using the result in any calculations, make sure to trim the trailing characters.
By adding the —machine argument to the parted invocation, you get colon separated output which will be much more reliable to parse than the default human readable output.
With the parted commands like this, parted will run in interactive mode. If this isn’t intended, the «unit TB» and «print free» commands need to swap places. This is also how the —help option shows it: first the command, then command args. The full command would then be: parted /dev/sda print free unit TB
The simplest way to show unallocated free space in a single command:
$ sudo sfdisk --list-free /dev/sdX (Add the —quiet option if you don’t need the extra info about sector size, etc.)
In addition to all the answers about how to find unpartitioned space, you may also have space allocated to an LVM volume but not actually in use. You can list physical volumes with the pvdisplay and see which volume groups each physical volume is associated with. If a physical volume isn’t associated with any volume group, it’s safe to reallocate or destroy. Assuming that it it is associated with a volume group, the next step is to use vgdisplay to show your those. Among other things, this will show if you have any free «physical extents» — blocks of storage you can assign to a logical volume. You can get this in a concise form with vgs :
$ sudo vgs VG #PV #LV #SN Attr VSize VFree fedora 1 3 0 wz--n- 237.46g 0 . and here you can see I have nothing free. If I did, that last number would be bigger than zero.
This is important, because that free space is invisible to du , df , and the like, and also will show up as an allocated partition if you are using fdisk or another partitioning tool.
vgdisplay really was the answer for me, as with most installers today a great option is to go with encrypted LVM which creates volume groups with logical volumes within. Then when moving space around the unallocated space is in the volume group, not the physical volume partitions.
I had just the same trouble with fedora 26 and LVM partitions, it seems I forgot check something during the installation, So, my 15G root directory has been increased to 227G like I needed.
I posted the steps I followed here:
0) #df -h Filesystem Size Used Avail Use% Mounted on devtmpfs 1.9G 0 1.9G 0% /dev tmpfs 1.9G 0 1.9G 0% /dev/shm tmpfs 1.9G 824K 1.9G 1% /run tmpfs 1.9G 0 1.9G 0% /sys/fs/cgroup /dev/mapper/fedora-root 15G 2.1G 13G 14% / tmpfs 1.9G 0 1.9G 0% /tmp /dev/md126p1 976M 119M 790M 14% /boot tmpfs 388M 0 388M 0% /run/user/0 1) # vgs VG #PV #LV #SN Attr VSize VFree fedora 1 2 0 wz--n- 231.88g 212.96g 2) # vgdisplay --- Volume group --- VG Name fedora System ID Format lvm2 Metadata Areas 1 Metadata Sequence No 3 VG Access read/write VG Status resizable MAX LV 0 Cur LV 2 Open LV 2 Max PV 0 Cur PV 1 Act PV 1 VG Size 231.88 GiB PE Size 4.00 MiB Total PE 59361 Alloc PE / Size 4844 / 18.92 GiB Free PE / Size 54517 / 212.96 GiB VG UUID 9htamV-DveQ-Jiht-Yfth-OZp7-XUDC-tWh5Lv 3) # lvextend -l +100%FREE /dev/mapper/fedora-root Size of logical volume fedora/root changed from 15.00 GiB (3840 extents) to 227.96 GiB (58357 extents). Logical volume fedora/root successfully resized. 4) #lvdisplay 5) #fd -h 6) # xfs_growfs /dev/mapper/fedora-root meta-data=/dev/mapper/fedora-root isize=512 agcount=4, agsize=983040 blks = sectsz=512 attr=2, projid32bit=1 = crc=1 finobt=1 spinodes=0 rmapbt=0 = reflink=0 data = bsize=4096 blocks=3932160, imaxpct=25 = sunit=0 swidth=0 blks naming =version 2 bsize=4096 ascii-ci=0 ftype=1 log =internal bsize=4096 blocks=2560, version=2 = sectsz=512 sunit=0 blks, lazy-count=1 realtime =none extsz=4096 blocks=0, rtextents=0 data blocks changed from 3932160 to 59757568 7) #df -h Filesystem Size Used Avail Use% Mounted on devtmpfs 1.9G 0 1.9G 0% /dev tmpfs 1.9G 0 1.9G 0% /dev/shm tmpfs 1.9G 828K 1.9G 1% /run tmpfs 1.9G 0 1.9G 0% /sys/fs/cgroup /dev/mapper/fedora-root 228G 2.3G 226G 2% / tmpfs 1.9G 0 1.9G 0% /tmp /dev/md126p1 976M 119M 790M 14% /boot tmpfs 388M 0 388M 0% /run/user/0 Classic SysAdmin: How to Check Disk Space on Linux from the Command Line
This is a classic article written by Jack Wallen from the Linux.com archives. For more great SysAdmin tips and techniques check out our free intro to Linux course.
Quick question: How much space do you have left on your drives? A little or a lot? Follow up question: Do you know how to find out? If you happen to use a GUI desktop (e.g., GNOME, KDE, Mate, Pantheon, etc.), the task is probably pretty simple. But what if you’re looking at a headless server, with no GUI? Do you need to install tools for the task? The answer is a resounding no. All the necessary bits are already in place to help you find out exactly how much space remains on your drives. In fact, you have two very easy-to-use options at the ready.
In this article, I’ll demonstrate these tools. I’ll be using Elementary OS, which also includes a GUI option, but we’re going to limit ourselves to the command line. The good news is these command-line tools are readily available for every Linux distribution. On my testing system, there are a number of attached drives (both internal and external). The commands used are agnostic to where a drive is plugged in; they only care that the drive is mounted and visible to the operating system.
With that said, let’s take a look at the tools.
df
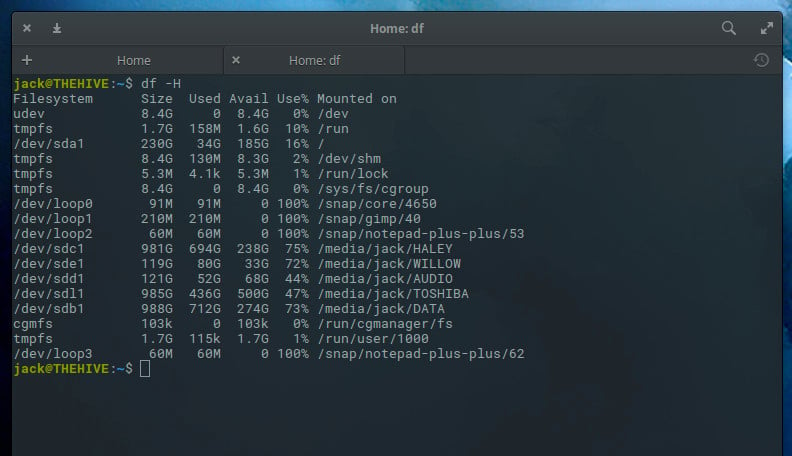
The df command is the tool I first used to discover drive space on Linux, way back in the 1990s. It’s very simple in both usage and reporting. To this day, df is my go-to command for this task. This command has a few switches but, for basic reporting, you really only need one. That command is df -H. The -H switch is for human-readable format. The output of df -H will report how much space is used, available, percentage used, and the mount point of every disk attached to your system (Figure 1).
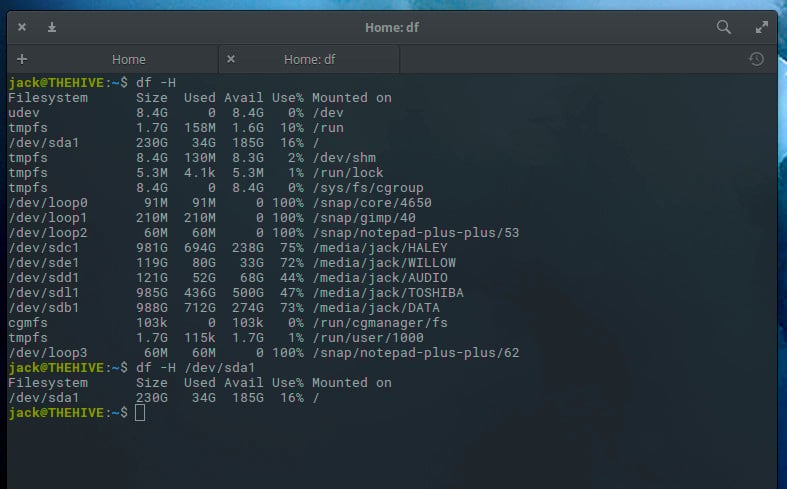
What if your list of drives is exceedingly long and you just want to view the space used on a single drive? With df, that is possible. Let’s take a look at how much space has been used up on our primary drive, located at /dev/sda1. To do that, issue the command:
The output will be limited to that one drive (Figure 2).
You can also limit the reported fields shown in the df output. Available fields are:
- source — the file system source
- size — total number of blocks
- used — spaced used on a drive
- avail — space available on a drive
- pcent — percent of used space, divided by total size
- target — mount point of a drive
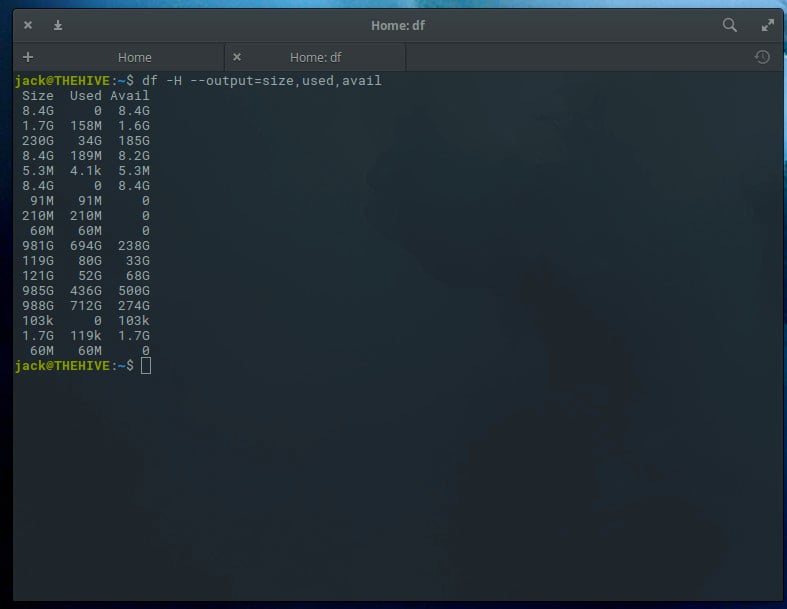
Let’s display the output of all our drives, showing only the size, used, and avail (or availability) fields. The command for this would be:
The output of this command is quite easy to read (Figure 3).
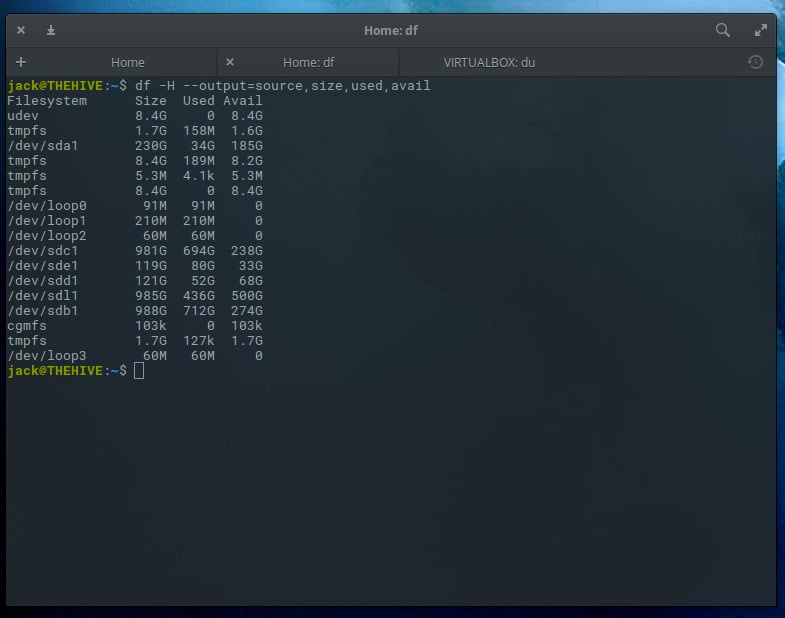
The only caveat here is that we don’t know the source of the output, so we’d want to include source like so:
df -H --output=source,size,used,avail
Now the output makes more sense (Figure 4).
du
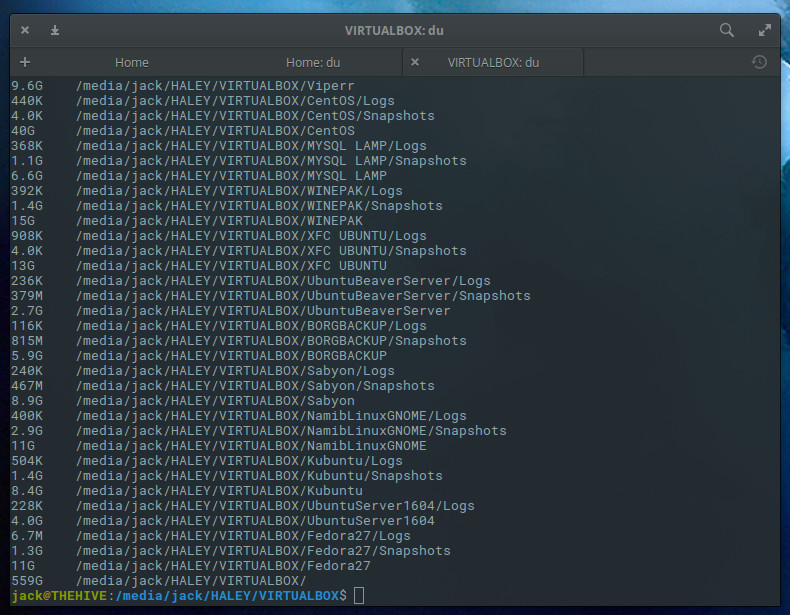
Our next command is du. As you might expect, that stands for disk usage. The du command is quite different to the df command, in that it reports on directories and not drives. Because of this, you’ll want to know the names of directories to be checked. Let’s say I have a directory containing virtual machine files on my machine. That directory is /media/jack/HALEY/VIRTUALBOX. If I want to find out how much space is used by that particular directory, I’d issue the command:
du -h /media/jack/HALEY/VIRTUALBOX
The output of the above command will display the size of every file in the directory (Figure 5).
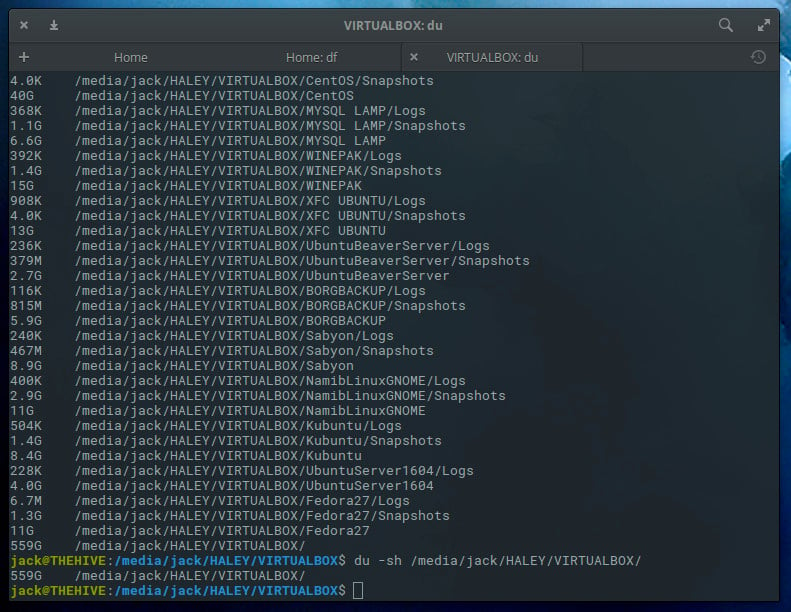
So far, this command isn’t all that helpful. What if we want to know the total usage of a particular directory? Fortunately, du can handle that task. On the same directory, the command would be:
du -sh /media/jack/HALEY/VIRTUALBOX/
Now we know how much total space the files are using up in that directory (Figure 6).
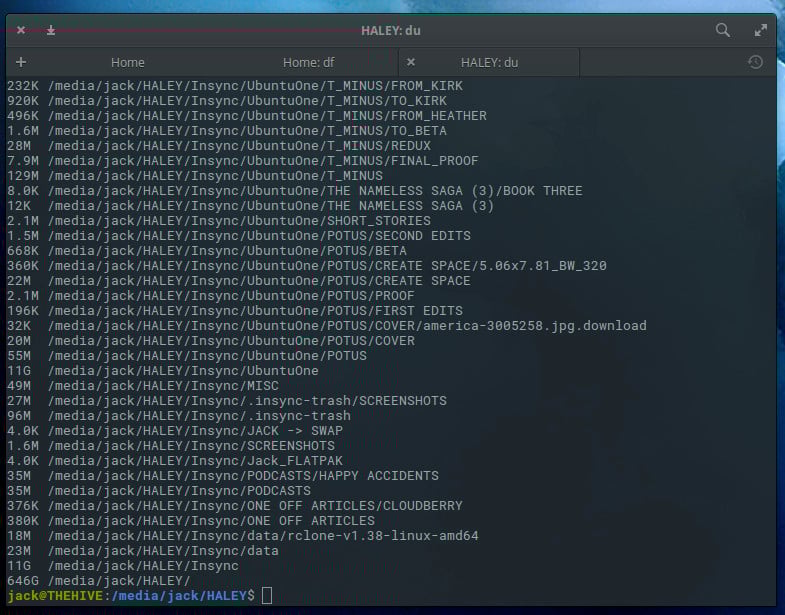
You can also use this command to see how much space is being used on all child directories of a parent, like so:
The output of this command (Figure 7) is a good way to find out what subdirectories are hogging up space on a drive.
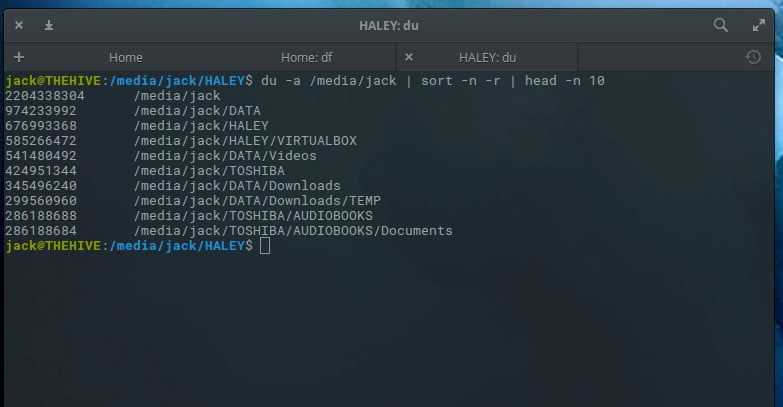
The du command is also a great tool to use in order to see a list of directories that are using the most disk space on your system. The way to do this is by piping the output of du to two other commands: sort and head. The command to find out the top 10 directories eating space on a drive would look something like this:
du -a /media/jack | sort -n -r | head -n 10
The output would list out those directories, from largest to least offender (Figure 8).
Not as hard as you thought
Finding out how much space is being used on your Linux-attached drives is quite simple. As long as your drives are mounted to the Linux system, both df and du will do an outstanding job of reporting the necessary information. With df you can quickly see an overview of how much space is used on a disk and with du you can discover how much space is being used by specific directories. These two tools in combination should be considered must-know for every Linux administrator.
And, in case you missed it, I recently showed how to determine your memory usage on Linux. Together, these tips will go a long way toward helping you successfully manage your Linux servers.