- How To Install fonts-ubuntu-console on Kali Linux
- What is fonts-ubuntu-console
- Install fonts-ubuntu-console Using apt-get
- Install fonts-ubuntu-console Using apt
- Install fonts-ubuntu-console Using aptitude
- How To Uninstall fonts-ubuntu-console on Kali Linux
- Uninstall fonts-ubuntu-console And Its Dependencies
- Remove fonts-ubuntu-console Configurations and Data
- Remove fonts-ubuntu-console configuration, data, and all of its dependencies
- References
- Summary
- How to Change Kali Linux Terminal Background and Font?
- Change Kali Linux Terminal Background
- How to Change Kali Linux Terminal Font?
- Conclusion
- 8thString
- Labels
- Comments
- Popular posts from this blog
- How to shutdown android-x86 pC
- Error! Could not locate dkms.conf file install VirtualBox 4.1.8 on Ubuntu 11.10
How To Install fonts-ubuntu-console on Kali Linux
In this tutorial we learn how to install fonts-ubuntu-console on Kali Linux.
What is fonts-ubuntu-console
The Ubuntu Font Family is a set of contemporary sans-serif fonts developed between 2010-2011. Dalton Maag performed the font design work and implementation with funding from Canonical. The fonts have been the default fonts for Ubuntu since 2010.
This package contains the “Ubuntu Mono” font converted to a bitmap version for Linux console use. These fonts can be loaded from a virtual terminal by executing “setfont /usr/share/consolefonts/UbuntuMono*.psf” .
There are three ways to install fonts-ubuntu-console on Kali Linux . We can use apt-get , apt and aptitude . In the following sections we will describe each method. You can choose one of them.
Install fonts-ubuntu-console Using apt-get
Update apt database with apt-get using the following command.
After updating apt database, We can install fonts-ubuntu-console using apt-get by running the following command:
sudo apt-get -y install fonts-ubuntu-console Install fonts-ubuntu-console Using apt
Update apt database with apt using the following command.
After updating apt database, We can install fonts-ubuntu-console using apt by running the following command:
sudo apt -y install fonts-ubuntu-console Install fonts-ubuntu-console Using aptitude
If you want to follow this method, you might need to install aptitude first since aptitude is usually not installed by default on Kali Linux. Update apt database with aptitude using the following command.
After updating apt database, We can install fonts-ubuntu-console using aptitude by running the following command:
sudo aptitude -y install fonts-ubuntu-console How To Uninstall fonts-ubuntu-console on Kali Linux
To uninstall only the fonts-ubuntu-console package we can use the following command:
sudo apt-get remove fonts-ubuntu-console Uninstall fonts-ubuntu-console And Its Dependencies
To uninstall fonts-ubuntu-console and its dependencies that are no longer needed by Kali Linux, we can use the command below:
sudo apt-get -y autoremove fonts-ubuntu-console Remove fonts-ubuntu-console Configurations and Data
To remove fonts-ubuntu-console configuration and data from Kali Linux we can use the following command:
sudo apt-get -y purge fonts-ubuntu-console Remove fonts-ubuntu-console configuration, data, and all of its dependencies
We can use the following command to remove fonts-ubuntu-console configurations, data and all of its dependencies, we can use the following command:
sudo apt-get -y autoremove --purge fonts-ubuntu-console References
Summary
In this tutorial we learn how to install fonts-ubuntu-console using different package management tools like apt, apt-get and aptitude.
How to Change Kali Linux Terminal Background and Font?

As Kali Linux user knows that when they open up the Terminal that is similar to Command Prompt (CMD) in the Windows operating system. They may not like the default background colour. If you want to change Kali Linux Terminal background, we are here to guide you. I really don’t like the Terminal background colour because nothing looks clearly. When we want to type something, we would not be able to recognise what we have written. So that’s why we are going to help you to change your Kali Linux Terminal background and font.
Change Kali Linux Terminal Background
For the demonstration, we are going to do our task on Kali Linux version 2. Right now this is the latest version of Kali Linux that its user works on it. Before we get started, I’m going to tell one thing else. We have the same terminal on the Mac operating system. When you want to change the Linux Terminal background, it means that you know how to change Mac OS Terminal as well. Because these two operating systems are somehow alike to each other.
To change Kali Linux Background, follow the instructions below. This article will help you to learn how to change Kali Linux Terminal background and as well as Mac OS X El Capitan.
For the first time what you are going to do is open up the Terminal. If you don’t know how to open Terminal, tap on the small black square icon at the left-hand side. If you don’t find it, go to the Applications tab and find the terminal there.
Step #1. When you open up the Terminal, click on the Edit tab then choose Profile Preferences.

Step #2. Go to “Colors Tab” now then do the following activity.
- Uncheck “Use colours from the system theme “
- Text Color
- Background Color
- Use Transparent Background
Uncheck the theme colour and choose a custom theme. Change the text colour to black or any colour that you want and as well change the background colour to white or custom colour that you want. Finally, uncheck the Transparent background and drag the small button to the right. Once you are satisfied with this setting, click “Close” at the bottom right-hand side.

Change Terminal Background Color
How to Change Kali Linux Terminal Font?
You might see that someone use a very unusual font on Kali Linux Terminal which attracts you. Don’t worry about this. You as well can do it. Just go to the Terminal Edit tab then choose the General tab. See the bottom left-hand side of the window and select “Custom Font”. Now, select the font which you like the most. Once you are agreed with this font, click on the “Close” button to end up this process.

Conclusion
This was all about how to change Kali Linux Terminal background and font. I hope that you have enjoyed this article and good luck. If you have got any question regarding this article, feel free to ask us right below this post via the comment. We will try to answer it as soon as possible. Thanks for being with us.
8thString
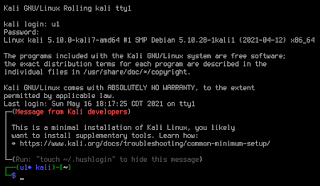
Fix corrupted console font on Kali Linux 2021.1
I have installed Kali Linux on a VM with 512 MB memory and 2 vCPU using network installer. The installation was uneventful but my first login shows the following:

$: sudo dpkg-reconfigure console-setup
Select different font type as appropriate.
It should now look much better
Keywords: Kali, Linux, Console, garbled, corrupted, text
- Get link
- Other Apps
Labels
- Get link
- Other Apps
Comments
Popular posts from this blog
How to shutdown android-x86 pC
Press Alt+F1, then type: #: reboot -p Reference(s): https://groups.google.com/forum/#!topic/android-x86/pEI7xAnOpNY
- Get link
- Other Apps
Error! Could not locate dkms.conf file install VirtualBox 4.1.8 on Ubuntu 11.10
Tried to update my Ubuntu host today and it did pickup that new version of VirtualBox is available (4.1.8). All other packages installed properly except that VirtualBox installation was complaining about missing dkms.conf file, see error message below. $: sudo /etc/init.d/vboxdrv setup * Stopping VirtualBox kernel modules [ OK ] * Uninstalling old VirtualBox DKMS kernel modules Error! Could not locate dkms.conf file. File: does not exist. [ OK ] * Trying to register the VirtualBox kernel modules using DKMS [ OK ] * Starting VirtualBox kernel modules [ OK ] Though it looks like installation was fine but I am concerned about its effects to VirtualBox functionality. To fix this, do: $: cd /var/lib/dkms/vboxhost $: sudo rm -r 4.1.4 $: sudo /etc/init.d/vboxdrv setup Of course you have to re
- Get link
- Other Apps