- Shrinking ext4 partition on command line [duplicate]
- 1 Answer 1
- How to Shrink an ext2/3/4 File system with resize2fs
- More Information
- Shrink existing partition mdraid linux ext4 using resize2fs
- 1. unmount the drive’s partition you want to shrink
- 2. Run e2fsck
- 3. Shrink the partition
- 4. Re-mount the partition
- 5. Verify new disk layout
- More useful commands
- What happens if I shrink a partition smaller than the used space, will I loose all my data?
- Get some large data (e.g. your database)
- Unmount the partition where the data is
- Resize the partition smaller than the size of the used data
- Sign up for more like this.
- Windows containers how to. not?
- How to Create a Table of Contents on Ghost
- If I want to get a website set up and some SEO done, what sort of figures would I be looking at?
- Как изменить размер Ext4
- Как увеличить размер Ext4
- Шаг 1. Увеличение раздела
- Шаг 2. Увеличение файловой системы
- Шаг 3. Проверка на ошибки
- Шаг 4. Монтирование
- Как уменьшить размер Ext4
- Шаг 1. Проверка файловой системы
- Шаг 2. Уменьшение файловой системы
- Шаг 3. Уменьшение раздела
- Шаг 4. Монтирование
- Выводы
- Похожие записи
- Оцените статью
- Об авторе
Shrinking ext4 partition on command line [duplicate]
Would it be possible on a running system to shrink ext4 partition and create another partition on the available free space such as it is done in Gparted? I want to shrink /dev/sdb1 which isn’t a system partition so unmounting isn’t a problem. I managed to resize /dev/sdb1 with resize2fs but after that I got lost, because fdisk didn’t see any free space to create new partition on it. Running Ubuntu Server 14.04.
There are several commands to run after each other if you want to do it with command line tools. It is much easier and safer to do with gparted, so I suggest that you do it with gparted, if it is OK to reboot the computer from a USB boot drive or DVD boot disk. (I realize that you might want to keep the server running.)
1 Answer 1
Yes, you need to run fdisk to actually change the partition table.
After you resize your file system with resize2fs (the partition must be unmounted), look at the output of the command:
$ resize2fs /dev/sdb1 24G . The filesystem on /dev/sdb1 is now 6291456 (4k) blocks long. Remember the number of blocks and the block length. This only changed the size of the filesystem, but not the partition. You’ll need to delete the partition and recreate it with the correct size, using the fdisk command:
You can type p to see the partition table:
Device Boot Start End Sectors Size Id Type /dev/sdb1 * 2048 52428766 52426719 25G 83 Linux Type d to delete the partition. Then n to add a new partition, use the same values as the original one but changing the last sector to the one that fits the current filesystem. It accepts a relative size for the last sector, so calculate the resulting size by multiplying the number of blocks with the block length that gave the resize2fs command. In this example:
When adding the new partition and you get asked for the last sector, type the resulting size (note the + prefix and the uppercase K ): +25165824K
Type a if the partition was a bootable one, and p to view the new partition table:
Device Boot Start End Sectors Size Id Type /dev/sdb1 * 2048 50333695 50331648 24G 83 Linux Type w to write changes to disk. After that you should now see the new size.
How to Shrink an ext2/3/4 File system with resize2fs
1. If the partition the file system is on is currently mounted, unmount it.
2. Run fsck on the unmounted file system.
~]# e2fsck /dev/vdb1 e2fsck 1.41.12 (17-May-2010) Pass 1:Checking inodes, blocks, and sizes Pass 2:Checking directory structure Pass 3:Checking directory connectivity Pass 4:Checking reference counts Pass 5:Checking group sumary information ext4-1:11/131072 files (0.0% non-contiguous),27050/524128 blocks 3. Shrink the file system with the resize2fs /dev/device size command.
~]# resize2fs /dev/vdb1 200M resize2fs 1.41.12 (17-May-2010) Resizing the filesystem on /dev/vdb1 to 204800 (1k) blocks. The filesystem /dev/vdb1 is now 204800 blocks long. Accepted size units for file system block sizes are:
4. Delete and recreate the partition the file system is on to the required amount. If the file system is smaller than 2TB use fdisk as is described in How to Resize a File System with fdisk, if the file system is larger than 2TB use parted as described in [LINK TO COME].
5. Mount the file system and partition.
More Information
man resize2fs – man page for resize2fs that contains information on what resize2fs is, what it supports, and the various options it takes.
Shrink existing partition mdraid linux ext4 using resize2fs

1. unmount the drive’s partition you want to shrink
If you see umount: : target is busy. then you may need to cd out of the directory you’re trying to umount. (e.g. cd / to go to root).
2. Run e2fsck
e2fsck 1.45.5 (07-Jan-2020)
Pass 1: Checking inodes, blocks, and sizes
Pass 2: Checking directory structure
Pass 3: Checking directory connectivity
Pass 4: Checking reference counts
Pass 5: Checking group summary information
/dev/md3: 12/115474432 files (0.0% non-contiguous), 7531170/461869424 blocks
3. Shrink the partition
e.g. this is resizing a 1TB partition to 500G
resize2fs 1.45.5 (07-Jan-2020)Resizing the filesystem on /dev/md3 to 131072000 (4k) blocks.
The filesystem on /dev/md3 is now 131072000 (4k) blocks long.
The sizes you can specify are:
4. Re-mount the partition
5. Verify new disk layout
More useful commands
What happens if I shrink a partition smaller than the used space, will I loose all my data?
e.g. Say you partition is 500GB, and 90% full with files, and you resize it using resize2fs, what will happen? Obviously there’s not enough free space. But what will resize2fs actually do? Lets find out!
- Download an ubuntu ISO image (2.1G) to our 500G partition (this is an example large file- it could be, your database or other important data you don’t want to loose.
- Next, we’ll unmount and then shrink the partition to 10 kilobytes (smaller than our ubuntu ISO image)
- Observe what happens to our precious data
Get some large data (e.g. your database)
wget https://releases.ubuntu.com/18.04.5/ubuntu-18.04.5-desktop-amd64.isols -lh
total 2.1G
-rw-r—r— 1 root root 6 Aug 22 13:47 hello.txt
-rw-r—r— 1 root root 2.1G Aug 7 2020 ubuntu-18.04.5-desktop-amd64.iso
Unmount the partition where the data is
e2fsck -f /dev/md3
e2fsck 1.45.5 (07-Jan-2020)
Pass 1: Checking inodes, blocks, and sizes
Pass 2: Checking directory structure
Pass 3: Checking directory connectivity
Pass 4: Checking reference counts
Pass 5: Checking group summary information
/dev/md3: 13/32768000 files (0.0% non-contiguous), 2873265/131072000 blocks
Resize the partition smaller than the size of the used data
Here we’re resiziing the partition to 10 kilobytes which is smaller than the existing used data size.
resize2fs 1.45.5 (07-Jan-2020)
`resize2fs: New size smaller than minimum (1303550)`
`echo $?`
1 # we get a > 0 exit code from $? meaning the previous command failed.
Thankfully, resize2fs stops us from shrinking a partition to a smaller size than the used disk space. But what if we want to?
We can force it with the -f option, making our data inaccessible:
resize2fs -f /dev/md3 10K
resize2fs 1.45.5 (07-Jan-2020)
Resizing the filesystem on /dev/md3 to 2 (4k) blocks.
resize2fs: Not enough space to build proposed filesystem while trying to resize /dev/md3
Please run ‘e2fsck -fy /dev/md3’ to fix the filesystem
after the aborted resize operation.
Notice that, even though the command was forced, we still get «Not enough space to build proposed filesystem while trying to resize». Please run ‘e2fsck -fy /dev/md3’ to fix the filesystem
Pass 1: Checking inodes, blocks, and sizes
Pass 2: Checking directory structure
Pass 3: Checking directory connectivity
Pass 4: Checking reference counts
Pass 5: Checking group summary information
/dev/md3: 13/32768000 files (0.0% non-contiguous), 2873265/131072000 blocks
Let’s remount: mount /dev/md3 /home and check our data:
Surprisingly, out data appears to be intact.
-rw-r—r— 1 root root 2.1G Aug 7 2020 ubuntu-18.04.5-desktop-amd64.iso
Summary: It’s surprisingly hard (thankfully) to forcibly and mistakenly shrink a partition using resize2fs smaller than than data currently used.
Sign up for more like this.

Windows containers how to. not?
Things to know about Windows Containers This started as an initial research into Windows Containers. My initial impression was not fantastic, left wanting. * «Windows requires the host OS version to match the container OS version» (src) * This is in stark constrast compared to Linux containers, where you can trivially, swap

How to Create a Table of Contents on Ghost
You know what’s scary? Ghosts. You know what’s even scarier? Not having a table of contents on your blog posts on Ghost! That’s why I’m going to show you how to make one in just a few easy steps. No coding required, no ghost hunting needed. Just follow me and you’ll be fine.

If I want to get a website set up and some SEO done, what sort of figures would I be looking at?
«for reals though, if it’s just a simple one page website, and to stick some keywords into google» . «Without more information I’d question why not use Squarespace, Wix, WordPress? They are all adequate. We also sell small business web hosting with support. . «Oh is it that easy?» . «Depends what «it»
Как изменить размер Ext4
На данный момент Ext4 — это самая популярная файловая система для операционных систем семейства Linux, она используется как на серверах, так и на домашних компьютерах, и там и там часто возникает необходимость изменить размер раздела.
В сегодняшней статье мы рассмотрим как расширить раздел Ext4 в графическом интерфейсе или с помощью терминала.
Как увеличить размер Ext4
Шаг 1. Увеличение раздела
Если вы хотите изменить размер корневого раздела файловой системы, то вам обязательно надо будет загрузится с LiveCD иначе вы не сможете редактировать примонтированный раздел. Если это не системный раздел, то его можно отмонтировать и затем изменять. Для увеличения раздела будем использовать parted. Сначала запустите утилиту:
Здесь /dev/sda — это ваш диск, один из разделов которого вы хотите расширить. Сначала выведите текущую таблицу разделов, для этого выполните:

Как видите, здесь есть только один раздел и он занимает 16 гигабайт, а всего на диске доступно 21,7 гигабайт. Чтобы расширить Ext4 и занять всё это пространство используйте команду resizepart:
(parted) resizepart 1 21,7GB
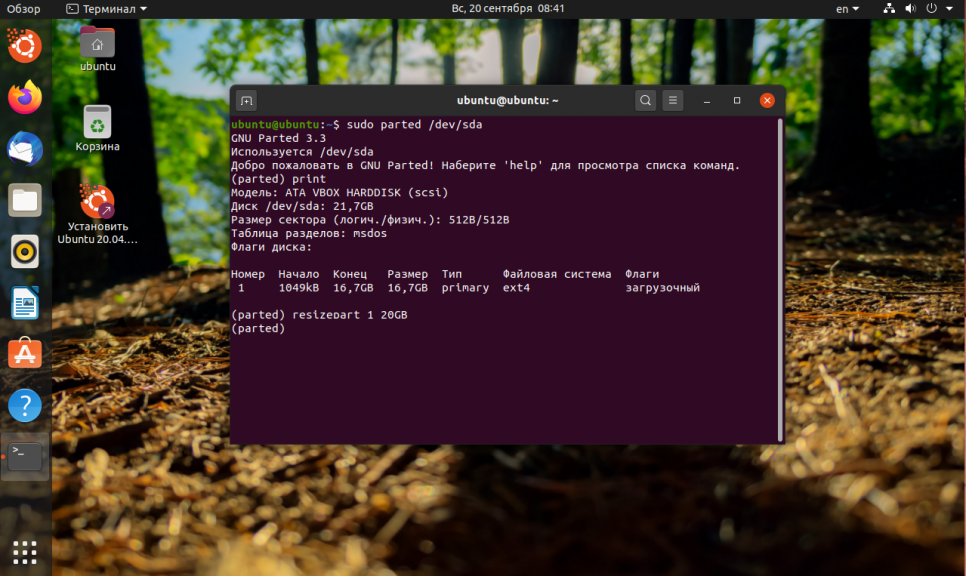
Первый параметр, это номер раздела, который вы узнали из предыдущей команды, а второй, размер раздела, доступный размер тоже выводится в предыдущей команде. Теперь утилиту можно закрыть:
Шаг 2. Увеличение файловой системы
Осталось увеличить самую файловую систему до конца раздела. Для этого воспользуемся утилитой resize2fs. Она может работать даже когда файловая система смонтирована.
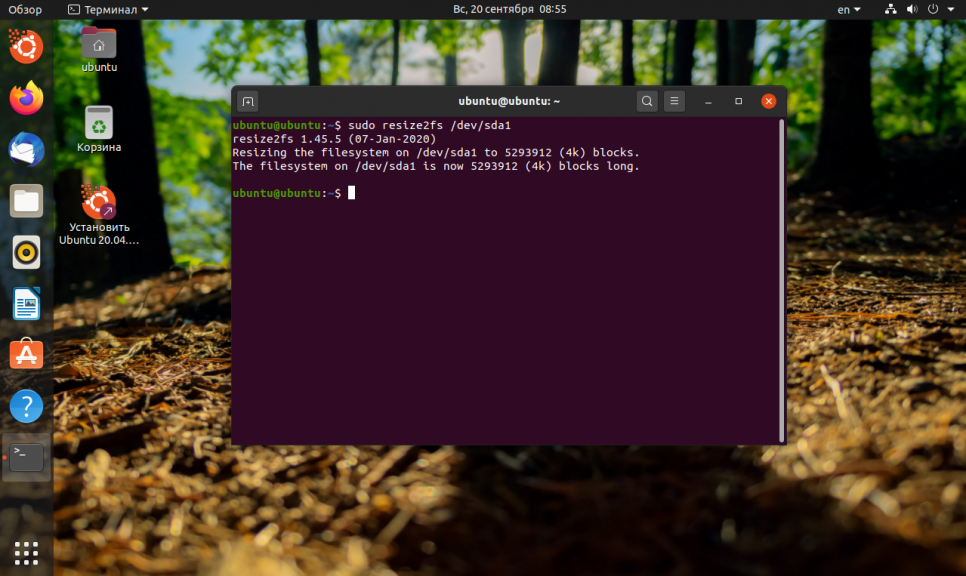
Утилита по умолчанию увеличивает файловую систему на всё доступное пространство раздела.
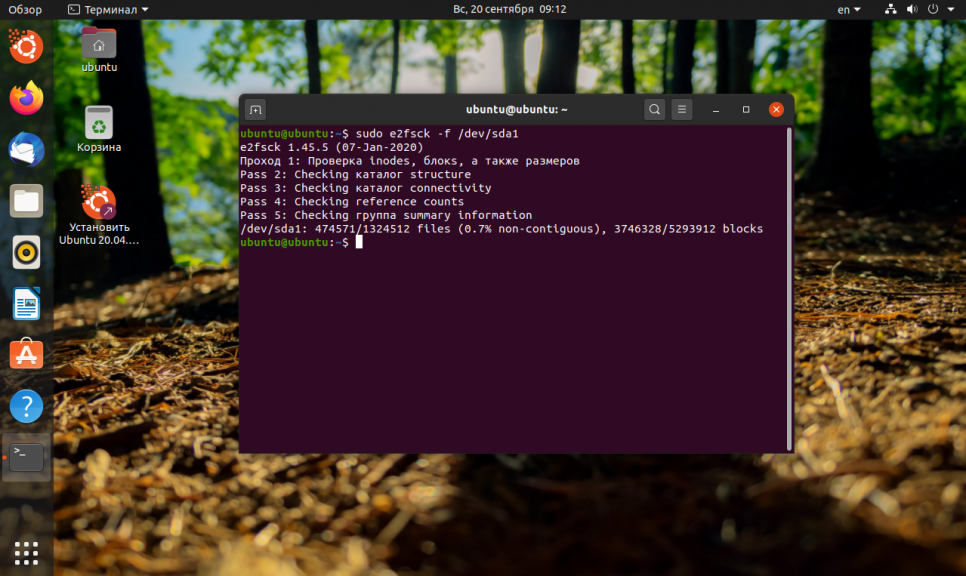
Шаг 3. Проверка на ошибки
После этого не помешает проверить всё на ошибки с помощью fsck:
Шаг 4. Монтирование
Затем можно монтировать полученную файловую систему и проверять её размер, как видите, теперь она занимает 20 гигабайт:
Как уменьшить размер Ext4
Допустим, нам надо отделить от корневого раздела четыре гигабайта и создать из них другой раздел, например, раздел подкачки. Для этого сначала надо уменьшить размер файловой системы, а затем самого раздела.
Шаг 1. Проверка файловой системы
Перед тем, как уменьшить размер Ext4 надо проверить её на ошибки. Если файловая система смонтирована, размонтируйте её:
Шаг 2. Уменьшение файловой системы
Уменьшение размера файловой системы тоже выполняется с помощью resize2fs. Но теперь утилите надо передать в параметрах новый размер файловой системы. Например, 16 гигабайт:
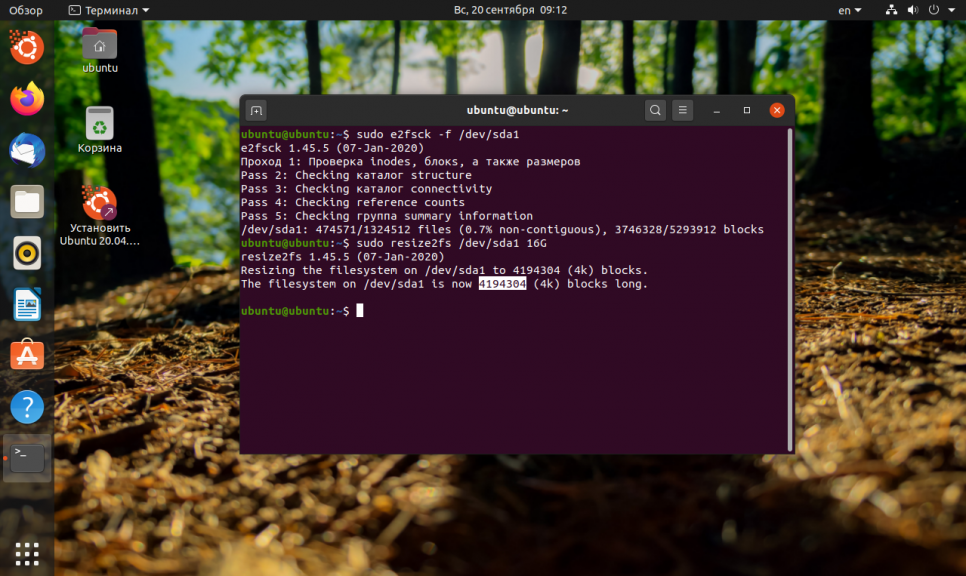
Размер можно указывать в килобайтах (K), мегабайтах (M) или гигабайтах (G). Теперь вы знаете как изменить размер Ext4. В выводе утилита вы увидите сколько теперь блоков занимает файловая система. Это число надо умножить на 4096 чтобы получить размер файловой системы в байтах. Цифра четыре взята потому что размер одного блока в Ext4 равняется четырём килобайтам. Например, в данном случае это будет 17179869184 байт или 16 гигабайт:

Теперь надо уменьшить размер раздела с помощью parted. Но значение желательно брать чуть больше, для безопасности, потому, что если вы зацепите пространство, где расположена файловая система, то работать с ней вы больше не сможете.
Шаг 3. Уменьшение раздела
Запустите parted и используйте ту же команду resizepart чтобы уменьшить размер раздела:
(parted) resizepart 1 16,1GB
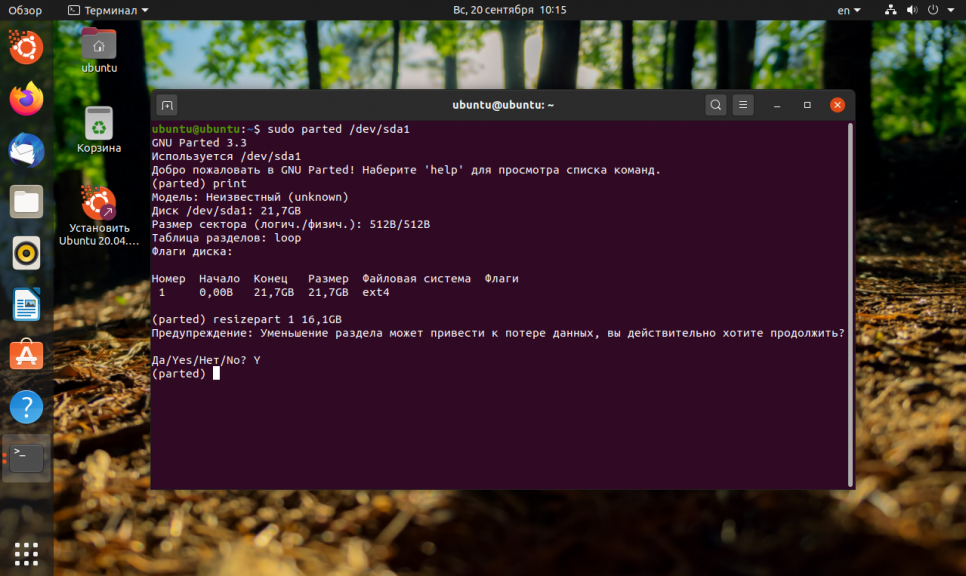
Чтобы закрыть программу выполните:
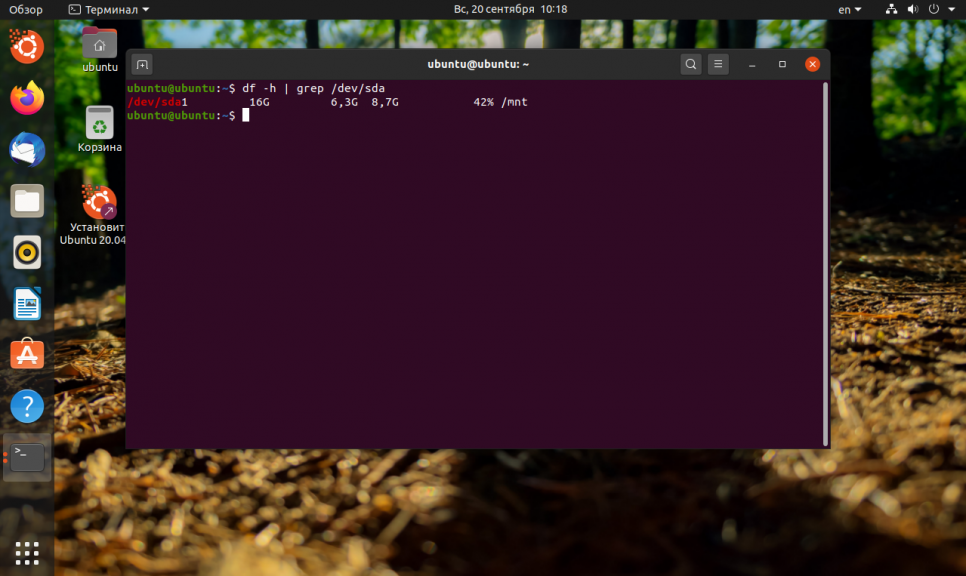
Шаг 4. Монтирование
После этого файловую систему можно монтирововать и проверять её размер:
Выводы
В этой статье мы рассмотрели как уменьшить раздел Ext4, а также как его увеличить через терминал. Если вы работаете в графическом интерфейсе, то всё выполняется гораздо проще. Для этого можно воспользоваться утилитой Gparted. Она автоматически меняет как размер раздела, так и файловой системы. К тому же программа может не только менять положение конца раздела, но и начала, иногда это может быть полезно. А как вы меняете размер файловой системы? Напишите в комментариях!
Обнаружили ошибку в тексте? Сообщите мне об этом. Выделите текст с ошибкой и нажмите Ctrl+Enter.
Похожие записи
Оцените статью
Статья распространяется под лицензией Creative Commons ShareAlike 4.0 при копировании материала ссылка на источник обязательна .
Об авторе
Основатель и администратор сайта losst.ru, увлекаюсь открытым программным обеспечением и операционной системой Linux. В качестве основной ОС сейчас использую Ubuntu. Кроме Linux, интересуюсь всем, что связано с информационными технологиями и современной наукой.