Sierra wireless wi fi
This page shows you how to configure Wi-Fi for your AirLink router in Access Point mode and Client mode.
Wi-Fi Interfaces
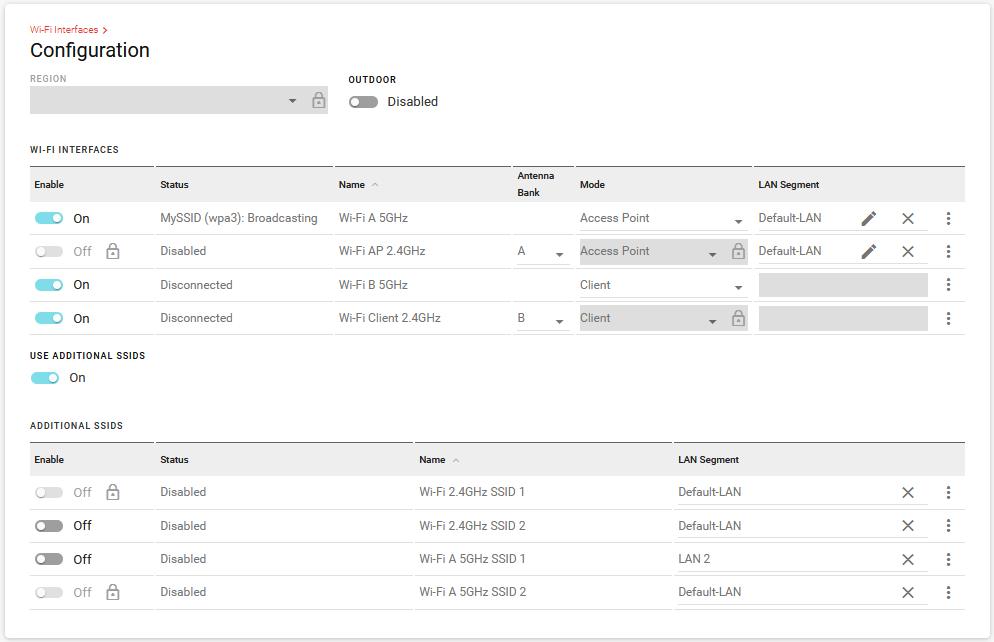
On the XR90, the following Wi-Fi Interfaces are available:
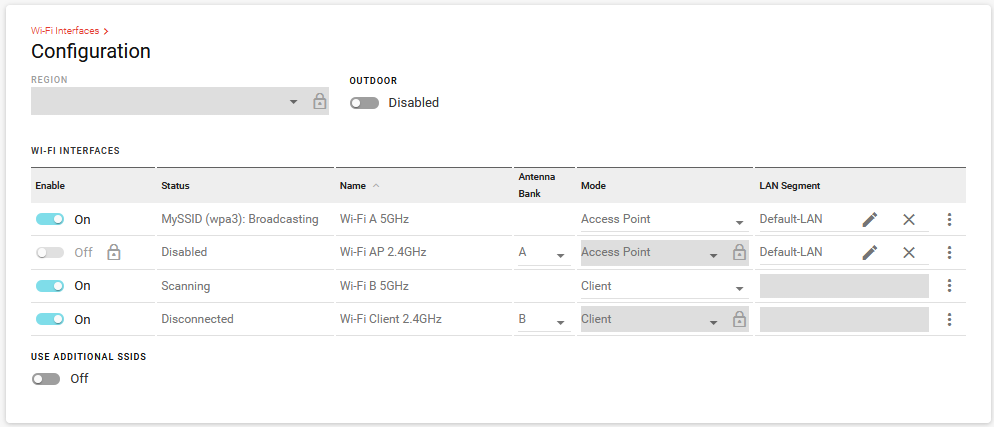
- Wi-Fi A 5GHz: By default, the interface is in Access Point mode, but can be configured for Client mode. This interface always uses Antenna Bank A (corresponding to the “Wi-Fi A” connectors on the XR90).
- Wi-Fi AP 2.4 GHz: This interface can only be used in Access Point mode, and you can select it to use Antenna Bank A or B. Select the Antenna Bank that is most suitable for your client devices.
- Wi-Fi B 5Ghz: By default, the interface is in Client mode, but can be configured for Access Point mode. This interface always uses Antenna Bank B (corresponding to the “Wi-Fi B” connectors on the XR90).
- Wi-Fi Client 2.4GHz: This interface can only be used in Client mode, and can use either antenna bank.
Vehicle applications often require the router Wi-Fi to have interfaces in both access point mode and client mode. The router will provide a Wi-Fi access point (using the cellular WAN) in the vehicle for laptops and other client devices. Client mode is required for when a service vehicle enters a depot, where the router can connect to another Wi-Fi network (instead of the cellular WAN). The in-vehicle devices can then take advantage of the increased bandwidth. Often, the router may need to upload video camera or vehicle data to the depot network.
Configuring a Wi-Fi Access Point

To configure the router as an Access Point, click at the end of the row of an Access Point interface (as shown above).
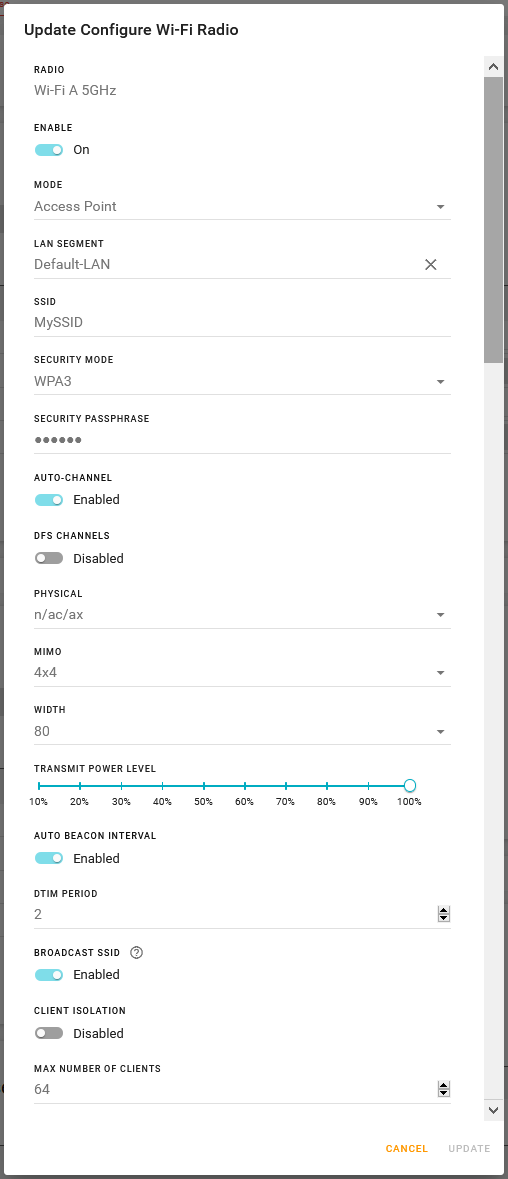
The UPDATE CONFIGURE WI-FI RADIO menu appears.
- ENABLE the interface, and leave the MODE as Access Point.
- Select the LAN SEGMENT that you’re going to use for this access point.
- Enter the access point’s SSID (a case-sensitive network name).
- Select the SECURITY MODE. For mode WPA2 or WPA2 Enterprise, 802.11w options appear. If required, select an option to enable 802.11w operation. The 802.11w standard uses Security Association Query Requests to ensure that clients are legitimate. Options are:
- Disabled
- Optional (default): 802.11w is used for clients that support it, while clients that do not support 802.11w will still connect to the router.
- Required: forces 802.11w operation; clients that do not support 802.11w will not connect.
For WPA3-only access points, Optional or Required must be selected.
- 5GHz Access Point configuration: In general, select n/ac/ax, which uses the latest standard 11ax, and supports legacy compatibility for 11n and 11ac. n/ac is limited to 5GHz (no fallback to 2.4GHz), and is intended for equipment that requires specifying n/ac as the maximum standard.
- 2.4GHz Access Point configuration: In general, select b/g/n/ax, which also uses the latest standard 11ax, and supports legacy compatibility for 11b, 11g, and 11n. b and b/g/n are the other options available.

A USE ADDITIONAL SSIDS switch is below the Wi-Fi configuration table. When enabled, it opens up a table from which you can select SSIDs, enable them and edit them. This allows you to use multiple SSIDs broadcasting on separate LAN segments and configured for different security protocols, if required.
Monitoring Access Point Mode Operation
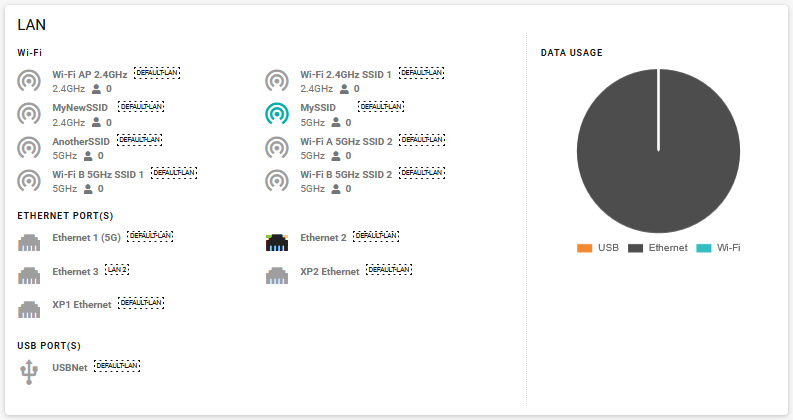
On Status/Monitoring > Dashboard, the LAN dashboard shows you the Wi-Fi LAN interfaces and the LAN segments they use. A blue icon indicates the interface is enabled and operating.
Tip: Click a Wi-Fi LAN interface icon to go to the WI-FI INTERFACES configuration table and review your configuration.
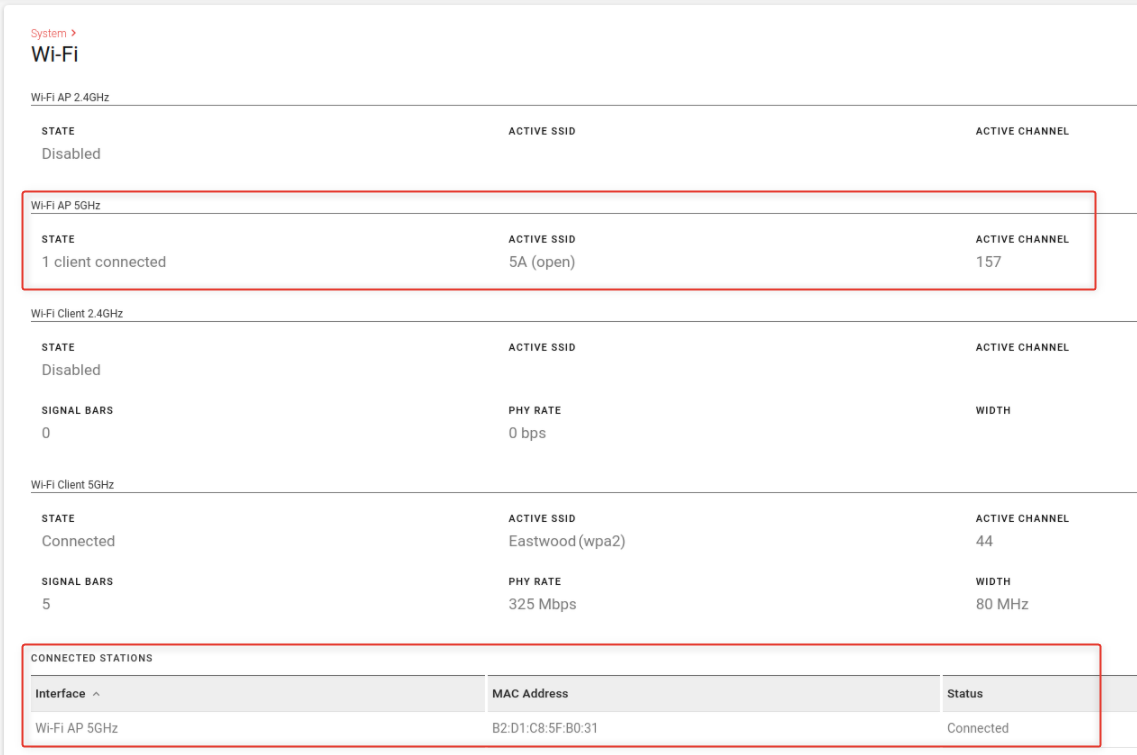
Additionally, you can go to Status/Monitoring > System > Wi-Fi to view detailed Wi-Fi Access Point status, including the active channel and connected stations (clients).
Configuring Wi-Fi Client Mode
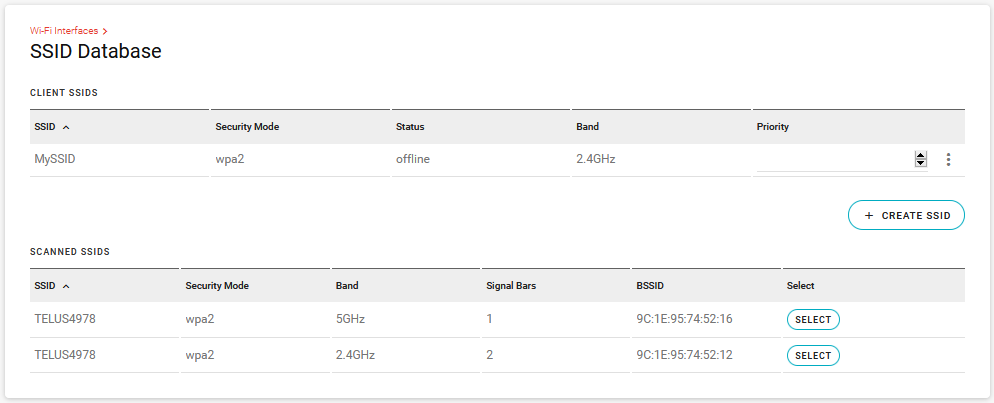
You can create a Client Mode configuration by using a scanned SSID from the SSID Database, or by creating an SSID. The router will use the SSID for its WAN connection.
To use a scanned SSID:
- In the SCANNED SSIDS table, click SELECT to add the desired SSID to the CLIENT SSIDS table. You must then fully enable the new SSID by adding the SSID’s security passphrase.
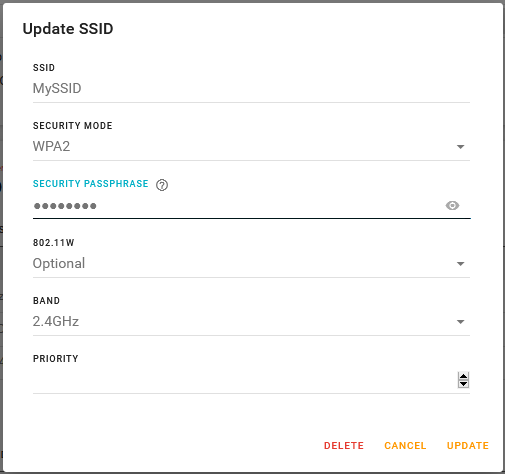
- In the CLIENT SSIDS table, click edit for the desired Client SSID.
- In the Update SSID screen, add the security passphrase and assign a priority (optional).
- Click UPDATE.
After you configure the SSID with a passphrase, the Wi-Fi Client interface starts using it (if another SSID with a higher priority is not configured).
To create an SSID manually:
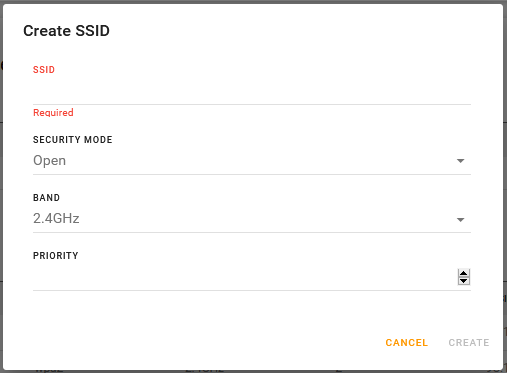
- Under the CLIENT SSIDS table, click CREATE SSID.
- Enter the SSID name.
- Select a SECURITY MODE. For mode WPA2 or WPA2 Enterprise, 802.11w options appear. If required, select an option to enable 802.11w operation. The 802.11w standard uses Security Association Query Requests to ensure that clients are legitimate. Options are:
- Disabled
- Optional (default): 802.11w will be used when connecting to access points that support it.
- Required: forces 802.11w operation; the router will not connect to access points unless they have 802.11w enabled. For WPA3-only access points, Optional or Required must be selected.
- Under BAND, select which radio to apply this SSID to.
- Select the PRIORITY. The smaller the value, the higher the priority. Leaving PRIORITY blank puts this SSID at the lowest priority.
- Click CREATE.
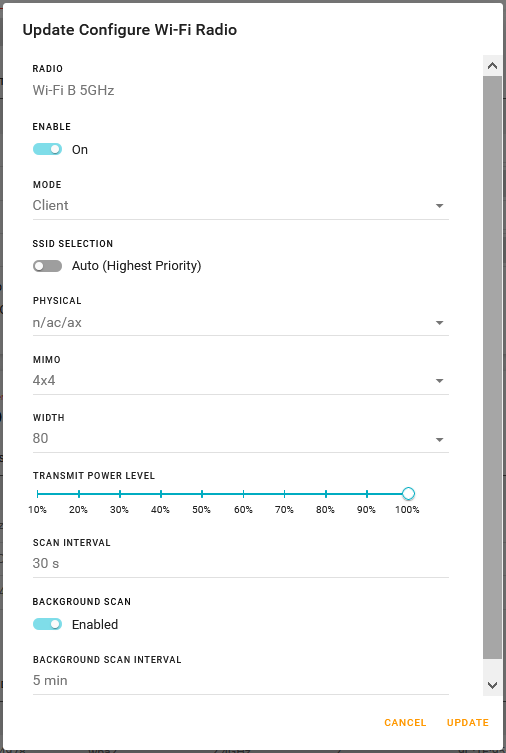
Additional Client mode configuration
You can complete the Client mode configuration in the WI-FI INTERFACES table.
To begin, click at the end of the row of an Client interface.
Most of the settings are described above in the Access Point section.
Settings specific to Client mode are:
- SCAN INTERVAL, which sets how often the router scans for SSIDs when disconnected.
- BACKGROUND SCAN, which enables or disables the router scanning and connecting to higher priority SSIDs while already connected.
- BACKGROUND SCAN INTERVAL, which sets how often the router scans for other SSIDs when connected.
Monitoring Client Mode Operation
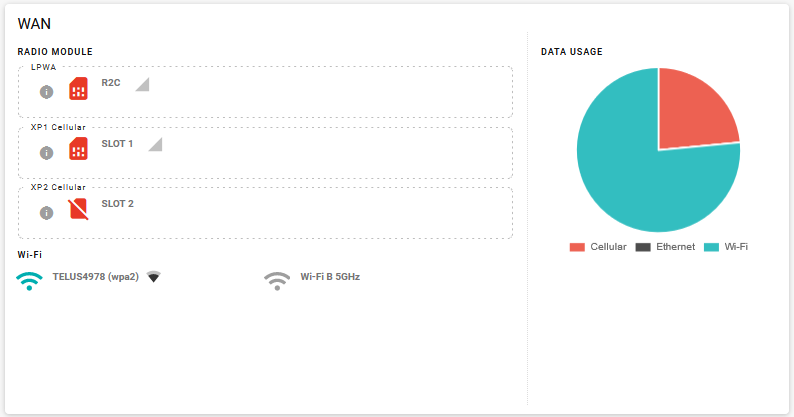
On Status/Monitoring > Dashboard, the WAN dashboard shows you the Wi-Fi WAN interfaces. A grey Wi-Fi icon indicates a disconnected interface. A blue Wi-Fi icon indicates an connected interface.
Tip: Click a Wi-Fi icon to go to the WI-FI INTERFACES configuration table and review your configuration.
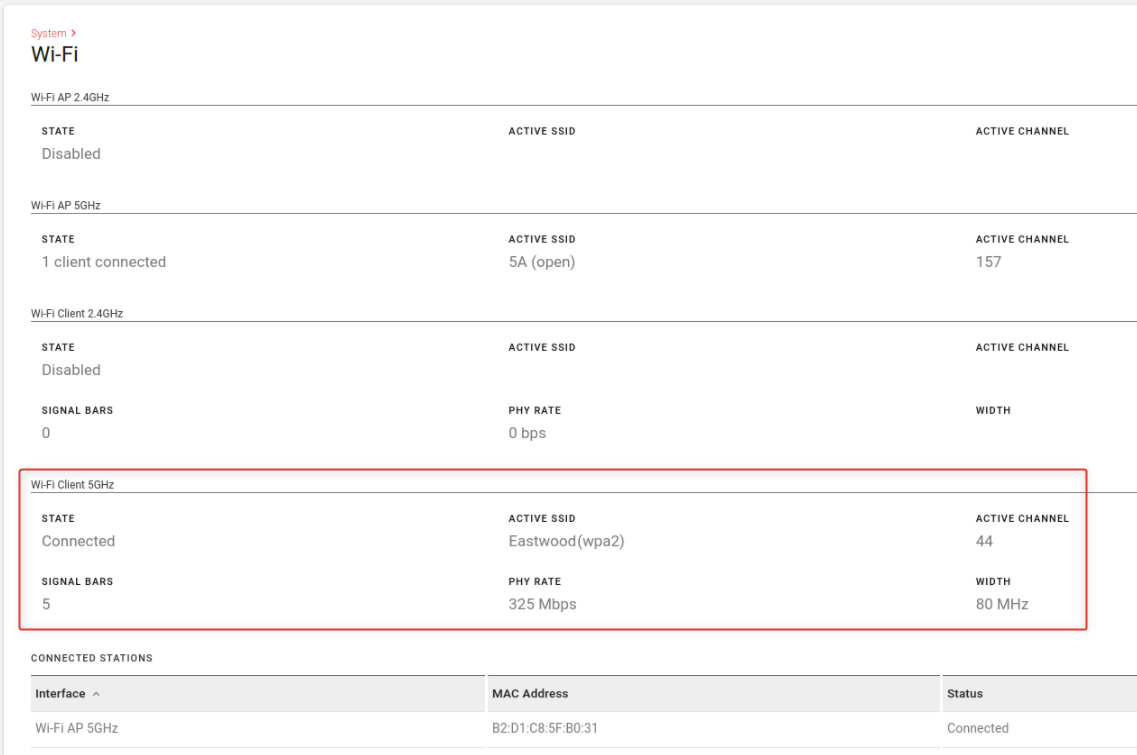
Additionally, you can go to Status/Monitoring > System > Wi-Fi to view detailed Wi-Fi Client status, including bitrate and the active channel.