- rkueny / snx_install.sh
- Linux setup Check Point Mobile Access VPN
- Introduction
- Dependencies
- Java
- SSL
- 32 bit libs
- Downloading the Shell Scripts
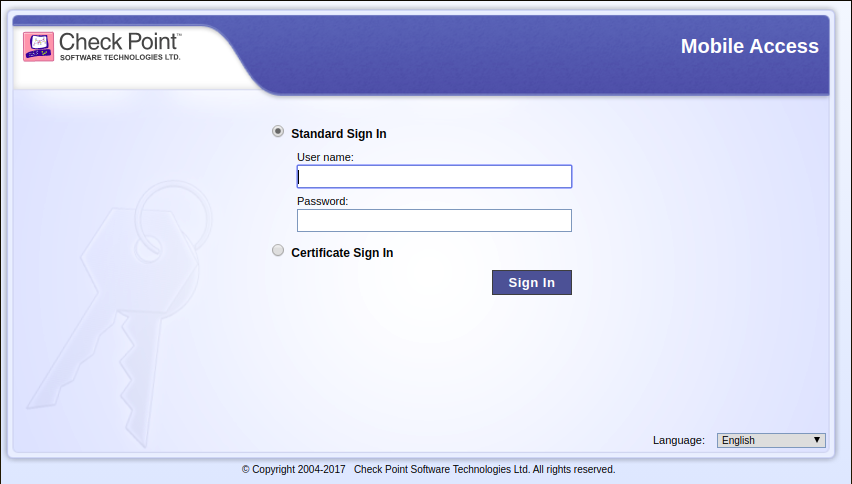
- 1. Login
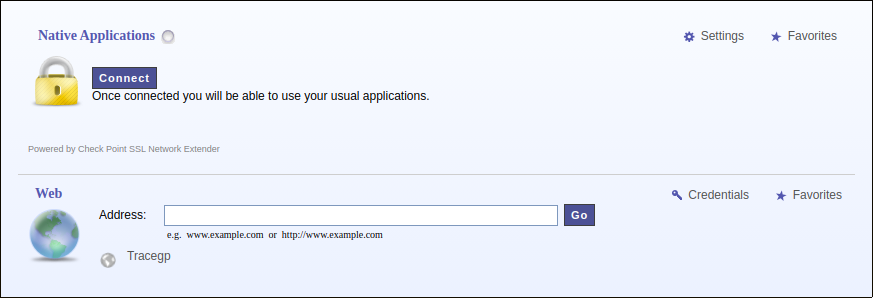
- 2. Click on “Settings” button
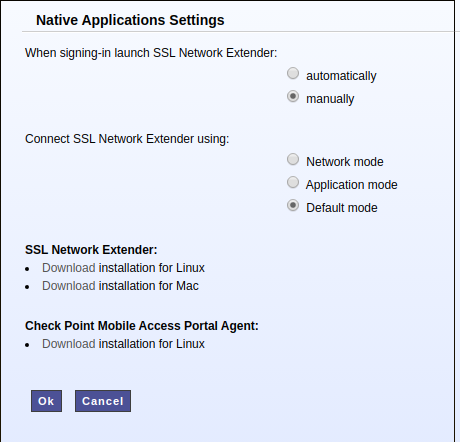
- 3. Click on “Download Installation for Linux” for both SSL Network Extender and Check Point Mobile Access Portal Agent
- Running the Shell Scripts
- Troubleshooting
- Post-install
rkueny / snx_install.sh
This file contains bidirectional Unicode text that may be interpreted or compiled differently than what appears below. To review, open the file in an editor that reveals hidden Unicode characters. Learn more about bidirectional Unicode characters
| mkdir temp && cd temp |
| # for linux ‘amd64’ architecture install those packages: |
| sudo apt-get install libx11-6:i386 libpam0g:i386 libstdc++5:i386 lib32z1 lib32ncurses5 lib32bz2-1.0 |
| wget https://vpnportal.aktifbank.com.tr/SNX/INSTALL/snx_install.sh |
| sudo ./snx_install.sh |
| cd .. && rm -rf temp/ |
Thanks for the reply @nachohc ! is there any open source client that can be used as an alternative to snx?
If anyone is getting SNX: Authentication failed errors you might want to ensure you have installed snx build 800007075 . See https://unix.stackexchange.com/questions/450229/getting-checkpoint-vpn-ssl-network-extender-working-in-the-command-line
I know it’s been a long time, but do you have a newer snx version?
I have been using 800007075 but the checkpoint server was updated to use TLS 1.1 and now it doesn’t work.
I tried 800008061 too but no success.
They are advising us to use Windows. Help me =\
In the same situation than @erzads . please an update tu use snx client with updated server to use TLS1.1 and upper. Please help
Well I am on gentoo system, where C14 support is default, so being on GCC 6/7/8, therefore missing the libstdc++.so.5 library on my system, doesn’t work.
Thx a lot, hopefully its against on later libstdc++ version
Can anyone verify the md5sum of this script? I got
4372e9936e2dfb1d1ebcef3ed4dd7787 snx_install.sh Can anyone verify the md5sum of this script? I got
4372e9936e2dfb1d1ebcef3ed4dd7787 snx_install.sh @icedwater got
md5sum snx_install_800007075.sh
4372e9936e2dfb1d1ebcef3ed4dd7787 snx_install_800007075.sh
but likely because we got it from same source. Did u make it work?
Thanks,
It works also for me. thanks!
I used 800007075 until the checkpoint server was updated to use TLS 1.1 . After that, until today, I used the following solution/workaround
Looks like older versions of SNX are not able to work with TLS 1.1. I am playing now with 800010003 from Checkpoint’s site (link given by @yurayko, thanks), but no success. From «connection aborted» I have shifted to «authentication failed». When looking into the debug log (-g option from command line) I see, that all is ok, but the communication on the end is not wrong, looks like a wrong format:
[ 4011 -141392832]@debi[5 Aug 17:19:28] ===snx_CCC_browser::send_auth_message=== [ 4011 -141392832]@debi[5 Aug 17:19:28] sending message [ 4011 -141392832]@debi[5 Aug 17:19:28] talkssl::send_data: Entering for 281 bytes [ 4011 -141392832]@debi[5 Aug 17:19:28] fwasync_connbuf_realloc: reallocating 0 from 0 to 1305 [ 4011 -141392832]@debi[5 Aug 17:19:28] fwasync_mux_in: 6: rc=1, next: 80f2060 with 3, req: 512r, 281w [ 4011 -141392832]@debi[5 Aug 17:19:28] fwasync_mux_out: 6: sent 0 of 281 bytes == 281 bytes to send [ 4011 -141392832]@debi[5 Aug 17:19:28] ckpSSL_do_write: write 281 bytes [ 4011 -141392832]@debi[5 Aug 17:19:28] fwasync_mux_out: 6: managed to send 281 of 281 bytes [ 4011 -141392832]@debi[5 Aug 17:19:28] fwasync_mux_out: 6: call: 80f2060 with 3 [ 4011 -141392832]@debi[5 Aug 17:19:28] talkssl::client_handler: after sending packet [ 4011 -141392832]@debi[5 Aug 17:19:28] fwasync_mux_out: 6: rc=1, next: 80f2060 with 3, req: 512r, 0w [ 4011 -141392832]@debi[5 Aug 17:19:28] fwasync_mux_in: 6: got 0 of 512 bytes == 512 bytes required [ 4011 -141392832]@debi[5 Aug 17:19:28] ckpSSL_do_read: read 411 bytes [ 4011 -141392832]@debi[5 Aug 17:19:28] fwasync_mux_in: 6: managed to read 411 of 512 bytes [ 4011 -141392832]@debi[5 Aug 17:19:28] fwasync_mux_in: 6: call: 80f2060 with 3 [ 4011 -141392832]@debi[5 Aug 17:19:28] talkssl::client_handler: state: SSL_RECV - entering [ 4011 -141392832]@debi[5 Aug 17:19:28] talkssl::client_handler: got 411 bytes, wanted 512 bytes [ 4011 -141392832]@debi[5 Aug 17:19:28] fwasync_conn_reset_read: 6 [ 4011 -141392832]@debi[5 Aug 17:19:28] talkssl::client_handler: calling recv with dlen 411 [ 4011 -141392832]@debi[5 Aug 17:19:28] Receive started [ 4011 -141392832]@debi[5 Aug 17:19:28] snx_browser::Receive: started [ 4011 -141392832]@debi[5 Aug 17:19:28] snx_browser::Receive: got 411 bytes [ 4011 -141392832]@debi[5 Aug 17:19:28] snx_CCC_browser::getMessageSize: header length is 279, content length found - 128 [ 4011 -141392832]@debi[5 Aug 17:19:28] snx_browser::Receive: message size should be = 411 [ 4011 -141392832]@debi[5 Aug 17:19:28] snx_browser::Receive: complete message received [ 4011 -141392832]@debi[5 Aug 17:19:28] snx_browser::Established: CCC_CLIENT_BAD_FORMAT [ 4011 -141392832]@debi[5 Aug 17:19:28] snx: quit. Linux setup Check Point Mobile Access VPN
This is a step-by-step tutorial to setup your Linux machine with all the required dependencies to work with Check Point Mobile Access VPN. This tutorial also includes some troubleshooting.
Introduction
In the past year I had to setup my Ubuntu 18.04 laptop twice. Both times were very exhausting and took long hours until it was ready to use due to so many different errors hard to find the solution on Google. So no need to mention this tutorial (at the current state) is only useful if you’re working with a clean and recently installed Ubuntu LTS distro.
Dependencies
First make sure your operating system is up-to-date with:
$ sudo apt-get update && sudo apt-get upgrade Now you need some basic tooling for installing and building independent package vendors:
$ sudo apt-get install software-properties-common apt-transport-https wget curl $ sudo apt-get install build-essential Java
If your system has no Java version installed, make sure you install the version 8 (or higher). You can do that quickly with SDKMAN!, but first be sure you’re on your home directory with:
And then for installing SDKMAN!:
$ curl -s "https://get.sdkman.io" | bash $ source "$HOME/.sdkman/bin/sdkman-init.sh" List the available Java versions and try to find the OpenJDK version 8 or higher (in my case it was 8.0.232-open ) and then install it:
$ sdk list java $ sdk install java 8.0.232-open SSL
For the Check Point Mobile Access required packages, you’ll need to install xterm and some SSL packages with the following commands:
$ sudo apt-get install xterm $ sudo apt-get install libnss3-tools certutil 32 bit libs
If you’re running a 64 bit operating system, you’ll need to install some 32 bit compatible libraries:
$ sudo apt-get install libx11-6 $ sudo dpkg --add-architecture i386 $ sudo apt-get update $ sudo apt-get install multiarch-support $ sudo apt-get install libx11-6:i386 libc6:i386 libncurses5:i386 libstdc++6:i386 libstdc++5:i386 libpam0g:i386 Downloading the Shell Scripts
There are two shell script files you’ll need to download to setup Check Point Mobile Access VPN on your machine:
Both of them you can get on your company’s Mobile Access VPN page.
1. Login
2. Click on “Settings” button
3. Click on “Download Installation for Linux” for both SSL Network Extender and Check Point Mobile Access Portal Agent
Running the Shell Scripts
The scripts you’ve just downloaded are just regular files. So we need to change their permissions to make them executable with the following commands:
$ chmod +x snx_install.sh $ chmod +x cshell_install.sh The first script we’re going to run is the snx_install.sh , which should not give any errors when installing it.
$ ./snx_install.sh Installation successfull Here comes the tricky part: running the other shell script. The script will ask you for your password because it’s going to run some things as sudo . Everything should be going fine until it gets to the last step: when it tries to run /usr/bin/cshell/launcher . That’s where it gets stuck. This executable file does not work properly with sudo .
$ ./cshell_install.sh Start Check Point Mobile Access Portal Agent installation Extracting Mobile Access Portal Agent. Done Installing Mobile Access Portal Agent. Done Installing certificate. Done Starting Mobile Access Portal Agent. When you notice it is stuck at the message above, open Ubuntu’s system monitor and try to find a process called launcher with 0% CPU usage and Sleeping status. Once you find it, kill it.
Do not ever type CTRL+C on the terminal or try to end its process or launcher ’s. You must kill the launcher process. Otherwise, the script will do a clean-up and erase everything it has made that will allow you to make Check Point Mobile Access VPN work.
If you’ve done everything right, there should be an executable file called launcher at /usr/bin/cshell/ . If so, run it and it should have been displayed some logs as follows:
$ /usr/bin/cshell/launcher LAUNCHER> Starting CShell. LAUNCHER> CShell Started It means it has successfully been installed, and you should be fine trying to connect to the VPN now, but it doesn’t mean we don’t have more work to do.
Troubleshooting
If you end up with an error when you’re trying to run /usr/bin/cshell/launcher about a named pipe file called cshell.fifo inside the /tmp folder, just delete it with:
Post-install
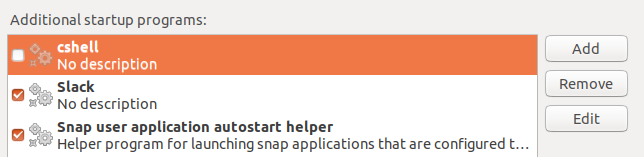
You need to disable one of your system’s startup applications. You should be able to see one of them called cshell with a marked checkbox. All it does is running the launcher executable file in /usr/bin/cshell/ . You must uncheck it because every time you let it run automatically it’s going to be run as sudo , which means it’s going to get stuck.
Now we’re going to do a little trick to make it start automatically without sudo : run it inside the .bashrc file, so every time you open up a terminal it’s going to run with your user normal permissions. Actually, we only want to run it once when you log in, right? So why don’t we simply run it inside .profile ? Because everything in .profile run as sudo , so the launcher is going to get stuck.
So here is the tricky part: let’s create a simple log file to check whether launcher should run every time you open up a terminal window. Add the following lines to the .profile file to remove the log file every time you log in.
if [ -f "/home/[MY-USER-NAME]/cshell_launcher.log" ]; then rm /home/[MY-USER-NAME]/cshell_launcher.log fi On the .bashrc file add the following lines to check whether it should run the launcher file every time you open up a terminal window:
if [ ! -f "/home/[MY-USER-NAME]/cshell_launcher.log" ]; then /usr/bin/cshell/launcher > /home/[MY-USER-NAME]/cshell_launcher.log fi Restart your computer, log into your user account and check if the log file we created is on your home directory by opening a terminal and typing:
$ ls | grep cshell cshell_launcher.log Then show its contents by using cat and it should be displayed as the following:
$ cat cshell_launcher.log LAUNCHER> Starting CShell. LAUNCHER> CShell Started Now you should be all set. Open your company’s Check Point Mobile Access page and you should be able to connect everytime you log into your computer. Just remember to open up a terminal window first 🙂