Глеб Гончаров
Иногда в работе над проектами приходится прибегать к уловкам для организации сетевых доступов. В тех случаях, когда согласован SSH с поддержкой перенаправления портов, альтернативным способом организации доступа становится SSH-туннель.
Рассмотрим пример создания такого туннеля с поддержанием работы с помощью systemd. Представим, что есть два сервера: сервер A ( alice.example.com ) с IP-адресом 10.0.0.1 и B ( bob.example.com ) с IP-адресом 10.0.0.2. Задача: пробросить порт 3128/tcp с сервера B на сервер A для доступа к HTTP-прокси.
Настройка
Перед началом убедитесь, что Port Forwarding разрешён на сервере: включите опцию AllowTcpForwarding . Подробнее об использовании перенаправлении TCP-портов в справке sshd_config(5) .
Далее заводим непривилегированного пользователя autossh на обоих серверах. Этот пользователь будет подключаться к серверу B, а там, в свою очередь, аутентифицироваться и перенаправлять порт.
sudo useradd -m -d /home/autossh/ -s /bin/bash autossh Генерируем пару закрытого и открытого ключей (RSA 4096 бит) на сервере A. В 2019 году 4096 бит достаточно для обеспечения должного уровня безопасности, не опасаясь подбора ключа. Вероятно, если вы читаете эту заметку в будущем, увеличьте размер ключа до 8192 бит или выше. Парольную фразу указывать не нужно.
su - autossh mkdir -p /home/autossh/.ssh/ident ssh-keygen -t rsa -b 4096 -f /home/autossh/.ssh/ident/ident@bob.example.com Копируем текст публичного ключа в файл /home/autossh/.ssh/authorized_keys вручную или с помощью ssh-copy-id(1) на сервер B. Это позволит пользователю autossh аутентифицироваться по нему при подключении.
# Using ssh-copy-id ssh-copy-id -i /home/autossh/.ssh/ident/ident@bob.example.com.pub autossh@bob.example.com # Manually cat ~/.ssh/ident/ident@bob.example.com.pub | ssh autossh@bob.example.com 'cat >> ~/.ssh/authorized_keys' Проверяем подключение к серверу B. Продолжаем, если всё в порядке.
ssh -i /home/autossh/.ssh/ident/ident@bob.example.com autossh@bob.example.com Конфигурируем SSH-клиент на сервере A.
# vim /home/autossh/.ssh/config Host bob-example-com-proxy HostName bob.example.com User autossh Port 22 IdentityFile ~/.ssh/ident/ident@bob.example.com RemoteForward 10.0.0.1:3128 10.0.0.2:3128 ServerAliveInterval 30 ServerAliveCountMax 3 Создаём systemd-юнит. Обратите внимание на символ @ в названии: после него может быть указан параметр для юнита. Конфигурация шаблонизируется спецификаторами, описанными в документации к systemd.unit.
# sudo vim /usr/lib/systemd/system/autossh@.service [Unit] Description=Persistent SSH tunnel (%i) After=network.target [Service] User=autossh ExecStart=/usr/bin/ssh -NT -o ExitOnForwardFailure=yes %i RestartSec=5 Restart=always [Install] WantedBy=multi-user.target sudo systemctl daemon-reload Запускаем юнит и добавляем в автозапуск. Имя параметра соответствует названию профиля SSH-клиента в $HOME/.ssh/config .
sudo systemctl start autossh@b-example-com-proxy.service sudo systemctl enable autossh@b-example-com-proxy.service Готово. Проверяем перенаправление портов на сервере A.
cat < /dev/null >/dev/tcp/10.0.0.1/3128 && echo OK || echo NOK Отладить подключение можно либо из-под пользователя autossh , либо добавив -vvv в systemd-юнит. Приведённое выше работает и для LocalForward для перенаправления порта с удалённого сервера на локальный. Легко комбинировать с > и другими возможностями SSH, когда в цепочке несколько узлов.
How to Create SSH Tunneling or Port Forwarding in Linux
SSH tunneling (also referred to as SSH port forwarding) is simply routing the local network traffic through SSH to remote hosts. This implies that all your connections are secured using encryption. It provides an easy way of setting up a basic VPN (Virtual Private Network), useful for connecting to private networks over unsecure public networks like the Internet.
You may also be used to expose local servers behind NATs and firewalls to the Internet over secure tunnels, as implemented in ngrok.
SSH sessions permit tunneling network connections by default and there are three types of SSH port forwarding: local, remote and dynamic port forwarding.
In this article, we will demonstrate how to quickly and easily set up SSH tunneling or the different types of port forwarding in Linux.
Testing Environment:
For the purpose of this article, we are using the following setup:
- Local Host: 192.168.43.31
- Remote Host: Linode CentOS 7 VPS with hostname server1.example.com.
Usually, you can securely connect to a remote server using SSH as follows. In this example, I have configured passwordless SSH login between my local and remote hosts, so it has not asked for user admin’s password.

Local SSH Port Forwarding
This type of port forwarding lets you connect from your local computer to a remote server. Assuming you are behind a restrictive firewall or blocked by an outgoing firewall from accessing an application running on port 3000 on your remote server.
You can forward a local port (e.g 8080) which you can then use to access the application locally as follows. The -L flag defines the port forwarded to the remote host and remote port.
$ ssh [email protected] -L 8080:server1.example.com:3000
Adding the -N flag means do not execute a remote command, you will not get a shell in this case.
$ ssh -N [email protected] -L 8080:server1.example.com:3000
The -f switch instructs ssh to run in the background.
$ ssh -f -N [email protected] -L 8080:server1.example.com:3000
Now, on your local machine, open a browser, instead of accessing the remote application using the address server1.example.com:3000, you can simply use localhost:8080 or 192.168.43.31:8080 , as shown in the screenshot below.

Remote SSH Port Forwarding
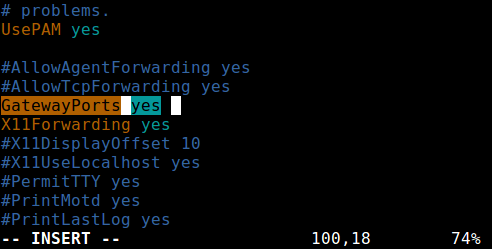
Remote port forwarding allows you to connect from your remote machine to the local computer. By default, SSH does not permit remote port forwarding. You can enable this using the GatewayPorts directive in your SSHD main configuration file /etc/ssh/sshd_config on the remote host.
Open the file for editing using your favorite command-line editor.
$ sudo vim /etc/ssh/sshd_config
Look for the required directive, uncomment it, and set its value to yes , as shown in the screenshot.
Save the changes and exit. Next, you need to restart sshd to apply the recent change you made.
$ sudo systemctl restart sshd OR $ sudo service sshd restart
Next run the following command to forward port 5000 on the remote machine to port 3000 on the local machine.
Once you understand this method of tunneling, you can easily and securely expose a local development server, especially behind NATs and firewalls to the Internet over secure tunnels. Tunnels such as Ngrok, pagekite, localtunnel, and many others work in a similar way.
Dynamic SSH Port Forwarding
This is the third type of port forwarding. Unlike local and remote port forwarding which allows communication with a single port, it makes possible, a full range of TCP communications across a range of ports. Dynamic port forwarding sets up your machine as a SOCKS proxy server that listens on port 1080, by default.
For starters, SOCKS is an Internet protocol that defines how a client can connect to a server via a proxy server (SSH in this case). You can enable dynamic port forwarding using the -D option.
The following command will start a SOCKS proxy on port 1080 allowing you to connect to the remote host.
From now on, you can make applications on your machine use this SSH proxy server by editing their settings and configuring them to use it, to connect to your remote server. Note that the SOCKS proxy will stop working after you close your SSH session.
Summary
In this article, we explained the various types of port forwarding from one machine to another, for tunneling traffic through the secure SSH connection. This is one of the very many uses of SSH. You can add your voice to this guide via the feedback form below.
Attention: SSH port forwarding has some considerable disadvantages, it can be abused: it can be used to bypass network monitoring and traffic filtering programs (or firewalls). Attackers can use it for malicious activities. In our next article, we will show how to disable SSH local port forwarding. Stay connected!