- Как создать загрузочную флешку Кали Линукс?
- Что будем использовать?
- Как создать загрузочную флешку Кали Линукс с помощью Rufus?
- Создать установочную флешку kali linux
- What You’ll Need
- Kali Linux Live USB Install Procedure
- Creating a Bootable Kali USB Drive on Linux (DD)
- Creating a Bootable Kali USB Drive on Linux (DD with status)
- Creating a Bootable Kali USB Drive on Linux (Etcher)
Как создать загрузочную флешку Кали Линукс?
В статье я покажу как быстро записать на флешку Кали Линукс, сделав её при этом загрузочной. Формат статьи основан на способах установки предыдущего поколения. Возможно, что сейчас разработчики представят обновлённый способ установки Кали на флешку. Работать будем, несмотря на формат блога, именно из Windows. Версия Windows значения не имеет, но именно она является подавляющим вариантом ОС на компьютерах пользователей. При этом, как и в случае с другими современными утилитами, записать загрузочную флешку Кали Линукс у нас с вами получится всего в несколько щелчков мышью. Специальных требований нет — от вас лишь потребуются права даминистратора в учётной записи Windows.
Что будем использовать?
- Бесплатную программу PowerISO для записи образа.
- Столь же бесплатную Rufus
- Флешка подходящего объёма (у меня 32 Гб и этого, кстати, может не хватить для последующих обновлений в режиме persistent).
- Скачанный из сети образ последней версии Кали Линукс.
Разобьём процесс в несколько этапов.
Сначала приобретаем образ. Советую воспользоваться самым быстрым и надёжным — официальный сайт. Туда вас и направляю:

По ссылке вы увидите несколько версий, начиная с самой полноценной для установки на прямую на диск. Там же версия, выпуск, размер, способ скачивания и разрядность процессора. Выбирайте под стать своей машине и ожидайте окончания загрузки.
ВНИМАНИЕ. На сегодняшний момент наиболее подходящим вариантом будет Live Boot, созданный для «живых» систем (Live CD).
Пока качается Кали, можно отправиться за PowerISO. Отправляю на официальный сайт:
Когда обе закачки на борту, устанавливайте вторую. У меня после запуска PowerISO вылезает 5-ти секундное окно с призывом приобрести ключ. Если у вас также — игнорируем его. Далее отправляемся по настройкам программы:

Выбираем панель Инструменты — > Создать загрузочный USB привод. Далее указываем на местонахождение только что скачанного образа Кали Линукс:

Теперь выставляем Прямую запись и не забудем указать на флешку:

Жмём Старт. О том, что данные на флешке затрутся, напоминать, думаю, не стоит?

Вобщем, статью писал дольше, чем записывал флешку. Запись шла менее пяти минут. Об успешном окончании записи сообщит следующее окно:

Из PowerISO выходим. Проверяем записанное. Для этого я перезагружу компьютер и после POST проверки из меню быстрого запуска (у меня на Lenovo это клавиша F12 сразу после включения) выберу загрузку с флешки. В меню Кали выберу Live amd64:


Всё работает, даже автоматически смонтированы все тома. Можете устанавливать на компьютер или использовать в таком виде.
Как создать загрузочную флешку Кали Линукс с помощью Rufus?
Очередная и почти всесильная утилита, которая также может помочь в записи Кали на флеш-носитель. Основные настройки программы можно выразить в следующем окне:

Важным этапом в настройке программы ползунок Постоянного размера раздела сдвинуть поближе к конечному объёму флешки. Пусть размер займёт чуть больше его половины: теперь ваша флешка будет комфортно работать в режиме persistence из меню, т.е. сохранять изменения после перезагрузки. Это значит, что можно обновлять систему, файлы, устанавливать скрипты. Ну, на ISO образ укажете сами, схема раздела — конечно, MBR. Если год выпуска машинки далеко не свежий — обратите внимание на пункт Добавить исправление для старых BIOS . Если программа попросит что-то доустановить, не мешайте:


В какой-то момент форматирование остановится на 100% — не торопитесь закрывать окно:

Следует учесть, что обновление такой флешки через apt-get идёт нестерпимо долго: на моём двухъядерном с 8 Гб RAM это заняло почти сутки. Так что не торопитесь расстраиваться из-за «остановившегося» в какой-то момент терминала при распаковке очередного пакета обновлений. Скорости через USB порты очень низкие.
Создать установочную флешку kali linux
Our favourite way, and the fastest method, for getting up and running with Kali Linux is to run it “live” from a USB drive. This method has several advantages:
- It’s non-destructive — it makes no changes to the host system’s hard drive or installed OS, and to go back to normal operations, you simply remove the “Kali Live” USB drive and restart the system.
- It’s portable — you can carry Kali Linux in your pocket and have it running in minutes on an available system
- It’s customizable — you can roll your own custom Kali Linux ISO image and put it onto a USB drive using the same procedures
- It’s potentially persistent — with a bit of extra effort, you can configure your Kali Linux “live” USB drive to have persistent storage, so the data you collect is saved across reboots
In order to do this, we first need to create a bootable USB drive which has been set up from an ISO image of Kali Linux.
What You’ll Need
- A verified copy of the appropriate ISO image of the latest Kali build image for the system you’ll be running it on: see the details on downloading official Kali Linux images.
- If you’re running under Linux, you can use the dd command, which is pre-installed, or use Etcher.
- A USB thumb drive, 4GB or larger. (Systems with a direct SD card slot can use an SD card with similar capacity. The procedure is identical.)
Kali Linux Live USB Install Procedure
The specifics of this procedure will vary depending on whether you’re doing it on a Windows, Linux, or macOS/OS X system.
Creating a Bootable Kali USB Drive on Linux (DD)
Creating a bootable Kali Linux USB drive in a Linux environment is easy. Once you’ve downloaded and verified your Kali ISO file, you can use the dd command to copy it over to your USB drive using the following procedure. Note that you’ll need to be running as root, or to execute the dd command with sudo. The following example assumes a Linux Mint 17.1 desktop — depending on the distro you’re using, a few specifics may vary slightly, but the general idea should be very similar. If you would prefer to use Etcher, then follow the same directions as a Windows user. Note that the USB drive will have a path similar to /dev/sdb.
WARNING: Although the process of imaging Kali Linux onto a USB drive is very easy, you can just as easily overwrite a disk drive you didn’t intend to with dd if you do not understand what you are doing, or if you specify an incorrect output path. Double-check what you’re doing before you do it, it’ll be too late afterwards.
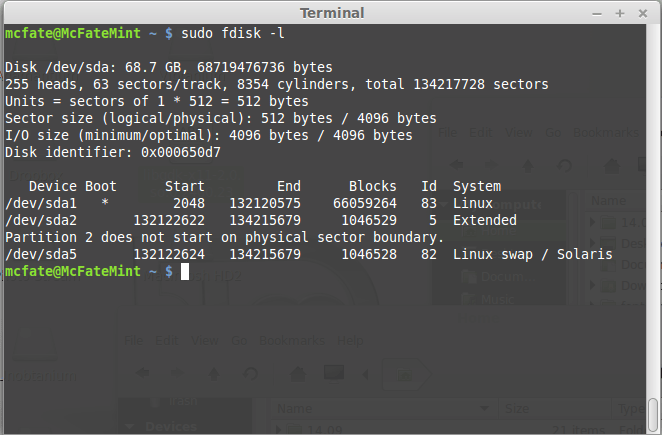
- First, you’ll need to identify the device path to use to write the image to your USB drive. Without the USB drive inserted into a port, execute the command sudo fdisk -l at a command prompt in a terminal window (if you don’t use elevated privileges with fdisk, you won’t get any output). You’ll get output that will look something (not exactly) like this, showing a single drive — “/dev/sda” — containing three partitions (/dev/sda1, /dev/sda2, and /dev/sda5):
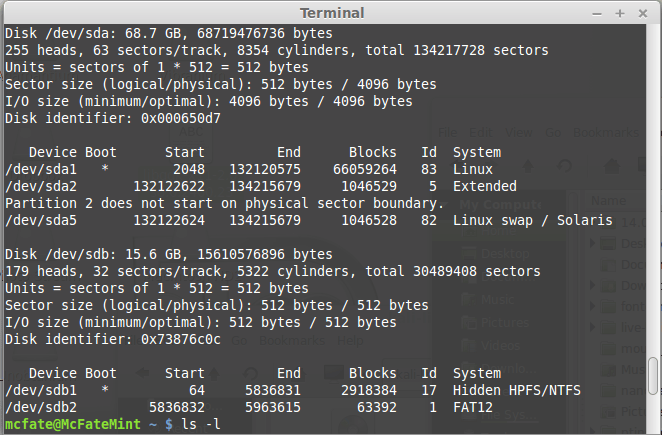
2. Now, plug your USB drive into an available USB port on your system, and run the same command, “sudo fdisk -l” a second time. Now, the output will look something (again, not exactly) like this, showing an additional device which wasn’t there previously, in this example “/dev/sdb”, a 16GB USB drive:
3. Proceed to (carefully!) image the Kali ISO file on the USB device. The example command below assumes that the ISO image you’re writing is named “kali-linux-2023.2-live-amd64.iso” and is in your current working directory. The blocksize parameter can be increased, and while it may speed up the operation of the dd command, it can occasionally produce unbootable USB drives, depending on your system and a lot of different factors. The recommended value, “bs=4M”, is conservative and reliable. Additionally, the parameter “conv=fsync” makes sure that the data is physically written to the USB drives before the commands returns:
[email protected]:~$ dd if=kali-linux-2023.2-live-amd64.iso of=/dev/sdb conv=fsync bs=4M Imaging the USB drive can take a good amount of time, over ten minutes or more is not unusual, as the sample output below shows. Be patient!
The dd command provides no feedback until it’s completed, but if your drive has an access indicator, you’ll probably see it flickering from time to time. The time to dd the image across will depend on the speed of the system used, USB drive itself, and USB port it’s inserted into. Once dd has finished imaging the drive, it will output something that looks like this:
Creating a Bootable Kali USB Drive on Linux (DD with status)
Alternatively there are a few other options available for imaging.
The first option is dd with a status indicator. This is only available on newer systems however. To do this, we simply add the status flag:
[email protected]:~$ dd if=kali-linux-2023.2-live-amd64.iso of=/dev/sdb conv=fsync bs=4M status=progress Another option is to use pv . We can also use the size flag here to get an approximate timer. Change the size depending on the image being used:
[email protected]:~$ dd if=kali-linux-2023.2-live-amd64.iso | pv -s 2.8G | dd of=/dev/sdb conv=fsync bs=4M Creating a Bootable Kali USB Drive on Linux (Etcher)
- Download and run Etcher.
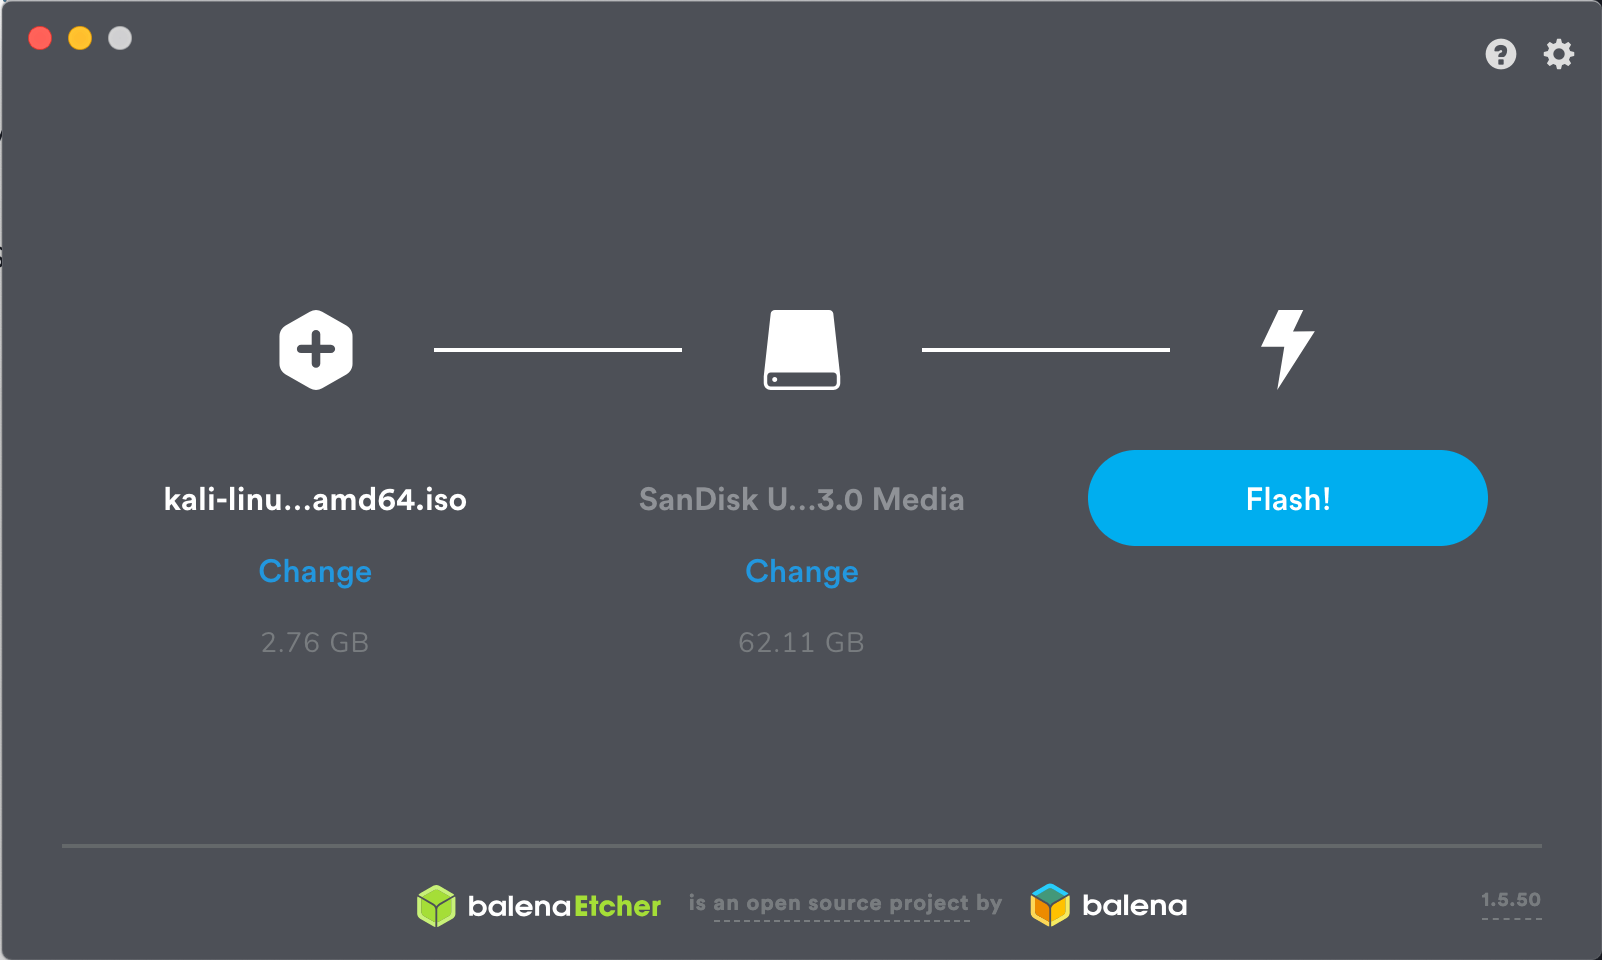
- Choose the Kali Linux ISO file to be imaged with “select image” and verify that the USB drive to be overwritten is the correct one. Click the “Flash!” button once ready.
3. Once Etcher alerts you that the image has been flashed, you can safely remove the USB drive.
You can now boot into a Kali Live / Installer environment using the USB device.
Updated on: 2023-May-30
Author: g0tmi1k


