Software Engineering Blog
Tipps und Tricks aus dem Leben eines Systemadministrators.
SSD caching using Linux
17.04.2016 01:04 von Felix Mößbauer
BTRFS + bcache + RAID5
Windows users have always been used to distribute their folders over the various disks, but as a linux user I just want to store everything nice and decent in my home folder. The only problem therewith is that the SSD does not provide enough (cheap) space to store all my data on the fast memory.
To meet this limitation, I mounted my large HDDs into folders in /home/felix/. Hence I had the same problem as the windows users described above. Furthermore this solution is not suitable for a multi-user environment.
Wouldn’t it be nice if I can combine the advantages of both SSD and HDD, and I don’t mean just to buy a consumer grade SSHD? My idea is to create a RAID5 with 3 HDDs and cache them all with bcache.
The target audience of this blog posts are sophisticated linux users who are familiar with the command line. Hence, all commands are posted without sudo to avoid users overwriting their existing filesystems by just copying the lines.
bcache
bcache is a block device cache, backed by a fast SSD and is optimized to detect sequential accesses. Hence, I expect to get the high IOPS rates of a SSD combined with a high throughput when reading large files, as this transfer should entirely bypass the cache. In addition, the relatively small cache is not trashed by large file transfers. The cache can be used in a read and a read/write mode, where the latter is disabled by default. In my opinion the only disadvantage of bcache is that in cannot be installed in-place.
RAID5
As the mean time between failure decreases massively with each disk added to a pool, I use a RAID5 to keep my data save. Using that, you need at least 3 HDDs and a single HDD can break without data loss. A nice side effect is that the throughput to the disk array is higher compared to a single disk, as the data is written to all disks in parallel.
Be aware: RAID is no alternative for backups.
Setup
If you want to try this setup using a different OS, check if your kernel version is at least 3.19. Otherwise you might end up with a corrupted filesystem due to a bug.
But moment: Why not use ZFS with an SSD L2ARC and ZIL cache? At first, ZFS is until version 16.04 not native on Ubuntu. Furthermore, the memory demands of the filesystem are huge. Another aspect is the missing capability to change settings like the RAID mode «on the fly».
Layout
/dev/sda1 ------------------- EXT4 / /dev/sda2 --------- | /dev/sdb -- /dev/bcache0 -| /dev/sdc -- /dev/bcache1 -|- BTRFS /home /dev/sdd -- /dev/bcache2 -|Commands
Be careful, these commands reflect the setup above. Your disk lables will virtually certain differ from mine. Before doing any changes to the filesystem, make a backup to a disk and remove it from the system.
# create cache make-bcache -C /dev/sda2 make-bcache -B /dev/sdb /dev/sdc /dev/sdd #attache cache, determine cache cset.uuid bcache-super-show /dev/sda2 | grep cset.uuid echo > /sys/block/bcache0/bcache/attach echo > /sys/block/bcache1/bcache/attach echo > /sys/block/bcache2/bcache/attach #create btrfs mkfs.btrfs /dev/bcache0 /dev/bcache1 /dev/bcache2 -d raid5 -m raid5 #mount filesystem to copy home folder mount /dev/bcache0 /mnt #if you trust in your SSD, enable write caching echo 'writeback' /sys/block/bcache*/bcache/cache_modeBenchmarks
I will definetly provide some IO benchmarks, but currently I do not have the time to specify and run these 🙁 However the subjective feeling is a way higher performance. The time to the fully loaded desktop decreased from around 1 minute to approx. 15 seconds.
Further Information
- Nice article about bcache (in German): https://www.thomas-krenn.com/de/wiki/Bcache
- Bcache on ArchLinux: https://wiki.archlinux.org/index.php/Bcache
- SSD caching using ZFS: https://blogs.oracle.com/brendan/entry/test
- Blogpost on a even more sophisticated setup: https://www.rath.org/ssd-caching-under-linux.html
Kommentare
Hey there, M.Mößbauer, i was reading you with much interest, a question if you may, is your setup still in working order? i read here from » https://wiki.ubuntu.com/ServerTeam/InstallOnBcache » quote : «I format both ext4 (had a recent issue with bcache + btrfs)».
Are you still happy with btrfs and bcache, as i d like to do it myself on a ubuntu server 16.04 at home, just for sport. Thank you for your time and articles.
Cheers, Cyril.
Antwort von Felix Mößbauer
Hi Cyril,
the setup is still working without any problems and the performance is great. However, compared to your link I do not use btrfs and bcache as rootfs. I would definitely not recommend that, as the time to bring the system back after a crash is way to long for me. If you have to do a recovery, you can’t just mount the partition in a live ubuntu. At first you have to install the appropriate packages and try to reassemble the cache. That is not exactly brilliant.
Another point to mention is even a bcached disk does not deliver the performance of a SSD. My recommendation is to split the SSD in two partitions: One for the OS (30 GB should be sufficient) and the remaining space for bcache.
As your setup is just for sport, try it and share your experience. I guess the problem mentioned in the article is a known bug which has been fixed at least a year ago (https://btrfs.wiki.kernel.org/index.php/Gotchas, Sect. Historical references).
Kommentar von Heiri | 17.11.2016
Hallo,
Ich habe diesen Blog mit grosser Aufmerksamkeit gelesen und angewendet.
Ich habe den Eindruck, dass BCache mir ein bisschen viel versteckt: Ich habe eine Harddisk aus dem Array ausgeschaltet. BTrFS zeigt mir keine «missing disk» an. Auch
btrfs device delete missing /dev/bcache0
sagt mir: «ERROR: not a btrfs filesystem: /dev/bcache0»
(Auch mit /dev/sd* klappt’s nicht.)
Hättest Du dazu irgendwelche Infos?
Antwort von Felix Mößbauer
BCache versteckt an und für sich gar nichts, sondern stellt lediglich ein Blockdevice bereit. Aus den drei Blockdevices bcache2 wird dann das btrfs Dateisystem aufgebaut.
Btrfs hat hierbei die Eigenheit, dass selbst bei RAID 5 ein Pool nur gemountet werden kann, wenn er nicht degraded ist (alle Geräte funktionsfähig). Fällt während des Betriebs eine Platte aus, bleibt der Pool weiterhin eingehängt.
Möchte man einen degraded Pool mounten, so muss «degraded» als Option übergeben werden:
mount /dev/bcache0 -o degraded
Wobei hier bcache0 durch ein noch vorhandenes Gerät des Pools ersetzt werden muss, d.h. falls bcache0 ausgefallen ist, einfach bcache1 nehmen. Siehe hierzu auch https://wiki.ubuntuusers.de/Installieren_auf_Btrfs-Dateisystem/#Probleme-und-Abhilfe
Ist der Pool wieder eingehängt, so kann die fehlende Platte mit `btrfs device delete missing` entfernt werden, oder mittels `btrfs replace` ersetzt werden.
Ich hoffe, ich konnte dir weiterhelfen.
Настройка SSD кеширования LVM Cache в CentOS
20.11.2020
VyacheslavK
CentOS, Linux
комментария 3
В этой статье мы покажем, как использовать SSD диск в качестве кэширующего устройства для двух SATA дисков, объединенных в RAID 1 на сервере с CentOS Linux на примере LVM Cache. В такой конфигурации кэширующее и кэшируемое устройство должно входить в одну группу томов LVM, а отключение/включение кэша можно выполнять без на ходу без без перезагрузок и перемонтирования.
SSD-кэширование — технология, когда твердотельные SSD накопители используются в качестве буфера для часто запрашиваемых данных. Система определяет данные по степени “теплоты” и перемещает их на быстрый накопитель, используемый в качестве кэширующего диска. Кэш позволяется системе получать доступ к данным в несколько раз быстрее, чем если бы они были получены с более медленного жесткого диска.
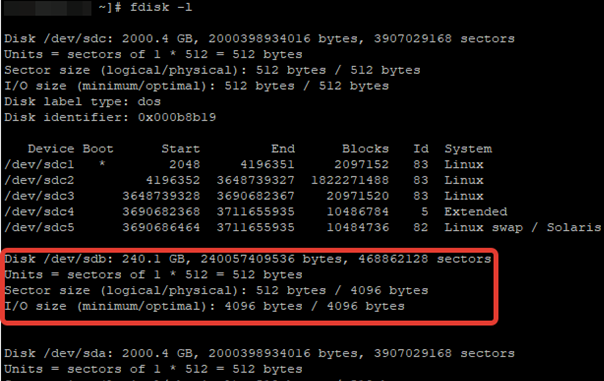
После установки ОС на RAID1 из двух SATA дисков, мы подключили отдельный SSD диск на 240 Гб. Проверим, что он доступен:
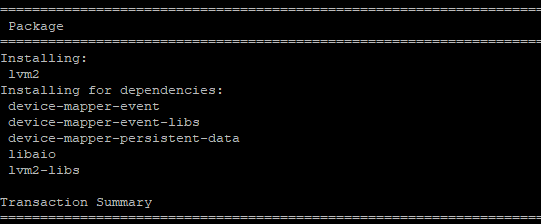
С помощью менеджера пакетов установите утилиту lvm2, которая будет использоваться для реализации кэша .
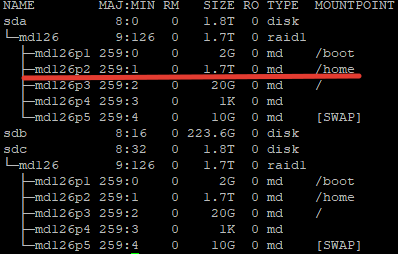
После установки ПО, нужно определить блочное устройство SSD-диска и раздел, к которому примонтирована нужная директория. В моем случае это будет директория home, раздел для которой я создал при установке ОС.
Директории /home соответствует раздел /dev/md126p2. Обратите на это внимание, так как дальнейшая настройка будет связана именно с этим разделом.
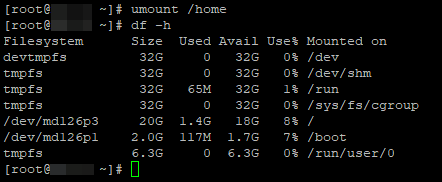
Теперь можно перейти к настройке кэша. Отмонтируйте директорию:
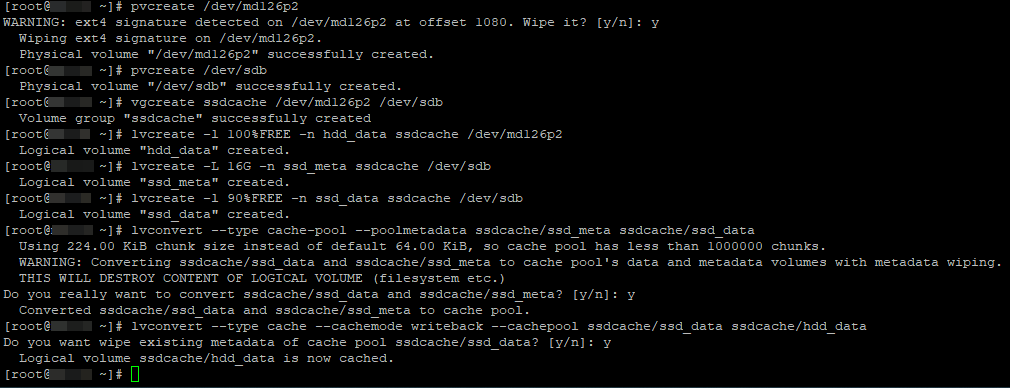
Для создания кэширующего SSD устройства выполните следующие команды
# pvcreate /dev/md126p2
# pvcreate /dev/sdb
# vgcreate ssdcache /dev/md126p2 /dev/sdb
# lvcreate -l 100%FREE -n hdd_data ssdcache /dev/md126p2
# lvcreate -L 16G -n ssd_meta ssdcache /dev/sdb
# lvcreate -l 90%FREE -n ssd_data ssdcache /dev/sdb
# lvconvert —type cache-pool —poolmetadata ssdcache/ssd_meta ssdcache/ssd_data
# lvconvert —type cache —cachemode writeback —cachepool ssdcache/ssd_data ssdcache/hdd_data
- pvcreate — инициализирует физический том для LVM
- vgcreate – создать группу томов
- lvcreate -l – создать логический том, размер тома указывается в процентах
- lvcreate -L – создание логического тома с метаданными для кэша
- lvconvert — объединяем кэш-пул и логический том через метаданные. Задаем режима кеширования, в нашем случае writeback.
Есть два режима кеширования:
- Writeback — данные сначала пишутся в кэш, затем на диск. Это более производительный вариант. При сбое кэширующего SSD диска, вы потеряете данные, которые не успели записаться на HDD. Хотя и не рекомендуется использовать этот режим на серверах с SSD без RAID, мне кажется с учетом надежности SSD дисков, это вполне рабочее решение.
- Writethrough — данные сразу пишутся одновременно на диск и в кэш, после чего наиболее часто используемые попадают в кэш. Это безопасный вариант, подходит для серверов с 1*SSD, но гораздо менее производительный.
Выбранный режим кэширования относится только к операциям записи. На скорость чтения данных с LVM тома с кэшем он не влияет.
После выполнения всех настроек, можно проверить кэш на наличие ошибок:
Если ошибок нет, значит вы все сделали верно. Данная команда покажет процент использования кэша. На данный момент размер кэша будет чуть практически нулевой.
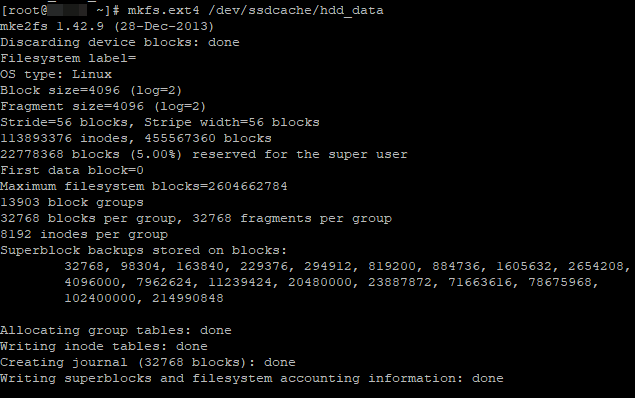
Теперь создадим файловую систему на новом LVM разделе:
После создания раздела, нужно определить его UUID, чтобы заменить его в fstab:
/dev/mapper/ssdcache-hdd_data: UUID="a89f0bb8-7bb2-4d83-87e2-39918154135b" TYPE="ext4"
После замены UUID в fstab для нужного раздела, перезагрузите сервер и проверяем текущие настройки:
Чтобы узнать текущий режим работы SSD кэша, используйте команду:
Для смены режима, используются команды:
# lvchange —cachemode writeback ssdcache
# lvchange —cachemode writethrough ssdcache
Если вам нужно заменить SSD диск, обязательно нужно удалить кэш:
# lvconvert —uncache /dev/ssdcache/hdd_data
# lvremove /dev/ssdcache/ssd_meta
# vgreduce ssdcache /dev/sdb
# pvremove /dev/sdb
После этого вы смело можете отключить сервер, заменить диске и добавить кэш заново с помощью следующих команд:
# pvcreate /dev/sdb
# vgextend ssdcache /dev/sdb
# lvcreate -L 16G -n ssd_meta ssdcache /dev/sdb
# lvcreate -l 90%FREE -n ssd_data ssdcache /dev/sdb
# lvconvert —type cache-pool —poolmetadata ssdcache/ssd_meta ssdcache/ssd_data
# lvconvert —type cache —cachemode writeback —cachepool ssdcache/ssd_data
На этом работа по настройке SSD-кэширования окончена. Определить скорость работы ssd-кэша обычными утилитами для замера операций чтения/записи, невозможно. Скорость будет такая же как на обычном SATA диске, но это все из-за специфики работы кэша, как ранее мы описывали, он срабатывает именно для “горячих” данных. При тестировании работы в различных приложениях, повышение скорости действительно ощутимо, где-то в 3-4 раза.


