- Настройка SFTP-сервера в Ubuntu 18.04 LTS
- Создание пользователя
- Создание каталога
- Конфигурация ssh-сервера
- Тестирование конфигурации
- Основные команды SFTP
- How to setup SFTP server on Ubuntu 22.04 Jammy Jellyfish Linux
- Configure SSH daemon
- Create SFTP user account
- Login to SFTP using command line
- Login to SFTP using GUI
- Closing Thoughts
- Related Linux Tutorials:
Настройка SFTP-сервера в Ubuntu 18.04 LTS
SFTP доступен по умолчанию без дополнительной настройки на всех серверах, имеющих доступ по SSH. Как следует из названия протокола, это безопасный способ передачи файлов на сервер с использованием зашифрованного SSH-соединения. В стандартной конфигурации сервер SSH предоставляет доступ к передаче файлов и к оболочке терминала всем системным пользователям с учетной записью.
Это не очень удобно, иногда нужно предоставить пользователю доступ по SFTP для передачи файлов, но запретить доступ к терминалу. Для начала добавим такого пользователя, потом ограничим его права и создадим каталог, куда это пользователь сможет загружать файлы.
Создание пользователя
Итак, создаем нового пользователя, основную группу и задаем пароль:
$ sudo groupadd sftp-group # создаем группу sftp-group $ sudo useradd --no-create-home --gid sftp-group sftp-user # создаем пользователя $ sudo passwd sftp-user # задаем пароль для пользователя sftp-user
Создание каталога
Чтобы ограничить доступ пользователя к SFTP одним каталогом, сначала нужно убедиться, что каталог соответствует требованиям. Сам каталог и все каталоги над ним в дереве файловой системы должны принадлежать root , а другие пользователи не должны иметь права на запись в них. Следовательно, невозможно просто предоставить ограниченный доступ к домашнему каталогу пользователя, поскольку домашние каталоги принадлежат пользователям, а не root .
В качестве целевого каталога загрузки будем использовать /srv/sftp/sftp-user . Каталог /srv/sftp будет принадлежать пользователю root и заблокирован для других пользователей. Подкаталог /srv/sftp/sftp-user будет принадлежать пользователю sftp-user , так что он сможет загружать в него файлы.
$ sudo mkdir /srv/sftp $ sudo chown root:root /srv/sftp $ sudo chmod 755 /srv/sftp
$ sudo mkdir /srv/sftp/sftp-user $ sudo chown sftp-user:sftp-group /srv/sftp/sftp-user
Конфигурация ssh-сервера
На этом этапе нужно изменить конфигурацию ssh-сервера и заблокировать пользователю sftp-user доступ к терминалу, но разрешить доступ к передаче файлов. Открываем на редактирование файл конфигурации ssh-сервера и дописываем в конец
$ sudo nano /etc/ssh/sshd_config
# использовать встроенный sftp-сервер Subsystem sftp internal-sftp # только для пользователей группы sftp-group Match Group sftp-group # только работа с файлами, запрет shell ForceCommand internal-sftp # разрешить аутентификацию по паролю PasswordAuthentication yes # разрешить доступ только к /srv/sftp ChrootDirectory /srv/sftp # запретить все, что не нужно для работы PermitTunnel no AllowAgentForwarding no AllowTcpForwarding no X11Forwarding no
$ sudo systemctl restart sshd.service
С функциональной точки зрения sftp-server и internal-sftp практически идентичны. Они построены из одного и того же исходного кода и реализуют SFTP-сервер. Sftp-server это отдельный бинарный файл, а internal-sftp это просто ключевое слово конфигурации. При указании internal-sftp будет использован встроенный SFTP-сервер, вместо запуска внешнего SFTP-сервера. В настоящее время sftp-server является избыточным и сохраняется для обратной совместимости.
#Subsystem sftp /usr/lib/openssh/sftp-server Subsystem sftp internal-sftp Тестирование конфигурации
Пользователь sftp-user не может подключиться по ssh и получить доступ к терминалу:
$ ssh sftp-user@192.168.110.9 sftp-user@192.168.110.9's password: пароль This service allows sftp connections only. Connection to 192.168.110.9 closed.
Но пользователь sftp-user может использовать SFTP для передачи файлов:
$ sftp sftp-user@192.168.110.9 sftp-user@192.168.110.9's password: пароль Connected to 192.168.110.9. > pwd Remote working directory: / > ls sftp-user
Основные команды SFTP
Оказавшись в командной строке sftp можно получить список доступных команд с помощью команды help
> help Available commands: bye Quit sftp cd path Change remote directory to 'path' chgrp grp path Change group of file 'path' to 'grp' chmod mode path Change permissions of file 'path' to 'mode' chown own path Change owner of file 'path' to 'own' df [-hi] [path] Display statistics for current directory or filesystem containing 'path' exit Quit sftp get [-afPpRr] remote [local] Download file reget [-fPpRr] remote [local] Resume download file reput [-fPpRr] [local] remote Resume upload file help Display this help text lcd path Change local directory to 'path' lls [ls-options [path]] Display local directory listing lmkdir path Create local directory ln [-s] oldpath newpath Link remote file (-s for symlink) lpwd Print local working directory ls [-1afhlnrSt] [path] Display remote directory listing lumask umask Set local umask to 'umask' mkdir path Create remote directory progress Toggle display of progress meter put [-afPpRr] local [remote] Upload file pwd Display remote working directory quit Quit sftp rename oldpath newpath Rename remote file rm path Delete remote file rmdir path Remove remote directory symlink oldpath newpath Symlink remote file version Show SFTP version !command Execute 'command' in local shell ! Escape to local shell ? Synonym for help
> pwd # удаленный рабочий каталог > lpwd # локальный рабочий каталог
Изменить рабочую директорию:
> cd uploads # сменить директорию на удаленной системе > lcd uploads # сменить директорию на локальной системе
Список файлов и директорий:
> ls # список на удаленной системе > lls # список на локальной системе
Загрузить на удаленную систему файл или директорию:
> put image.jpg # загрузить файл > put -r images/ # загрузить директорию
Скачать с удаленной системы файл или директорию:
> get image.jpg # скачать файл > get -r images/ # скачать директорию
> mkdir images # создать директорию на удаленной системе > lmkdir images # создать директорию на локальной системе
> rmdir images # удалить директорию на удаленной системе > !rmdir images # удалить директорию на локальной системе
Выполнить произвольную команду на локальной системе:
Выполнить несколько команд на локальной системе:
> ! # временно выходим из командной строки sftp $ команда # выполняем команду в shell (bash) $ команда # выполняем команду в shell (bash) $ exit # возвращаемся к командной строке sftp >
Lorem ipsum dolor sit amet, consectetur adipiscing elit, sed do eiusmod tempor incididunt ut labore et dolore magna aliqua.
Lorem ipsum dolor sit amet, consectetur adipiscing elit, sed do eiusmod tempor incididunt ut labore et dolore magna aliqua.
Lorem ipsum dolor sit amet, consectetur adipiscing elit, sed do eiusmod tempor incididunt ut labore et dolore magna aliqua.
- 1С:Предприятие (31)
- API (29)
- Bash (43)
- CLI (99)
- CMS (139)
- CSS (50)
- Frontend (75)
- HTML (66)
- JavaScript (150)
- Laravel (72)
- Linux (146)
- MySQL (76)
- PHP (125)
- React.js (66)
- SSH (27)
- Ubuntu (68)
- Web-разработка (509)
- WordPress (73)
- Yii2 (69)
- БазаДанных (95)
- Битрикс (66)
- Блог (29)
- Верстка (43)
- ИнтернетМагаз… (84)
- КаталогТоваров (87)
- Класс (30)
- Клиент (27)
- Ключ (28)
- Команда (68)
- Компонент (60)
- Конфигурация (62)
- Корзина (32)
- ЛокальнаяСеть (28)
- Модуль (34)
- Навигация (31)
- Настройка (140)
- ПанельУправле… (29)
- Плагин (33)
- Пользователь (26)
- Практика (99)
- Сервер (74)
- Событие (27)
- Теория (105)
- Установка (66)
- Файл (47)
- Форма (58)
- Фреймворк (192)
- Функция (36)
- ШаблонСайта (68)
How to setup SFTP server on Ubuntu 22.04 Jammy Jellyfish Linux
In this tutorial, we will show you how to setup an SFTP server on Ubuntu 22.04 Jammy Jellyfish.
FTP is a great protocol for accessing and transferring files, but it has the shortcoming of being a clear text protocol. In other words, it’s not secure to use over an internet connection, since your credentials and data are transmitted without encryption. The ‘S’ in SFTP stands for ‘Secure’ and tunnels the FTP protocol through SSH, providing the encryption needed to establish a secure connection.
In this tutorial you will learn:
- How to install and configure SSH daemon
- How to setup an SFTP user account and group
- How to connect to SFTP server via GUI
- How to connect to SFTP server via command line

| Category | Requirements, Conventions or Software Version Used |
|---|---|
| System | Ubuntu 22.04 Jammy Jellyfish |
| Software | SSH daemon |
| Other | Privileged access to your Linux system as root or via the sudo command. |
| Conventions | # – requires given linux commands to be executed with root privileges either directly as a root user or by use of sudo command $ – requires given linux commands to be executed as a regular non-privileged user |
Configure SSH daemon
- SFTP requires SSH, so if SSH server is not already installed on your system, install it by opening a command line terminal and executing the following commands:
$ sudo apt update $ sudo apt install ssh
$ sudo nano /etc/ssh/sshd_config
Match group sftp ChrootDirectory /home X11Forwarding no AllowTcpForwarding no ForceCommand internal-sftp
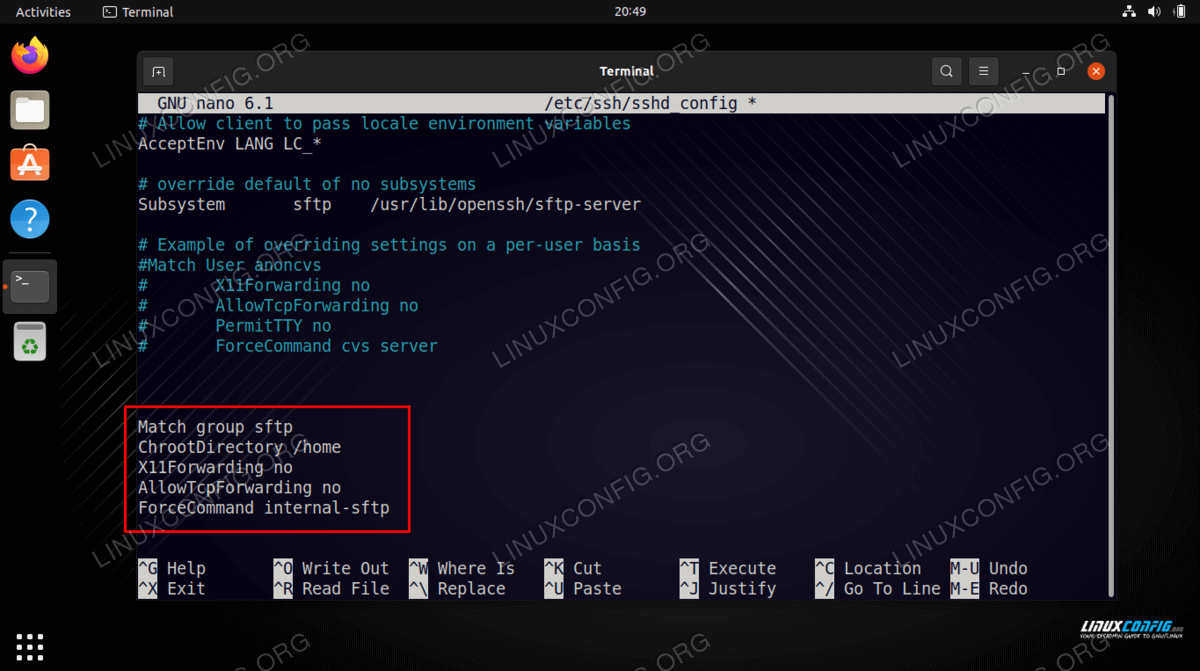
The lines above will allow users in the sftp group to access their home directories via SFTP, but denies them normal SSH access, so they can never access a shell. After pasting those lines, save and close the configuration file.
Execute the following command in order to restart the SSH service for these new changes to take effect:
$ sudo systemctl restart ssh
With SSH configured properly, we can move on to setting up an SFTP account for a user.
Create SFTP user account
Now we need to create user accounts for anyone that we wish to grant SFTP access to.
- Create a new user group called sftp . All of our SFTP users will need to belong to this group.
$ sudo useradd -m sftpuser -g sftp
$ sudo chmod 700 /home/sftpuser/
Our SFTP configuration is complete and now we can log in to make sure everything is working properly.
Login to SFTP using command line
You can login via SFTP with either the hostname or IP address of your system. To test from the same system as the one you just configured SFTP on, connecting to the loopback address 127.0.0.1 will work just fine.
- Open a terminal and login using the sftp command and the sftpuser account (or whatever name you decided to use for yours). You will be required to enter the password that we configured in the previous section for this user.
sftp> cd sftpuser sftp> mkdir sftp-test sftp> ls sftp-test sftp>
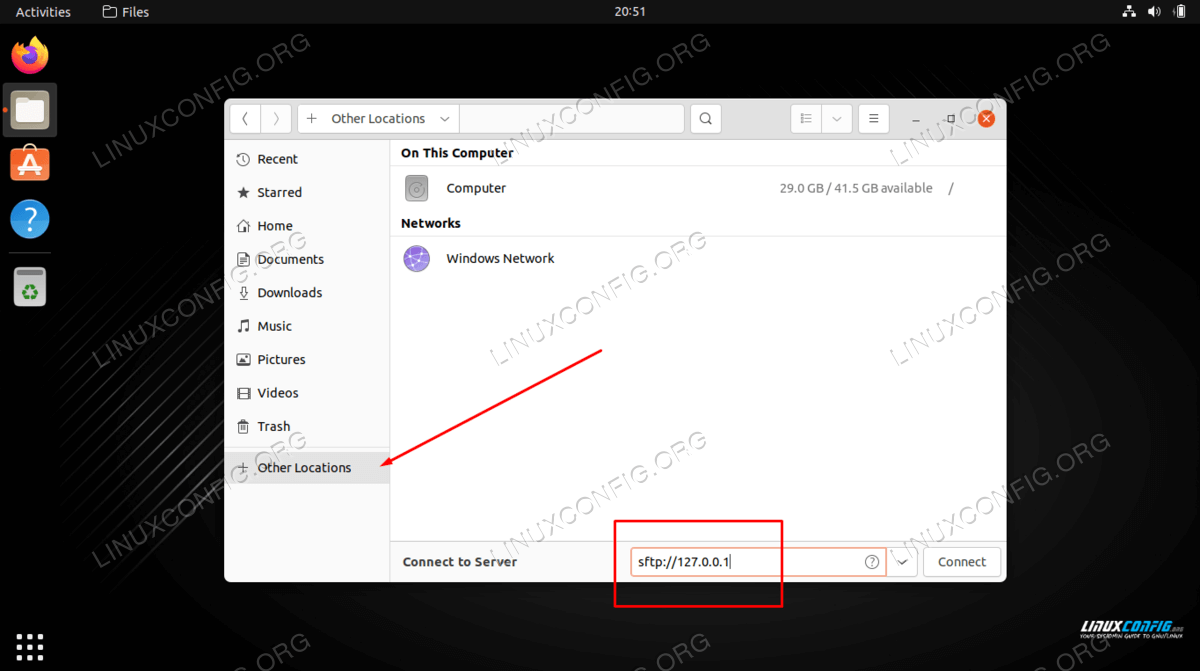
Login to SFTP using GUI
If you prefer to use a GUI application to connect to your SFTP server, there are lots of options available. You can use your preferred SFTP client or the one built into Ubuntu 22.04 by default – the Nautilus file manager on GNOME.
- Open Nautilus file manager from within the Applications menu.
- Click on “Other Locations” and enter sftp://127.0.0.1 in the “Connect to server” box at the bottom of the window and click connect.

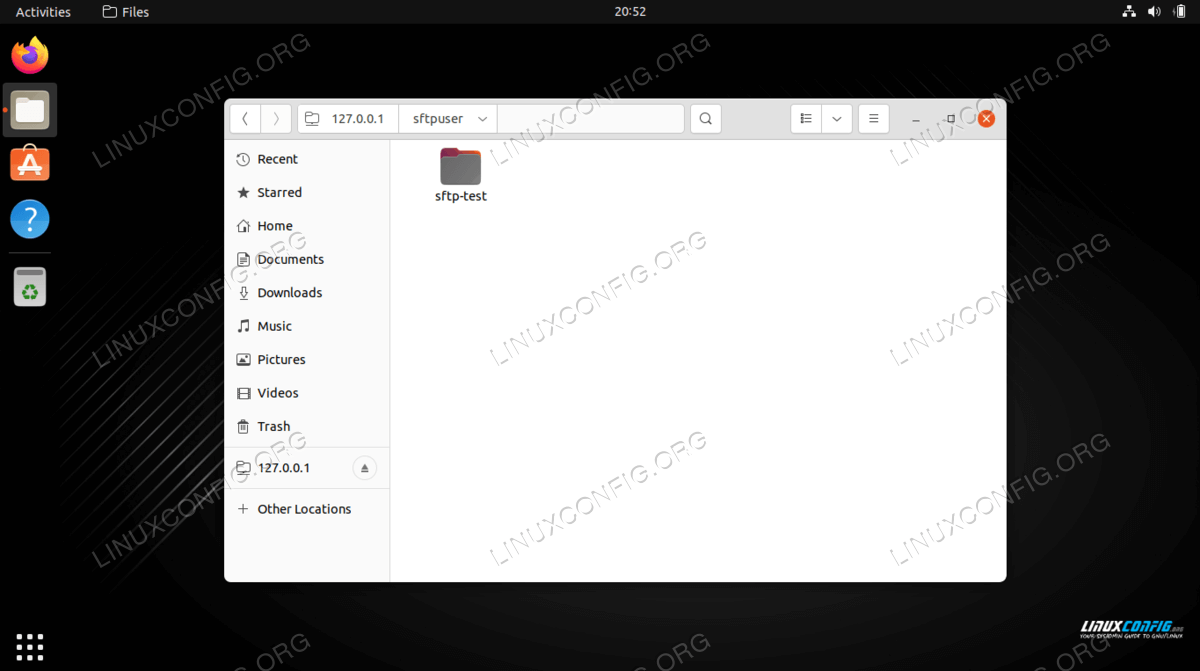
- Enter the SFTP account’s credentials that we setup earlier and click connect.
- Upon a successful connection, you will be able to open your home directory and see the test directory you created earlier.
Closing Thoughts
In the SFTP Server article, we saw how to create an SFTP server and subsequently log in to it on Ubuntu 22.04 Jammy Jellyfish Linux. We also covered how to use the command line and Ubuntu GUI to connect to the FTP server.
In this article, we saw how to secure the FTP protocol by setting up SFTP on our system. By following the instructions in this guide, computers on your local network or across the internet can securely access your system to store and retrieve files, either via the command line or their preferred SFTP client.