How to Set Up SSH on CentOS & RHEL
Learn to enable SSH on CentOS Linux systems. Also learn to configure it to follow the best practices.
SSH (Secure Shell) is a secure network protocol based on the client-server architecture that allows you to securely access remote computers/servers over the network.
SSH is widely used by system administrators for connecting to remote servers. This makes administrators easily manage servers and applications remotely and securely from anywhere at any time.
In this guide, I’ll show you how to set up and enable SSH on CentOS/RHEL systems. With the SSH enabled on this CentOS system, you should be able to access this system from other computers using its IP address.
This tutorial also includes the steps to change the default SSH port, disable SSH login for the root user, and set up firewalld to secure your SSH server.
To complete this guide, ensure you have got the following requirements:
- A CentOS/RHEL Linux system. You can install it on your physical machine/real hardware, or using the virtual machine through KVM/VirtualBox, or using third-party cloud providers like Linode (but they usually already have SSH enabled).
- A non-root user with sudo/root privileges. This user will be used for modifying your system. And in the end, this user can be used to log in to your server.
Installing OpenSSH Packages
OpenSSH is one of the most popular software implementations of SSH protocol. It is used by millions of Linux servers, and become a critical part of the server environment. By default, OpenSSH is available on most Linux distribution repositories, including CentOS and RHEL systems.
Before you get started, refresh your package index using the DNF package manager as below.
Next, install OpenSSH packages on the CentOS/RHEL systems using the following command. This command will install OpenSSH server packages, as well as OpenSSH client software.
sudo dnf install openssh-server openssh-clients -y After OpenSSH installation is complete, execute the following command to start the sshd service and enable it to start automatically at the system boot.
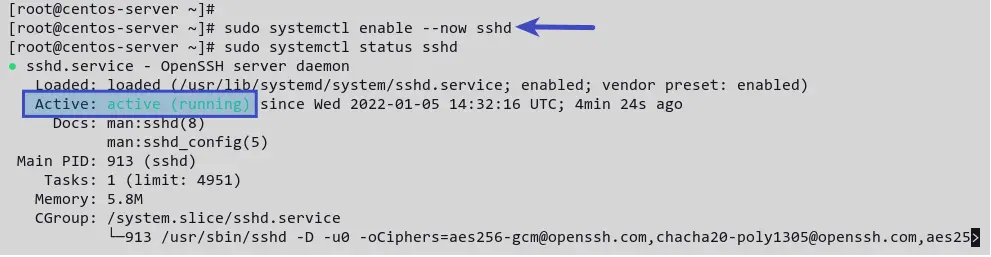
sudo systemctl enable --now sshd Now, verify the sshd service status by running the following command.
sudo systemctl status sshd You’ll receive output like the following screenshot. The sshd service is active (running) .
Configuring SSH Server
By default, the SSH configuration is available at the /etc/ssh directory, and the main configuration file is sshd_config . This file contains some basic SSH configuration, such as ListenAddress that determines the IP address of running SSH service, Port for setting up SSH service port, authentication methods, and many more.
In this section, you’ll modify the configuration sshd_config , then change the default SSH port and disable login for the root user.
This setting is recommended for security reasons, it is to increase server security and reduce the brute force attack against your server.
Now, open the file sshd_config using vi editor or your preferred editor.
sudo vi /etc/ssh/sshd_config Before you start editing the file, you must know that lines beginning with # and empty lines are interpreted as comments.
At the top of the line, change the default SSH port from 22 to your preferred port. This tutorial uses the non-standard port 2028 for SSH.
Please make sure that you have a non-root user with sudo access already enabled on this system. Otherwise, if you disable root login, you may not be able to log in to your server remotely.
Next, change the option of PermitRootLogin yes to PermitRootLogin no . This will disable SSH login for the user root user. Optionally, you can add # at the beginning of the line PermitRootLogin .
After making changes, verify the SSH configuration, then restart the sshd service.
sshd -t sudo systemctl restart sshd Now, you can connect to your SSH server by running the ssh command below.
The -p option is used to specify the port of your SSH server.
In this section, you have completed the basic configuration for securing the SSH server by changing the default SSH port and disabling login for the root user. Moreover, you’ve learned to connect to the SSH server with a non-standard port. Next, you’ll install and configure firewalld.

Installing and Configuring Firewalld
If you are using the CentOS/RHEL server on the public internet, such as a cloud server, then you may need to enable the firewall. This will increase your server security, by limiting access only to specific services such as SSH, HTTP, and HTTPS. On CentOS/RHEL-based distribution, firewalld is the default firewall package that you can install on your system.
In this section, you’ll install firewalld and set up its open ports for your SSH server.
To install firewalld, run the dnf command below.
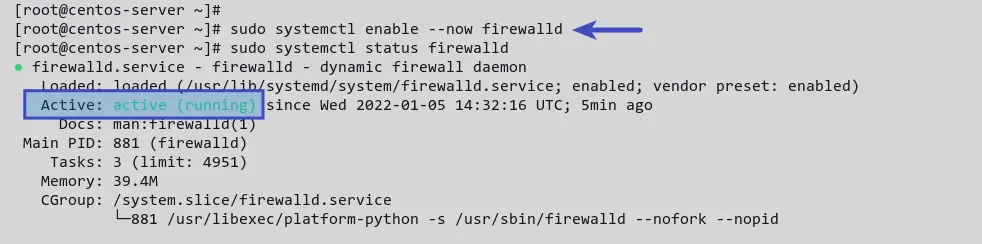
sudo dnf install firewalld -y After firewalld installation is completed, start and enable the firewalld service. Then verify its status by running the following command.
sudo systemctl enable --now firewalld sudo systemctl status firewalld You’ll receive a similar output like the screenshot below. The firewalld service is active (running) .
For interacting with firewalld, you can use the command firewall-cmd . It is the command-line interface for managing firewalld rules. You can use firewall-cmd to add, remove, and modify firewalld rules. And there are many more that you can do with using the firewall-cmd .
Now, to add the custom SSH port to your system, run the firewall-cmd command below.
sudo firewall-cmd --add-port=2028/tcp --permanent You’ll receive the output success , which means the operation success and completed.
This example uses the port 2028 as the custom SSH port. and the SSH service is running on the TCP port, so you need to specify the port and protocol such as 2028/tcp . The option —permanent makes this rule permanently.
Next, reload firewalld rules to apply a new configuration using the following command.
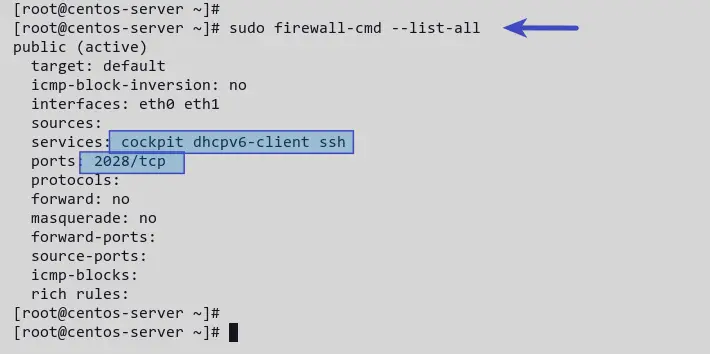
You have added the SSH custom port to the firewalld. Execute the command below to list all enabled rules.
Now you’ll see a list of enabled rules in firewalld. The services SSH, Cockpit, and dhcp are enabled by default.
To remove the default SSH rule, run the firewall-cmd command below. Then reload again firewalld rules.
sudo firewall-cmd --permanent --remove-service=ssh sudo firewall-cmd --reload Now, you have completed the installation and configuration of firewalld to secure your SSH server.
Conclusion
In this guide, you have completed the installation and configuration of SSH on the CentOS/RHEL system. You have secured your SSH server by changing the default port and disabling the login for the root user. Additionally, you’ve completed the firewalld installation and configuration on the CentOS/RHEL system for securing the SSH server.
Let us know if you have questions.
Настройка доступа по SSH в CentOS

SSH-сервер (OpenSSH) позволяет производить удалённое управление операционной системой, а также копирование файлов между компьютерами по шифрованному каналу связи. SSH расшифровывается как Secure Shell. OpenSSH обеспечивает надежную авторизацию и безопасную передачу данных по открытым каналам связи.
Установка SSH-сервера
Для установки SSH-сервера в CentOS необходимо установить пакет openssh-server:
# sudo yum install openssh-server 

Добавляем OpenSSH в автозагрузку:


Настройки SSH-сервера
Настройки SSH-сервера хранятся в файле /etc/ssh/sshd_config .
Для приведенного выше примера он может быть следующим:

Наиболее важные опции с точки зрения безопасности:
- Port 22 – Порт по умолчанию.
- Protocol 2,1 – Какая реализация протокола SSH будет использоваться. Рекомендую оставить только 2.
- ListenAddress – По умолчанию SSH сервер прослушивает все доступные интерфейсы, что абсолютно не нужно в большинстве ситуаций. Необходимо прописать сетевой интерфейс, с которого будет осуществляться управление сервером.
- PermitRootLogin yes – По умолчанию разрешает входить по SSH суперпользователю root. Необходимо указать no.
- AllowUsers adminsys – Данный параметр разрешает входить по SSH только перечисленным пользователям.
- AllowGroups wheel – Группа пользователей которой можно входить по SSH, опцию можно не использовать если указана опция AllowUsers .
- DenyUsers baduser – Данная опция запрещает вход по SSH перечисленным пользователям.
- DenyGroups badgroup – Данная опция запрещает вход по SSH перечисленным группам пользователей.
- MaxAuthTries 3 – Сколько раз переспрашивать пароль при неверном вводе. В данном случае SSH-сервер после 3 неверных попыток разорвет соединение с клиентом.
- LoginGraceTime 60 – Через сколько секунд разрывать соединение при отсутствии аутентификации со стороны клиента.
- PermitEmptyPasswords no – Разрешать использовать пустые пароли. По вполне понятным причинам значение этого параметра no.
- PrintLastLog yes – при входе пользователя в систему по SSH ему будет показано когда и откуда последний раз был произведен вход под данным пользователем.
- LogLevel INFO – В качестве параметра этой опции необходимо указать уровень журналирования. Возможные значения QUIET, FATAL, ERROR, INFO, VERBOSE, DEBUG1, DEBUG2, DEBUG3. Чем выше уровень журналирования, тем больше информации появится в файле регистрации событий.
- SyslogFacility AUTHPRIV – Куда будут попадать логи. Возможные значения: DAEMON, USER, AUTH, LOCAL0, LOCAL1, LOCAL2, LOCAL3, LOCAL4, LOCAL5, LOCAL6, LOCAL7.
Вход на сервер через PUTTY PORTABLE
Для начало нам нужно узнать Ip-адрес сервера:
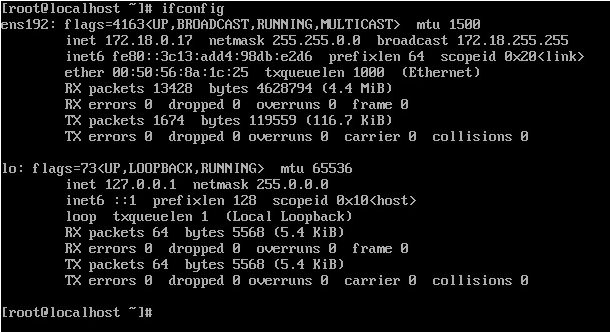
После чего вводим Ip-адрес в PUTTY указав 22 порт (стоит по умолчанию).
Указываем SSH соединение и заходим на сервер.
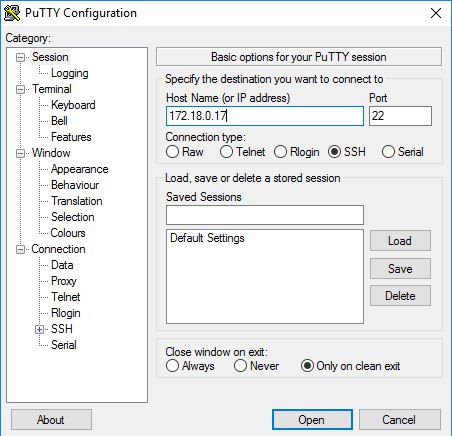
При входе на сервер он попросит вас зайти под своей учетной записью.