- How to set up VPN over SSH in Linux
- Install sshuttle on Linux
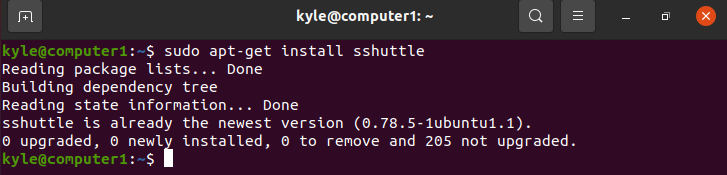
- Install sshuttle on Ubuntu or Debian
- Set up a VPN Tunnel with sshuttle
- Support Xmodulo
- Creating a VPN Over SSH Using sshuttle Linux Command
- How To Install sshuttle
- Using sshuttle To Set Up a VPN
- Proxying All Local Connections
- Testing Connection to the Remote Server
- Tunnelling All Traffic
- Excluding Specific Traffic
- Tunnelling Specific Subnets
- Conclusion
- About the author
- Denis Kariuki
- VPN через SSH
- Одно P2P (peer to peer — точка точка) соединение
- Конфигурация SSH сервера
- Конфигурирование SSH клиента
- Соединение двух сетей
- Подключение из сети А к сети сети Б
- Настройка шлюза А
How to set up VPN over SSH in Linux
There are many ways to set up a VPN. Setting up a VPN typically requires using privileged access on all hosts involved (in order to create virtual network interfaces via tun / tap devices), as well as opening up additional VPN ports on any existing firewall. This is an administrative overhead. If you can configure a VPN over a commonly available SSH tunnel, it will reduce the VPN provisioning overhead.
In this tutorial, I will describe how to set up a VPN over SSH in Linux, by using a command-line tool called sshuttle .
sshuttle is originally developed as a transparent proxy server, but it can work as a VPN over SSH.
To be able to create a VPN through SSH with sshuttle , you only need to install sshuttle on local host. You do not need to install sshuttle nor require root access on the other remote host. Upon VPN creation, the sshuttle ‘s python code on local host will automatically be uploaded to the remote host for running without root access. The only requirements for the remote host are that SSH server be running, and that python interpreter be installed.
Install sshuttle on Linux
Install sshuttle on Ubuntu or Debian
$ sudo apt-get install sshuttle
Install sshuttle on CentOS, Fedora or RHEL
First, download its python code from its official repository, and include the downloaded sshuttle in your PATH environment variable.
$ sudo yum install git $ git clone git://github.com/apenwarr/sshuttle
Set up a VPN Tunnel with sshuttle
To initiate a VPN connection through SSH tunnel with sshuttle , run the following command.
[email protected]_host's password: ####### Connected.
As you can see above, sshuttle will ask you for SSH password to the remote host. If you see Connected message after logging in, this means that a VPN is successfully established over SSH.
0.0.0.0/0 means that all traffic will be forwarded to, and routed via the remote SSH host. —dns option makes local DNS requests be forward to the remote host as well.
At this point, you should be able to access any external host via a remote SSH host. To tear down an existing VPN over SSH, simply press Ctrl+c on the terminal where sshuttle is running.
If you want only specific subnets to be routed over the VPN, you can specify such subnets when launching sshuttle as follows.
$ sudo sshuttle -r [email protected]_host 172.194.0.0/16 172.195.0.0/16
As clarified in the beginning, the remote host must have python installed. If python is not available on the remote host, you will see the following error when running sshuttle .
P=python2: Command not found. P: Undefined variable. client: fatal: server died with error code 1
Support Xmodulo
This website is made possible by minimal ads and your gracious donation via PayPal or credit card
Please note that this article is published by Xmodulo.com under a Creative Commons Attribution-ShareAlike 3.0 Unported License. If you would like to use the whole or any part of this article, you need to cite this web page at Xmodulo.com as the original source.
Creating a VPN Over SSH Using sshuttle Linux Command
![]()
A Virtual Private Network (VPN) is one way of masking your identity and location over the internet. Also, if you are trying to connect to your workplace or home device remotely, a VPN comes in handy to route your traffic. You have the option to purchase VPNs from trusted sources or even create your own over SSH.
Outsourcing VPNs pose different security risks. However, you can create a VPN connection from a host machine and connect to a remote device via SSH with the sshuttle Linux command. You must have Python installed on the host machine and be connected as root for this to work. As for the remote machine, it doesn’t need to be root. Provided you have its password, sshuttle will work fine.
Moreover, once the connection gets established, sshuttle will upload the Python source code to the remote machine, eliminating the hassle of you having to install Python on it.
How To Install sshuttle
Installing sshuttle is straightforward. If you are on Debian or Ubuntu, use the following command to install it from the package manager:
Use the following command if you use Fedora, RHEL, or CentOS. Alternatively, you can clone its git repository and run the setup file.
$ sudo dnf install sshuttle
$ git clone https: // github.com / sshuttle / sshuttle.git
Using sshuttle To Set Up a VPN
First, you must install sshuttle on the host machine to create a VPN connection. In addition, you need the hostname and the IP address of the remote device.
There are different ways to use sshuttle.
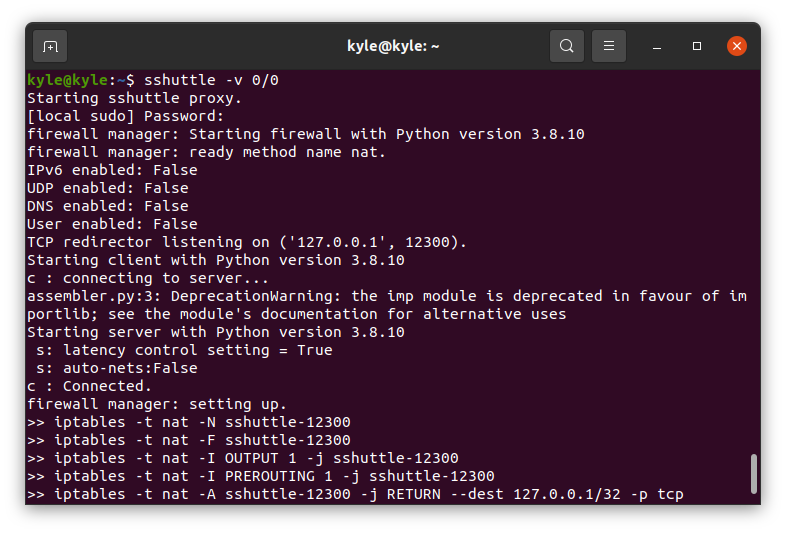
Proxying All Local Connections
The best way to test sshuttle is by proxying all local connections without involving SSH. The command for this is:
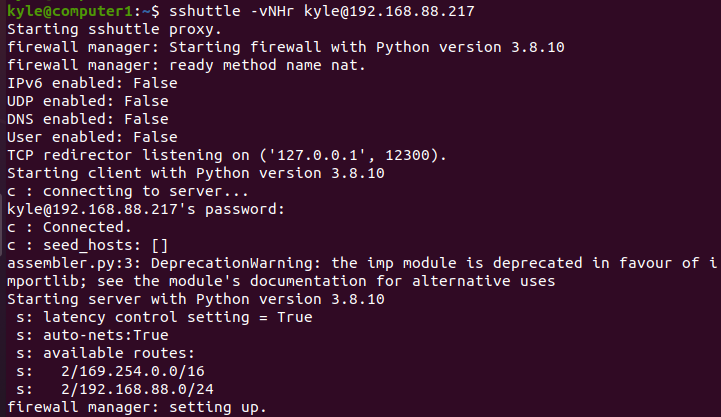
Testing Connection to the Remote Server
It’s possible to test your connection to the remote machine using sshuttle. We use the “-N” option to allow the server to decide the route and “-H” for auto-hosts. Our command will be:
The IP is the remote machine we are testing.
Tunnelling All Traffic
You can use sshuttle to tunnel all traffic to a remote SSH server. Note that sshuttle only forwards DNS requests and TCP traffic to the remote server. Other protocols, like UDP, are not supported.
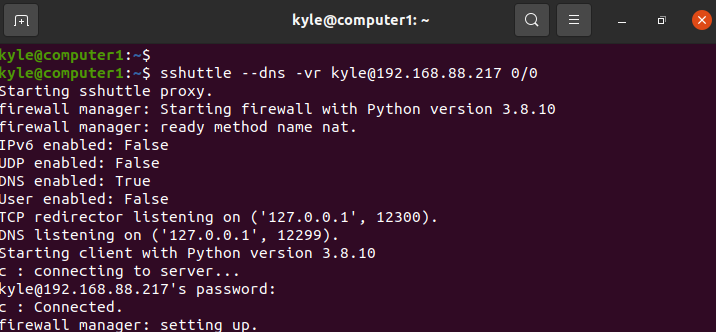
The 0/0 is a shorthand for the DNS server 0.0.0.0, “kyle” is the username of the remote server, and 192.168.88.217 is its IP. Also, the connection should indicate it is “connected” to show that the created VPN is working.
Excluding Specific Traffic
The “-x” option excludes certain traffic when using sshuttle. Specify the IP address to be excluded in the tunneling. For instance, to exclude “192.168.88. 21”, the command will be as shown below:
Tunnelling Specific Subnets
Similar to excluding specific traffic, you can choose which subnets to route over the created VPN. You can specify the IP address or the ranges for the subnets. For instance, to specify a given IP and a subnet range, the command will be:
The only traffic that will be tunneled is for the specified IP subnets, Class B and C. Specifying the subnets to tunnel works best when dealing with many hosts in an extensive network as not all connections require the VPN. You can also add the “–dns” option to forward DNS queries to the server.
Conclusion
There is a risk in purchasing or using publicly available VPNs to tunnel your connections. When working with servers and remote machines, you may need to route your traffic and keep it safe using a VPN. This guide covered how to install the sshuttle Linux tool, which enables you to create a VPN over an SSH connection. With sshuttle, you need not worry about VPN anymore. It will give you the protection you need for your traffic when using Linux systems.
About the author
Denis Kariuki
Denis is a Computer Scientist with a passion for Networking and Cyber Security. I love the terminal, and using Linux is a hobby. I am passionate about sharing tips and ideas about Linux and computing.
VPN через SSH
С версии 4.3, OpenSSH поддерживает устройства tun/tap, позволяющие создавать шифрованный туннель, что может быть весьма полезно в случае удаленного администрирования. Это очень похоже на OpenVPN, основанный на TLS. Плюс протокола SSH в том, что для реализации не нужно устанавливать и настраивать дополнительный софт. Из минусов, низкая производительность на медленных линиях.
Шифрованный туннель создается на основе одного TCP соединения, что весьма удобно, для быстрого поднятия простого VPN, на IP. В конфигурационном файле sshd_conf, должны стоять следующие опции:
Одно P2P (peer to peer — точка точка) соединение
- Подключиться по SSH используя опцию -w
- Сконфигурировать IP адреса туннеля, ssh сервер — ssh клиент
Конфигурация SSH сервера
Сервер на Linux
cli># ssh -w5:5 root@p2p_server srv># ifconfig tun5 10.0.1.1 netmask 255.255.255.252 # Выполняется в оболочке сервера Сервер на FreeBSD
cliуте# ssh -w5:5 root@p2p_server sуrvук# ifconfig tun5 10.0.1.1 10.0.1.2 # Выполняется в системной оболочке сервера Конфигурирование SSH клиента
cli># ifconfig tun5 10.0.1.2 netmask 255.255.255.252 # SSH клиент на Linux cli># ifconfig tun5 10.0.1.2 10.0.1.1 # SSH клиент на FreeBSD
Соединение двух сетей
- Подключится через SSH с опцией -w.
- Настройка IP адреса SSH туннеля, делается единожды, на сервере и на клиенте.
- Добавить маршрут для обоих сетей.
- Если нужно, включить NAT на внутреннем интерфейсе шлюза.
Подключение из сети А к сети сети Б
шлюз Б на Linux
gateA># ssh -w5:5 root@gateB gateB># ifconfig tun5 10.0.1.1 netmask 255.255.255.252 # Выполняется в оболочке шлюза Б gateB># route add -net 192.168.51.0 netmask 255.255.255.0 dev tun5 gateB># echo 1 > /proc/sys/net/ipv4/ip_forward # Необходимо только если шлюз не Default Gateway gateB># iptables -t nat -A POSTROUTING -o eth0 -j MASQUERADE
шлюз Б на FreeBSD
gateA># ssh -w5:5 root@gateB # Создаем устройство tun5 gateB># ifconfig tun5 10.0.1.1 10.0.1.2 # Выполняется на шлюзе Б gateB># route add 192.168.51.0/24 10.0.1.2 gateB># sysctl net.inet.ip.forwarding=1 # Необходимо только если шлюз не Default Gateway gateB># natd -s -m -u -dynamic -n fxp0 # Смотрим NAT gateA># sysctl net.inet.ip.fw.enable=1
Настройка шлюза А
шлюз A на Linux
gateA># ifconfig tun5 10.0.1.2 netmask 255.255.255.252 gateA># route add -net 192.168.16.0 netmask 255.255.255.0 dev tun5 gateA># echo 1 > /proc/sys/net/ipv4/ip_forward gateA># iptables -t nat -A POSTROUTING -o eth0 -j MASQUERADE
шлюз A на FreeBSD
gateA># ifconfig tun5 10.0.1.2 10.0.1.1 gateA># route add 192.168.16.0/24 10.0.1.2 gateA># sysctl net.inet.ip.forwarding=1 gateA># natd -s -m -u -dynamic -n fxp0 gateA># sysctl net.inet.ip.fw.enable=1
В итоге имеет две частные сети, прозрачно соединенные в VPN через SSH. Перенаправление IP и настройки NAT необходимы только если шлюзы не являются шлюзами по умолчанию (в этом случае клиент не будет знать, куда пересылать ответы).