- Copying a local file from Windows to a remote server using scp [closed]
- 7 Answers 7
- Как копировать и передавать файлы по SSH
- Для подключения к серверу вам потребуются:
- Как скопировать файл через SSH на Linux
- Как отправить файл по SSH с локального компьютера на сервер
- Как скачать файлы с удаленного сервера на компьютер
- Как скопировать файлы по SSH на Windows
- Как загрузить файл с компьютера на сервер
- Как скачать файл через SSH на локальный компьютер
- How to Use SCP from Windows to Linux
- Syntax:
- Transfer Files Using SCP in Linux from Local to Remote System
- Conclusion
- About the author
- Omar Farooq
Copying a local file from Windows to a remote server using scp [closed]
Closed. This question does not meet Stack Overflow guidelines. It is not currently accepting answers.
This question does not appear to be about a specific programming problem, a software algorithm, or software tools primarily used by programmers. If you believe the question would be on-topic on another Stack Exchange site, you can leave a comment to explain where the question may be able to be answered.
I try to transfer a folder of files from my local computer to a server via ssh and scp . After getting sudo privileges, I’m using the command as follows:
scp -r C:/desktop/myfolder/deployments/ user@host:/path/to/whereyouwant/thefile None of the non-GUI solutions work for me. I get the error, fork: No such file or directory. I can ssh the destination and I can dir to the source.
7 Answers 7
If your drive letter is C, you should be able to use
scp -r \desktop\myfolder\deployments\ user@host:/path/to/whereyouwant/thefile
without drive letter and backslashes instead of forward slashes.
You are using putty, so you can use pscp. It is better adapted to Windows.
scp -r root@31.222.168.64:/var/www/vhosts/mywork \test — I added this code this is create a test folder in my server no in my local computer scp -r root@31.222.168.64:/var/www/vhosts/mywork D:\test —gives error «ssh: Could not resolve hostname D: Name or service not known lost connection»
@pTi which scp are you using? If you are using Cygwin’s scp , you can use the path as /cygdrive/d/test . To omit using /cygdrive you can run mount —change-cygdrive-prefix / so that the path would be /d/test instead.
Not sure if it’s specific to tunneling or to the version of scp in Windows 10, but I had to use the syntax (after lots of trials and errors): scp -P
Drive letters can be used in the target like
scp some_file user@host:/c/temp where c is the drive letter. It’s treated like a directory.
Maybe this works on the source, too.
Thanks for this simple and working answer, not trying to make me use another software or whatever ! I was searching the web to find just that, nobody answers the question directly.
In my case, user@host:/ is the root for my C:\ directory. So if I write user@host:/temp/ , it is equivalent to C:\temp\ . I only have access to my C Drive, not others.
@imans77, that may work, but if your drive letter is e: it won’t 😉 That was the case for me and how I discovered this.
On windows you can use a graphic interface of scp using winSCP. A nice free software that implements SFTP protocol.
I see this post is very old, but in my search for an answer to this very question, I was unable to unearth a solution from the vast internet super highway. I, therefore, hope I can contribute and help someone as they too find themselves stumbling for an answer. This simple, natural question does not seem to be documented anywhere.
On Windows 10 Pro connecting to Windows 10 Pro, both running OpenSSH (Windows version 7.7p1, LibreSSL 2.6.5), I was able to find a solution by trial and error. Though surprisingly simple, it took a while. I found the required syntax to be
BY EXAMPLE INSTEAD OF MORE OBSCURE AND INCOMPLETE TEMPLATES:
Transferring securely from a remote system to your local system:
scp user@remotehost:\D\mySrcCode\ProjectFooBar\somefile.cpp C:\myRepo\ProjectFooBar or going the other way around:
scp C:\myRepo\ProjectFooBar\somefile.cpp user@remotehost:\D\mySrcCode\ProjectFooBar I also found that if spaces are in the path, the quotations should begin following the remote host name:
scp user@remotehost:"\D\My Long Folder Name\somefile.cpp" C:\myRepo\SimplerNamerBro Also, for your particular case, I echo what Cornel says:
On Windows, use backslash, at least at conventional command console.
Kind Regards. RocketCityElectromagnetics
Как копировать и передавать файлы по SSH
В статье мы расскажем, как передать файлы через SSH на разных операционных системах — Windows и Linux.
Для подключения к серверу вам потребуются:
- IP-адрес или имя сервера,
- логин пользователя (в том числе root),
- пароль пользователя,
- порт.
Чаще всего копирование файлов через SSH делают с помощью двух мини-программ:
- scp (Secure Copy) — утилита для Linux. Она позволяет безопасно передать или скачать файл по протоколу SSH. Программа scp входит в комплект OpenSSH и не требует установки.
- pscp.exe — это утилита для Windows. Она используется по тому же назначению, что и scp: подключение к серверу по SSH и работа с файлами. Эта мини-программа входит в состав PuTTY: ее можно скачать на официальном сайте. Процедура настройки SSH-клиента описана в нашей статье.
Важно: если загружаемый файл существует на целевом хосте, он перезапишется.
Работа через SSH предполагает использование консольных команд. Наиболее популярные из них вы можете найти в статье.
Как скопировать файл через SSH на Linux
Копирование файлов по SSH на Linux можно сделать с помощью scp. Эта утилита позволяет:
- передать файл с локального компьютера на удаленный сервер,
- скачать файл с удаленного сервера на локальный компьютер.
Команда scp имеет следующий синтаксис:
Как отправить файл по SSH с локального компьютера на сервер
- /home/test.doc — путь к файлу на локальном компьютере;
- username — имя SSH-пользователя;
- servername — имя сервера или его IP-адрес;
- directory — директория на сервере, в которую нужно загрузить файл.
Готово, вы загрузили файл на сервер.
Как скачать файлы с удаленного сервера на компьютер
- /directory/test.doc — путь к файлу на сервере;
- username — имя SSH-пользователя;
- servername — имя сервера или его IP-адрес;
- home — папка на компьютере, в которую нужно загрузить файл.
Готово, вы скачали файл на компьютер.
Как скопировать файлы по SSH на Windows
Копирование через SSH на ОС Windows выполняется с помощью утилиты pscp.exe из набора PuTTY.
Как загрузить файл с компьютера на сервер
- /documents/test.doc — путь к файлу на локальном компьютере;
- username — имя SSH-пользователя;
- servername — имя сервера или его IP-адрес;
- directory — директория на сервере, в которую нужно загрузить файл.
Если название файла или путь содержит пробелы, заключите его в кавычки:
Готово, вы загрузили файл на сервер.
Как скачать файл через SSH на локальный компьютер
- username — имя SSH-пользователя;
- servername — имя сервера или его IP-адрес;
- directory/test.doc — путь к файлу на сервере;
- /documents — директория на локальном компьютере, в которую нужно загрузить файл.
Если название файла или путь содержит пробелы, заключите его в кавычки:
Готово, вы скачали файл на компьютер.
How to Use SCP from Windows to Linux
![]()
In the Linux Operating system, we use the SCP command to copy the files or directories from our local machine to a remote server or from a remote server to our local machine. It can also be used to transfer the files between two remote servers using your local machine. It is a very useful command line utility and comes in handy when we need to transfer our files securely. SCP is the short form of Secure Copy Protocol. This command uses SSH keys or Secure Shell keys for the secure transfer of data.
SSH keys are a couple of private and public keys that are used to establish an encrypted and encoded connection between a remote server and a client server. SCP is famous for its ease of use, secured transfer, and preinstalled availability. SCP Command commands a set of options whose purpose is to keep track of its functionality and control its behavior. The following are a few options that are used more popularly:
SCP – P port: Allocates the port that is required for a connection to a remote server.
SCP -p: Keeps record of modification dates, access dates, creation dates, etc.
SCP -q: Used to disable the non-error messages and progress bar.
SCP -r: It removes and copies whole directories.
SCP -s: A program that specifies the name of the program that is used to encrypt the connection. The program must be the one that can understand the SSH options.
SCP -v: Enables the debugging options and displays the process step by step. It becomes helpful when we are facing authentication or connection problems.
When we are copying or moving the data from one server to another. The whole connection is secured by making sure that all the files and passwords are encrypted so that any stalker that comes in traffic does not get his hands on anything sensitive.
Syntax:
The following command is used to move the files from a local system to a remote one:
-
- OPTION – Scp options such as cipher, ssh configuration, ssh port, limit, recursive copy…etc.
- [user@]SRC_HOST:]file1 – Source file
- [user@]DEST_HOST:]file2 – Destination file
The following command is used to transfer the directories of files from the remote to the local system.
Transfer Files Using SCP in Linux from Local to Remote System
The SCP allows us to transfer the files from local to remote system or from remote to the local system. We can perform both tasks using SCP utility. To get a better understanding of the use of SCP, we perform the file transfers from remote to local system and from local to remote system.
Let’s suppose we have a file named “myfile” in our local system and we want to transfer it to the remote system. To do so, we must have an SSH connection between the local and the remote system. To check the installation of the SSH, we first open the command prompt in our local system. Then, we write a command to check whether we have an access to the SCP or not.
After running the previous command, we get the output that is shown in the following snippet which shows that the usage here is SCP, followed by flags and the source in a target computer.

Now, we create a new file using a notepad which we named “myfile” where we write the simple “this is SP file transfer” text as shown in the following figure:
Now, we transfer the file from our local system to the remote system. For that, we must have the IP and the path of the remote system where we want to store the file. But before that, we must have the SSH installed in our remote system. To check for the SSH installation, we run the following command:
After running the command, we receive this output which shows that we do not have an installed SSH in our system:
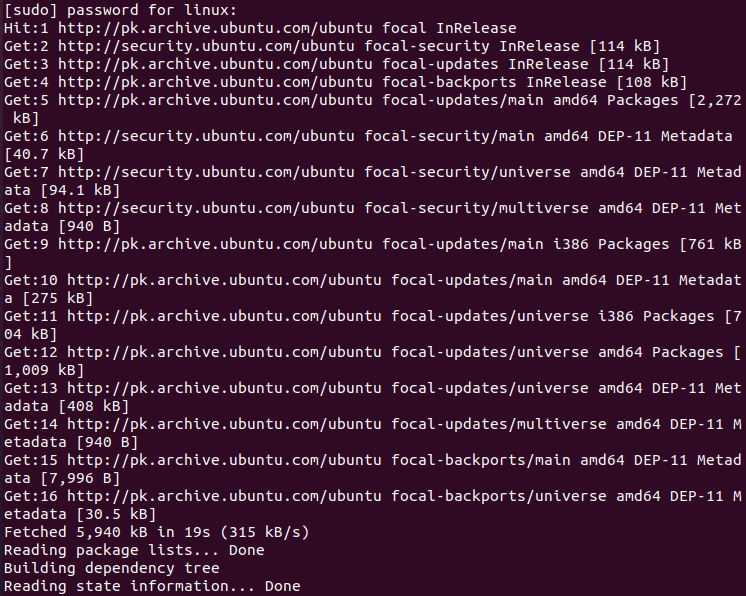
For the installation of SSH, let us first update the system to the latest version. To update the version, we run the following command:
After running the previous command, our system is upgraded. As shown in the following snippet, we successfully updated the system:
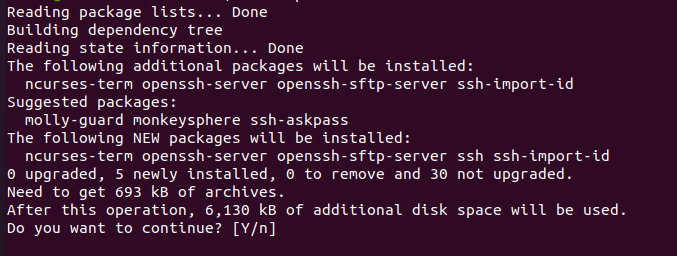
Now, we install SSH in our remote system. For that, we run the command that is displayed in the following after pressing “enter”, and our installation starts:
When we run the command for the installation of SSH, it will ask for permission to continue the installation or not by entering the “y” letter to grant the permission to install the SSH services.
Now, we successfully install the SSH server. Our next step is to allow the port 22/tcp for SSH. To do so, we write the following command in the terminal:
We get this message on running the previous command.
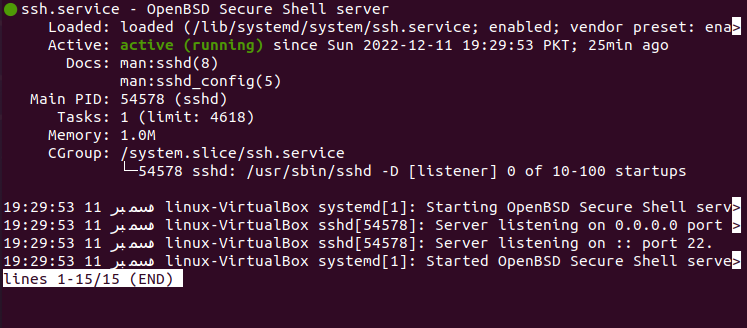
Let us check the status of the SSH again whether it is working or not. To check this, we write the previously-mentioned command that is used to check the status of the SSH. After that, as in the following snippet, we can see that our SSH is now active.
We now attempt to copy the file from the local system to the remote system. For this, we open the command prompt in the local system.
It allows us to transfer the “myfile.txt” file to the remote system named “linux” along with the “10.0.2.255” IP address and also the location where it is to be stored. As we can see in the following, we successfully transferred the file from the local to the remote user.
Conclusion
In this article, we introduced you to the SCP commands that are used to transfer files from one system to another. We also performed an example to explain how we can perform this task without any problems.
About the author
Omar Farooq
Hello Readers, I am Omar and I have been writing technical articles from last decade. You can check out my writing pieces.