- How to create an SSH tunnel between a Linux server and a Windows client
- Configure Linux server
- Configure the router
- Configure the Windows client
- Создание SSH-туннелей с помощью PuTTY
- 1. Локальный проброс порта
- 2. Удалённый проброс порта
- 3. Socks–proxy
- Простой SSH туннель с помощью Putty
- Шаг №1: Создание SSH — шлюза
- Шаг №2: Делаем туннель
How to create an SSH tunnel between a Linux server and a Windows client
The «disadvantage» of this method is that you always have to have this machine turned on and configured correctly to function as an SSH server, but it allows you to substantially improve the security of your connection and even evade the connection restrictions imposed by network administrators ( for example, your job).
I hear you ask: can this really help me? Well, let’s assume the following scenario: you are in an internet cafe or restaurant with free Wi-Fi and you need to make a bank transfer or other important operation. Of course, it is always recommended to carry out these types of transactions in a safe environment. However, there is a solution: an SSH tunnel. In this way, we can connect to the Internet through our «secure» server.
This method is also useful for circumventing the restrictions imposed on the connections of many work environments. Can’t access YouTube from work? Well, an SSH tunnel may be the solution, as all requests will be made through your «secure» server. In other words, as the IP of your secure server is not blocked (yes, on the other hand, YouTube’s) you will be able to «evade» this restriction (not being able to access YouTube) since for the administrator of your company’s network your machine was only chatting with your «secure» server and has no idea that through it you are actually browsing a lot of pages.
In this tutorial we are going to explain the «typical» case: Linux server, Windows client.
Configure Linux server
1.- Install the SSH server. To do this, I opened a terminal and ran:
sudo apt-get install openssh-server
yum -y install openssh-server
Ready. You will now be able to access the Ubuntu (SSH server) with an SSH client.
2.- Once installed, it is useful to review the configuration file:
sudo nano / etc / ssh / sshd_config
From this file you will be able to configure your SSH server at ease. My recommendation is to modify only 2 parameters: port and allowusers.
To avoid possible attacks it is advisable to change the port that SSH will use. By default it comes with the value 22, you can choose another that suits you best (for the purposes of this tutorial we chose 443 but it can be any other).
The Allowusers parameter allows you to restrict access by user and, optionally, the host from which you can connect. The following example restricts access to the SSH server so that only so-and-so users can do so from hosts 10.1.1.1 and 10.2.2.1.
AllowUsers so and so@10.1.1.1 mengano@10.1.1.1 so and so@10.2.2.1 mengano@10.2.2.1
Configure the router
In case your server is behind a router, it is necessary to configure the latter so that it does not block incoming connections. More specifically, you have to configure.
Before going to the point and showing the necessary configuration it seems prudent to explain a little what port-forwarding consists of.
Suppose you have a local network of 3 machines, all of them behind a router. How does an incoming connection (from SSH, as would be our case) to communicate with machine 1 of our local network? Don’t forget that «from the outside» the 3 machines, although they have local IPs, share a single public IP through which they connect to the Internet.
The solution to the aforementioned problem is port-forwarding. In this way, when incoming connections are received to port X of our public IP, the router will refer it to the corresponding machine. In this way, whenever we connect through that port, we know that the router is going to redirect us (hence port-forwarding) to the corresponding machine. All this, obviously, must be configured in the router.
The port-forwarding configuration varies a bit according to the router you are using. The most practical is to visit portforward.com, choose the router model you are using and follow the steps described there.
Configure the Windows client
To connect from Windows, it is practical to use the PuTTY tool as an SSH client.
1.- The first step is to download PuTTY
As you can see on the PuTTY download page, there are several versions available. I recommend downloading the portable version of the program: putty.exe. The advantage of choosing the portable version is that you can always carry it with you on a pendrive and run the program from any computer, wherever you are.
2.- Open PuTTY and specify the IP (public) and port of the server to which the SSH client should connect. How to find out the public IP of your server? Easy, just google «what is my public ip» to find thousands of pages that offer this service.

3.- In case the «client» is behind a proxy, don’t forget to configure it correctly. In case you are not sure what data to enter, open Internet Explorer and go to Tools> Connections> LAN Settings> Advanced. Copy and paste the data that appears there in PuTTY, as seen in the image below. In some cases, you may need to enter a username and password.

4.- It is necessary to enter the «local» port-forwarding data to build the SSH tunnel. Go to Connection> SSH> Tunnels. Here the idea is the following, we have to tell PuTTY which connections to «divert» to our secure server. To do this, we must choose a port.
My recommendation, especially if the machine is behind a proxy, is that you choose port 443 since it is the one used by SSL to make secure connections, which will make it difficult for the administrator to discover what you are doing. On the other hand, port 8080 is the one used by HTTP (which is not a «secure» connection) so an experienced network administrator may be suspicious and may even have blocked the port for other types of connections.
In Destination, re-enter the IP of the secure server, followed by a colon and the port you opened in the dot titled «Configure the router» and in the ~ / .ssh / config file. For example, 192.243.231.553:443.
Select Dynamic (which will create a SOCKS connection, which we will use in the next point) and click Add.

5.- I went back to the main PuTTY screen, clicked Save and then Open. The first time you connect to the server, an alert message like the one below will appear:

6.- Then, it will ask for your username and password with access to the server.
If everything went well, once the login is done, you should see something like what you see below .

7.- Finally, without closing PuTTY, open and configure Firefox (or your favorite browser) to connect to the Internet through PuTTY.

The content of the article adheres to our principles of editorial ethics. To report an error click here.
Full path to article: From Linux » FileLet’s UseLinux » How to create an SSH tunnel between a Linux server and a Windows client
Создание SSH-туннелей с помощью PuTTY
В данной статье будет описано как строить SSH–туннели с помощью PuTTY.
1. Локальный проброс порта
Рассмотрим следующую ситуацию. Мы находимся внутри корпоративной сети, у нашего компьютера адрес 192.168.0.2, доступ во внешний мир полностью закрыт (то есть никакого NAT–а, proxy и т.п.). Влиять на политику ограничения доступа у нас возможности нет, но зато есть SSH–доступ на один из серверов с маршрутизируемым IP–адресом, который доступен из Интернета. Внутренний адрес этого сервера, пусть будет для примера 192.168.0.3. Структура сети изображена на рисунке:

Предположим, что нам очень нужно подключиться, к примеру, по SSH на некоторый удалённый сервер с IP–адресом 212.212.212.212 где–то далеко в Интернет. Для этого запускаем PuTTY, создаём SSH–подключение к серверу 192.168.0.3 (далее по тексту SSH–сессия 1), идём в пункт Tunnels:

и указываем, что локальный порт 2222 нашего компьютера должен быть поставлен в соответствие порту 22 на сервере с IP–адресом 212.212.212.212. Далее жмём кнопку «Open», авторизуемся на сервере 192.168.0.3. Затем создаём ещё одно подключение (далее по тексту SSH–сессия 2), но уже на localhost, порт 2222 и жмём кнопку «Open»:

В результате SSH–сессия 2 будет туннелироваться (т.е. будет установлена внутри ранее установленной SSH–сессии 1). Для удалённого сервера 212.212.212.212 всё будет выглядеть так, как будто к нему подключается 111.111.111.111:

2. Удалённый проброс порта
В этом случае подключение внутри SSH–туннеля устанавливается в другую сторону — от удалённого сервера на наш локальный компьютер. Может быть полезно, если требуется открыть доступ к локальным сервисам нашего компьютера. Рассмотрим ту же сеть, что и в пункте 1, но для простоты предположим, что теперь у нас есть NAT:

Здесь уже у нас есть возможность подключаться через SSH напрямую к 212.212.212.212 благодаря наличию NAT–а. А вот 212.212.212.212 подключиться на 192.168.0.2 без специальных ухищрений, понятное дело, не сможет, т.к. 192.168.0.2 не подключён к Интернет непосредственно. Предположим, что пользователю, сидящему под X–ами на 212.212.212.212 нужно через remote desktop попасть на наш компьютер 192.168.0.2. Для этого в SSH–сеансе подключения с 192.168.0.2 на 212.212.212.212 нужно изменить настройки в разделе Tunnels следующим образом:

В результате после успешной авторизации на 212.212.212.212 можно увидеть следующее:
#lsof -i -nP | grep 3333 sshd 18598 avz 11u IPv4 592868957 TCP 127.0.0.1:3333 (LISTEN)
То есть sshd ожидает подключений на TCP–порт 3333, которые затем по SSH–туннелю будут перенаправлены на 192.168.0.2 порт 3389. И юзер сидящий за 212.212.212.212 сможет с помощью rdesktop увидеть наш рабочий стол:

3. Socks–proxy
В этом случае мы можем использовать сервер с SSH–демоном как промежуточный (proxy). Схема сети как в случае #1 (без NAT и штатных прокси):

Чтобы заставить PuTTY исполнять роль socks–прокси, нужно параметры SSH–сессии с 192.168.0.2 на 192.168.0.3 изменить следующим образом:

В результате после успешной авторизации со стороны клиента можно будет наблюдать следующее:
C:\>netstat -ano | find "1080" TCP 127.0.0.1:1080 0.0.0.0:0 LISTENING 2392 C:\>tasklist | find /i "2392" putty.exe 2392 Console 0 5420 КБ
То есть putty, выполняющийся с PID–ом 2392, начинает слушать порт 1080, ожидая подключений. Далее бёрем любое приложение, умеющее работать с SOCKS–прокси, например Firefox, и указываем ему использовать наш прокси:

Теперь все запросы от браузера будут проходить через сервер 192.168.0.3. В логах веб–сайтов, по которым мы таким образом будем ходить, будет отображаться внешний IP–адрес нашего сервера — 111.111.111.111.
P.S. Из help–файла Putty 0.58:
Question A.10.3: What does «PuTTY» mean?
It’s the name of a popular SSH and Telnet client. Any other meaning is in the eye of the beholder. It’s been rumoured that «PuTTY» is the antonym of «getty», or that it’s the stuff that makes your Windows useful… 🙂
Простой SSH туннель с помощью Putty
![]()
Многие из вас наверняка используют в повседневной работе SSH подключение к удаленным серверам. Но не многие знают, что с помощью SSH мы можем создавать защищенные соединения (туннели), через которые трафик будет передаваться в зашифрованном виде.
В статье мы расскажем о простом способе создания SSH – туннеля и использования его для HTTP/RDP доступа.
Шаг №1: Создание SSH — шлюза
Первое, что необходимо сделать, это создать SSH – шлюз. Для этого, откроем Putty и создадим подключение к шлюзу:

Сохраните сессию, чтобы потом оперативно загрузить ее с помощью кнопки Load.
Шаг №2: Делаем туннель
В левом меню навигации, переходим в раздел Connection → SSH → Tunnels. В данном меню настройки укажите параметр Source Port — это порт, к которому вы будете подключаться локально, чтобы отправить трафик через SSH – туннель. В поле Destination укажите адрес назначения, к которому вы будете подключаться:
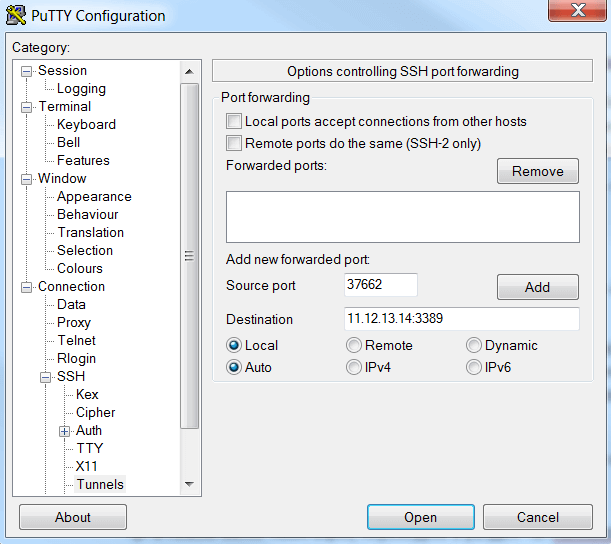
Данная запись означает то, что при подключении к локальному порту 37662 (127.0.0.1:37662), вы будете перенаправлены через SSH туннель до SSH – шлюза, а затем уйдете на адрес назначения 11.12.13.14:3389 – то есть RDP.
Помимо этого, мы добавим подключение к WEB по 80 порту. Нажимаем Add:
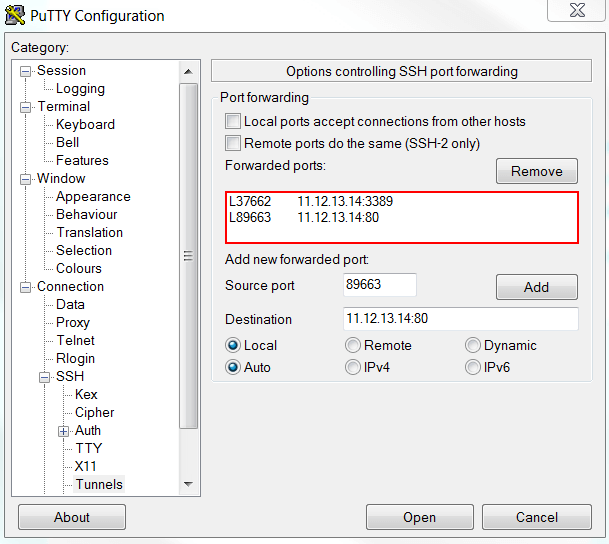
Отлично. Теперь в Putty нажимаем Open — туннель готов к использованию.
Шаг №3: Проверяем
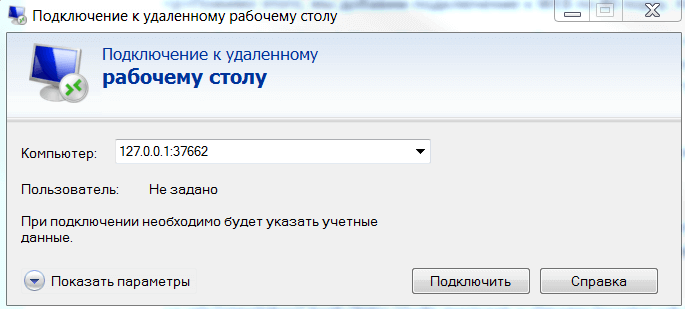
Вызываем утилиту подключения к удаленному рабочему столу командой mstsc и указываем требуемые для нас реквизиты подключения – локалхост и созданный ранее RDP порт:
В примере, для того, чтобы «гнать» web – трафик через SSH – туннель настройте прокси сервер.
Важно: подключение через SSH – туннель будет активно до тех пор, пока открыта утилита Putty и существует коннекция с SSH – шлюзом.