- Вход по SSH без пароля | Авторизация по ключу SSH
- Установка SSH клиента в Windows 10/11
- Генерация ssh-ключей в Windows 10/11
- Как загрузить ssh-ключ на сервер?
- Защита приватного ssh-ключа в Windows
- Генерация ssh-ключей в Linux
- Establish an SSH connection between Windows and Linux
- Ways to use SSH
- 1. Configure SSHD
- 2. Set up a remote console
- 3. Copy files over the network
- 4. Tunnel a protocol
- Debugging
- Learn more
- A beginner’s guide to SSH for remote connection on Linux
- Bypass your Linux firewall with SSH over HTTP
Вход по SSH без пароля | Авторизация по ключу SSH
Доступно за пару минут о настройке безопасного входа на сервер без пароля. Рассказываю подробно как настроить авторизацию c Windows ПК на сервере Linux по SSH ключу.
У меня несколько тестовых Linux-машин, к которым приходится часто подключаться по SSH. Вводить пароль каждый раз очень неудобно (особенно, если он имеет большую сложность), поэтому делюсь как быстро сгенерировать SSH-ключ.
Установка SSH клиента в Windows 10/11
На ПК с Windows потребуется установленный компонент OpenSSH.Client. Чтобы проверить его наличие в системе, запустите PowerShell от имени администратора и вставьте следующую команду:
Если клиент установлен, в строке State будет значение «Installed» , как на скрине ниже:
В противном случае установите клиент следующей командой:
Генерация ssh-ключей в Windows 10/11
Теперь нам нужно запустить PowerShell от обычного пользователя и сгенерировать ключи для автоматической авторизации с помощью команды ssh-keygen:
Рассмотрим подробнее вывод команды:
- Enter file in which to save the key — в данной строке генератор просит ввести путь для файла ключа и его имя. Чтобы ssh-клиент мог подхватить ключ автоматически, рекомендую просто нажать Enter, тогда ключ будет сохранен в стандартном расположении (указано в скобках).
- Enter passphrase (empty for no passphrase) — здесь можно ввести пароль, с помощью которого файл приватного ключа будет зашифрован. В случае ввода пароля при подключении потребуется вводить введённую в данной строке фразу. Ниже я покажу как обезопаситься способом, рекомендуемым Microsoft, поэтому оставьте значение пустым.
- Enter same passphrase again — повторный запрос пароля. Для нас не актуально, жмём Enter.
- Your identification has been saved in. — путь к сгенерированному приватному ключу. Это аналог пароля от учётной записи. Получив его, злоумышленник может авторизоваться на сервере от вашего имени, поэтому необходимо его защитить.
- Your public key has been saved in. — путь к публичному ключу, который необходимо загрузить на сервер. Публичный ключ генерируется на основе приватного ключа и составляет с последним пару.
- В остальных строках выводится информация о сгенерированном ключе.
Как загрузить ssh-ключ на сервер?
Один из способов, это использовать scp для загрузки файла с расширением .pub:
С помощью этой команды файл my_ssh_key.pub был загружен на сервер в каталог .ssh домашней директории пользователя. Затем его содержимое нужно добавить в файл authorized_keys.
Второй способ гораздо проще. Нужно всего лишь отредактировать файл authorized_keys (находится в /home/username/.ssh), добавив в него строку с содержимым из файла публичного ключа:
Теперь вы можете авторизоваться на сервере по ssh без ввода пароля.
Если вы задали своё имя файлу ключа, указали нестандартный путь сохранения или просто хотите обезопасить файл приватного ключа, пункт ниже для вас:
Защита приватного ssh-ключа в Windows
Я уже говорил выше, что приватный ключ — это аналог пароля от учётной записи, поэтому его рекомендуется запаролить на этапе генерации или добавить в ssh-agent, как рекомендует официальная документация Microsoft . Служба ssh-agent запоминает приватный ключ, благодаря этому отпадает надобность хранить сгенерированный файл на ПК.
Для начала установим автоматический запуск службы и запустим её (нужны права Администратора):
Используйте Get-Service ssh-agent для того, чтобы убедиться в нормальном запуске службы:
Теперь добавим в агент значение приватного ssh-ключа, указав к нему путь:
*при наличии пробелов в пути к файлу, укажите его в кавычках
Осталось открыть PowerShell и ввести username@SERVERNAME для подключения. Если всё настроено верно, пароль запрашиваться не будет.
Когда проверили, что всё работает, удалите файл приватного ключа . На этом настройка авторизации SSH по ключу закончена.
Генерация ssh-ключей в Linux
Для линукса всё довольно проще. Сначала генерируем ключ на нашем компьютере:
Что указывать в полях вывода команды подробно описано выше в пункте «Генерация ssh-ключей в Windows 10/11»
После успешной генерации ключей, копируем публичный ключ на сервер:
Если всё сделано правильно, команда сообщит об успешном добавлении ключа и предложит выполнить вход на сервер.
Establish an SSH connection between Windows and Linux
Use the open source tool, PuTTY to establish an SSH connection from a Windows machine to a Linux system.

The secure shell protocol (SSH) is the most common method for controlling remote machines over the command line in the Linux world. SSH is a true Linux original, and it is also gaining popularity in the Windows world. There is even official Windows documentation for SSH, which covers controlling Windows machines using OpenSSH.
This article describes how to establish an SSH connection from a Windows machine to a Fedora 33 Linux system using the popular open source tool PuTTY.
Ways to use SSH
SSH uses a client-server architecture, where an SSH client establishes a connection to an SSH server. The SSH server is usually running as a system daemon, so it is often called SSHD. You can hardly find a Linux distribution that does not come with the SSH daemon. In Fedora 33, the SSH daemon is installed but not activated.
You can use SSH to control almost any Linux machine, whether it’s running as a virtual machine or as a physical device on your network. A common use case is the headless configuration of embedded devices, including the Raspberry Pi. SSH can also be used to tunnel other network services. Because SSH traffic is encrypted, you can use SSH as a transport layer for any protocol that does not provide encryption by default.
In this article, I’ll explain four ways to use SSH: 1. how to configure the SSH daemon on the Linux side, 2. how to set up a remote console connection, 3. how to copy files over the network, and 4. how to tunnel a certain protocol over SSH.
1. Configure SSHD
The Linux system (Fedora 33 in my case) acts as the SSH server that allows the PuTTY SSH client to connect. First, check the daemon’s SSH configuration. The configuration file is located at /etc/ssh/sshd_config and contains a lot of switches that can be activated by commenting out related lines:
# $OpenBSD: sshd_config,v 1.100 2016/08/15 12:32:04 naddy Exp $ # This is the sshd server system-wide configuration file. See # sshd_config(5) for more information. # This sshd was compiled with PATH=/usr/local/sbin:/usr/sbin:/sbin:/usr/local/bin:/usr/bin:/bin # The strategy used for options in the default sshd_config shipped with # OpenSSH is to specify options with their default value where # possible, but leave them commented. Uncommented options override the # default value. Include /etc/ssh/sshd_config.d/*.conf #Port 22 #AddressFamily any #ListenAddress 0.0.0.0 #ListenAddress :: The default configuration, where no line is uncommented, should work for this example. Check whether the SSH daemon is already running by typing systemctl status sshd :
$ systemctl status sshd ● sshd.service - OpenSSH server daemon Loaded: loaded (/usr/lib/systemd/system/sshd.service; enabled; vendor preset: enabled) Active: active (running) since Fri 2018-06-22 11:12:05 UTC; 2 years 11 months ago Docs: man:sshd(8) man:sshd_config(5) Main PID: 577 (sshd) Tasks: 1 (limit: 26213) CGroup: /system.slice/sshd.service └─577 /usr/sbin/sshd -D -oCiphers=aes256-gcm@openssh.com,chacha20-[. ] If it’s inactive, start it with the systemctl start sshd command.
2. Set up a remote console
On Windows, download the PuTTY installer, then install and open it. You should see a window like this:
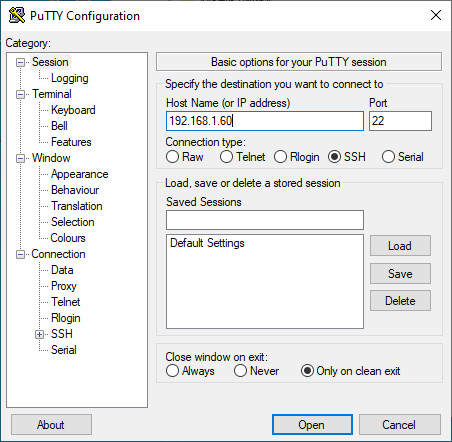
In the Host Name (or IP address) input field, enter the connection information for your Linux system. In this example, I set up a Fedora 33 virtual machine with a bridged network adapter that I can use to contact the system at the IP address 192.168.1.60 . Click Open, and a window like this should open:
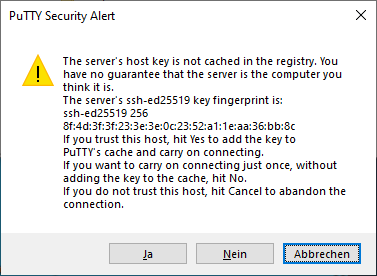
This is an SSH security mechanism to prevent a man-in-the-middle attack. The fingerprint in the message should match the key on the Linux system at /etc/ssh/ssh_host_ed25519_key.pub. . PuTTY prints the key as an MD5 hash. To check its authenticity, switch to the Linux system, open a command shell, and enter:
ssh-keygen -l -E md5 -f /etc/ssh/ssh_host_ed25519_key.pubThe output should match the fingerprint shown by PuTTY:
$ ssh-keygen -l -E md5 -f /etc/ssh/ssh_host_ed25519_key.pub 256 MD5:E4:5F:01:05:D0:F7:DC:A6:32 no comment (ED25519)Confirm the PuTTY Security Alert by clicking Yes. The host system’s fingerprint is now in PuTTYs trust list, which is located in the Windows registry under:
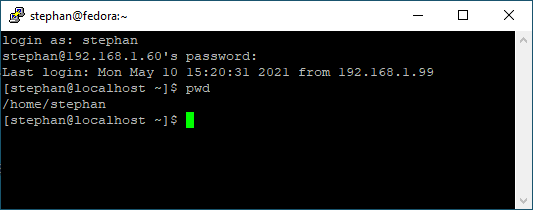
HKEY_CURRENT_USER\SOFTWARE\SimonTatham\PuTTY\SshHostKeysEnter your correct login credentials, and you should be on the console in your home directory:
3. Copy files over the network
In addition to the remote console, you can use PuTTY to transfer files via SSH. Look in the installation folder under C:\\Program Files (x86)\\PuTTY and find pscp.exe . You can use this to copy files to and from a Linux system.
Open a command prompt with Windows + R and enter cmd. Copy the file MyFile.txt from your Linux user home directory to your Windows home directory by entering:
C:\"Program Files (x86)"\PuTTY\pscp.exe stephan@192.168.1.60:/home/stephan/MyFile.txt .To copy a file from the Windows home directory to the Linux user home directory, enter:
C:\"Program Files (x86)"\PuTTY\pscp.exe MyFile.txt stephan@192.168.1.60:/home/stephan/As you may have already figured out, the copy command’s general structure is:
4. Tunnel a protocol
Imagine you have a Linux machine that is running an HTTP-based service for some arbitrary application. You want to access this HTTP service from your Windows machine over the internet. Of course, you cannot expose the related TCP port to the public because:
At first glance, it looks like an impossible task to set up this architecture without producing a horrible security flaw. But SSH makes it relatively easy to set up a safe solution for this scenario.
I will demonstrate this procedure with my software project Pythonic. Running as a container, Pythonic exposes two TCP ports: TCP port 7000 (main editor) and TCP port 8000 (the code-server source-code editor).
To install Pythonic on a Linux machine, run:
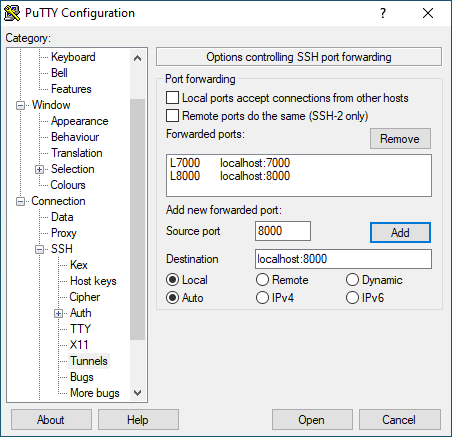
podman pull pythonicautomation/pythonic podman run -d -p 7000:7000 -p 8000:8000 pythonicSwitch to your Windows machine, open PuTTY, and navigate to Connection -> SSH -> Tunnels. Add the two TCP ports you want to forward:
Then go back to the Session section, and establish an SSH connection as you did before. Open a browser and navigate to http://localhost:7000 ; you should see a screen like this:
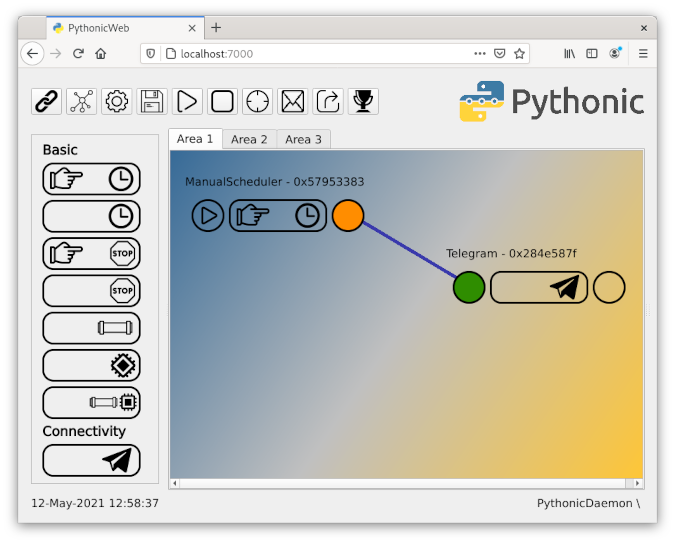
You have successfully configured port forwarding!
Warning: If you expose TCP Port 22 to the public, don’t use easy-to-guess login credentials. You will receive login attempts from all over the world trying to access your Linux machine with common, standard credentials. Instead, permit only known clients to log in. This login restriction can be achieved using public-key cryptography, which uses a key pair in which the public key is stored on the SSH host machine, and the private key remains at the client.
Debugging
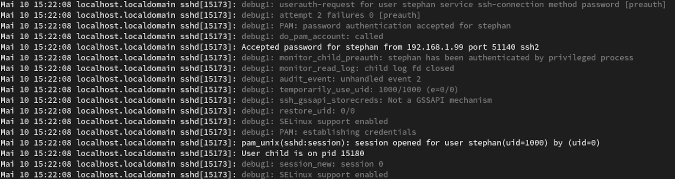
If you are struggling to connect to your Linux machine, you can follow the processes in your SSH daemon with:
This is how an ordinary log-in process looks like with LogLevel DEBUG :
Learn more
This article barely scratched the surface about ways to use SSH. If you are looking for information about a specific use case, you can probably find it among the tons of SSH tutorials on the internet. I use PuTTY heavily at work because its easy configuration and good interoperability between operating systems make it a Swiss Army knife tool for connectivity solutions.

A beginner’s guide to SSH for remote connection on Linux
Establish connections with remote computers using secure shell.

Bypass your Linux firewall with SSH over HTTP
Remote work is here to stay; use this helpful open source solution to quickly connect and access all your devices from anywhere.