- How to Get Started with Linux
- Choosing a Linux Distro
- Installing a Linux Distro Using an External Drive
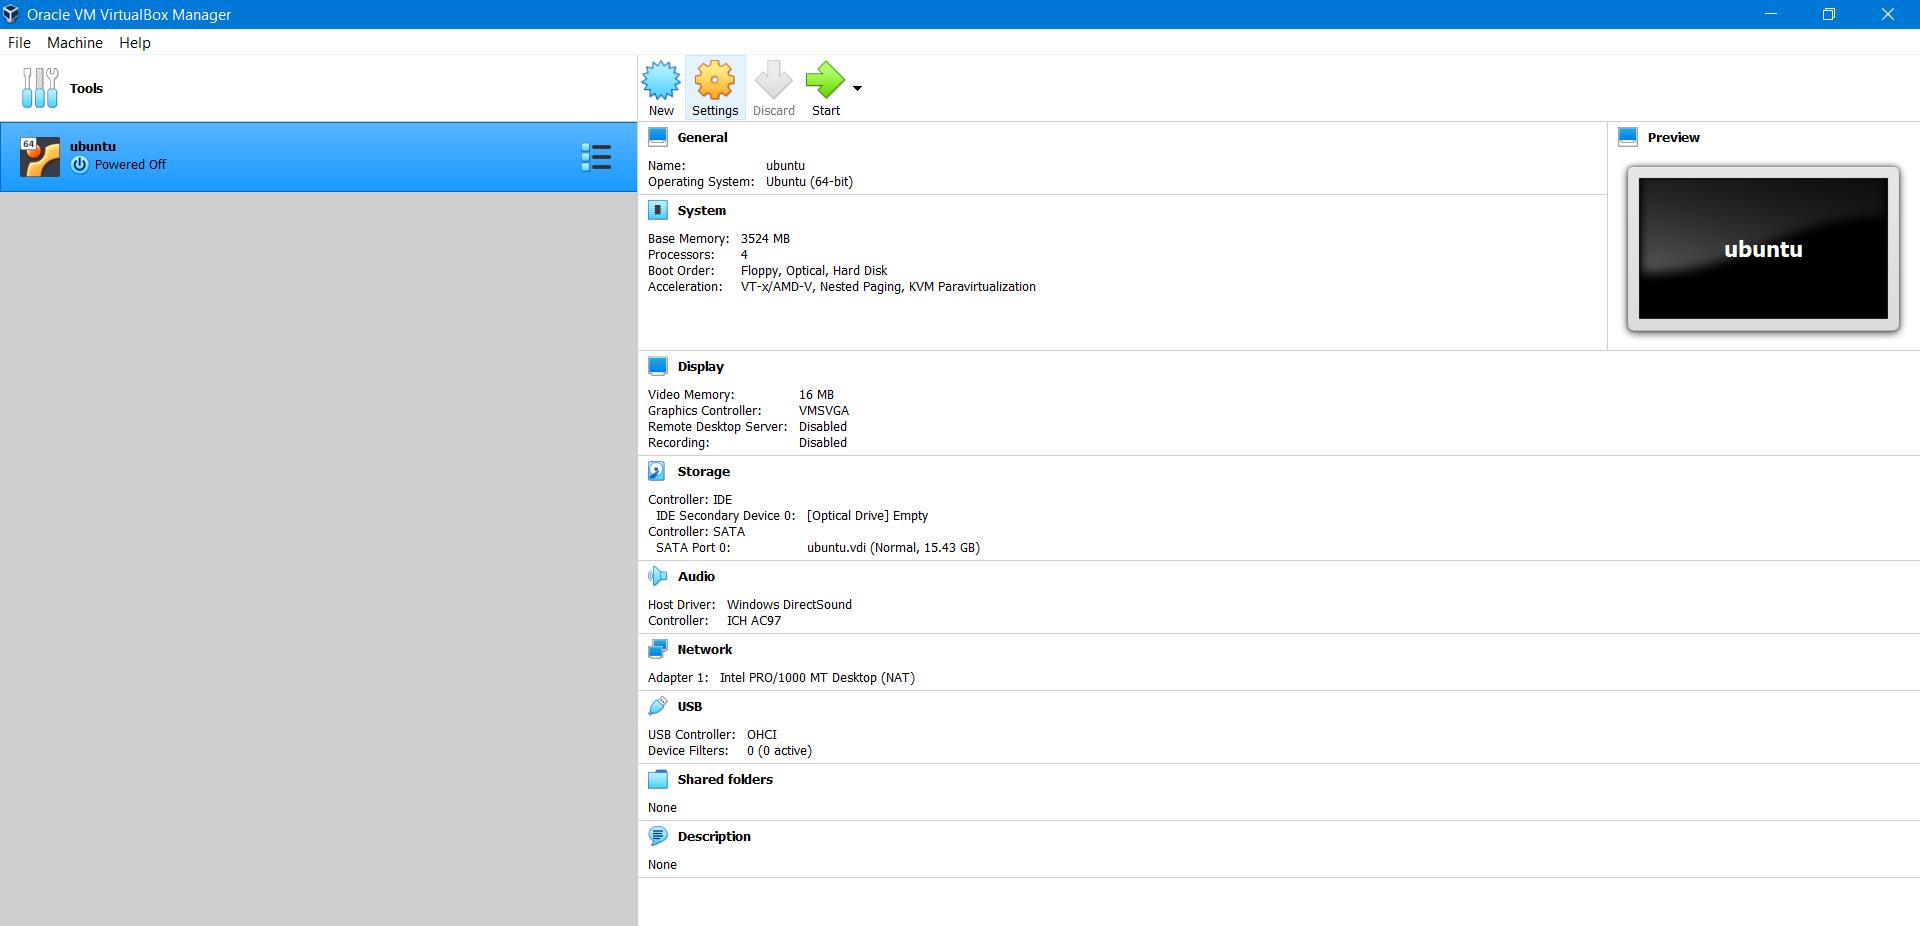
- Installing a Linux Distro Using VirtualBox
- The Command Terminal
- Nano Editor
- How to Install Additional Software
- Conclusion
- About the author
- Zeeman Memon
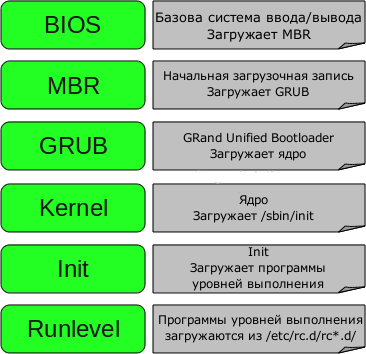
- 6 шагов загрузки Linux на пальцах
- 1. BIOS
- 2. MBR
- 3. GRUB
- 4. Ядро или Kernel
- 5. Init
- 6. Уровень выполнения программ (Runlevel)
- Дополнения, исправления, уточнения
How to Get Started with Linux
![]()
Linux is an open-source Unix-based operating system. It was first released by Linus Torvalds, but he wasn’t the only one who contributed to creating Linux. Being open-source, there were thousands of contributors and this led to the development of several distributions based on Linux. These distributions such as Ubuntu, Fedora, Arch Linux are referred to as Linux distros.
Linux was based on Unix, but it didn’t have the code of Unix – only their architecture was the same. With the emergence of an open-source OS, leading companies and technologies started preferring Linux and it replaced Unix. Today, the popularity of Linux is not the same as that of Windows, but some people and companies prefer using Linux over Windows due to Linux being lightweight, fast, secure, and open-source. The open-source factor is the primary one. Having the ability to create another OS out of it is appealing and the added security of a Linux kernel has boosted its popularity.
If you are also looking to jump on the bandwagon and try out Linux, this article should help you learn the basics of Linux and how to use it.
Choosing a Linux Distro
As stated before, there are several distributions of Linux available. Some distributions are based on others, and each has its pros and cons. So, selecting a distribution that suits your needs is important. Considering that you are just starting off with Linux, it is recommended that you choose Ubuntu, Debian, or Manjaro as they are user-friendly and easy to get started with as compared to others. Other distributions such as Arch Linux, Fedora, or Gentoo are for the people who have a good understanding of Linux and are experienced in working with it.
After choosing a Linux distro, the next step is to install it on your system. There are different methods to install and use the chosen distro on your computers. We will go through the two common ones using an external drive or by creating a virtual machine.
Installing a Linux Distro Using an External Drive
External drives refer to DVDs and USBs. If you have any of these, you can either install it on your system or use the bootable drive. But before any of that, you need to boot the distro on your system.
Start with plugging in the USB or DVD containing the distro and restart your computer. When you restart the computer, the booting process should start automatically.
In case it doesn’t, you need to change the “boot order” of your BIOS or UEFI or select a “boot device”. There are different ways of accessing the BIOS/UEFI of different systems. Figure out how to do it on your system and change the boot order or select a boot device. With the latest computers having Windows 10, you may have to disable the “Secure Boot” feature to boot a Linux distro.
Installing a Linux Distro Using VirtualBox
The second method to use Linux on your computer is through a virtual machine. VirtualBox allows users to run multiple operating systems at a single time. It creates a separate environment for the virtual machine, so you can work on your primary OS and the machine simultaneously.

To use the distro on VirtualBox, you need to first install it. Follow the steps given below.
Open your web browser and type VirtualBox in the search bar. Go to the website and select the download option.

Once you’re there, choose the package for the platform you are using as the primary OS.

Your work doesn’t end there. After installing VirtualBox, you need to set up a new virtual machine on it. There are various steps you need to go through. So if you find yourself in a pickle and if you can’t set up a virtual machine on your own, this step-by-step guide on VirtualBox should help you out.
The Command Terminal
No matter which distro you are using, the “Terminal” is the cornerstone of each one. The terminal is a CLI by which users can control their computer using executable commands. It is the primary feature of Linux, and it allows you to communicate with your computer in a deeper way. To fully enjoy Linux, mastering the terminal is important. The commands can perform anything that you can do using the GUI. Some of the basic commands you should know about are given below.
| Mkdir | Creates a directory in the directory you are present in |
| Cd | Takes you to another directory of your choice |
| Date | Gives the current date and time |
| ls | Displays the list of files and folders in a directory |
| cp | Used to copy directory, files, folders, and their contents |
| mov | Moves files, folders, and their contents |
| pwd | Shows the current working directory |
| rm | Deletes a file |
| kill | Terminates the current process |
| find | Searches for anything you want |
| rmdir | Deletes a directory |

These are some of the main commands that can be used to perform the basic everyday tasks on your system.
Nano Editor
To create text files using the Terminal, we use the GNOME Nano command-line text editor. Using Nano, you can create files of different extensions. For example, if you want to create a coded java file, we can use the command:
You can type a Java code, compile, and run it using other commands. So, you can learn Java using Linux and its Terminal as well.

How to Install Additional Software
When you successfully boot a Linux distro, some applications come built-in such as the Firefox web browser, there is the “LibreOffice” which is the Linux alternative for Microsoft Office, the “Thunderbird mail” with Ubuntu, etc. But obviously, you would want to install additional applications according to your needs and liking. To cater to this, there are Software Stores available with some distros such as Ubuntu and Fedora. For others, you can install the required software from your browser and the Terminal. Some commands let you add “repositories” of the applications, and you can install them using:

Conclusion
This article went through the ways you can install and use Linux distros on your systems. We also attempted at guiding you through the basics and how to navigate through the early problems you might face while using Linux as a beginner. The distros of Linux are quite fun to use if you get the hang of it. We hope that this article helped you out and you will enjoy the Linux experience.
About the author
Zeeman Memon
Hi there! I’m a Software Engineer who loves to write about tech. You can reach out to me on LinkedIn.
6 шагов загрузки Linux на пальцах
Нажмите кнопку включения питания на вашем системнике, и спустя несколько секунд вы увидите окно входа в систему.
Посмею предположить, что каждого интересовало хоть когда-либо то, что происходит за занавесом заставок и загрузочных экранов с момента включения питания компьютера к моменту, когда предлагается войти в систему.
Я предлагаю вам познакомиться со следующими уровнями типичной загрузки Linux:
1. BIOS
- BIOS отвечает за базовый ввод/вывод данных с устройств/на устройства.
- Делает некоторые проверки целостности устройств. К тому же, за тестирование работоспособности электроники отвечает POST (Power-on self-test, он же «тест на адекватность себя самого», выполняющийся как этап пре-загрузки), который управляется BIOS
- Ищет, загружает и выполняет программу-загрузчик ОС
- Берет загрузчик из флопика, сидюка или жесткого диска. Во время загрузки BIOS’а вы можете нажать на кнопку (обычно это F12 или F2 или Del, зависит от платформы), если вам требуется внести некоторые изменения касательно настройки железа.
- Как только загрузчик был обнаружен и загружен в память, BIOS передает управление ему.
- Короче говоря, BIOS загружает и выполняет загрузочную запись (MBR).
2. MBR
- MBR — это главная загрузочная запись, хранящаяся на жестком диске
- Она размещена в 1-м секторе загрузочного диска, например /dev/hda или /dev/sda
- MBR занимает меньше, чем 512 байтов. Она состоит из трех компонентов: 1) главная загрузочная информация, «живущая» в первых 446 байтах; 2) информация о таблице разделов — в следующих 64 байтах; 3) и последние 2 байта нужны для проверки корректности mbr.
- Она содержит информацию о GRUB’е (или LILO).
- Простыми словами — MBR загружает и выполняет загрузчик GRUB.
3. GRUB
- GRUB — Grand Unified Bootloader.
- Если в вашей системе установлено более, чем одно ядро, у вас есть возможность выбирать, которое из них должен выполняться
- GRUB отображает
красивую анимацию plymouthзаставку, и, подождав несколько секунд интерактивного воздействия пользователя, если он не нажал ни одной клавиши, он загружает ядро, установленное по умолчанию в файле конфигурации grub. - GRUB понимает, что такое файловая система (древние загрузчики Linux’а, например, LILO этого не понимают).
- Конфигурационный файл Grub обычно лежит по пути /boot/grub/grub.conf (так же /etc/grub.conf может быть символьной ссылкой на него). Вот пример файла конфигурации для CentOS:
#boot=/dev/sda
default=0
timeout=5
splashimage=(hd0,0)/boot/grub/splash.xpm.gz
hiddenmenu
title CentOS (2.6.18-194.el5PAE)
root (hd0,0)
kernel /boot/vmlinuz-2.6.18-194.el5PAE ro root=LABEL=/
initrd /boot/initrd-2.6.18-194.el5PAE.img
4. Ядро или Kernel
- Ядро монтирует файловую систему в соответствии с настройкой «root=» в фале grub.conf
- Выполняет программу /sbin/init
- Поскольку init — это первый процесс, запущенный ядром Linux, поэтому она имеет идентификатор процесса (PID) №1. Можете выполнить «ps -ef | grep init» и убедиться в этом.
- initrd — это Initial RAM Disk, он же временный диск в оперативной памяти
- initrd используется самим ядром в качестве временной корневой файловой системы, пока kernel не загрузится в реальную примонтированную файловую систему. Этот временный диск также содержит необходимые для загрузки драйверы, позволяющие получить доступ к разделам дисков и другому оборудованию
5. Init
- Смотрит в файл /etc/inittab для того, чтобы определить уровень выполнения (run level).
- Есть следующие уровни выполнения:
- 0 – прервать выполнение
- 1 – Однопользовательский режим, так называемый «Single user mode», или иными словами, консоль восстановления
- 2 – Многопользовательский режим без поддержки NFS
- 3 – Полноценный многопользовательский режим
- 4 – не используется
- 5 – X11
- 6 – перезагрузка
6. Уровень выполнения программ (Runlevel)
- Когда Линукс выполняет свою загрузку, вы можете наблюдать загрузку различных служб. К примеру, это могут быть сообщения типа «starting Postfix … OK» (запускается Postfix). Эти службы — и называются программами уровня выполнения, выполняемые из директории, которая соответствует нужному уровню выполнения.
- Исходя из настроек по умолчанию, система будет выполнять файлы в соответствии с нижеприведенными директориями.
- Выполнение уровня 0 – /etc/rc.d/rc0.d/
- Выполнение уровня 1 – /etc/rc.d/rc1.d/
- Выполнение уровня 2 – /etc/rc.d/rc2.d/
- Выполнение уровня 3 – /etc/rc.d/rc3.d/
- Выполнение уровня 4 – /etc/rc.d/rc4.d/
- Выполнение уровня 5 – /etc/rc.d/rc5.d/
- Выполнение уровня 6 – /etc/rc.d/rc6.d/
Вот и все. Возможно, некоторым из вас это не ново и особого интереса не было при чтении статью, поскольку она более ориентирована на начально-средний уровень знакомства з Линуксом.
В таком случае могу лишь сказать, что «повторение — мать учения» (с).Дополнения, исправления, уточнения
- artemlight:: «Ну скажем прямо — так грузятся далеко не все дистры». С ним согласилось большинство, отмечая и bsd-style init, u-boot, и хоть initrd в статье пропущен, стоить заметить, что он нужен ядру не во всех дистрибутивах. Также отмечено, что в slackware поддержка rc.d осуществляется только в качестве совместимости, а встраиваемые системы грузятся иначе. На декстопах иногда бывает EFI, а кроме того Linux популярен в мире embedded и там ещё куча разных платформ. Линукс в телефоне вообще иначе грузится.
- soomrack, ссылая на википедию: Еще хочется сделать замечание по поводу MBR, первого сектора и пр. Все несколько усложнилось за последние годы. Сейчас уместней говорить о EFI.