- Getting started
- And a Code Editor
- What is Python, exactly?
- Opening a console on Mac OS X
- Opening a console on Linux
- Opening a console on Windows
- Using Python
- Interacting With Python
- Exercise
- Solution
- 2. Using Python on Unix platforms
- 2.1. Getting and installing the latest version of Python
- 2.1.1. On Linux
- 2.1.2. On FreeBSD and OpenBSD
- 2.1.3. On OpenSolaris
- 2.2. Building Python
- 2.3. Python-related paths and files
- 2.4. Miscellaneous
- 2.5. Custom OpenSSL
- Starting with python on linux
- Запуск интерпретатора
- Создание файла программы
Getting started
If you haven’t yet got python, the latest official installation packages can be found here:
Python 3 is preferable, being the newest version out!
On Windows, you’ll want to add Python to your PATH, so it can be found by other programs. With Python 3.5 or later, there should be and option to do this in the installer. Otherwise, you can navigate to your installation directory ( C:\Python34\ ), open the Tools , then Scripts folder, and run the win_add2path.py file by double clicking on it.
And a Code Editor
A code editor helps with reading and writing programming code. There are many around, and it is one of the most personal choices a programmer can make — Like a tennis-player choosing their racket, or a chef choosing their favourite knife. To start off with, you’ll just want a basic, easy-to-use one that doesn’t get in your way, but is still effective at writing python code. Here are some suggestions for those:
- Atom: A new code editor available for Windows, Mac and Linux. It’s an open-source project developed by GitHub and is very easy to add functionality for, with its packages system.
- Sublime Text: A great all around editor that’s easy to use. It’s Ctl+B shortcut lets you run the python file you’re working on straight away. Runs on Windows, Mac and Linux.
- Geany: A simple editor that doesn’t aim to be too complicated. Available on Windows and Linux (you can probably find it in your package manager).
- TextMate: One of the most famous code editors for Mac, it used to be a paid product but has since been open-sourced.
- Gedit and Kate: if you run Linux using Gnome or KDE respectively, you might already have one of these two installed!
- Komodo Edit: a sleak, free editor for Mac, Windows and Linux, based on the more powerful Komodo IDE.
If you’d like our recommendation, try out Sublime Text first.
Wordpad, TextEdit, Notepad, and Word are not suitable code editors.
What is Python, exactly?
Ok, so python is this thing called a programming language. It takes text that you’ve written (usually referred to as code), turns it into instructions for your computer, and runs those instructions. We’ll be learning how to write code to do cool and useful stuff. No longer will you be bound to use others’ programs to do things with your computer — you can make your own!
Practically, Python is just another program on your computer. The first thing to learn is how to use and interact with it. There are in fact many ways to do this; the first one to learn is to interact with python’s interpreter, using your operating system’s (OS) console.
A console (or ‘terminal’, or ‘command prompt’) is a textual way to interact with your OS, just as the ‘desktop’, in conjunction with your mouse, is the graphical way to interact your system.
Opening a console on Mac OS X
OS X’s standard console is a program called Terminal. Open Terminal by navigating to Applications, then Utilities, then double-click the Terminal program. You can also easily search for it in the system search tool in the top right.
The command line Terminal is a tool for interacting with your computer. A window will open with a command line prompt message, something like this:
Opening a console on Linux
Different linux distributions (e.g Ubuntu, Fedora, Mint) may have different console programs, usually referred to as a terminal. The exact terminal you start up, and how, can depend on your distribution. On Ubuntu, you will likely want to open Gnome Terminal. It should present a prompt like this:
Opening a console on Windows
Window’s console is called the Command Prompt, named cmd. An easy way to get to it is by using the key combination Windows+R ( Windows meaning the windows logo button), which should open a Run dialog. Then type cmd and hit Enter or click Ok . You can also search for it from the start menu. It should look like:
Window’s Command Prompt is not quite as powerful as its counterparts on Linux and OS X, so you might like to start the Python Interpreter (see just below) directly, or using the IDLE program that Python comes with. You can find these in the Start menu.
Using Python
The python program that you have installed will by default act as something called an interpreter. An interpreter takes text commands and runs them as you enter them — very handy for trying things out.
Just type python at your console, hit Enter , and you should enter Python’s Interpreter.
To find out which version of python you’re running, instead type python -V in your console to tell you.
Interacting With Python
After Python opens, it will show you some contextual information similar to this:
Python 3.5.0 (default, Sep 20 2015, 11:28:25) [GCC 5.2.0] on linux Type "help", "copyright", "credits" or "license" for more information. >>>
The prompt >>> on the last line indicates that you are now in an interactive Python interpeter session, also called the “Python shell”. This is different from the normal terminal command prompt!
You can now enter some code for python to run. Try:
Press Enter and see what happens. After showing the results, Python will bring you back to the interactive prompt, where you could enter another command:
>>> print("Hello world") Hello world >>> (1 + 4) * 2 10
An extremely useful command is help() , which enters a help functionality to explore all the stuff python lets you do, right from the interpreter. Press q to close the help window and return to the Python prompt.
To leave the interactive shell and go back to the console (the system shell), press Ctrl-Z and then Enter on Windows, or Ctrl-D on OS X or Linux. Alternatively, you could also run the python command exit() !
Exercise
Just above we demonstrated entering a command to figure out some math. Try some math commands of your own! What operations does python know? Get it to tell you what 239 and 588 added together, and then squared is.
Solution
Here are some ways you might have got the answer:
>>> 239 + 588 827 >>> 827 * 827 683929
>>> (239 + 588) * (239 + 588) 683929
2. Using Python on Unix platforms
2.1. Getting and installing the latest version of Python
2.1.1. On Linux
Python comes preinstalled on most Linux distributions, and is available as a package on all others. However there are certain features you might want to use that are not available on your distro’s package. You can easily compile the latest version of Python from source.
In the event that Python doesn’t come preinstalled and isn’t in the repositories as well, you can easily make packages for your own distro. Have a look at the following links:
2.1.2. On FreeBSD and OpenBSD
pkg_add -r python pkg_add ftp://ftp.openbsd.org/pub/OpenBSD/4.2/packages//python-.tgz
pkg_add ftp://ftp.openbsd.org/pub/OpenBSD/4.2/packages/i386/python-2.5.1p2.tgz
2.1.3. On OpenSolaris
You can get Python from OpenCSW. Various versions of Python are available and can be installed with e.g. pkgutil -i python27 .
2.2. Building Python
If you want to compile CPython yourself, first thing you should do is get the source. You can download either the latest release’s source or just grab a fresh clone. (If you want to contribute patches, you will need a clone.)
The build process consists of the usual commands:
./configure make make install
Configuration options and caveats for specific Unix platforms are extensively documented in the README.rst file in the root of the Python source tree.
make install can overwrite or masquerade the python3 binary. make altinstall is therefore recommended instead of make install since it only installs exec_prefix /bin/python version .
2.3. Python-related paths and files
These are subject to difference depending on local installation conventions; prefix and exec_prefix are installation-dependent and should be interpreted as for GNU software; they may be the same.
For example, on most Linux systems, the default for both is /usr .
Recommended location of the interpreter.
prefix /lib/python version , exec_prefix /lib/python version
Recommended locations of the directories containing the standard modules.
prefix /include/python version , exec_prefix /include/python version
Recommended locations of the directories containing the include files needed for developing Python extensions and embedding the interpreter.
2.4. Miscellaneous
To easily use Python scripts on Unix, you need to make them executable, e.g. with
and put an appropriate Shebang line at the top of the script. A good choice is usually
which searches for the Python interpreter in the whole PATH . However, some Unices may not have the env command, so you may need to hardcode /usr/bin/python3 as the interpreter path.
To use shell commands in your Python scripts, look at the subprocess module.
2.5. Custom OpenSSL
- To use your vendor’s OpenSSL configuration and system trust store, locate the directory with openssl.cnf file or symlink in /etc . On most distribution the file is either in /etc/ssl or /etc/pki/tls . The directory should also contain a cert.pem file and/or a certs directory.
$ find /etc/ -name openssl.cnf -printf "%h\n" /etc/ssl
$ curl -O https://www.openssl.org/source/openssl-VERSION.tar.gz $ tar xzf openssl-VERSION $ pushd openssl-VERSION $ ./config \ --prefix=/usr/local/custom-openssl \ --libdir=lib \ --openssldir=/etc/ssl $ make -j1 depend $ make -j8 $ make install_sw $ popd
$ pushd python-3.x.x $ ./configure -C \ --with-openssl=/usr/local/custom-openssl \ --with-openssl-rpath=auto \ --prefix=/usr/local/python-3.x.x $ make -j8 $ make altinstall
Patch releases of OpenSSL have a backwards compatible ABI. You don’t need to recompile Python to update OpenSSL. It’s sufficient to replace the custom OpenSSL installation with a newer version.
Starting with python on linux
Для создания программ на Python нам потребуется интерпретатор. Стоит отметить, что в некоторых дистрибутивах Linux (например, в Ubuntu) Python может быть установлен по умолчанию. Для проверки версии Python в терминале надо выполнить следующую команду
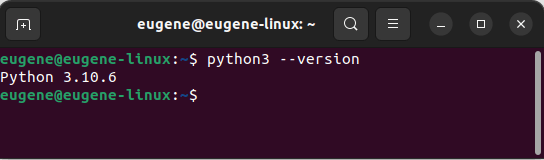
Если Python установлен, то она отобразит версию интерпретатора.
Однако даже если Python установлен, его версия может быть не самой последней. Для установки последней доступной версии Python выполним следующую команду:
sudo apt-get update && sudo apt-get install python3
Если надо установить не последнюю доступную, а какую-то определенную версию, то указывается также подверсия Python. Например, установка версии Python 3.10:
sudo apt-get install python3.10
Соответственно, установка версии Python 3.11:
sudo apt-get install python3.11
Запуск интерпретатора
После установки интерпретатора, как было описано в прошлой теме, мы можем начать создавать приложения на Python. Итак, создадим первую простенькую программу. Для этого введем в терминале
В результате запускается интерпретатор Python. Введем в него следующую строку:
И консоль выведет строку «hello METANIT.COM»:
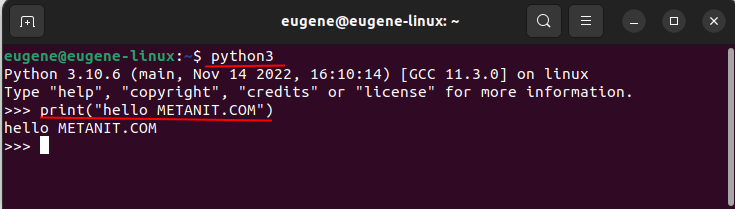
Для этой программы использовалась функция print() , которая выводит некоторую строку на консоль.
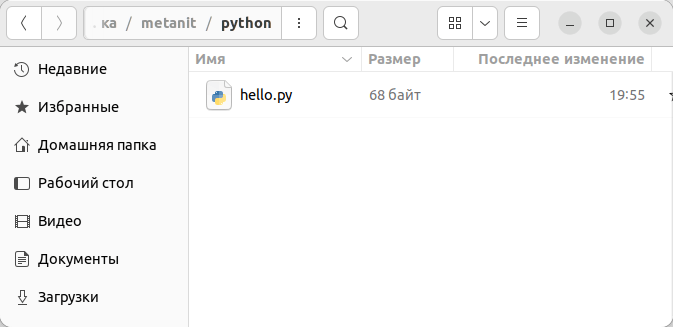
Создание файла программы
В реальности, как правило, программы определяются во внешних файлах-скриптах и затем передаются интерпретатору на выполнение. Поэтому создадим файл программы. Для этого определим для скриптов папку python . А в этой папке создадим новый текстовый файл, который назовем hello.py . По умолчанию файлы с кодом на языке Python, как правило, имеют расширение py .
Откроем этот файл в любом текстовом редакторе и добавим в него следующий код:
name = input("Введите имя: ") print("Привет,", name) 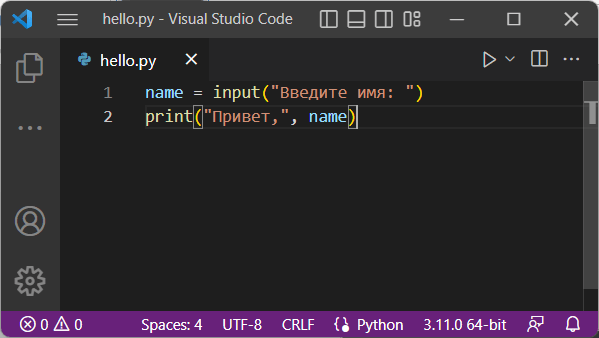
Скрипт состоит из двух строк. Первая строка с помощью функции input() ожидает ввода пользователем своего имени. Введенное имя затем попадает в переменную name .
Вторая строка с помощью функции print() выводит приветствие вместе с введенным именем.
Теперь запустим терминал и с помощью команды cd перейдем к папке, где находится файл с исходным кодом hello.py (например, в моем случае это папка metanit/python в каталоге текущего пользователя). И затем выполним код в hello.py с помощью следующей команды
В итоге программа выведет приглашение к вводу имени, а затем приветствие.