- How to set static IP address for Wi-Fi connection on Ubuntu phone?
- 2 Answers 2
- Как настроить статический IP-адрес в Ubuntu Server 20.04
- Определение сетевых интерфейсов
- Настройки локальной сети
- Настройки беспроводной сети
- Применение конфигурации
- Подключение по SSH
- Пример конфигурации
- How to set a static ip on Ubuntu 18.04 LTS
- After reboot
How to set static IP address for Wi-Fi connection on Ubuntu phone?
We need to set a static IP address (and DNS etc.) to connect to our workplace Wi-Fi, but I couldn’t find an option on my bq Aquaris E5 device. How should I do it?
There is a year old feature request to implement this setting pad.lv/1445772, but sadly not much activity. I’m here asking for a workaround.
@mikeymop: Could you please convert that to an answer so that schmucks like me who go around hunting for unanswered questions don’t have to look at this one any more? 😉 (And I’ll upvote if you drop me a note and it’s a good one too!)
If you run do a $less /etc/NetworkManager/system-settings > ~/networkSettings.txt and upload the file it leaves in your home folder I can better tailor my answer for you.
2 Answers 2
As suggested you can modify
/etc/NetworkManager/system-settings A quick Google search reveals this guide
With a text editor. This is in XML format, if you’re unfamiliar don’t be afraid. Skim through the whole thing, it’s like a settings screen.
You need to determine which device is represented by your WiFi adapter.
Find your wifi connection information
Look for the connection that is related to wlan0, this will show you both the SSID (wifi name) and the ip address assigned to the phone.
Keep all of this information handy as you’ll need to write a configuration file.
Open terminal on your device as a superuser.
#cd /etc/NetworkManager/system-connections #ls # cat [name of wireless device wlan0] This will list the formatting of the automatic wireless configuration that will made when you connected to your wifi network, use this as a base to make you static ip address assignment.
$sudo apt-get install vim $sudo vim [name of wireless device wlan0] Look in this file for the header that says [ipv6] ,hit ‘i’ to switch to insert mode, and change the line below it to show method=ignore
Move on to the header for [ipv4] and make the following changes:
[ipv4] method=manual address1=[staticIP/netmask],[default ip route] dns=8.8.8.8;[your ISP's DNS address]; You can save these changes by hitting escape and typing :wq
Turn off wifi and turn it back on.
You should suggest a different text editor than vim. You also didn’t specify how to get vim into insert mode. Just change it to something like nano.
Once you boot into Ubuntu Touch, connect to the chosen Wi-Fi network. Then, drop to the shell prompt.
Then check the current IP address of your device and verify if it’s the same IP as Android. If not, then follow the steps below.
root@ubuntu-phablet:~# ip addr show wlan0 Navigate to the NetworkManager folder and look for the Wi-Fi SSID name
cd /etc/NetworkManager/system-connections ls cat YOURWIFINAME Your wifi connection should look like this:
[connection] uuid=WIRELESS-UUID type=802-11-wireless [802-11-wireless] ssid=WIFISSID mode=infrastructure mac-address=WIRELESS:CARD:MAC:ADDRESS [ipv6] method=auto [ipv4] method=auto To change to static IP and ignore IPV6 address, you will need to change the sections in [ipv6] and [ipv4]. The changes to be made are shown in the file below in bold,italics. Use the vi editor to edit the file (don’t use up and down arrow keys in edit mode). Nano, which is the default editor in Ubuntu Touch,did not allow me to save the file due to some reason.
[connection] uuid=WIRELESS-UUID type=802-11-wireless [802-11-wireless] ssid=WIFISSID
mode=infrastructure mac-address=WIRELESS:CARD:MAC:ADDRESS [ipv6]
method=ignore [ipv4] method=manual
address1=your.device.ip.address/netmask,your.default.ip.route
# The following is Google’s DNS, works everywhere.
dns=8.8.8.8
# or use your DNS IP address
Save the file. Disconnect and reconnect the Wi-Fi from the Ubuntu Touch UI to get the static IP going. You can verify the ip using the command:
Как настроить статический IP-адрес в Ubuntu Server 20.04
Настройка сети в Ubuntu Server 20.04 LTS осуществляется через утилиту Netplan.
NetPlan — это инструмент для управления настройками сети, представленный в Ubuntu начиная с версии 17.10 и выше.
Этот инструмент заменяет файл статических интерфейсов /etc/network/interfaces , который ранее использовался для настройки сетевых интерфейсов в Ubuntu. Теперь нужно использовать /etc/netplan/*.yaml для ваших изменений в настройках сетевых интерфейсов.
Определение сетевых интерфейсов
Определите все доступные сетевые интерфейсы используя команду ip или lshw :
sudo ip a // Или sudo lshw -class network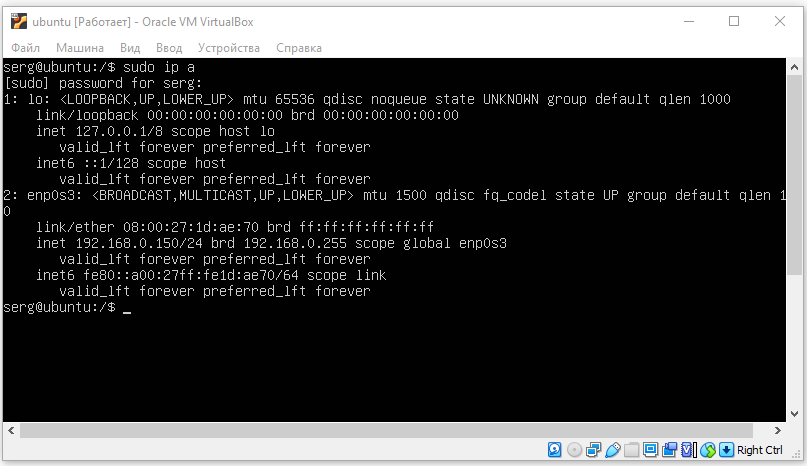
У меня уже настроен IP адрес: 192.169.0.150. Я изменю его.
Настройки локальной сети
Отредактируйте файл конфигурации netplan который находится в директории /etc/netplan/ :
sudo vim /etc/netplan/00-installer-config.yaml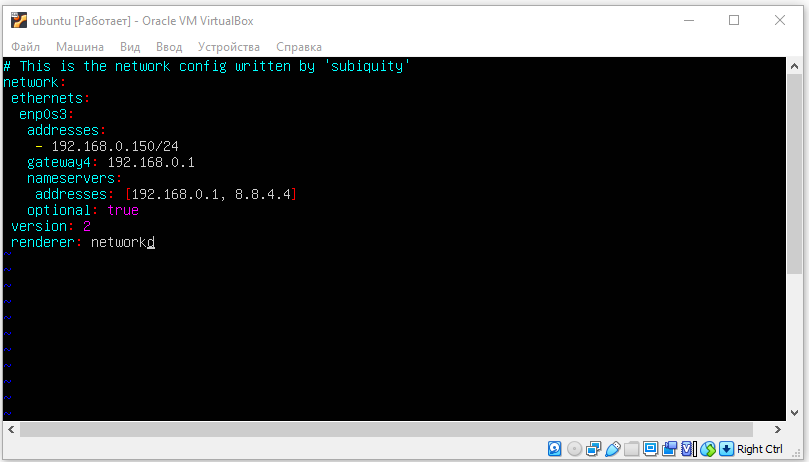
Здесь придётся прописать всё ручками, если у вас ещё нет доступа по SSH. У меня этот файл уже редактировался, мне необходимо изменить только IP адрес.
Основные настройки:
- addresses — ip адрес который будет назначен вашей сетевой карте.
- gateway4 — ip адрес вашего роутера.
- nameservers — DNS сервера. Первый — наш роутер.
- search — домен в котором будет произведен поиск. Домен можно настроить при помощи DNS сервера
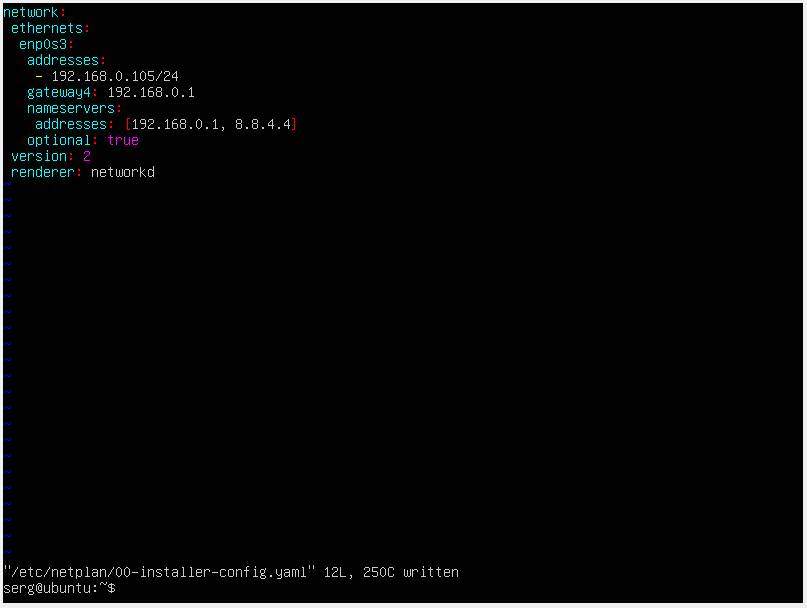
Мои настройки:
network: ethernets: enp0s3: addresses: - 192.168.0.105/24 gateway4: 192.168.0.1 nameservers: addresses: [192.168.0.1, 8.8.4.4] optional: true version: 2 renderer: networkdВАЖНО!
Обратите внимание на пробелы! Именно пробелы должны быть, а не табуляция. Если у вас после сохранения файла не появилась ошибка типа: Error while loading /etc/netplan/00-installer-config.yaml, то файл отредактирован правильно с точки зрения его синтаксиса.
После редактирования файла: Esc -> Shift + : -> wq! -> Enter .
Если есть необходимость передать управление сетевыми устройствами утилите NetworkManager:
network: version: 2 renderer: NetworkManagerНастройки беспроводной сети
Для корректной работы беспроводного интерфейса вам потребуется установить утилиту WPA supplicant , которая позволяет подключиться к точкам доступа с WPA. WPA и WPA2:
sudo apt install wpasupplicantДобавьте новый файл конфигурации в каталог /etc/netplan/ :
sudo vim /etc/netplan/01-config.yamlОтредактируйте файл конфигурации беспроводной сети с динамическим ip-адресом (DHCP):
network: version: 2 renderer: networkd wifis: wlp3s0: dhcp4: yes dhcp6: no access-points: "network_ssid_name": password: "**********"Для беспроводной сети в которой используются статические ip-адреса подойдет следующая конфигурация:
network: version: 2 renderer: networkd wifis: wlp3s0: dhcp4: no dhcp6: no addresses: [192.168.0.21/24] gateway4: 192.168.0.1 nameservers: addresses: [192.168.0.1, 8.8.8.8] access-points: "network_ssid_name": password: "**********"Применение конфигурации
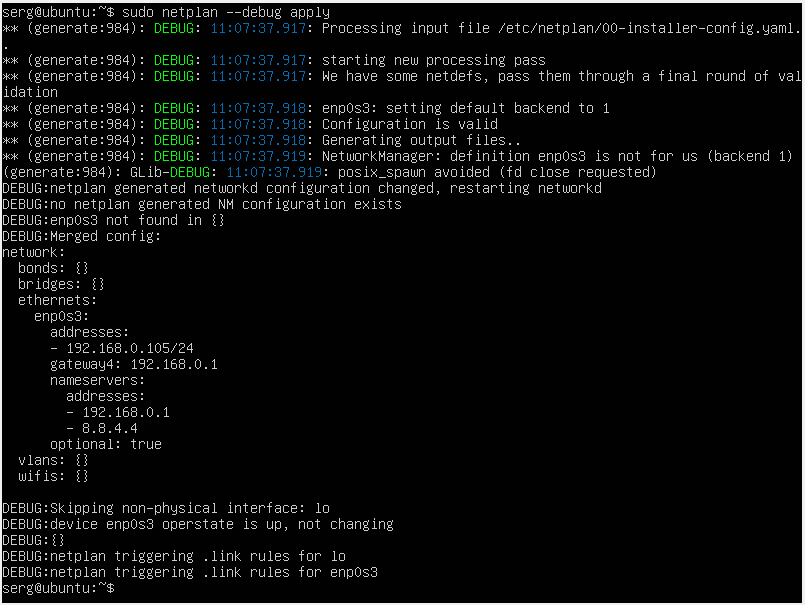
Использование netplan для генерации необходимой конфигурации:
Для подробного вывода информации при генерации, используйте опцию —debug :
sudo netplan --debug generateПрименение конфигурации netplan:
Для подробного вывода информации при применении, используйте опцию —debug :
Далее рекомендуется перезапустить интерфейсы или перезагрузить сервер:
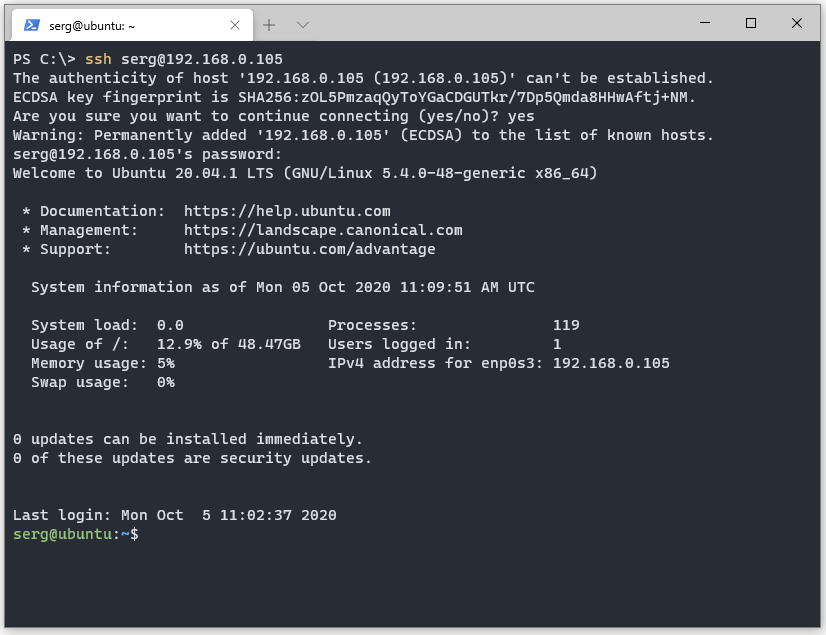
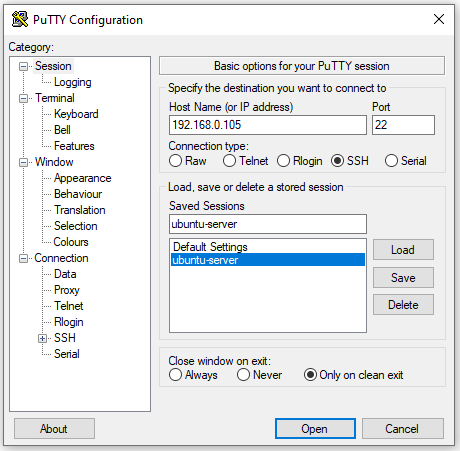
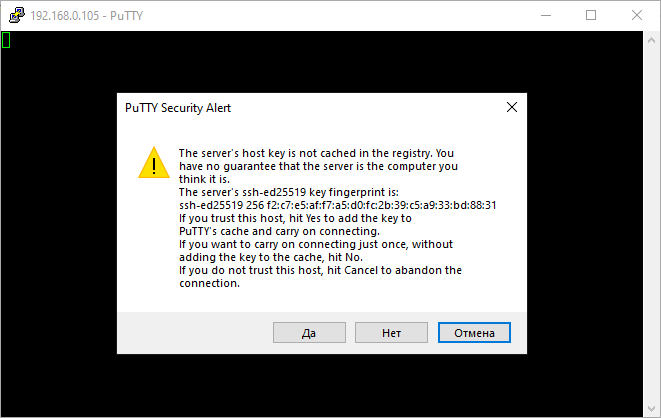
Подключение по SSH
В Windows PowerShell:
Используем Putty. Указываем IP адрес и задаем имя сессии, жмём Open:
При первом подключении к серверу мы увидим сообщение. Жмём ДА.
Вводим имя пользователя и пароль. Если всё прошло успешно, увидим:
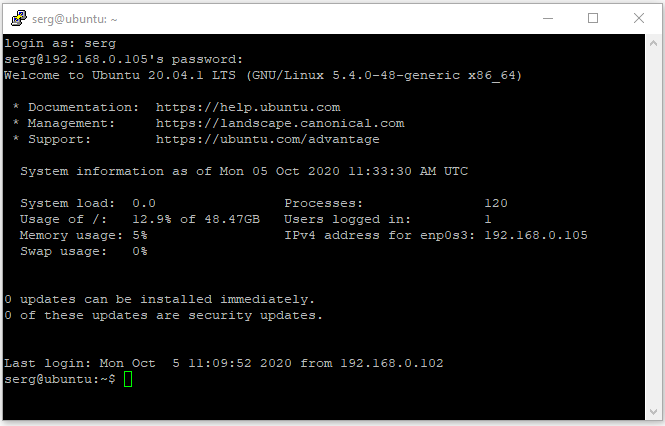
На этом настройка статического IP-адреса в Ubuntu Server 20.04 LTS закончена.
Пример конфигурации
Пример, который показывает большинство доступных функций:
network: version: 2 # if specified, can only realistically have that value, as networkd cannot # render wifi/3G. renderer: NetworkManager ethernets: # opaque ID for physical interfaces, only referred to by other stanzas wlp3s0: match: macaddress: 00:11:22:33:44:55 wakeonlan: true dhcp4: true addresses: - 192.168.14.2/24 - 192.168.14.3/24 - "2001:1::1/64" gateway4: 192.168.14.1 gateway6: "2001:1::2" nameservers: search: [foo.local, bar.local] addresses: [8.8.8.8] routes: - to: 0.0.0.0/0 via: 11.0.0.1 table: 70 on-link: true metric: 3 routing-policy: - to: 10.0.0.0/8 from: 192.168.14.2/24 table: 70 priority: 100 - to: 20.0.0.0/8 from: 192.168.14.3/24 table: 70 priority: 50 # only networkd can render on-link routes and routing policies renderer: networkd lom: match: driver: ixgbe # you are responsible for setting tight enough match rules # that only match one device if you use set-name set-name: lom1 dhcp6: true switchports: # all cards on second PCI bus unconfigured by # themselves, will be added to br0 below # note: globbing is not supported by NetworkManager match: name: enp2* mtu: 1280 wifis: all-wlans: # useful on a system where you know there is # only ever going to be one device match: <> access-points: "Joe's home": # mode defaults to "infrastructure" (client) password: "s3kr1t" # this creates an AP on wlp1s0 using hostapd # no match rules, thus the ID is the interface name wlp1s0: access-points: "guest": mode: ap # no WPA config implies default of open bridges: # the key name is the name for virtual (created) interfaces # no match: and set-name: allowed br0: # IDs of the components; switchports expands into multiple interfaces interfaces: [wlp1s0, switchports] dhcp4: trueПодробнее об использовании Netplan здесь.
How to set a static ip on Ubuntu 18.04 LTS
The goal is to set a static ip for a wifi device on a machine called myhost, which is running Ubuntu 18.04 LTS. The device name is wlp1s0, and the desired ip address is 192.168.1.10. All attempts have failed. Sequence of steps: 1) Identify ip:
$ ip route default via 192.168.1.254 dev wlp1s0 proto dhcp metric 600 169.254.0.0/16 dev wlp1s0 scope link metric 1000 192.168.1.0/24 dev wlp1s0 proto kernel scope link src 192.168.1.154 metric 600 $ route -n Kernel IP routing table Destination Gateway Genmask Flags Metric Ref Use Iface 0.0.0.0 192.168.1.254 0.0.0.0 UG 600 0 0 wlp1s0 169.254.0.0 0.0.0.0 255.255.0.0 U 1000 0 0 wlp1s0 192.168.1.0 0.0.0.0 255.255.255.0 U 600 0 0 wlp1s0 $ cat /etc/resolv.conf # Dynamic resolv.conf(5) file for glibc resolver(3) generated by resolvconf(8) # DO NOT EDIT THIS FILE BY HAND -- YOUR CHANGES WILL BE OVERWRITTEN # 127.0.0.53 is the systemd-resolved stub resolver. # run "systemd-resolve --status" to see details about the actual nameservers. nameserver 127.0.0.1 search attlocal.net cat /etc/network/interfaces # interfaces(5) file used by ifup(8) and ifdown(8) auto lo iface lo inet loopback auto wlp1s0 iface wlp1s0 inet static address 192.168.1.10 netmask 255.255.255.0 gateway 192.168.1.254 cat /etc/hosts 127.0.0.1 localhost 192.168.1.10 myhost # The following lines are desirable for IPv6 capable hosts ::1 ip6-localhost ip6-loopback fe00::0 ip6-localnet ff00::0 ip6-mcastprefix ff02::6 ip6-allnodes ff02::2 ip6-allrouters 192.168.1.180 mysystem.mydomain sudo ip link set wlp1s0 up After reboot
$ ip route default via 192.168.1.254 dev wlp1s0 onlink linkdown 169.254.0.0/16 dev wlp1s0 scope link metric 1000 linkdown 192.168.1.0/24 dev wlp1s0 proto kernel scope link src 192.168.1.10 linkdown $ route -n Kernel IP routing table Destination Gateway Genmask Flags Metric Ref Use Iface 0.0.0.0 192.168.1.254 0.0.0.0 UG 0 0 0 wlp1s0 169.254.0.0 0.0.0.0 255.255.0.0 U 1000 0 0 wlp1s0 192.168.1.0 0.0.0.0 255.255.255.0 U 0 0 0 wlp1s0 $ dmesg | grep wlp1s0 [ 37.095682] iwlwifi 0000:01:00.0 wlp1s0: renamed from wlan0 [ 38.911441] IPv6: ADDRCONF(NETDEV_UP): wlp1s0: link is not ready cat /etc/network/interfaces # interfaces(5) file used by ifup(8) and ifdown(8) auto lo iface lo inet loopback auto wlp1s0 iface wlp1s0 inet static address 192.168.1.10 netmask 255.255.255.0 gateway 192.168.1.254 dns-nameservers 192.168.1.254