- WiFi Web Client
- Hardware Required
- Circuit
- Code
- See Also:
- WiFi class
- WiFi.begin()
- Синтаксис
- Параметры
- Возвращаемые значения
- WiFi.disconnect()
- Синтаксис
- Параметры
- Возвращаемые значения
- WiFi.config()
- Синтаксис
- Параметры
- Возвращаемые значения
- WiFi.setDNS()
- Синтаксис
- Параметры
- Возвращаемые значения
- WiFi.SSID()
- Синтаксис
- Параметры
- Возвращаемые значения
- WiFi.BSSID()
- Синтаксис
- Параметры
- Возвращаемые значения
- WiFi.RSSI()
- Синтаксис
- Параметры
- Возвращаемые значения
- WiFi.encryptionType()
- Синтаксис
- Параметры
- Возвращаемые значения
- WiFi.scanNetworks()
- Синтаксис
- Параметры
- Возвращаемые значения
- WiFi.status()
- Синтаксис
- Параметры
- Возвращаемые значения
- WiFi.getSocket()
- Синтаксис
- Параметры
- Возвращаемые значения
- WiFi.macAddress()
- Синтаксис
- Параметры
- Возвращаемые значения
- Железо
- WiFi — client.available()
- Syntax
- Parameters
- Returns
- Example
- Введение. Подключение к WiFi
- Подключение к роутеру
- Создание точки доступа
WiFi Web Client
This example shows you how to make a HTTP request using a WiFi shield. It returns a Google search for the term «Arduino». The results of this search are viewable as HTML through your Arduino Software (IDE) serial window.
This example is written for a network using WPA encryption. For WEP or WPA, change the Wifi.begin() call accordingly.
Hardware Required
Circuit
The WiFi shield uses pins 10, 11, 12, and 13 for the SPI connection to the HDG104 module. Digital pin 4 is used to control the slave select pin on the SD card.
You should have access to a 802.11b/g wireless network that connects to the internet for this example. You will need to change the network settings in the sketch to correspond to your particular networks SSID.
For networks using WPA/WPA2 Personal encryption, you need the SSID and password. The shield will not connect to networks using WPA2 Enterprise encryption.
WEP network passwords are hexadecimal strings known as keys. A WEP network can have 4 different keys; each key is assigned a «Key Index» value. For WEP encrypted networks, you need the SSID, the key, and key number.
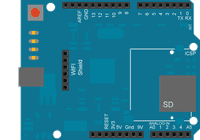
image developed using Fritzing. For more circuit examples, see the Fritzing project page
In the above image, the Arduino board would be stacked below the WiFi shield.
Code
/* Web client This sketch connects to a website (http://www.google.com) using a WiFi shield. This example is written for a network using WPA encryption. For WEP or WPA, change the Wifi.begin() call accordingly. This example is written for a network using WPA encryption. For WEP or WPA, change the Wifi.begin() call accordingly. Circuit: * WiFi shield attached created 13 July 2010 by dlf (Metodo2 srl) modified 31 May 2012 by Tom Igoe */ #include #include char ssid[] = "yourNetwork"; // your network SSID (name) char pass[] = "secretPassword"; // your network password (use for WPA, or use as key for WEP) int keyIndex = 0; // your network key Index number (needed only for WEP) int status = WL_IDLE_STATUS; // if you don't want to use DNS (and reduce your sketch size) // use the numeric IP instead of the name for the server: //IPAddress server(74,125,232,128); // numeric IP for Google (no DNS) char server[] = "www.google.com"; // name address for Google (using DNS) // Initialize the Ethernet client library // with the IP address and port of the server // that you want to connect to (port 80 is default for HTTP): WiFiClient client; void setup() //Initialize serial and wait for port to open: Serial.begin(9600); while (!Serial) ; // wait for serial port to connect. Needed for native USB port only > // check for the presence of the shield: if (WiFi.status() == WL_NO_SHIELD) Serial.println("WiFi shield not present"); // don't continue: while (true); > String fv = WiFi.firmwareVersion(); if (fv != "1.1.0") Serial.println("Please upgrade the firmware"); > // attempt to connect to Wifi network: while (status != WL_CONNECTED) Serial.print("Attempting to connect to SSID: "); Serial.println(ssid); // Connect to WPA/WPA2 network. Change this line if using open or WEP network: status = WiFi.begin(ssid, pass); // wait 10 seconds for connection: delay(10000); > Serial.println("Connected to wifi"); printWifiStatus(); Serial.println("\nStarting connection to server. "); // if you get a connection, report back via serial: if (client.connect(server, 80)) Serial.println("connected to server"); // Make a HTTP request: client.println("GET /search?q=arduino HTTP/1.1"); client.println("Host: www.google.com"); client.println("Connection: close"); client.println(); > > void loop() // if there are incoming bytes available // from the server, read them and print them: while (client.available()) char c = client.read(); Serial.write(c); > // if the server's disconnected, stop the client: if (!client.connected()) Serial.println(); Serial.println("disconnecting from server."); client.stop(); // do nothing forevermore: while (true); > > void printWifiStatus() // print the SSID of the network you're attached to: Serial.print("SSID: "); Serial.println(WiFi.SSID()); // print your WiFi shield's IP address: IPAddress ip = WiFi.localIP(); Serial.print("IP Address: "); Serial.println(ip); // print the received signal strength: long rssi = WiFi.RSSI(); Serial.print("signal strength (RSSI):"); Serial.print(rssi); Serial.println(" dBm"); > See Also:
- WiFi library — Your reference for the WiFi Library.
- WiFi Shield — Product details for the retired WiFi Shield.
- Getting started — Getting started with the retired WiFi Shield.
- Connect No Encryption — Demonstrates how to connect to an open network.
- Connect With WEP — Demonstrates how to connect to a network that is encrypted with WEP.
- Connect With WPA — Demonstrates how to connect to a network that is encrypted with WPA2 Personal.
- Scan Networks — Displays all WiFi networks in range.
- Simple Web Server WiFi — Turn on and off an LED accessing this simple Web Server.
- UDP NTP Client — Query a Network Time Protocol (NTP) server using UDP.
- WiFi Chat Server — Set up a simple chat server.
- WiFi Web Client Repeating — Repeatedly make HTTP calls to a server.
- WiFi Web Server — Serve a webpage from the WiFi shield with Analog Input values.
- WiFi Send Receive UDP String — Send and receive a UDP string.
Last revision 2018/08/23 by SM
WiFi class
Основной класс для работы с подключением к WiFi. Необходим для подключения ESP32, ESP 8266, а так же ардуинок с WiFi шилдом.
WiFi.begin()
Инициализирует подключение по заданным параметрам и возвращает текущий статус.
Синтаксис
WiFi.begin(ssid, keyIndex, key, pass);Параметры
ssid — Необязательный параметр. Имя точки доступа к которой вы хотите подключиться
keyIndex — Необязательный параметр. Сети использующие WEP шифрование могут иметь до 4 ключей. Этот параметр указывает индекс ключа который вы хотите использовать.
key — Необязательный параметр. Шестнадцатеричная строка, используемая как ключ безопасности для WEP сетей.
pass — Необязательный параметр. Сети с шифрованием WPA используют пароль в виде строки от 8 символов.
Возвращаемые значения
WiFi.disconnect()
Отключение от текущей сети
Синтаксис
Параметры
Возвращаемые значения
WiFi.config()
Позволяет установить статический IP адрес, сменить DNS, шлюз и адрес подсети.
Синтаксис
WiFi.config(ip, dns, gateway, subnet);Параметры
ip — IP адрес устройства (массив из 4 байт)
dns — адрес DNS сервера.
gateway — Необязательный параметр. IP адрес сетевого шлюза (массив из 4 байт)
subnet — Необязательный параметр. маска подсети (массив из 4 байт). По умолчанию: 255.255.255.0
Возвращаемые значения
WiFi.setDNS()
Синтаксис
WiFi.setDNS(dns_server1, dns_server2);Параметры
dns_server1: IP адрес основного DNS сервера
dns_server2: IP адрес дополнительного DNS сервера
Возвращаемые значения
WiFi.SSID()
Получает имя текущей точки доступа
Синтаксис
Параметры
wifiAccessPoint — Необязательный параметр. Уточняет от какой сети получить информацию
Возвращаемые значения
Строка с названием текущей точки доступа.
WiFi.BSSID()
Получает MAC адрес роутера
Синтаксис
Параметры
bssid : массив из 6 байт
Возвращаемые значения
Массив, содержащий MAC адрес роутера к которому подключен микроконтроллер
WiFi.RSSI()
Получает силу сигнала текущего подключения
Синтаксис
Параметры
wifiAccessPoint: Необязательный параметр. Уточняет от какой сети получить информацию.
Возвращаемые значения
Число, текущая сила сигнала в dBm
WiFi.encryptionType()
Получает тип шифрование текущей сети
Синтаксис
WiFi.encryptionType(wifiAccessPoint);Параметры
wifiAccessPoint: Необязательный параметр. Уточняет от какой сети получить информацию.
Возвращаемые значения
byte : значение обозначающее тип шифрования
WiFi.scanNetworks()
Ищет доступные WiFi сети и возвращает их число
Синтаксис
Параметры
Возвращаемые значения
byte число найденных сетей.
WiFi.status()
Возвращает текущий статус соединения
Синтаксис
Параметры
Возвращаемые значения
- WL_CONNECTED: подключен к WiFi сети
- WL_NO_SHIELD: нет WiFi шилда
- WL_IDLE_STATUS: временный статус. Срабатывает после вызова WiFi.begin() остается до истечения попыток подключения (WL_CONNECT_FAILED) или до установки соединения (WL_CONNECTED);
- WL_NO_SSID_AVAIL: SSID не доступен
- WL_SCAN_COMPLETED: сканирование сетей завершено
- WL_CONNECT_FAILED: не получилось подключиться после всех попыток
- WL_CONNECTION_LOST: соединение потеряно
- WL_DISCONNECTED: отключен от сети
WiFi.getSocket()
Получает первый доступный сокет
Синтаксис
Параметры
Возвращаемые значения
int — первый доступный сокет
WiFi.macAddress()
Получает MAC адрес WiFi шилда или микроконтроллера
Синтаксис
Параметры
mac: массив из 6 byte с MAC адресом
Возвращаемые значения
byte массив: 6 byte массив с MAC адресом вашего шилда или микроконтроллера
Железо
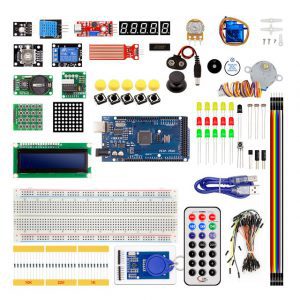
Стартовый набор с Arduino Mega и RFID Это расширенный стартовый набор. В комплект входит Arduino Mega R3, макетные платы, множество датчиков, управляемые механизмы и необходимые радиоэлектронные компоненты. Полный список.
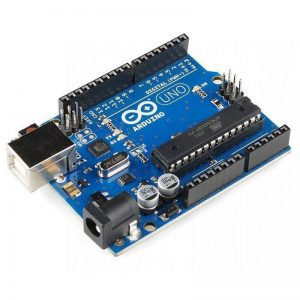
Плата Arduino Uno R3 Arduino Uno — плата на базе микроконтроллера ATmega328P с частотой 16 МГц. На плате есть все необходимое для удобной и быстрой работы.
WiFi — client.available()
Returns the number of bytes available for reading (that is, the amount of data that has been written to the client by the server it is connected to).
available() inherits from the Stream utility class.
Syntax
Parameters
Returns
The number of bytes available.
Example
#include #include char ssid[] = "myNetwork"; // your network SSID (name) char pass[] = "myPassword"; // your network password int status = WL_IDLE_STATUS; char servername[]="google.com"; // Google WiFiClient client; void setup() < Serial.begin(9600); Serial.println("Attempting to connect to WPA network. "); Serial.print("SSID: "); Serial.println(ssid); status = WiFi.begin(ssid, pass); if ( status != WL_CONNECTED) < Serial.println("Couldn't get a wifi connection"); // don't do anything else: while(true); >else < Serial.println("Connected to wifi"); Serial.println("\nStarting connection. "); // if you get a connection, report back via serial: if (client.connect(servername, 80)) < Serial.println("connected"); // Make a HTTP request: client.println("GET /search?q=arduino HTTP/1.0"); client.println(); >> > void loop() < // if there are incoming bytes available // from the server, read them and print them: if (client.available()) < char c = client.read(); Serial.print(c); >// if the server's disconnected, stop the client: if (!client.connected()) < Serial.println(); Serial.println("disconnecting."); client.stop(); // do nothing forevermore: for(;;) ; >> Введение. Подключение к WiFi
ESP8266 – мощный китайский микроконтроллер с WiFi на борту. Это позволяет делать на его основе проекты с доступом в Интернет!
- Если вы уже работали с Arduino и первый раз держите в руках плату на базе esp8266 (в наборе GyverKIT это плата Wemos Mini) – обязательно изучите урок по особенностям данного микроконтроллера и отличиям от обычных плат Arduino.
- Для работы с Wemos нужно установить поддержку данных плат в Arduino IDE: на сайте набора в блоке Начало работы есть отдельная инструкция по настройке.
Работать с платой через WiFi есть два способа:
- Подключить плату к домашнему WiFi роутеру (режим STA) – для работы в локальной сети или через Интернет
- Настроить плату как точку доступа (режим AP) и подключиться к ней со смартфона
Подключение к роутеру
- Подключаем в скетч встроенную библиотеку ESP8266WiFi.h
- Переводим режим работы в STA через WiFi.mode(WIFI_STA) – необязательно, если до этого режим работы не изменялся
- Инициируем подключение к WiFi роутеру:
- Вызываем WiFi.begin(WIFI_SSID) – с указанием названия незащищённой сети (без пароля)
- Вызываем WiFi.begin(WIFI_SSID, WIFI_PASS) – с указанием названия сети и пароля
- Для удобства настройки можно вынести логин и пароль в начало программы через #define
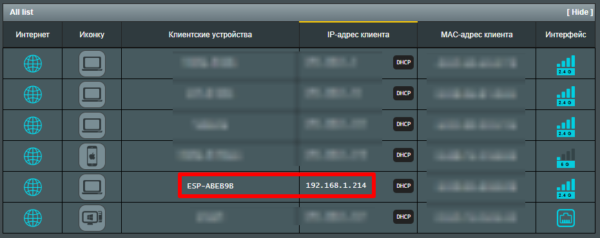
После успешного подключения можно вывести IP адрес платы в локальной сети роутера при помощи WiFi.localIP() .
#include #define WIFI_SSID «Alex» #define WIFI_PASS «pass» void setup() < Serial.begin(115200); WiFi.begin(WIFI_SSID, WIFI_PASS); while (WiFi.status() != WL_CONNECTED) < delay(500); Serial.print("."); >Serial.println(«Connected»); Serial.println(WiFi.localIP()); > void loop()
Скриншот со страницы конфигурации роутера. Плата есть в списке подключенных устройств:

Создание точки доступа
- Подключаем в скетч встроенную библиотеку ESP8266WiFi.h
- Переводим режим работы в AP через WiFi.mode(WIFI_AP)
- Создаём точку доступа:
- WiFi.softAP(AP_SSID) – сеть без пароля. Указываем только имя
- WiFi.softAP(AP_SSID, AP_PASS) – сеть с паролем
#include #define AP_SSID «ESP» void setup() < Serial.begin(115200); WiFi.mode(WIFI_AP); WiFi.softAP(AP_SSID); >void loop()
Теперь можно подключиться к плате со смартфона как к точке доступа WiFi. Примечание: по умолчанию в своей сети плата имеет IP адрес 192.168.4.1