- STM32CubeIDE
- Contents
- 1 STM32CubeIDE purpose [ edit ]
- 2 How to install STM32CubeIDE [ edit ]
- 3 How to get started with STM32CubeIDE [ edit ]
- 3.1 How to get started with STM32CubeIDE from scratch [ edit ]
- 3.2 How to migrate from SW4STM32 to STM32CubeIDE [ edit ]
- 4 Project structure [ edit ]
- 5 Arm ® Cortex ® -M debug on STM32 MPU device [ edit ]
- 5.1 Engineering mode [ edit ]
- 5.2 Production mode [ edit ]
- Saved searches
- Use saved searches to filter your results more quickly
- License
- PascalBod/lm-stm32cubeide
- Name already in use
- Sign In Required
- Launching GitHub Desktop
- Launching GitHub Desktop
- Launching Xcode
- Launching Visual Studio Code
- Latest commit
- Git stats
- Files
- README.md
- About
STM32CubeIDE
This article explains some of the basics of STM32CubeIDE support for STM32 MPU . STM32CubeIDE is an all-in-one multi- OS development tool, which is part of the STM32Cube ecosystem.
For more information about STM32CubeIDE, refer to its user guide.
Contents
- 1 STM32CubeIDE purpose
- 2 How to install STM32CubeIDE
- 3 How to get started with STM32CubeIDE
- 3.1 How to get started with STM32CubeIDE from scratch
- 3.2 How to migrate from SW4STM32 to STM32CubeIDE
- 5.1 Engineering mode
- 5.2 Production mode
- 5.3 ST-LINK sharing support
- 6.1 How to install Yocto Project ® SDK in STM32CubeIDE
- 6.2 How to manage OpenSTLinux projects
- 6.3 How to debug a user space application
- 6.4 How to debug a OP-TEE trusted application
1 STM32CubeIDE purpose [ edit ]
STM32CubeIDE is an advanced C/C++ development platform with peripheral configuration, code generation, code compilation, and debug features for STM32 microcontrollers and microprocessors. It is based on the Eclipse ® /CDT framework, GCC toolchain for the development and GDB for the debugging.
It allows the integration of the hundreds of existing plugins that complete the features of the Eclipse ® IDE . STM32CubeIDE integrates all STM32CubeMX functionalities to offer all-in-one tool experience, and save installation and development time.
With STM32CubeIDE, you can
- select the appropriate STM32 device corresponding to your needs
- configure the device using STM32CubeMX
- develop and debug applications on top of Arm ® Cortex ® -M
2 How to install STM32CubeIDE [ edit ]
STM32 MPU support, inside STM32CubeIDE, is available on Linux ® and Windows ® host PCs, but it is NOT on macOS ® .
- Download the preferred all-in-one Linux installer from st.com
- Generic Linux Installer — STM32CubeIDE-Lnx
- RPM Linux Installer — STM32CubeIDE-RPM
- Debian Linux Installer — STM32CubeIDE-DEB
- Refer to STM32CubeIDE installation guide (UM2563) available on st.com.
- When the installation is completed, see additional information about STM32CubeIDE in st.com:
- STM32CubeIDE quick start guide (UM2553)
- Details about the content of this tool version are available in the STM32CubeIDE release v1.13.0 release note from st.com
Minor releases may be available from the update site. Check chapter 10 in (UM2609) for more information on how to update STM32CubeIDE.
3 How to get started with STM32CubeIDE [ edit ]
This section links to two different how to articles depending on whether you are migrating from SW4STM32 to STM32CubeIDE or starting a new project with STM32CubeIDE.
3.1 How to get started with STM32CubeIDE from scratch [ edit ]
How to get started with STM32CubeIDE from scratch.
3.2 How to migrate from SW4STM32 to STM32CubeIDE [ edit ]
How to move from SW4STM32 to STM32CubeIDE.
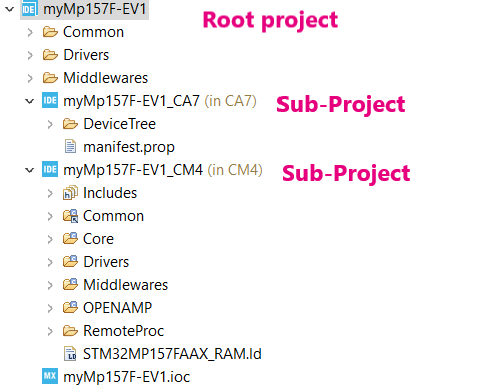
4 Project structure [ edit ]
A hierarchical project structure is created together with the creation of an STM32 MPU project.
The project structure for single-core projects is flat. On the contrary, in a multi-core project, the hierarchical project structure is used. When the user creates or imports an STM32 MPU project, its structure is made of one root project together with sub-projects, referred to as STM32 MCU projects, for each core. A hierarchical structure example is shown below.

5 Arm ® Cortex ® -M debug on STM32 MPU device [ edit ]
Two modes are used to debug Arm ® Cortex ® -M firmware on STM32 MPU devices.
5.1 Engineering mode [ edit ]
Very powerful to debug preliminary Arm ® Cortex ® -M, the engineering mode implies a specific boot mode: the Engineering Boot Mode where only the Cortex ® -M is started. Firmware is loaded via JTAG / SWD into its dedicated RAM .
This mode is not the default one. It must be set via the «Debug Configuration» menu, in the «Debugger» tab , with «through JTGA/ SWD link (Engineering mode)» option selected.
Debugging in engineering mode in an STM32 MPU device is very similar to a standard STM32 MCU debug in terms of functionality, except that in this case the Arm ® Cortex ® -M core has only one dedicated memory, no Flash memory type.
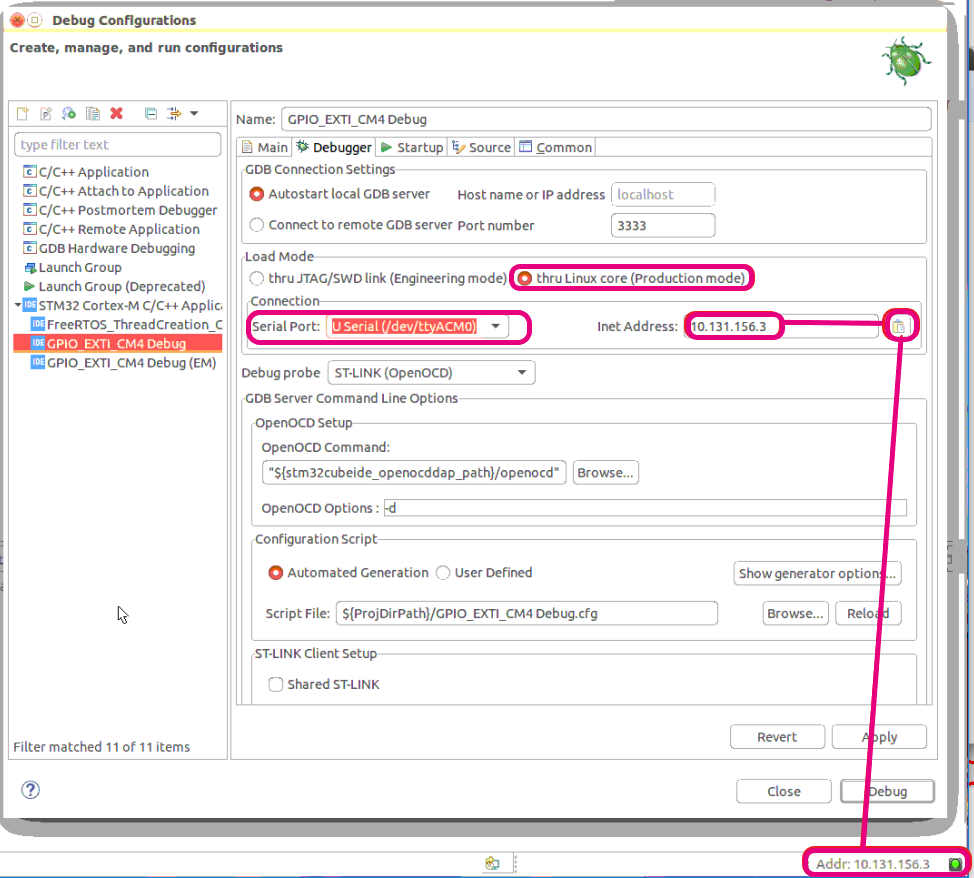
5.2 Production mode [ edit ]
Production mode targets a debug close to the final product. It means to have an STM32 MPU board up and running on the Cortex ® -A ( Linux ® ) and a Cortex ® -M firmware to debug (usually an STM32CubeIDE project).
The board, also named «target», is booted in the production mode from the Flash memory (the SD card ); it is connected to the Host:
- via the Ethernet network, using an Ethernet cable or dedicated USB cable
- and via a USB cable to the ST-LINK probe, giving access to the JTAG / SWD and Linux ® console
ST-LINK automatically brings support for Cortex ® -A Linux ® console via VCP (Virtual COM port). This enables the Target Status widget, visible on the bottom-right of STM32CubeIDE, allowing target IP address discovery. For production mode setup, it is recommended to get the target IP address discovered by the Target Status widget before creating the debug configuration. This principle is depicted in the Debug Configuration screenshot below.
Network connection can be set up in two ways:
- Ethernet
- managed network: IP address attributed by DHCP server
- unmanaged network: IP address to be manually configured
- using the dedicated USB OTG connection for Ethernet point to point.
Debug is performed though the following workflow:
1. The firmware built binary is transferred to the target using the network (SSH protocol), more precisely to the Cortex ® -A Linux ® file system.
2. Firmware is loaded to Cortex ® -M core using the “remoteproc” framework.
3. Finally the debug session is started via the JTAG / SWD connection
The production mode is the default one when you create a new debug configuration. It is automatically set via the «Debug Configuration» menu.
More information on how to use STM32CubeIDE target status are given in article How to use the Target Status widget in STM32CubeIDE.
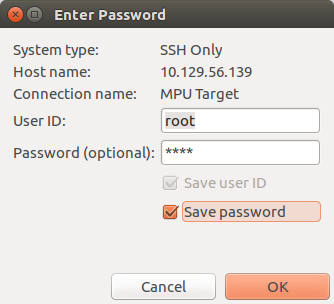
At debug launch, some specific pop-up appear:

Saved searches
Use saved searches to filter your results more quickly
You signed in with another tab or window. Reload to refresh your session. You signed out in another tab or window. Reload to refresh your session. You switched accounts on another tab or window. Reload to refresh your session.
How to set up STM32CubeIDE in a Linux virtual machine and build a first sample application
License
PascalBod/lm-stm32cubeide
This commit does not belong to any branch on this repository, and may belong to a fork outside of the repository.
Name already in use
A tag already exists with the provided branch name. Many Git commands accept both tag and branch names, so creating this branch may cause unexpected behavior. Are you sure you want to create this branch?
Sign In Required
Please sign in to use Codespaces.
Launching GitHub Desktop
If nothing happens, download GitHub Desktop and try again.
Launching GitHub Desktop
If nothing happens, download GitHub Desktop and try again.
Launching Xcode
If nothing happens, download Xcode and try again.
Launching Visual Studio Code
Your codespace will open once ready.
There was a problem preparing your codespace, please try again.
Latest commit
Git stats
Files
Failed to load latest commit information.
README.md
This short tutorial describes a way to make a virtual machine configured for STM32 software development with STM32CubeIDE, and explains how to use it. The virtualization environment is VirtualBox, and the guest machine runs Linux Mint.
- Hardware: a 64-bit computer with enough memory so that the VM can be granted 16 GB, with a few tens of GB available on the disk, and one free USB A port
- Hardware (bis): a Nucleo-L476RG board with an USB A / mini USB B cable — any similar NUCLEO board can be used
- Developer:
- basic knowledge of Linux (knowing the most common commands. )
- basic knowledge of VirtualBox (knowing how to create a virtual machine. )
Follow the instructions in this guide.
Be sure to provide the guest machine with enough resources. STM32CubeIDE is quite power-hungry. The guide recommends 16 GB for RAM and two CPUs. On my i7-8559U host machine, a one-CPU VM won’t display correctly the Device Configuration Tool (aka CubeMX) window: two CPUs are required.
- Download STM32CubeIDE Debian Linux Installer, version 1.12.0 at the time of writing. You will have to create an account
- Unzip the file
- Run resulting script:
$ sudo sh ./st-stm32cubeide_1.12.0_14980_20230301_1550_amd64.deb_bundle.sh
No need to perform the last step, the manual installation, described in the Installation Guide.
Install sample applications
- Start STM32CubeIDE, from Linux Mint main menu and then All applications > Programming
- Keep the default workspace and click the Launch button
- Install the STM32 MCU Package for STM32L4 Series (version 1.17.2 at the time of writing):
- Select Help > Manage Embedded Software Packages
- On the STM32Cube MCU Packages tab, expand the STM32L4 list and select the package
- Click the Install button
The package is installed in /home/developer/STM32Cube/Repository/STM32Cube_FW_L4_V1.17.2 .
Import a sample application
- Select File > Import.
- Select General > Import ac6 System Workbench for STM32Project
- Click the Next > button
- For Import source, select /home/developer/STM32Cube/Repository/STM32Cube_FW_L4_V1.17.2/Projects/NUCLEO-L476RG/Examples/GPIO/GPIO_EXTI/SW4STM32/STM32L476RG_NUCLEO
- Click the Finish button
- Accept project conversion
- A project named STM32L476RG_NUCLEO appears in the Project Explorer window
- Click the small vertical triangle at the left of the project name, in order to display project files
- Select Project > Build Project. If nothing happens, right-click on the project and select Build Project
At the end of the build, the Console window displays the result:
The Build Analyzer window provides memory usage information:
Flash and run the application
Connect the NUCLEO board to the host PC. Check that the virtual machine can see it, with Devices > USB from VirtualBox menu. A new USB device should be visible: STMicroelectronics STM32 STLink [0100]. Tick the associated checkbox.
Assign the board to the virtual machine on a permanent basis:
- Select Device > USB > USB Settings.
- Click on the Add new USB filter button
- Select the board
- Click the OK button
In the Project Explorer window, open the Debug directory and select STM32L476RG_NUCLEO.bin . This is the binary file to use to program the board.
Create a run configuration by selecting Run > Run configurations. . Select STM32 Cortex-M C/C++ Application. Click on the New Launch Configuration tool, above the list of configuration types. The various fields should be prefilled with the right default values:
Click the Run button.
Depending on the version of the NUCLEO board, a window requesting an update of the ST-Link firmware may be displayed:
Click the Yes button.
The ST-Link upgrade window is displayed:
Click the Open in update mode button. The window displays firmware version information:
Click the Upgrade button. At the end of the upgrade, close the window.
Request again to run the above run configuration. The Console window displays a rebuild, the board programming, and ends with a message saying that the debugger connection is lost. That’s normal, as we didn’t start a debugging session.
Push the board blue button. The green LED should light up when you release the button. Push again, it should cut out when the button is released.
STM32CubeIDE is installed with sudo. This means that the file owner is root . Consequently, updating STM32CubeIDE using Eclipse update mechanism (Help > Check for Updates) fails, when you run STM32CubeIDE from a normal user.
One way to use this update mechanism would be to start STM32CubeIDE from root . But trying this, I got in trouble: STM32CubeIDE refused to start after an update from 1.7.0 to 1.8.0. Consequently, now, instead of updating, I install the new version from scratch. An additional benefit: the previous version can be kept.
About
How to set up STM32CubeIDE in a Linux virtual machine and build a first sample application