- Настройка сервера
- Генерация ключевых пар и сертификатов УЦ и сервера:
- Настройка strongSwan
- Настройка firewall
- Запуск VPN сервера
- Добавление нового клиента со смарт-картой
- Настройка клиента
- Проверка доступности сервера
- Установка пакетов
- Настройка strongSwan
- Настройка модуля pkcs11
- Подключение к сети
- strongSwan
- Open-source, modular and portable IPsec-based VPN solution
- strongSwan is a comprehensive implementation of the Internet Key Exchange (IKE) protocols that allows securing IP traffic in policy- and route-based IPsec scenarios from simple to very complex.
- Features
- Internet Key Exchange (IKE)
- Modularity
- Authentication / Cryptography
- Portability
- Downloads
- Downloads for strongSwan and its NetworkManager plugin and Android app
- strongSwan
- Binary Packages
- Sources
- Current Release
- Pre-Releases
- Security Patches
- Signature Key
- Download mirrors / Older versions
- Try strongSwan via Docker
- NetworkManager Plugin
- Sources
- Current Release
- Previous Releases
- Signature Key
- Older versions
- Android App
- Current Release
Настройка сервера
За основу инструкции по настройке сервера была взята следующая инструкция.
В первую очередь поставим все необходимые пакеты для работы:
sudo apt update # пакеты для работы strongSwan VPN сервера sudo apt-get install strongswan strongswan-pki libcharon-extra-plugins libcharon-extauth-plugins # пакеты для работы со смарт-картами и токенами (чтобы создать ключевую пару и сертификаты на Рутокене) sudo apt install opensc libengine-pkcs11-openssl1.1
Генерация ключевых пар и сертификатов УЦ и сервера:
# инициализируем директорию для хранения ключей и сертификатов mkdir -p ~/pki/ chmod 700 ~/pki # создание ключевой пары УЦ pki --gen --type rsa --size 4096 --outform pem > ~/pki/private/ca-key.pem # создание корневого сертификата pki --self --ca --lifetime 3650 --in ~/pki/private/ca-key.pem \ --type rsa --dn "CN=VPN root CA" --outform pem > ~/pki/cacerts/ca-cert.pem # создание ключевой пары сервера pki --gen --type rsa --size 4096 --outform pem > ~/pki/private/server-key.pem # получение сертификата сервера # обратите внимание, что аргументы --dn и --san нужно будет заменить на свои pki --pub --in ~/pki/private/server-key.pem --type rsa \ | pki --issue --lifetime 1825 \ --cacert ~/pki/cacerts/ca-cert.pem \ --cakey ~/pki/private/ca-key.pem \ --dn "CN=server.astradomomain.ad" --san server.astradomain.ad \ --flag serverAuth --flag ikeIntermediate --outform pem \ > ~/pki/certs/server-cert.pem # копируем полученные сертификаты в директорию strongSwan sudo cp -r ~/pki/* /etc/ipsec.d/
Настройка strongSwan
Сохраним предыдущую конфигурацию:
Откроем файл /etc/ipsec.conf и вставим туда следующее содержимое:
config setup charondebug="ike 1, knl 1, cfg 0" uniqueids=no conn ikev2-vpn auto=add compress=no type=tunnel keyexchange=ikev2 fragmentation=yes forceencaps=yes dpdaction=clear dpddelay=300s rekey=no left=%any # доменное имя сервера нужно будет заменить на свое leftid=@server.astradomain.ad leftcert=server-cert.pem leftsendcert=always leftsubnet=0.0.0.0/0 right=%any rightid=%any # активация аутентификации по сертификатам rightauth=eap-tls rightsourceip=10.10.10.0/24 rightdns=8.8.8.8,8.8.4.4 rightsendcert=never eap_identity=%identity ike=chacha20poly1305-sha512-curve25519-prfsha512,aes256gcm16-sha384-prfsha384-ecp384,aes256-sha1-modp1024,aes128-sha1-modp1024,3des-sha1-modp1024! esp=chacha20poly1305-sha512,aes256gcm16-ecp384,aes256-sha256,aes256-sha1,3des-sha1!
Укажем какой ключ использовать серверу для аутентификации себя клиенту /etc/ipsec.secrets:
Настройка firewall
sudo ufw allow OpenSSH sudo ufw enable sudo ufw allow 500,4500/udp
Узнаем имя интерфейса, к которому подключен сервер. Данное имя нам потребуется при настройке firewall. Это можно сделать с помощью команды:
ip route show default # вывод данной команды будет примерно следующим: # default via your_server_ip dev eth0 proto static # Имя интерфейса -- eth0
Добавим в файл настроек firewall /etc/ufw/before.rules следующие строки :
# Добавим этот блок # Не забудьте поменять имя интерфейса *nat -A POSTROUTING -s 10.10.10.0/24 -o eth0 -m policy --pol ipsec --dir out -j ACCEPT -A POSTROUTING -s 10.10.10.0/24 -o eth0 -j MASQUERADE COMMIT # Добавим этот блок # Не забудьте поменять имя интерфейса *mangle -A FORWARD --match policy --pol ipsec --dir in -s 10.10.10.0/24 -o eth0 -p tcp -m tcp --tcp-flags SYN,RST SYN -m tcpmss --mss 1361:1536 -j TCPMSS --set-mss 1360 COMMIT # Этот блок остается без изменений *filter :ufw-before-input - [0:0] :ufw-before-output - [0:0] :ufw-before-forward - [0:0] :ufw-not-local - [0:0] # Добавим этот блок -A ufw-before-forward --match policy --pol ipsec --dir in --proto esp -s 10.10.10.0/24 -j ACCEPT -A ufw-before-forward --match policy --pol ipsec --dir out --proto esp -d 10.10.10.0/24 -j ACCEPT
Добавим в файл /etc/ufw/sysctl.conf следующие строки :
net/ipv4/ip_forward=1 net/ipv4/conf/all/accept_redirects=0 net/ipv4/conf/all/send_redirects=0 net/ipv4/ip_no_pmtu_disc=1
sudo ufw disable sudo ufw enable
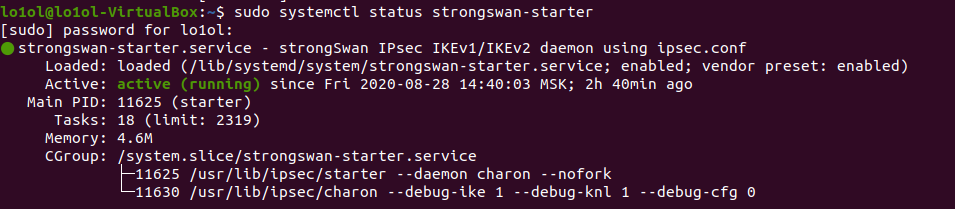
Запуск VPN сервера
sudo systemctl restart strongswan-starter
Проверить, что сервер поднялся успешно, можно, например, с помощью команды:
sudo systemctl status strongswan-starter
Добавление нового клиента со смарт-картой
Модуль pkcs11 для работы со смарт-картами
Необходимо использовать модуль opensc-pkcs11.so из состава OpenSC.
Отформатируем смарт-карту, сгенерируем на ней ключи и получим сертификат.
# форматирование и инициализация pkcs15-init --erase-card -p rutoken_ecp pkcs15-init --create-pkcs15 --so-pin "87654321" --so-puk "" pkcs15-init --store-pin --label "User PIN" --auth-id 02 --pin "12345678" --puk "" --so-pin "87654321" --finalize # генерация ключей ID=45 pkcs15-init -G rsa/2048 --auth-id 02 --label "My Private Key" --public-key-label "My Public Key" --id $ID # генерация заявки на сертификат openssl > engine dynamic -pre SO_PATH:/usr/lib/x86_64-linux-gnu/engines-1.1/pkcs11.so -pre ID:pkcs11 -pre LIST_ADD:1 -pre LOAD -pre MODULE_PATH:opensc-pkcs11.so # не забудьте заменить идентификатор сертификата > req -engine pkcs11 -new -key 45 -keyform engine -out req.csr -subj "/C=RU/CN=user" > exit # выдадим сертификат по заявке pki --issue --lifetime 1825 \ --cacert ~/pki/cacerts/ca-cert.pem \ --cakey ~/pki/private/ca-key.pem \ --in req.csr --type pkcs10 --outform pem \ > ~/pki/certs/client-cert.pem # загрузим сертификат на токен pkcs15-init --store-certificate ~/pki/certs/client-cert.pem --auth-id 02 --id $ID --format pem
Убедиться, что сертификат и ключи загружены на токен можно с помощью команды:
Теперь Рутокен готов к работе и его можно отдать клиенту.
Настройка клиента
Проверка доступности сервера
Проверим, что сервер доступен.
Установка пакетов
Установим необходимые пакеты для работы:
sudo apt update # пакеты для работы strongSwan VPN сервера sudo apt-get install strongswan libstrongswan-extra-plugins libcharon-extra-plugins # пакеты для работы со смарт-картами (чтобы создать ключевую пару и сертификаты на токене) sudo apt install opensc libengine-pkcs11-openssl1.1
Настройка strongSwan
Корневой сертификат сервера положим в директорию /etc/ipsec.d/cacerts:
sudo cp /path/to/ca-cert.pem /etc/ipsec.d/cacerts
Настроим файл конфигурации strongSwan /etc/ipsec.conf:
config setup conn ikev2-rw # измените адрес сервера на свой right=server.astradomain.ad rightid=@server.astradomain.ad rightsubnet=0.0.0.0/0 rightauth=pubkey leftsourceip=%config # имя пользователя для которого выдан сертификат leftid=user leftcert=%smartcard:45 leftauth=eap eap_identity=%identity auto=start
Настроим файл паролей аутентфикации strongSwan /etc/ipsec.secrets и укажем, какой ключ нужно использовать для аутентификации по смарт-карте:
# Формат следующий #: PIN %smartcard: : PIN %smartcard:45 "12345678"
Более подробно о способах задания паролей смарт-карт можно почитать здесь.
Настройка модуля pkcs11
Настроим использование pkcs11 модулей в strongSwan. Для этого откроем файл конфигурации /etc/strongswan.d/charon/pkcs11.conf и отредактируем настройки модулей pkcs11:
Подключение к сети
Подключите смарт-карту и инициализируйте подключение c помощью команды:
sudo systemctl stop strongswan-starter sudo systemctl start strongswan-starter
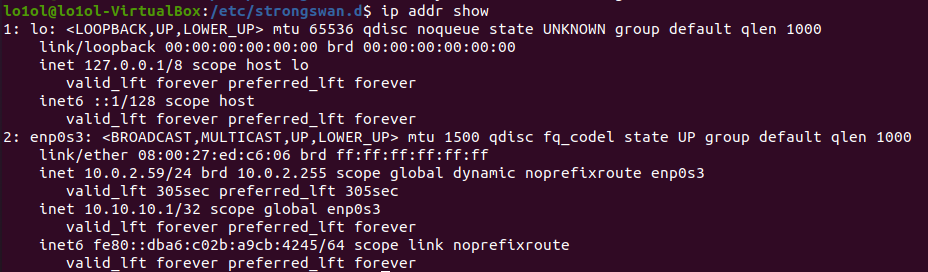
Проверить, что соединение прошло успешно, можно, например, выведя список своих ip адресов С помощью команды:
Среди них появится ваш виртуальный ip:
strongSwan
Open-source, modular and portable IPsec-based VPN solution
Get the latest open-source GPLv2 version now, or learn more about commercial licensing options
strongSwan is a comprehensive implementation of the Internet Key Exchange (IKE) protocols that allows securing IP traffic in policy- and route-based IPsec scenarios from simple to very complex.
Features
Below you’ll find some of the key features of strongSwan. More information and how-tos can be found in the documentation.
Internet Key Exchange (IKE)
- Implements the IKEv2 (RFC 7296) key exchange protocol (IKEv1 is also supported)
- Fully tested support of IPv6 IPsec tunnel and transport mode connections
- Dynamic IP address and interface update with MOBIKE (RFC 4555)
- Automatic insertion and deletion of IPsec-policy-based firewall rules
- NAT-Traversal via UDP encapsulation and port floating (RFC 3947)
- Support of IKEv2 message fragmentation (RFC 7383) to avoid issues with IP fragmentation
- Dead Peer Detection (DPD, RFC 3706) takes care of dangling tunnels
- Virtual IP address pool managed by IKE daemon, DHCP, RADIUS or SQL database
- Implemented RFCs and Internet Drafts
Modularity
- A modular plugin system offers great extensibility and flexibility
- Plugins can provide crypto algorithms, credentials, authentication methods, configs, access to IPsec and network stacks and more
- Optional built-in integrity and crypto tests for plugins and libraries
Authentication / Cryptography
- Secure IKEv2 EAP user authentication (EAP-SIM, EAP-AKA, EAP-TLS, EAP-TTLS, EAP-PEAP, EAP-MSCHAPv2, etc.)
- Optional relaying of EAP messages to AAA server via EAP-RADIUS plugin
- Support of IKEv2 Multiple Authentication Exchanges (RFC 4739)
- Authentication based on X.509 certificates or pre-shared keys
- Use of strong signature algorithms with Signature Authentication in IKEv2 (RFC 7427)
- Support for CRLs and OCSP (RFC 6960)
- Storage of private keys and certificates on a smartcard (PKCS #11 interface) or protected by a TPM 2.0
- Support of NIST elliptic curve DH groups and ECDSA signatures and certificates
- Support of X25519 elliptic curve DH group (RFC 8031) and Ed25519 signatures and certificates (RFC 8420)
- Trusted Network Connect compliant to PB-TNC (RFC 5793), PA-TNC (RFC 5792), PT-TLS (RFC 6876), PT-EAP (RFC 7171) and SWIMA for PA-TNC (RFC 8412)
Portability
- Runs on Linux 2.6, 3.x, 4.x, 5.x and 6.x kernels
- Has been ported to Android, FreeBSD, macOS, iOS and Windows
- Integration into Linux desktops via NetworkManager plugin
- An Android app is available
Downloads
Downloads for strongSwan and its NetworkManager plugin and Android app
strongSwan
Binary Packages
The simplest way to get strongSwan is to install the binary packages provided by your distribution. Our installation instructions provide links to common distributions and information for building strongSwan from sources.
Sources
Current Release
Version: 5.9.11
strongswan-5.9.11.tar.bz2 2023-06-12, size 4’786’552 bytes, pgp-signature,
md5: 673e194cd256af77b46928179f2c81ad strongswan-5.9.11.tar.gz 2023-06-12, size 7’836’375 bytes, pgp-signature,
md5: 02e61d43e41d88154c86456232dd4a6c
Pre-Releases
Version: 6.0.0beta3
Security Patches
Security patches are available for older releases. See our blog for corresponding advisories.
Signature Key
strongSwan releases and security patches are signed with the PGP key with keyid DF42C170B34DBA77.
Download mirrors / Older versions
Older releases can be found on our download mirrors:
Try strongSwan via Docker
Docker images are available to easily try out strongSwan. There is one for regular releases and another for pre-releases of strongSwan 6.0 that supports post-quantum cryptography.
NetworkManager Plugin
strongSwan’s NetworkManager plugin is available as binary package for several distributions (e.g. network-manager-strongswan on Debian/Ubuntu). For an introduction and how-to see our docs.
Sources
Current Release
Version: 1.6.0
2022-05-16, size 302’787 bytes, pgp-signature,
md5: c9314b1df92d693afe2a78217f897a2c
This version supports GTK 4 (in addition to GTK 3), but doesn’t support compiling against libnm-glib anymore.
Previous Releases
2020-05-19, size 300’735 bytes, pgp-signature,
md5: 164afb79d1c9447c3abefa3faa7fc7f1
This version requires strongSwan 5.8.3 or newer, it’s not compatible with older releases.
2019-05-20, size 306’689 bytes, pgp-signature,
md5: 157db6b445dbe6014ef3473f31744334
This version works with older strongSwan releases, but doesn’t support the new features introduced with 5.8.3.
Signature Key
Releases of the NetworkManager Plugin are signed with the PGP key with keyid 765FE26C6B467584.
Older versions
Older releases can be found on our download server:
Android App
The strongSwan Android app can be installed from App stores, or manually by downloading the APK from our download server.
Current Release
Version: 2.4.1