- switch between different version of kernel without a reboot
- 3 Answers 3
- How to Boot into an Older Kernel By Default in Ubuntu and Other Linux
- Booting into the older Linux kernel
- Making older kernel the default
- Installing Grub Customizer
- Using Grub Customizer to change the default boot entry
- Ubuntu: Изменение версии ядра
- Проверка доступных версия ядра
- Установка конкретной версии ядра
- Проверка списка установленных ядер
- Изменение настроек grub
- Загрузка с определенной версии ядра
- Удаление других версия ядра
- How to Change the Default Ubuntu Kernel
- Buddhika Jayawardhana (Jay)
- Install the Generic Kernel
- Backup First
- Show Loaded Kernel
- Show Availalbe options
- Create the default menu entry
- Edit Grub
- Update and Reboot
switch between different version of kernel without a reboot
I want to switch between different version of kernel installed on my system without reboot. That is to say if i have ‘ 3.0.0-16-generic kernel currently running and i have older kernel 3.0.0-14-generic also there, then I maybe be able to switch to 3.0.0-14-generic (the other kernel) without rebooting . (I need to do live kernel debugging and making changes so in order to do so i can’t reboot)
3 Answers 3
There is no way to swap out two complete Kernels. I’m sure you can understand the significance of a monolithic kernel like Linux and why that makes it impossible to simply replace.
The closest you can get is a live-patching process using Ksplice. It converts Kernel updates into magical shims that can plug holes in a running Kernel, allowing you to keep the computer on indefinitely without needing a reboot. For your purposes, it also lets you roll back changes.
It is free for Ubuntu Desktop editions so you can play around with it but you have to pay a subscription for servers (where this sort of thing is most needed).
Just seen your edit. Ksplice probably isn’t going to help if you’re manually hacking and building your own Kernels for debugging as «the service» is that they provide the special updates and they’re not something you can generate on your own.
If you’re just building things against an official kernel, it might still work.
One more idea: Virtualisation. You could build your new kernel and swap things around in your VM and reboot. It’s still going to take the time it needs to reboot but you could make the VM much more light than your development machine (base it on Ubuntu Server, drop the X server if you don’t need it, etc).
How to Boot into an Older Kernel By Default in Ubuntu and Other Linux
Want to boot into an older available Linux kernel version by default? Here’s how to downgrade the Linux kernel.
Here’s a possible scenario. Your system received a kernel update, but somehow things are not working as smoothly as previously. You realized that if you boot into the older kernel (yes, you can downgrade kernel), things are back to normal. That makes you happy with a little inconvenience. You have to manually select the older kernel at each boot. This problem was faced by an elderly It’s FOSS reader. The new kernel update in Linux Mint wasn’t working as expected. Booting into the older kernel ‘fixed’ the issues, but choosing the older kernel at each boot was a problem. Removing the new kernel (while using the older kernel) is not a good idea because the new kernel will be installed and used with the next system updates. So, I suggested booting into the older Linux kernel by default. How to do that? That’s what I am going to show you in this tutorial.
Booting into the older Linux kernel
If you are not already familiar with it, your Linux distribution keeps more than one Linux kernel installed on your system. Don’t believe me? List the installed kernels in Ubuntu with this command:
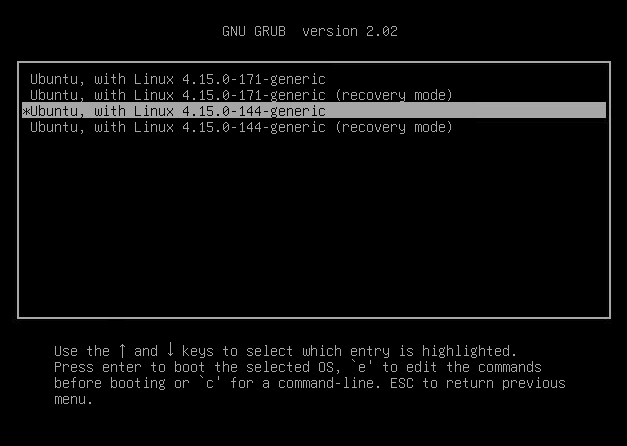
apt list --installed | grep linux-image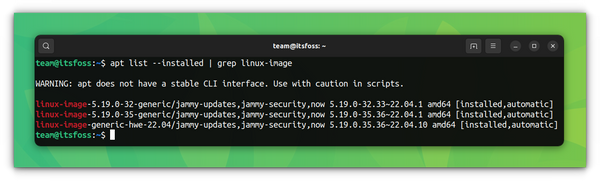 When you get a new kernel version with the system updates, your system automatically chooses to boot into the latest available kernel. From the grub screen, you can go to the Advanced options (or older Linux versions):
 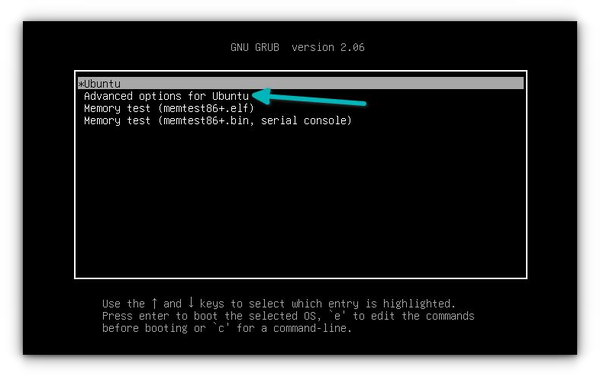 Here, you can see the available kernels to boot into. Choose the older one (without recovery option):
 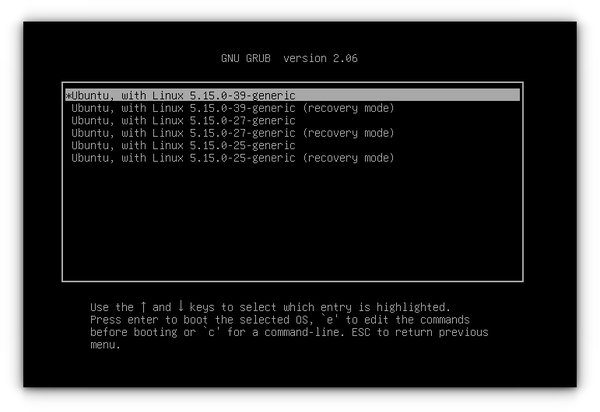 You won’t notice any visual difference. Your files and applications remain the same. Suggested Read 📖 Now that you have booted into the older kernel, it’s time to make your system boot into it automatically.
Making older kernel the default
If you are comfortable with Linux terminal and commands, you can modify the /etc/default/grub file and add the following lines to it:
GRUB_DEFAULT=saved GRUB_SAVEDEFAULT=trueWhat you did here is to tell your system to save the currently used entry as the default entry for the future runs of GRUB. However, not everyone is okay with the command line, and hence I’ll focus on a GUI tool called Grub Customizer.
Installing Grub Customizer
sudo add-apt-repository ppa:danielrichter2007/grub-customizer sudo apt update sudo apt install grub-customizerUsing Grub Customizer to change the default boot entry
When you run Grub Customizer, it shows the available boot entries. 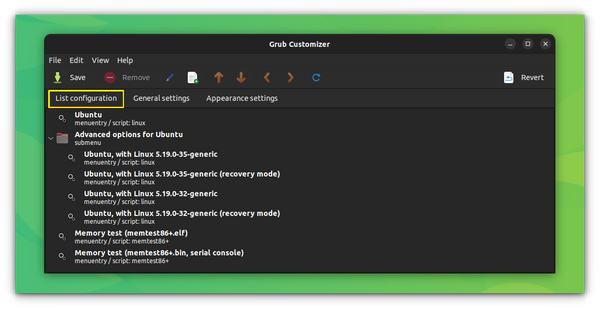 You have two options here. Option 1: Select the desired kernel entry and use the arrow (displayed on the top menu) to move it up the order.
 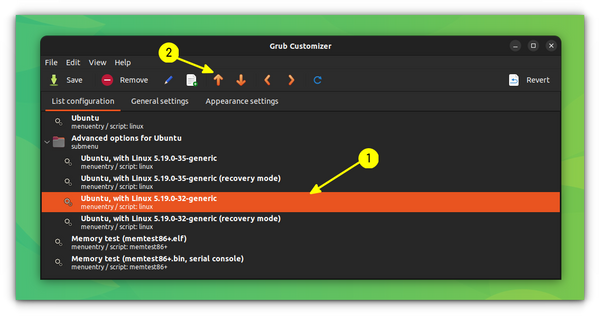 Option 2: Make the ‘previously booted entry’ the ‘default entry’.
 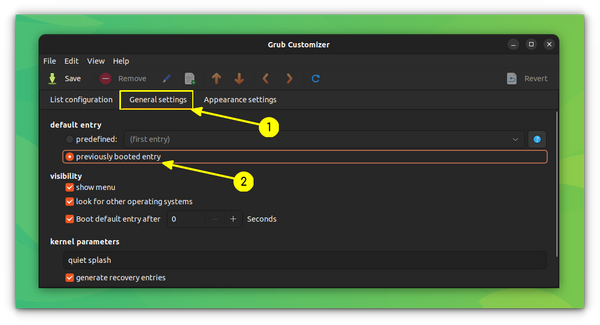 I would suggest going with option 2 because it will work even when there are new kernel updates. This way, you downgrade the kernel in Ubuntu or other distributions without removing the older version. Note that most distributions like Ubuntu only keep two kernel versions simultaneously. So eventually, your preferred older kernel will be removed with the newer kernel versions. This neat trick helped me when I installed the latest Linux kernel in Ubuntu, and it had issues with my audio system for some reason. Whatever may be the reason, you now know how to boot into an older kernel automatically. Grub Customizer is an excellent tool. It can do several more things to change your boot experience. You can read more about its capabilities here: Questions? Suggestions? The comment section is all yours.
Ubuntu: Изменение версии ядра
При использовании некоторых программ требуется установка конкретной версии ядра, обычно старее чем после установки системы. Данная инструкция поможет установить конкретную версию ядра в Ubuntu.

Проверить текущую используемую версию ядра можно командой
Если версия ядра не подходит, то действуем по инструкции.
Проверка доступных версия ядра
Обновляем список доступных пакетов
Проверить все доступные версии ядер
apt search linux-image-*| more 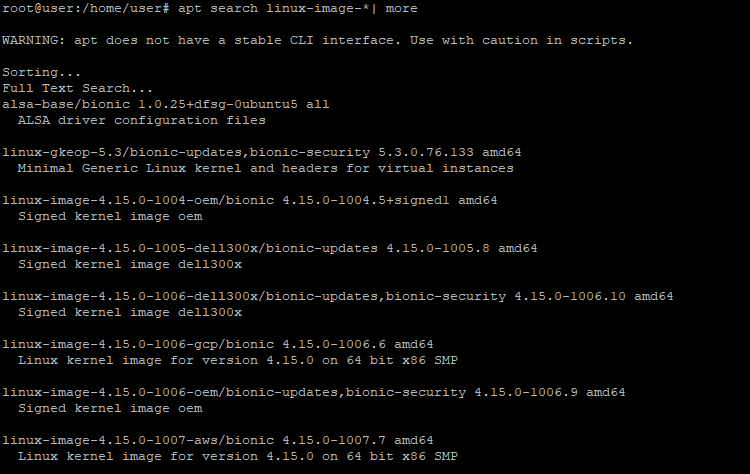
Так же можно посмотреть конкретную версию ядра
apt search linux-image-4.15.0-144* 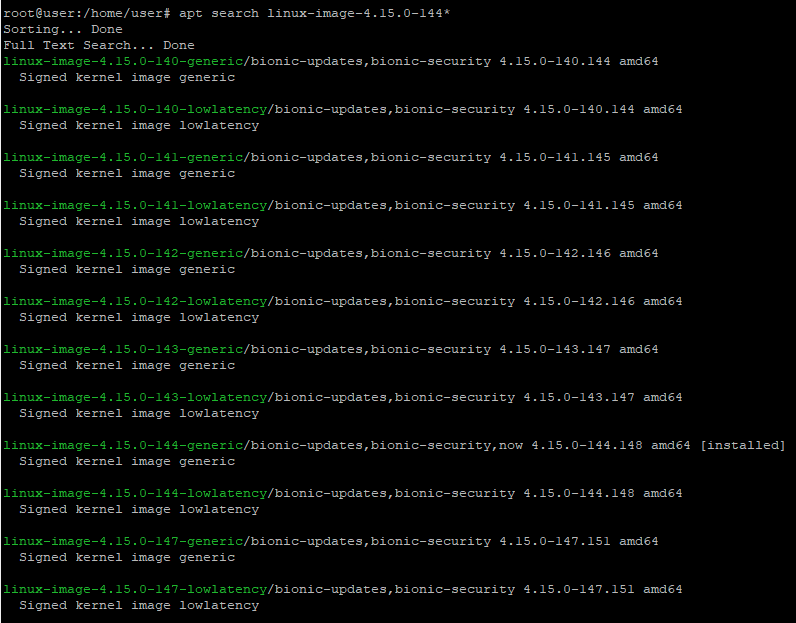
Установка конкретной версии ядра
Устанавливаем само ядро и все возможные модули (на всякий случай)
apt install linux-headers-4.15.0-144 apt install linux-headers-4.15.0-144-generic apt install linux-modules-4.15.0-144-generic apt install linux-image-4.15.0-144-generic apt install linux-modules-extra-4.15.0-144-genericПроверка списка установленных ядер
Проверить ядра, установленные в системе можно командой
dpkg --list | grep linux-image 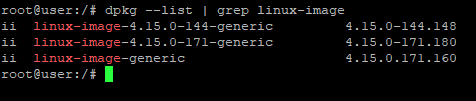
Изменение настроек grub
Для загрузке определенного ядра, необходимо его выбрать в advanced mode. В некоторых установках время может быть крайне малым или вообще быть равным 0.
cp /etc/default/grub /etc/default/grub.bakменяем таймаут загрузки GRUB_TIMEOUT
после чего обновляем настройки grub
Загрузка с определенной версии ядра
Если меню не появляется, при загрузке, а вместо него верный экран, необходимо нажать shuft.
Перегружаем систему и в меню grub выбираем расширенные настройки

и выбираем нужную версию ядра системы
Удаление других версия ядра
Что бы при перезагрузке системы Ubuntu загружала необходимое ядро, необходимо удалить из системы не используемые версии.
apt remove --purge linux-image-4.15.0-171-generic apt remove --purge linux-image-unsigned-4.15.0-171-generic apt remove --purge linux-modules-4.15.0-171-generic apt remove --purge linux-headers-4.15.0-171-generic apt remove --purge linux-headers-4.15.0-171How to Change the Default Ubuntu Kernel
A complete guide and tutorial on how to change the default ubuntu kernel.

Buddhika Jayawardhana (Jay)
Principal Engineer @ Meetrix.
These instructions were tested on Ubuntu 16.04 environment.
Install the Generic Kernel
sudo apt-get update sudo apt-get -y install linux-image-extra-virtual Backup First
sudo cp /etc/default/grub /etc/default/grub.bak Show Loaded Kernel
Show Availalbe options
grep -A100 submenu /boot/grub/grub.cfg |grep menuentry submenu 'Advanced options for Ubuntu' $menuentry_id_option 'gnulinux-advanced-4a67ec61-9cd5-4a26-b00f-9391a34c8a29' menuentry 'Ubuntu, with Linux 4.4.0-1062-aws' --class ubuntu --class gnu-linux --class gnu --class os $menuentry_id_option 'gnulinux-4.4.0-1062-aws-advanced-4a67ec61-9cd5-4a26-b00f-9391a34c8a29' menuentry 'Ubuntu, with Linux 4.4.0-1062-aws (recovery mode)' --class ubuntu --class gnu-linux --class gnu --class os $menuentry_id_option 'gnulinux-4.4.0-1062-aws-recovery-4a67ec61-9cd5-4a26-b00f-9391a34c8a29' menuentry 'Ubuntu, with Linux 4.4.0-1061-aws' --class ubuntu --class gnu-linux --class gnu --class os $menuentry_id_option 'gnulinux-4.4.0-1061-aws-advanced-4a67ec61-9cd5-4a26-b00f-9391a34c8a29' menuentry 'Ubuntu, with Linux 4.4.0-1061-aws (recovery mode)' --class ubuntu --class gnu-linux --class gnu --class os $menuentry_id_option 'gnulinux-4.4.0-1061-aws-recovery-4a67ec61-9cd5-4a26-b00f-9391a34c8a29' menuentry 'Ubuntu, with Linux 4.4.0-131-generic' --class ubuntu --class gnu-linux --class gnu --class os $menuentry_id_option 'gnulinux-4.4.0-131-generic-advanced-4a67ec61-9cd5-4a26-b00f-9391a34c8a29' menuentry 'Ubuntu, with Linux 4.4.0-131-generic (recovery mode)' --class ubuntu --class gnu-linux --class gnu --class os $menuentry_id_option 'gnulinux-4.4.0-131-generic-recovery-4a67ec61-9cd5-4a26-b00f-9391a34c8a29' Create the default menu entry
find the ids of parent and child menu entries. For example, menu entry id for Advanced options for Ubuntu is gnulinux-advanced-4a67ec61-9cd5-4a26-b00f-9391a34c8a29
menu entry for Ubuntu, with Linux 4.4.0-131-generic is gnulinux-4.4.0-131-generic-recovery-4a67ec61-9cd5-4a26-b00f-9391a34c8a29
Concat those two strings with > . Result would be like
Edit Grub
and replace GRUB_DEFAULT with above value (With Quotes)
GRUB_DEFAULT="gnulinux-advanced-4a67ec61-9cd5-4a26-b00f-9391a34c8a29>gnulinux-4.4.0-131-generic-advanced-4a67ec61-9cd5-4a26-b00f-9391a34c8a29" GRUB_HIDDEN_TIMEOUT=0 GRUB_HIDDEN_TIMEOUT_QUIET=true GRUB_TIMEOUT=0 GRUB_DISTRIBUTOR=`lsb_release -i -s 2> /dev/null || echo Debian` GRUB_CMDLINE_LINUX_DEFAULT="console=tty1 console=ttyS0" GRUB_CMDLINE_LINUX="" Update and Reboot
sudo update-grub sudo reboot Updated: August 05, 2018