Установка агента Backup Exec на Linux\Unix
Step by step installation of the Backup Exec Remote Agent for Linux and UNIX Servers (RALUS) on the Red Hat Linux platform.
Follow these steps to install the Remote Agent for Linux and UNIX Servers on Red Hat Linux:
Note: RALUS is an additionally purchased option and is enabled by installing the RALUS serial numbers on the Backup Exec media server.
For Backup Exec 2010, there is no separate download available, RALUS is included on the DVD, and can be found in the «LinuxUnixMac» folder present at the root of the DVD for Backup Exec for 2010.
It is also advisable to check the RALUS compatibility with LINUX host before installation, To check the compatibility refer to:
http://support.veritas.com/rd/bews-compatibility.htm
To install the Remote Agent for Linux and UNIX Servers on the LINUX host:
1. On a LINUX host, download the installation files from the Symantec support site.
2. Connect to the target host using a terminal session or Log On locally with super user, root, or administrator privileges.
3. Extract the contents of the installation files that were downloaded in Step 1 using the following command Figure 1a below:
Note: Do not extract the RALUS installer files on a Windows system and copy the resulting files to the Linux/Unix host. Doing so will cause difficult to diagnose installation errors. It is important to copy the .gz file to the Linux/Unix host and extract the files there as shown below.
Note: This is a one step command to extract and untar the file.
Note: If the file does not have «.gz» extension that means its already uncompressed and one has to just extract it using «tar xvf» command.
Or, in two commands as shown in Figure 1b below:
Note: This is a two step command to extract and untar the file.
4. Navigate to the Linux folder that was extracted in Step 3 as shown in Figure 2 below:
5. At the command prompt, type: installralus and press as shown in Figure 3 below:
6. The installation screen appears: (Figure 4)
Type the LINUX server IP address or Hostname and press Enter as shown in Figure above.
7 . RALUS performs the initial system check as shown in Figure 5 below:
Press Enter to continue.
8 . RALUS will check and install the following rpms on Linux server as shown in Figure 6 below:
Press Enter to continue.
9. Installation requirement checks completed successfully as shown in Figure 7 below.
10. To configure RALUS with user friendly configuration press «Y» (Figure 8)
11. The installation utility will now ask a series of questions to configure RALUS (Figure 9)
Press Enter to continue.
12. The installation utility will ask for the Media Server IP address or Hostname to display the remote agent as a selection in the media server’s backup selection tree as shown in Figure 10 below.
Note: A host name can be used, however make sure that the Linux server can resolve the host name properly. Its recommended to add the Windows host entry in the /etc/hosts file on the Linux server.
13. To display the remote agent on more than one media server choose «Y» and press Enter or Simply type «N» and press Enter to continue as shown. (Figure 11)
14. Confirm the Media Server IP address or Hostname by typing «Y» and press Enter, else press «N» and re-type the IP or Hostname as shown. (Figure 12)
15. The installation utility will now ask to create «beoper» group as shown. (Figure 13)
Note: beoper is a group that is used by Remote Agent for Linux and Unix Servers to authenticate the Backup Exec logon account, as the members of this group are given permissions to back up and restore the Linux server.
Press Enter to continue.
16. If the beoper group is not found, the installation utility will ask to create one. (Figure 14)
Type «Y» and press Enter.
17. Installation utility will now prompt to specify any specific Group ID. (Figure 15)
Group ID: All Linux users have a user ID and a group ID and a unique numerical identification number called a userid (UID) and a groupid (GID) respectively. Groups can be assigned to logically tie users together for a common security, privilege and access purpose. Its recommended not to assign any Group ID.
Type «N» and press Enter.
18. Note the «beoper» group has been created successfully as shown. (Figure 16)
19. Installation utility will now ask to add the user root to the beoper group (Figure 17)
Type «Y» and press Enter.
User root has been successfully added to the beoper group.
20. Installation utility shows successful installation of RALUS. (Figure 18)
Read the information and press Enter.
21. The RALUS configuration has also completed successfully as shown. (Figure 19)
Read the information and press Enter.
22. Finally, Symantec Backup Exec Remote Agent for Linux and Unix Server has completely successfully. (Figure 20)
24. Go to the Backup Exec media server and check the remote selections listed on the Backup tab. Expand the Unix icon: (Figure 21)
Use the following commands to stop and start the RALUS service as shown: (Figure 22)
RALUS configuration file.
The ralus.cfg file can be edited for either troubleshooting or configuration purposes as shown.
The file is located in the following location: /etc/VRTSralus/ralus.cfg
For more information regarding RALUS, please refer to the Related Documents section given below.
Related Documents:
279329 : Symantec Backup Exec revision 10.1.5629 — Remote Agent for Linux and UNIX Servers (RALUS)
http://support.veritas.com/docs/279329
272988 : How to run the Symantec Backup Exec ™ Remote Agent for UNIX or Linux Servers in debug mode
http://support.veritas.com/docs/272988
277215 : Backup Exec 10.0 revision 5520 for Windows Servers — Remote Agent for Linux and UNIX Servers (RALUS)
http://support.veritas.com/docs/277215
306806 : After the successful installation of the RALUS (Remote Agent for Linux and Unix Servers) Agent for Backup Exec for Windows Servers (BEWS) on Linux RHEL 4, the agent won’t start.
http://support.veritas.com/docs/306806
315533 : Installation of RALUS ( Remote Agent for Linux and Unix Server) or RAMS (Remote Agent for Mac Servers) fails while performing initial system check.
http://support.veritas.com/docs/315533
316499 : Unable to authenticate SYS/SYSTEM account while configuring the Remote Agent for Linux/Unix Servers (RALUS) for Oracle Backup.
http://support.veritas.com/docs/316499
266075 : General file system backup/restore: How to troubleshoot the error message «Access is denied» in Backup Exec for Windows Servers
http://support.veritas.com/docs/266075
327354 : How to perform a restore with the Backup Exec Remote Agent For Linux and Unix Systems (RALUS).
http://support.veritas.com/docs/327354
288617 : Backup Exec Remote Agent for Linux or Unix Servers (RALUS) will not install to Solaris 9 reporting the user is not running as root
http://support.veritas.com/docs/288617
Last Updated: February 09 2010 09:35 PM GMT
Expires on: 02-09-2011
Subscribe to receive critical updates about this document
Subjects:
Backup Exec
Agent For Unix-Mac: Install
Application: How To, Installation, Unix Agent
Publishing Status: Akami
RHAS 2.1, RHEL (ES) 3.0 (zSeries), RHEL 4.0, Red Flag DC Server 4.1
Symantec Backup Exec: восстановление Oracle, установленного на Linux
В первой части было описано, как сделать резервную копию БД Oracle установленной на Linux средствами Symantec Backup Exec, теперь рассмотрим как из этой копии восстановить данные. Как и с резервным копированием не все так просто и очевидно.
Восстановление будет происходить в три этапа, это связано с тем, что SBE разделяет файлы и БД, когда мы настраивали резервную копию, мы выбирали в [ROOT] путь к ORACLE_HOME, и БД. В такой очередности и будем восстанавливать.
Этап 1. Восстановление ORACLE_HOME
Восстанавливать данные не обязательно на тот же самый сервер, такая возможность очень удобна, так как можно сделать тестовый сервер для разработок, а также проверить возможность восстановления и попрактиковаться в развертывании бэкапа. Итак приступим, создаем первое задание:
Меню > Файл > Создать > Задание восстановления 
Выбираем в ресурсах имя сервера и дату для восстановления каталогов. На вкладке «Перенаправление файлов» указываем на какой сервер восстанавливать данные, если не нужно восстановить на тот же с которого был сделан бэкап. Нажимаем выполнить немедленно и наблюдаем в разделе «Монитор заданий» успешное выполнение задания.
Этап 2. Подготовка к восстановлению файлов данных
Поле того как ORACLE_HOME был восстановлен – было сделано восстановление только программной части БД ORACLE. Далее необходимо выполнить запуск базы. Так как файлов данных нет то можно запустить БД не больше чем в режиме mount.
SQL> startup nomount lsnrctl start
Если вы восстанавливаете на другой сервер, то скорее всего попадете на ошибку связанную с файлом конфигурации БД, например
ORA-27102: out of memory Linux Error: 12: Cannot allocate memory Такая ошибка возникает, когда БД работает с spfile в котором остались настройки с другого сервера. Самый простой способ это найти стандартный файл примера конфигурации – он обычно имеет минимальный набор параметров для запуска БД. Искать его нужно в ORACLE_HOME/dbs, имя его init.ora. Обычный файл параметров pfile имеет имя init.ora. Итак пробуем запустить БД с другим файлом параметров.
SQL> shu immediate --- останавливаем БД SQL> startup pfile= nomount; SQL> create spfile from pfile=; SQL> shu immediate SQL> startup nomount База данных в режиме nomount, listener запущен, переходим к восстановлению файлов данных БД dbf (Так называемое расширение в названии файлов может быть любое, в Linux это не имеет значения и обозначается больше для удобства восприятия файлов).
Этап 3. Восстановление файлов данных БД Oracle.
Возвращаемся к консоли управления SBE на сервере резервного копирования данных.
По такому же принципу как в первом этапе создаем задание восстановления.
Меню > Файл > Создать > Задание восстановления 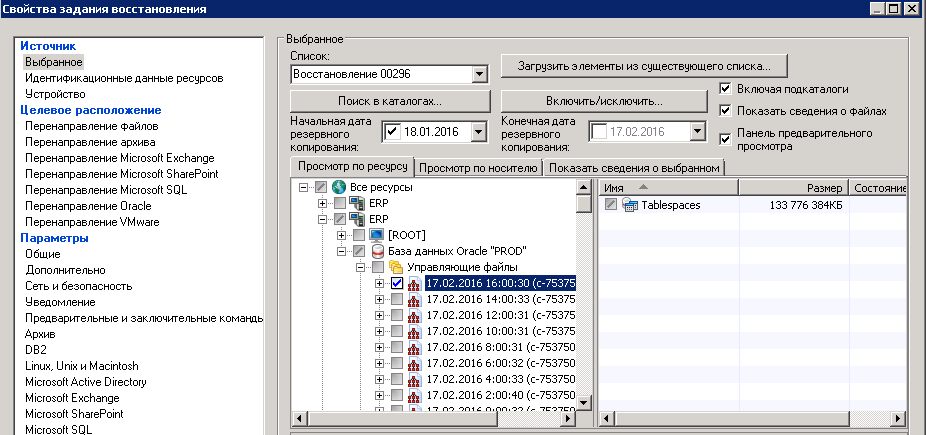
В этом задании мы выбираем раздел «Управляющие файлы» и выбираем один соответствующий тому времени на какой момент мы хотим восстановить БД. Далее также просматриваем все вкладки, в «Перенаправлении Oracle» указываем имя сервера на который мы восстанавливаем (отличный от того с которого был сделан бэкап) и останавливаемся на вкладке Oracle. 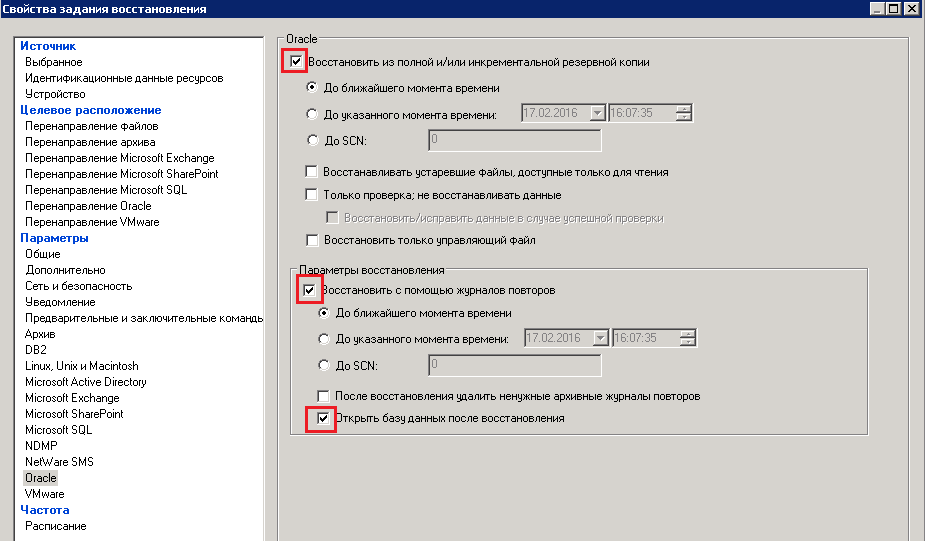
Рекомендую установить галочки как на картинке, это поможет избежать некоторых проблем например таких как не согласованность времени указанного вами и выбранного Управляющего файла. Момент на который будет произведено восстановление данных будет равен времени выбранного управляющего файла. Запускаем на восстановление, по окончанию успешного восстановления возвращаемся на сервер куда выполнили восстановление и выполняем следующее:
SQL> ALTER DATABASE OPEN RESETLOGS; Если команда не возвратила ошибок, проверяем alert.log на наличие ошибок. Проблем не обнаружено – восстановление прошло успешно!