- How to change ubuntu’s server date and time via command line?
- 7 Answers 7
- How to Sync Time in Linux Server using Chrony
- Install Chrony on CentOS / RHEL / Fedora System
- Install Chrony on Debian / Ubuntu System
- Configuration File of Chrony
- Testing Chrony
- Start and Enabled Chronyd Service
- Verify and Track Chrony Synchronization
- Check Chrony Sources
- Check Chrony Source Statistics
- Configure Chrony NTP Server
- How to Set Time, Timezone and Synchronize System Clock Using timedatectl Command
- How to Find and Set Local Timezone in Linux
- How to Set Time and Date in Linux
- Set Time in Linux
- Set Date and Time in Linux
- How to Find and Set Hardware Clock in Linux
- Synchronizing Linux System Clock with a Remote NTP Server
- Summary
How to change ubuntu’s server date and time via command line?
The Ubuntu server’s current date and time is different from the time zone date and time. I have tried using:
sudo date "30 Sep 2015 4:43:42" to change it but it did not change the date and time, just printed on terminal the date and time I changed, but when I executed:
The date and time is still the old one. What is the correct way to change date and time of Ubuntu Server?
7 Answers 7
You can set the system date with this command:
sudo date --set="2015-09-30 10:05:59.990" Then when using date , it should be showed correctly.
Now you should also the set hardware clock in the BIOS of the system, that the setting persists over a reboot (dureing the startup the system time is set to the value of the hardware clock). Do that with hwclock :
This gets the system clocks (sys) value and sets the hardware clock (hc). Check it with the hwclock command. Both hwclock and date should now show the same date and time.
To set your timezone, you can use this command:
sudo dpkg-reconfigure tzdata BTW: If you use a this machine as a server, I strongly recommend using an NTP-Client to sync the time over network. So you can guarantee that all your servers have the exactly same time set. This will sync the time while the machine runs. If you have applications which are dependent of synced time over server, I recommend the NTP-Daemon. The longer it runs in the background, the more precise is the time.
How to Sync Time in Linux Server using Chrony
Time plays an important role in Linux servers specially when they are used in banking, stock markets and other financial sectors. If we want all our Linux servers should have the correct time, then we must configure some NTP client which will fetch correct time always from remote NTP Servers and if needed makes the required adjustments for syncing the time.
In this article we will demonstrate how we can sync time with NTP servers in Linux Server using Chrony (NTP Client).
Install Chrony on CentOS / RHEL / Fedora System
To Install Chrony on CentOS, RHEL and Fedora System, execute the following yum or dnf command
~]# yum install chrony -y Or ~]# dnf install chrony -y
Install Chrony on Debian / Ubuntu System
To install Chrony on Debian and Ubuntu Systems, run the following apt command,
~]$ sudo apt install chrony -y
Once the chrony is installed on Linux server then it offers two programs,
- chronyc : It is command line interface of chrony
- chronyd : It is daemon for chrony which start and enable chrony service across the reboot.
Configuration File of Chrony
Configuration file for Chrony is “/etc/chrony.conf” , sample chrony.conf file is listed below,
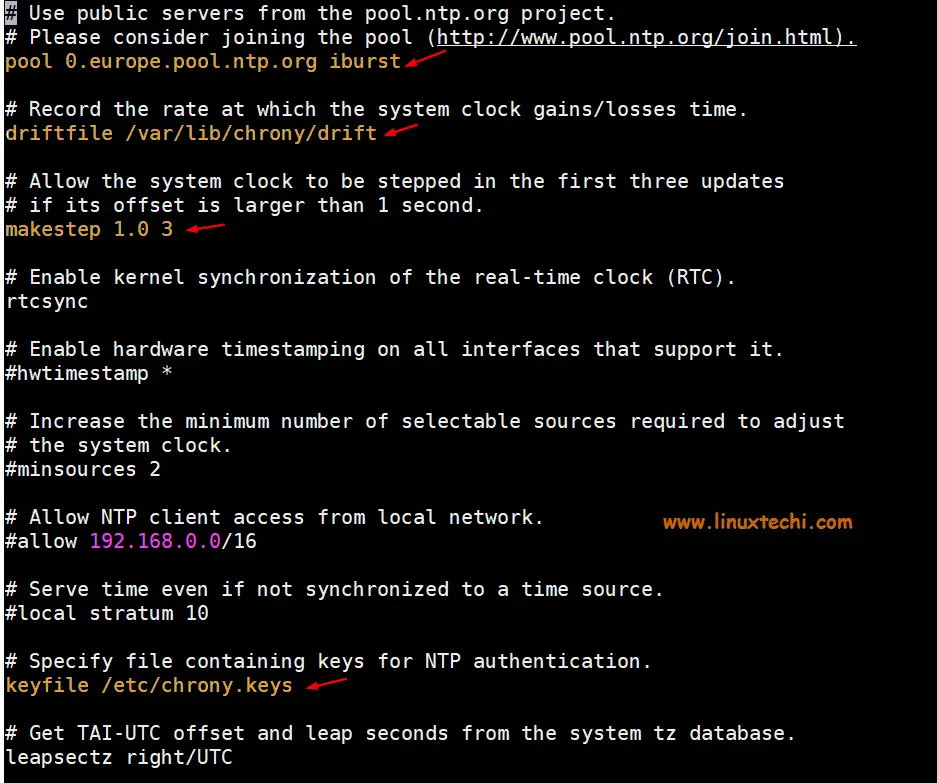
- pool 0.europe.pool.ntp.org iburst is the remote NTP server from where chrony will fetch the time.
- driftfile /var/lib/chrony/drift is the drift file which contains drift data
- makestep 1.0 3 is the parameter which will step system clock (speedup or slow down) if adjustment is larger than 1 second but only for first 3 clock updates
- keyfile /etc/chrony.keys as the name suggest this file contains keys for NTP authentication.
- logdir /var/log/chrony , it is the log file which logs of Chrony.
Testing Chrony
Just like ntpdate command in NTP distribution, we can use chronyd to sync time of our Linux server with remote NTP server manually,
Syntax: # chronyd -q ‘server iburst’
~]# chronyd -q 'server 0.europe.pool.ntp.org iburst'
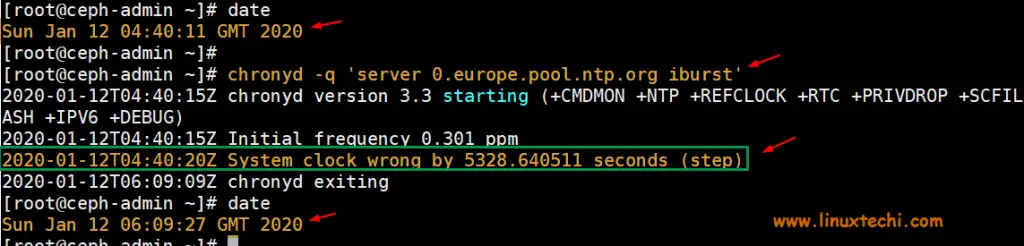
As we can see in above output, chrony has corrected the system time, before running the chronyd command system time was almost 2 hours behind from accurate time.
Start and Enabled Chronyd Service
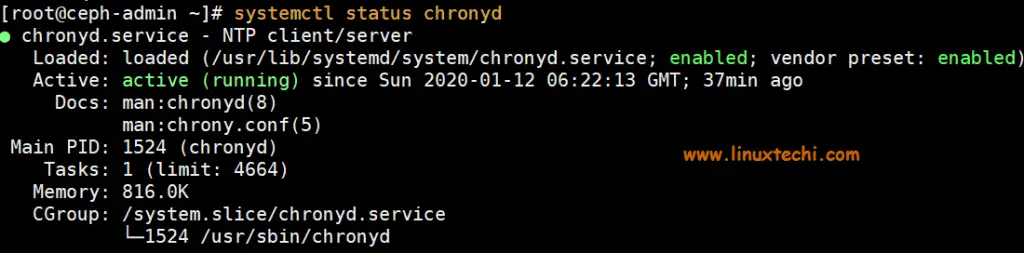
Run the following commands to start and enable chronyd daemon so that it will be available across the reboots.
Run the beneath command to verify the chronys service status
Verify and Track Chrony Synchronization
To verify whether your system’s time is synchronized using chrony, issue the following command,
[[email protected] ~]# chronyc tracking Reference ID : 904C13DD (its.no-fun.de) Stratum : 3 Ref time (UTC) : Sun Jan 12 06:23:26 2020 System time : 0.000174314 seconds slow of NTP time Last offset : -0.000199483 seconds RMS offset : 0.000199483 seconds Frequency : 0.301 ppm fast Residual freq : -40.403 ppm Skew : 0.541 ppm Root delay : 0.172664896 seconds Root dispersion : 0.047364954 seconds Update interval : 64.8 seconds Leap status : Normal [[email protected] ~]#
- Reference ID is the ID and name of server to which your system’s time currently synced.
- Stratum , it indicates the number of hops away from the server with an attached reference clock we are.
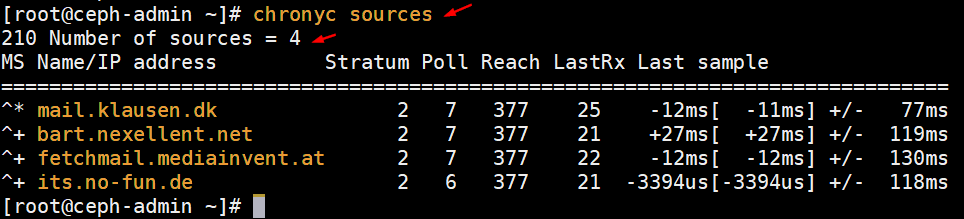
Check Chrony Sources
To list information about the current time sources that the chronyd is using, run the following command,
To list more detailed information about sources then run the following command
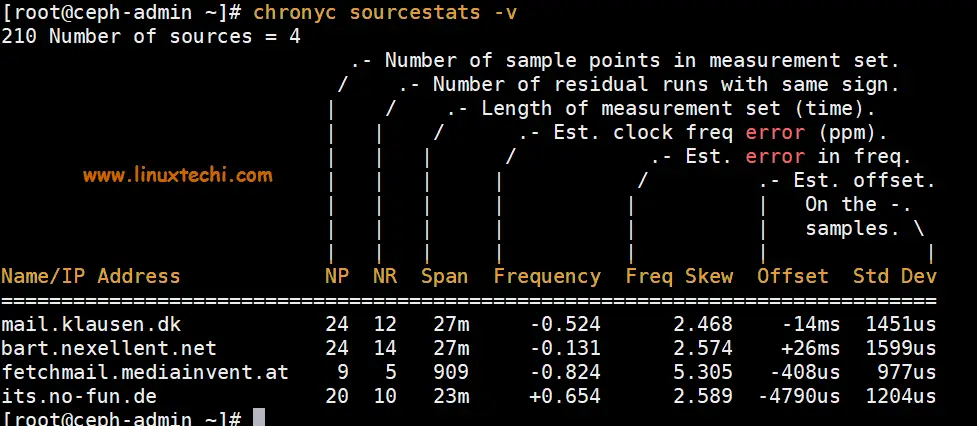
Check Chrony Source Statistics
To list the information about drift speed and offset estimation of each source that the chronyd is using, run the following command
Configure Chrony NTP Server
Let’s assume you want to configure your Linux Server as a Chrony NTP server for all internal systems. To accomplish this, we need to uncomment two lines from configuration file “/etc/chrony.conf”
Execute the following commands
~]# sed -i "s/#local stratum 10/local stratum 10/g" /etc/chrony.conf ~]# sed -i "s/#allow 192.168.0.0\/16/allow 192.168.0.0\/16/" /etc/chrony.conf
When we uncomment the line “ local stratum 10″ then makes our Linux Server as chrony NTP server and continue to work normally even if it is disconnected from network. Whereas “ allow 192.168.0.0/26 ” indicates that clients from this network is allowed to make connection to our Chrony NTP server for time syncing.
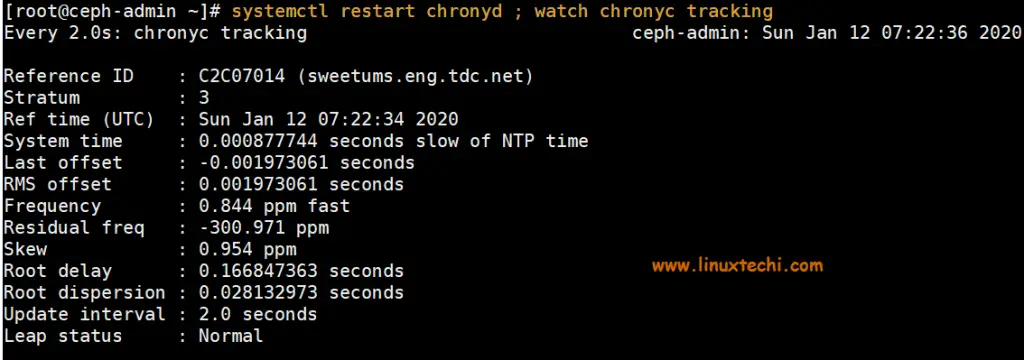
After making changes restart chrony service and track chrony
~]# systemctl restart chronyd ; watch chronyc tracking
Allow NTP Service in firewall using following command,
~]# firewall-cmd --add-service=ntp –permanent ~]# firewall-cmd --reload
That’s all from this article, I hope you get an idea how we can sync our linux system’s time with NTP server using chrony service and apart from this we have also learned how we can configure our own Chrony NTP server. Please do share your valuable feedback and comments.
How to Set Time, Timezone and Synchronize System Clock Using timedatectl Command
The timedatectl command is a new utility for RHEL/CentOS 7/8 and Fedora 30+ based distributions, which comes as a part of the systemd system and service manager, a replacement for old traditional date command used in sysvinit daemon based Linux distributions.

The timedatectl command allows you to query and change the configuration of the system clock and its settings, you can use this command to set or change the current date, time, and timezone or enable automatic system clock synchronization with a remote NTP server.
In this tutorial, am going to take you through the ways you can manage time on your Linux system by setting the date, time, timezone, and synchronize time with NTP from the terminal using the new timedatectl command.
It is always a good practice to maintain the correct time on your Linux server or system and it can have the following advantages:
- maintain a timely operation of system tasks since most tasks in Linux are controlled by time.
- the correct time for logging events and other information on the system and many more.
How to Find and Set Local Timezone in Linux
1. To display the current time and date on your system, use the timedatectl command from the command line as follows:
In the screencast above, RTC time is the hardware clock time.
2. The time on your Linux system is always managed through the timezone set on the system, to view your current timezone, do it as follows:
# timedatectl OR # timedatectl | grep Time
3. To view all available timezones, run the command below:
# timedatectl list-timezones
4. To find the local timezone according to your location, run the following command:
# timedatectl list-timezones | egrep -o "Asia/B.*" # timedatectl list-timezones | egrep -o "Europe/L.*" # timedatectl list-timezones | egrep -o "America/N.*"
5. To set your local timezone in Linux, we will use the set-timezone switch as shown below.
# timedatectl set-timezone "Asia/Kolkata"
It is always recommended to use and set the coordinated universal time, UTC.
# timedatectl set-timezone UTC
You need to type the correct name timezone otherwise you may get errors when changing the timezone, in the following example, the timezone “Asia/Kolkata” is not correct therefore causing the error.
How to Set Time and Date in Linux
6. You can set the date and time on your system, using the timedatectl command as follows:
Set Time in Linux
To set time only, we can use a set-time switch along with the format of time in HH:MM:SS (Hour, Minute, and Seconds).
# timedatectl set-time 15:58:30
You may get the below error when setting the date as shown above:
Failed to set time: NTP unit is active
7. The error says that the NTP service is active. You need to disable it using the below command.
# systemctl disable --now chronyd
Set Date and Time in Linux
8. To set date and time, we can use a set-time switch along with the format of date in YY:MM:DD (Year, Month, Day) and time in HH:MM:SS (Hour, Minute, and Seconds).
# timedatectl set-time '2015-11-20 16:14:50'
How to Find and Set Hardware Clock in Linux
9. To set your hardware clock to coordinated universal time, UTC, use the set-local-rtc boolean-value option as follows:
First Find out if your hardware clock is set to local timezone:
Set your hardware clock to local timezone:
# timedatectl set-local-rtc 1
Set your hardware clock to coordinated universal time (UTC):
# timedatectl set-local-rtc 0
Synchronizing Linux System Clock with a Remote NTP Server
NTP stands for Network Time Protocol is an internet protocol, which is used to synchronize the system clock between computers. The timedatectl utility enables you to automatically sync your Linux system clock with a remote group of servers using NTP.
Please note that you must have NTP installed on the system to enable automatic time synchronization with NTP servers.
To start automatic time synchronization with a remote NTP server, type the following command at the terminal.
To disable NTP time synchronization, type the following command at the terminal.
Summary
These are very easy examples described in this tutorial and I hope you will find them helpful for setting various Linux system clocks and timezones. To learn more about this tool, head over to timedatectl man page.
If you have anything to say about this article, feel free to leave a comment for any more information to add. Stay connected to Tecmint.