Таблица маршрутизации роутера tp link
T1600G-18TS v2 or above, T1600G-28TS v3 or above, T1600G-28PS v3 or above, T1600G-52TS v3 or above, T1600G-52PS v3 or above, T1700X-16TS v3 or above, T1700G-28TQ v3 or above, T2600G-18TS v2 or above, T2600G-28TS v3 or above, T2600G-28MPS v3 or above, T2600G-28SQ v1 or above, T2600G-52TS v3 or above.
Routing table is used for a Layer 3 device (in this configuration guide, it means the switch) to forward packets to the correct destination. When the switch receives packets of which the source IP address and destination IP address are in different subnets, it will check the routing table, find the correct outgoing interface then forward the packets.
The routing table mainly contains two types of routing entries: dynamic routing entries and static routing entries.
Dynamic routing entries are automatically generated by the switch. The switch use dynamic routing protocols to automatically calculate the best route to forward packets.
Static routing entries are manually added none-aging routing entries. In a simple network with a small number of devices, you only need to configure static routes to ensure that the devices from different subnets can communicate with each other. On a complex large-scale network, static routes ensure stable connectivity for important applications because the static routes remain unchanged even when the topology changes.
The switch supports IPv4 static routing and IPv6 static routing configuration.
2 IPv4 Static Routing Configuration
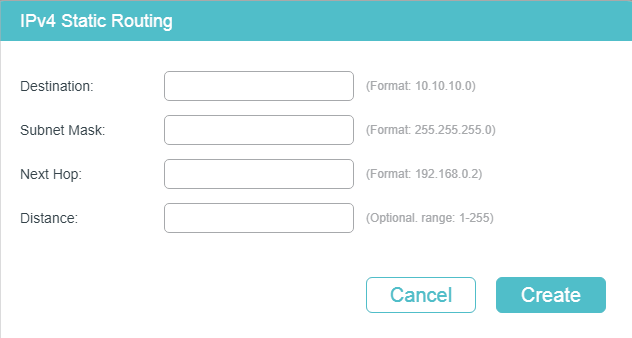
Choose the menu L3 FEATURES > Static Routing > IPv4 Static Routing and click to load the following page.
Figure 2-1 Configuring the IPv4 Static Routing
Configure the corresponding parameters to add an IPv4 static routing entry. Then click Create .
Specify the destination IPv4 address of the packets.
Specify the subnet mask of the destination IPv4 address.
Specify the IPv4 gateway address to which the packet should be sent next.
Specify the administrative distance, which is the trust rating of a routing entry. A higher value means a lower trust rating. Among the routes to the same destination, the route with the lowest distance value will be recorded in the IPv4 routing table.
The valid value ranges from 1 to 255 and the default value is 1.
Follow these steps to create an IPv4 static route.
Enter global configuration mode.
dest-address: Specify the destination IPv4 address of the packets.
mask: Specify the subnet mask of the destination IPv4 address.
next-hop-address: Specify the IPv4 gateway address to which the packet should be sent next.
distance: Specify the administrative distance, which is a rating of the trustworthiness of the routing information. A higher value means a lower trust rating. When more than one routing protocols have routes to the same destination, only the route that has the shortest distance will be recorded in the IP routing table. The valid values are from 1 to 255 and the default value is 1.
show ip route [ static | connected ]
Verify the IPv4 route entries of the specified type.
Return to privileged EXEC mode.
copy running-config startup-config
Save the settings in the configuration file.
The following example shows how to create an IPv4 static route with the destination IP address as 192.168.2.0, the subnet mask as 255.255.255.0 and the next-hop address as 192.168.0.2:
Switch(config)#ip route 192.168.2.0 255.255.255.0 192.168.0.2
Switch(config)#show ip route
Codes: C — connected, S — static
C 192.168.0.0/24 is directly connected, Vlan1
S 192.168.2.0/24 [1/0] via 192.168.0.2, Vlan1
Switch#copy running-config startup-config
3 IPv6 Static Routing Configuration
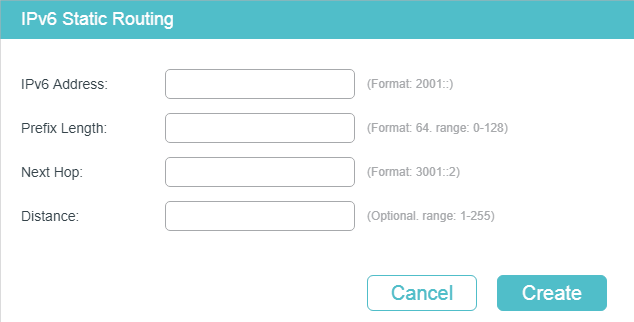
Choose the menu L3 FEATURES > Static Routing > IPv6 Static Routing > IPv6 Static Routing Table and click to load the following page.
Figure 3-1 Configuring the IPv6 Static Routing
Configure the corresponding parameters to add an IPv6 static routing entry. Then click Create .
Specify the destination IPv6 address of the packets.
Specify the prefix length of the IPv6 address.
Specify the IPv6 gateway address to which the packet should be sent next.
Specify the administrative distance, which is the trust rating of a routing entry. A higher value means a lower trust rating. Among the routes to the same destination, the route with the lowest distance value will be recorded in the IPv6 routing table.
The valid value ranges from 1 to 255 and the default value is 1
Follow these steps to enable IPv6 routing function and create an IPv6 static route.
Enter global configuration mode.
Enable the IPv6 routing function on the specified Layer 3 interface.
ipv6-dest-address: Specify the destination IPv6 address of the packets, in the format of X:X:X:X::X/.
next-hop-address: Specify the IPv6 gateway address to which the packet should be sent next.
distance: Specify the administrative distance, which is a rating of the trustworthiness of the routing information. A higher value means a lower trust rating. When more than one routing protocols have routes to the same destination, only the route that has the shortest distance will be recorded in the IP routing table. The valid values are from 1 to 255 and the default value is 1.
show ipv6 route [ static | connected ]
Verify the IPv6 route entries of the specified type.
Return to privileged EXEC mode.
copy running-config startup-config
Save the settings in the configuration file.
The following example shows how to create an IPv6 static route with the destination IP address as 3200::/64 and the next-hop address as 3100::1234:
Switch(config)#ipv6 route 3200::/64 3100::1234
Switch(config)#show ipv6 route static
Codes: C — connected, S — static
C 3000::/64 is directly connected, Vlan1
S 3200::/64 [1/0] via 3100::1234 , Vlan2
Switch#copy running-config startup-config
You can view the routing tables to learn about the network topology. The switch supports IPv4 routing table and IPv6 routing table.
4.1.1 Viewing IPv4 Routing Table
Choose the menu L3 FEATURES > Routing Table > IPv4 Routing Table to load the following page.
Figure 4-1 Viewing IPv4 Routing Table
View the IPv4 routing entries .
Displays the type of the routing entry.
Connected : The destination network is directed connected to the switch.
Static : The routing entry is a manually added static routing entry.
Displays the destination IP address and subnet mask.
Displays the IPv4 gateway address to which the packet should be sent next.
Displays the administrative distance, which is the trust rating of a routing entry. A higher value means a lower trust rating. Among the routes to the same destination, the route with the lowest distance value will be recorded in the IPv6 routing table.
Displays the metric to reach the destination IP address.
Displays the name of the gateway interface.
4.1.2 Viewing IPv6 Routing Table
Choose the menu L3 FEATURES> Routing Table > IPv6 Routing Table to load the following page.
Figure 4-2 Viewing IPv6 Routing Table
View the IPv6 routing entries .
Displays the type of the routing entry.
Connected : The destination network is directed connected to the switch.
Static : The routing entry is a manually added static routing entry.
Displays the destination IPv6 address and subnet mask.
Displays the IPv6 gateway address to which the packet should be sent next.
Displays the administrative distance, which is the trust rating of a routing entry. A higher value means a lower trust rating. Among the routes to the same destination, the route with the lowest distance value will be recorded in the IPv6 routing table.
Displays the metric to reach the destination IPv6 address.
Displays the name of the gateway interface.
4.2.1 Viewing IPv4 Routing Table
On privileged EXEC mode or any other configuration mode, you can use the following command to view IPv4 routing table:
show ip route [ static | connected ]
View the IPv4 route entries of the specified type. If not specified, all types of route entries will be displayed.
static: View the static routes.
connected: View the connected routes.
4.2.2 Viewing IPv6 Routing Table
On privileged EXEC mode or any other configuration mode, you can use the following command to view IPv6 routing table:
show ipv6 route [ static | connected ]
View the IPv6 route entries of the specified type. If not specified, all types of route entries will be displayed.
static: View the static IPv6 routes.
connected: View the connected IPv6 routes.
5 Example for Static Routing
As shown below, Host A and Host B are on different network segments. To meet business needs, Host A and Host B need to establish a connection without using dynamic routing protocols to ensure stable connectivity.
Figure 5-1 Network Topology
To implement this requirement, you can configure the default gateway of host A as 10.1.1.1/24, the default gateway of host B as 10.1.2.1/24, and configure IPv4 static routes on Switch A and Switch B so that hosts on different network segments can communicate with each other.
Demonstrated with T2600G-28TS, the following sections provide configuration procedure in two ways: using the GUI and using the CLI.
The configurations of Switch A and Switch B are similar. The following introductions take Switch A as an example.
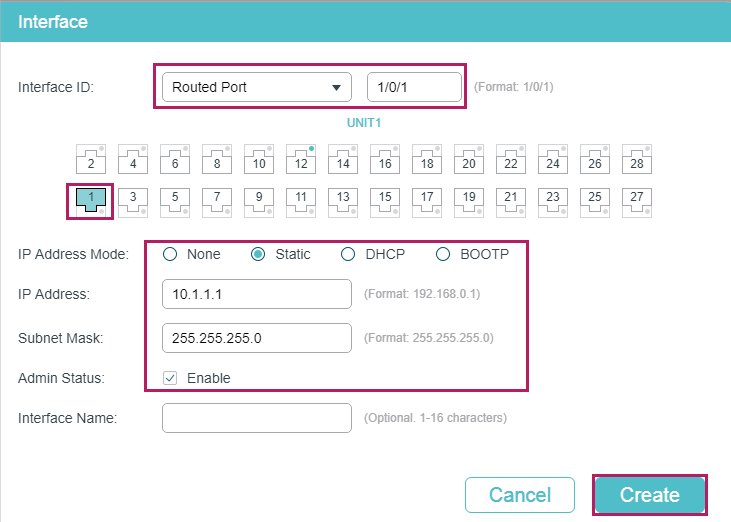
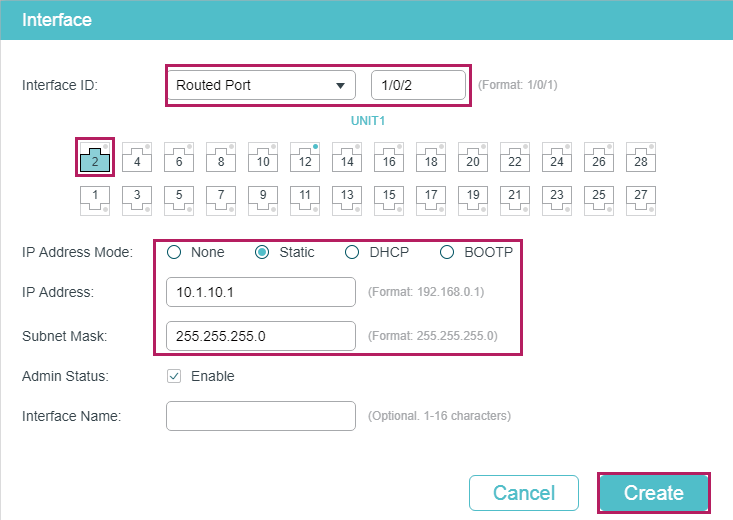
1) Choose the menu L3 FEATURES > Interface to create a routed port Gi1/0/1 with the mode as static, the IP address as 10.1.1.1, the mask as 255.255.255.0 and the admin status as Enable. Create a routed port Gi1/0/2 with the mode as static, the IP address as 10.1.10.1, the mask as 255.255.255.0 and the admin status as Enable.
Figure 5-2 Create a Routed Port Gi1/0/1 for Switch A
Figure 5-3 Create a Routed Port Gi1/0/2 for Switch A
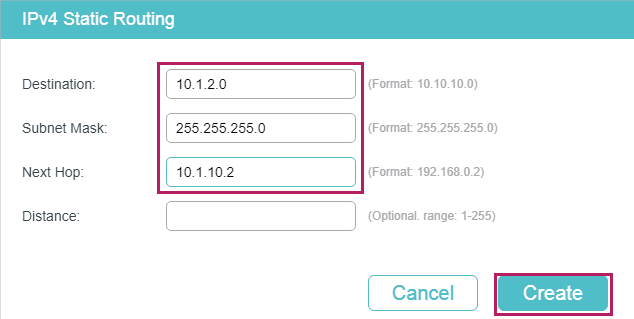
2) Choose the menu L3 FEATURES > Static Routing > IPv4 Static Routing to load the following page. Add a static routing entry with the destination as 10.1.2.0, the subnet mask as 255.255.255.0 and the next hop as 10.1.10.2. For switch B, add a static route entry with the destination as 10.1.1.0, the subnet mask as 255.255.255.0 and the next hop as 10.1.10.1.
Figure 5-4 Add a Static Route for Switch A
The configurations of Switch A and Switch B are similar. The following introductions take Switch A as an example.
1) Create a routed port Gi1/0/1 with the mode as static, the IP address as 10.1.1.1, the mask as 255.255.255.0 and the admin status as Enable. Create a routed port Gi1/0/2 with the mode as static, the IP address as 10.1.10.1, the mask as 255.255.255.0 and the admin status as Enable.
Switch_A(config)#interface gigabitEthernet 1/0/1
Switch_A(config-if)#ip address 10.1.1.1 255.255.255.0
Switch_A(config)#interface gigabitEthernet 1/0/2
Switch_A(config-if)#ip address 10.1.10.1 255.255.255.0
2) Add a static route entry with the destination as 10.1.2.0, the subnet mask as 255.255.255.0 and the next hop as 10.1.10.2. For switch B, add a static route entry with the destination as 10.1.1.0, the subnet mask as 255.255.255.0 and the next hop as 10.1.10.1.
Switch_A(config)#ip route 10.1.2.0 255.255.255.0 10.1.10.2
Switch_A#copy running-config startup-config
Verify the Configurations
Verify the static routing configuration:
Codes: C — connected, S — static
C 10.1.1.0/24 is directly connected, Vlan10
C 10.1.10.0/24 is directly connected, Vlan20
S 10.1.2.0/24 [1/0] via 10.1.10.2, Vlan20
Verify the static routing configuration:
Codes: C — connected, S — static
C 10.1.2.0/24 is directly connected, Vlan30
C 10.1.10.0/24 is directly connected, Vlan20
S 10.1.1.0/24 [1/0] via 10.1.10.1, Vlan20
Connectivity Between Switch A and Switch B
Run the ping command on switch A to verify the connectivity:
Pinging 10.1.2.1 with 64 bytes of data :
Reply from 10.1.2.1 : bytes=64 time
Reply from 10.1.2.1 : bytes=64 time
Reply from 10.1.2.1 : bytes=64 time
Reply from 10.1.2.1 : bytes=64 time
Ping statistics for 10.1.2.1:
Packets: Sent = 4 , Received = 4 , Lost = 0 (0% loss)
Approximate round trip times in milli-seconds:
Minimum = 1ms , Maximum = 3ms , Average = 1ms
