- telnet on Kali Linux
- 2. Uninstall / Remove telnet package
- 3. Details of telnet package
- 4. References on Kali Linux
- 5. The same packages on other Linux Distributions
- How To Install and Use Telnet Client In Linux and Windows
- Install
- Ubuntu, Debian, Mint, Kali
- Fedora, CentOS, RHEL
- Windows
- Security
- Connect Telnet Server
- Connect Different Telnet Port
- Specify Login Name
- Interactive Shell
- Linux telnet Command Tutorial
- Warning Telnet Is Not Secure
- Install telnet Command
- Install Telnet Server (telnetd)
- Allow telnet Service Port In Firewall
- Connect Telnet Server
- Connect Telnet Server with Non-Default Port
- Telnet Interactive Shell
- Display Telnet Connection Status
- Close/Logout Telnet Connection
- List Of Telnet Command and Examples
- Install Telnet From Windows Command Line
- Install Telnet For Ubuntu, Debian, Mint, Kali
- Install Telnet For Fedora, CentOS, RedHat
- Connect Remote Telnet Server
- Connect Remote Telnet Server with Different Port Number
- Start Telnet Interactive Shell
- Help Command
- Open Command
- Close Command
- Display Command
- Quit Command
- Set Command
- Unset Command
- Status Command
telnet on Kali Linux
Please follow the steps below to install telnet package:
2. Uninstall / Remove telnet package
Please follow the instructions below to uninstall telnet package:
3. Details of telnet package
Package: telnet
Source: inetutils (2:2.3-5)
Version: 0.17+2.3-5
Installed-Size: 49
Maintainer: Guillem Jover
Architecture: all
Depends: inetutils-telnet
Size: 37544
SHA256: e44e6d14dfc6b4c2961a74afa4fb148989f26a42ba8e1823f377ee341bfeebda
SHA1: 947ab13c17858a72acd1557f2e84fa955a9323b8
MD5sum: 591af1aeda739f411626e1b7634a7788
Description: transitional dummy package for inetutils-telnet default switch
This package will force a switch from the old netkit telnet implementation
to the inetutils-telnet one, which is an upstream maintained project.
.
This package can be safely removed once it has been upgraded, as
inetutils-telnet provides a matching virtual package. It will stop being
provided after Debian bookworm’s release.
.
If you want to keep using the netkit implementation, then install
netkit-telnet instead.
Description-md5: 585f33831b9ee8d09d2941beb715379e
Multi-Arch: foreign
Homepage: https://www.gnu.org/software/inetutils/
Tag: admin::login, interface::shell, network::client, protocol::ipv6,
protocol::telnet, role::program, uitoolkit::ncurses, use::login
Section: oldlibs
Priority: optional
Filename: pool/main/i/inetutils/telnet_0.17+2.3-5_all.deb
4. References on Kali Linux
5. The same packages on other Linux Distributions
![]()
telnet (0.17-41) Ubuntu 18.04 LTS (Bionic Beaver)
![]()
telnet (0.17-40) Ubuntu 16.04 LTS (Xenial Xerus)
![]()
telnet (0.17-41.2build1) Ubuntu 20.10 (Groovy Gorilla)
![]()
telnet (0.17-42) Ubuntu 21.10 (Impish Indri)
![]()
telnet (1.2-1.30) openSUSE Leap
![]()
telnet (1.2-174.9) openSuSE Tumbleweed
![]()
telnet (0.17-44build1) Ubuntu 22.04 LTS (Jammy Jellyfish)
![]()
telnet (0.17-41.2) Debian 10 (Buster)
How To Install and Use Telnet Client In Linux and Windows

Telnet is easiest remote management protocol used in Computer networks. It remains popular even today because of its simplicity. Telnet is a client server protocol where clients uses telnet tool which to connect remote telnet server. This telnet server may be switch, router, windows operating system, linux server or a printer. In this tutorial we will look how to install and enable telnet with some usage examples.
Install
Ubuntu, Debian, Mint, Kali
We can install telnet package with the following command in deb based Linux distributions.
Fedora, CentOS, RHEL
We can install telnet package with yum command for rpm based distributions like Fedora, centOS and RHEL.
Windows
As windows operating system do not have online package manager telnet is provided by inline. By defualt telnet server and client applications are not enabled. We will enable the client where server can be enabled too. Follow these instructions.

- Click Start >Control Panel.
- Click Programs and Features.
- Click Turn Windows features on or off.
- In the Windows Features dialog box, check the Telnet Client check box.
Security
As telnet is old fashion protocol it provides some defects. One of the most important negative issue with telnet is its security features. Telnet do not have any encryption support as builtin. So telnet traffic can be easily eavesdropped during transmission. So do not rely telnet on insecure networks.
Connect Telnet Server
We will start by simply connecting a telnet server. The simplest form is just providing the host name or IP address of the telnet server. The syntax is like below. In this example telnet server is a Ubuntu 17.10 .

Connect Different Telnet Port
The default port for telnet is TCP 23 . By default it is not specified during connection. But in some cases telnet server may use different then 23. We can specify the port number by adding after the host name or IP address. In this example we will connect port number 2323 .
Specify Login Name
Most cases telnet servers requires authentication. In order to authenticate ourself we need to provide some user name and password. The regular usage is providing username and then put password interactively. We will use -l which stands for login.
$ telnet -l ismail 192.168.115.143

Interactive Shell
Telnet provides interactive shell where it provides its own environment. We can enter interactive shell just putting telnet command.
We can get help for interactive shell with help command. We can see that we will use open command and the hostname or IP address to connect telnet server.

We will connect to the localhost telnet server.
Linux telnet Command Tutorial

Telnet is a network protocol and tool used to connect remote systems via a command-line interface. Similar to SSH, telnet can be used to manage remote systems. Telnet use the TCP port 23. Event the telnet is created by Microsoft it is popularly used Linux and network systems. In this tutorial we examine how to install telnet client, telnet server, how to connect telnet and use it.
Warning Telnet Is Not Secure
Before starting the tutorial we want to explain that the telnet protocol is not secure by default. The telnet connection is a clear text connection where the telnet traffic is not encrypted and can be easily sniffed. Also, telnet does not provide remote service verification like SSH. Even it is not secure by default some steps can be taken in order to make it secure like using SSL/TLS tunnels.
Install telnet Command
The telnet command can be installed by using the apt or dnf package managers for the related Linux distributions.
Install Telnet For Ubuntu, Debian, Mint, Kali:
Install Telnet For Fedora, CentOS, RHEL:
Install Telnet Server (telnetd)
The telnet client connects to the telnet server in order to manage the telnet server. The telnet server should be installed for this connection. The telnet server package name is telnetd where the letter d comes from daemon. The telnet server or service can be installed like below.
Install Telnet Server For Ubuntu, Debian, Mint, Kali:
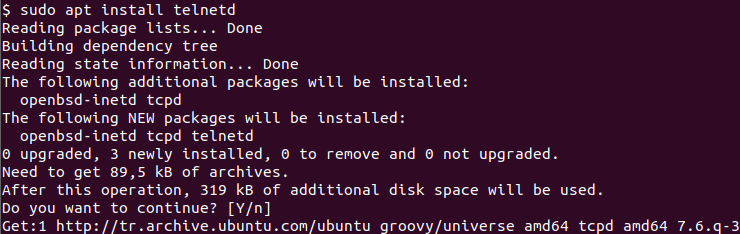
Install Telnet Server For Fedora, CentOS, RHEL:
Allow telnet Service Port In Firewall
Most of the Linux distributions come with a firewall installed and enabled. In order to connect the telnet server, there is two way. The first one is adding an exception about telnet port which is 23 or stopping the firewall completely. In the following step, we add exceptions and allow telnet connections to the telnet server. The following command is executed in the telnet server.
Alternatively, we can specify port number 23 like below.
Connect Telnet Server
Telnet command can be used to connect a remote telnet server or telnet service. The IP address or hostname of the remote telnet server is provided like below.
Alternatively, the remote server IP address can be also specified like below.
Connect Telnet Server with Non-Default Port
The telnet service default port number is 23 but in some cases, this may be different for security reasons. The non-default port number can be specified after the telnet server IP address or hostname. In the following example, we connect a remote telnet server with non-default port number 2323 .
Telnet Interactive Shell
Telnet provides an interactive shell if it is executed without any remote server IP address. The interactive shell can be used to connect remote telnet servers or print connection status etc.
Display Telnet Connection Status
Telnet provides different useful commands. The status command can be used to show the current status of the telnet connection. The status command is executed in the telnet interactive shell.
Close/Logout Telnet Connection
A telnet connection can be closed or exited or logout with the close command like below.
List Of Telnet Command and Examples

telnet is very important protocol used to connect remote systems via command line. It has some security defects but used widely because of its simple and widespread usage. In this tutorial we will learn telnet commands .
Install Telnet From Windows Command Line
We have all ready examined how to install telnet in Windows operating systems. This can be looked from following tutorial.
In this case we will use dism tool from command line. This will also require Administrator privileges.
> Dism /Online /Enable-feature /FeatureName:TelnetClient

Install Telnet For Ubuntu, Debian, Mint, Kali
We can install telnet client with the following command for Ubuntu, Debian, Mint, Kali.
Install Telnet For Fedora, CentOS, RedHat
We can install telnet client with the following command for Fedora, CentOS, RedHat .
Connect Remote Telnet Server
We can connect a remote telnet service with the telnet command like below. We just need to specify the remote system IP address or host name. In this example we will connect 192.168.142.138 .

We will also provide the user name and password.
Connect Remote Telnet Server with Different Port Number
Default telnet port is TCP/23. But in some cases we can change port number for security reasons. If so we need to specify the port number explicitly. We will add the port number after the IP address or host name. In this example we will connect remote telnet port 2323 .
Start Telnet Interactive Shell
Now we start using telnet interactive shell. Interactive shell provides some commands specially created for telnet . We can start a telnet interactive shell with telnet command like below.

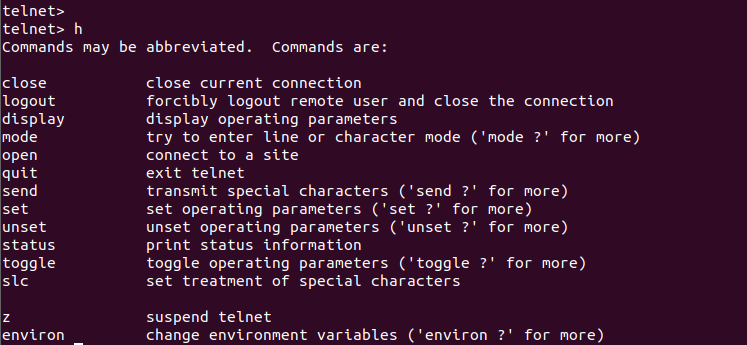
Help Command
In order to list all commands provided by telnet interactive shell and their explanation we can use h or help command like below.

As we can see that command short and long usage with explanation.
Open Command
We can use open command in order to connect remote system. We can also use o short usage form by providing the remote system IP address or host name.
Close Command
We can use close command in in order to close current connection to the remote system.
Display Command
Telnet provides terminal functions. Terminals provides some features which can be displayed with the display command.

- We can see that Escape Character is `CTRL+ü`
- `NTLM` authentication enabled
- Local echo is off
- New line mode is CR & LF
- Current mode is console
- Preferred termina type is ANSI
Quit Command
If we want to exit from the current telnet interactive shell we can use quit command. Alternative is q command.
![]()
Set Command
We can enable given terminal settings with set command. We can list avaiable settings with set ?

Unset Command
unset is used to disable given terminal option which is the reverse of set command.
Status Command
status command will list current connection status. We can list current status with s command too. In this example we can see that there is no connection.