- How to Install and Use Telnet on Linux Systems
- Install Telnet in Linux
- Testing Remote Linux Connections via Telnet
- Testing Open Ports on Linux via Telnet
- Как установить и использовать Telnet в Ubuntu 22.04 LTS
- Требования
- Установить Telnet-сервер
- Проверка подключения Telnet из удаленной системы
- Используйте telnet для проверки открытых портов
- Используйте команду Telnet для проверки почтового сервера
- How To Install and Use Telnet Client In Linux and Windows
- Install
- Ubuntu, Debian, Mint, Kali
- Fedora, CentOS, RHEL
- Windows
- Security
- Connect Telnet Server
- Connect Different Telnet Port
- Specify Login Name
- Interactive Shell
How to Install and Use Telnet on Linux Systems
Remote access to other operating system environments on an active network is not just a thing of the SSH (Secure Shell) protocol. Telnet achieves the same functionality through TCP/IP protocol.
With Telnet, you not only get to establish successful remote connections but also troubleshoot and test the system services that define the remote computing environment.
For instance, we could check if a particular port is active/open/listening on the targeted remote system. It is worth noting that Telnet utilizes port 23 for its remote TCP connections.
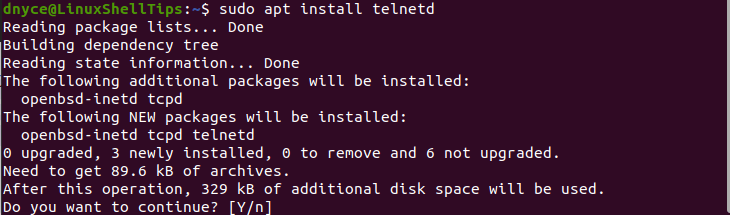
Install Telnet in Linux
This article will walk us through the installation and usage of this ancient server administration protocol. Since Telnet is unencrypted, its recommended usage is for testing purposes only and in user-defined networks.
$ sudo apt-get install telnetd [On Debian, Ubuntu and Mint] $ sudo yum install telnetd [On RHEL/CentOS/Fedora and Rocky Linux/AlmaLinux] $ sudo emerge -a net-misc/netkit-telnetd [On Gentoo Linux] $ sudo pacman -S telnetd [On Arch Linux] $ sudo zypper install telnetd [On OpenSUSE]
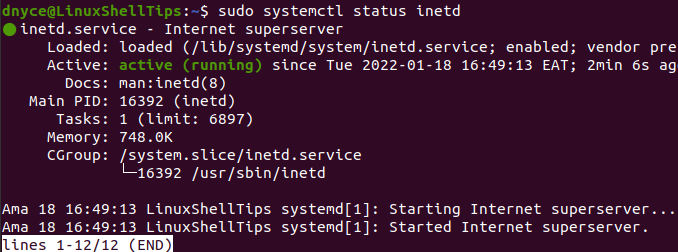
Check on its status to make sure it is up and running.
$ sudo systemctl status inetd
Testing Remote Linux Connections via Telnet
To perform an unencrypted connection to remote host systems via Telnet, we first need to identify the IP address of the machine we are targeting.

Also, the targeted remote Linux machine should have Telnet installed on it as per the suggested installation commands discussed above.
$ sudo apt install telnetd -y
Also, check on the status of Telnet to make sure it is running on the remote machine too.
$ sudo systemctl status inetd
On the Telnet-powered server machine, we will adhere to the following syntax rule:
$ telnet [remote-system-ip-address]
The implementation of the above syntax rule will look like the following:
The above IP address belongs to the targeted machine. If you are using or have a firewall enabled on your remote/targeted Linux machine, you will need to allow traffic through port 23 since Telnet uses it for its network communication.
$ sudo ufw allow 23/tcp [On Ubuntu & Debian] $ sudo firewall-cmd --permanent --zone=public --add-port=23/tcp [On RHEL] $ sudo firewall-cmd --reload
We can now attempt to make a Telnet connection to a targeted/remote Linux machine.

An acceptable user login input will be followed by a password request which when we key in should give us managerial access to the remote Linux system. Once granted access, the interface should change to something like the following:
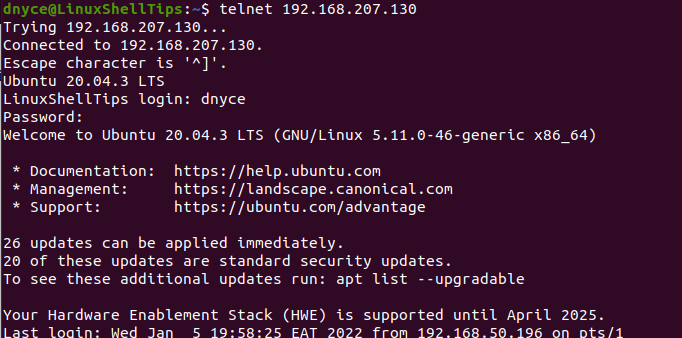
From here, we can perform normal OS operations if needed.
Testing Open Ports on Linux via Telnet
Another interesting feature Telnet offers its users is its ability to detect an open or closed port on a targeted remote system via its IP address. This feature is useful in figuring out any vulnerabilities present on your system.
For instance, we can check if the above discussed remote system has port 80 open by executing the following command:
If the port is open, you will see an output like the following:

If the port is blocked, then expect the following outcome:

You can also test your mail server through the SMTP port 25:
With Telnet, you can make remote connections to other client computers with the same approach as SSH and additionally test any vulnerabilities on your system by troubleshooting if a suspicious port is listening/open or unintentionally closed.
Как установить и использовать Telnet в Ubuntu 22.04 LTS
Telnet — это программа эмуляции терминала для сетей TCP/IP, которая позволяет вам получить доступ к другому компьютеру в Интернете или в локальной сети, войдя в удаленную систему. Telnet — это клиент-серверный протокол, который подключается к порту 23 протокола управления передачей. Вы также можете использовать Telnet для проверки открытых портов в удаленной системе.
В этом руководстве вы узнаете, как установить и использовать сервер и клиент Telnet на сервере Ubuntu 22.04 LTS.
ПРЕДУПРЕЖДЕНИЕ. Telnet — незашифрованный и поэтому небезопасный протокол. Это руководство предназначено только для образовательных целей и не является рекомендацией по использованию Telnet Server в вашей системе. Это руководство покажет вам, как установить и использовать клиент и сервер Telnet, если вы хотите узнать больше об этом древнем протоколе администрирования сервера или если вы хотите использовать клиент Telnet для тестирования своего почтового сервера. Мы НЕ рекомендуем использовать Telnet (сервер) на современных серверах, особенно если вы используете его через Интернет. Для управления сервером по сети используйте SSH вместо Telnet. Использование клиента Telnet — это нечто другое. Клиент Telnet — это полезный инструмент для тестирования вашего почтового или веб-сервера, например, как показано ниже.
Требования
- Сервер с установленной Ubuntu 22.04.
- Пользователь без полномочий root с привилегиями sudo.
- На вашем сервере настроен статический IP-адрес 192.168.0.100.
Установить Telnet-сервер
По умолчанию пакет сервера Telnet доступен в репозитории по умолчанию Ubuntu 20.04. Вы можете установить его, просто выполнив следующую команду:
sudo apt install telnetd -y
После завершения установки вы можете проверить состояние службы Telnet с помощью следующей команды:
sudo systemctl status inetd
? inetd.service - Internet superserver Loaded: loaded (/lib/systemd/system/inetd.service; enabled; vendor preset: enabled) Active: active (running) since Thu 2022-08-04 09:10:22 UTC; 24s ago Docs: man:inetd(8) Main PID: 1158 (inetd) Tasks: 1 (limit: 1114) CGroup: /system.slice/inetd.service ??1158 /usr/sbin/inetd Aug 04 09:10:22 ubuntu2204 systemd[1]: Starting Internet superserver. Aug 04 09:10:22 ubuntu2204 systemd[1]: Started Internet superserver.
Проверка подключения Telnet из удаленной системы
Сервер Telnet теперь установлен и прослушивает порт 23. Пришло время подключиться к серверу Telnet из удаленной системы.
Теперь войдите в другую систему Ubuntu и выполните следующую команду:
Вам будет предложено ввести имя пользователя и пароль. После успешной аутентификации вы должны увидеть следующий вывод:
Trying 192.168.0.100. Connected to 192.168.0.100. Escape character is '^]'. Ubuntu 22.04 LTS ubuntu2204 login: hitesh Password: Welcome to Ubuntu 22.04 LTS (GNU/Linux 5.15.0-41-generic x86_64) * Documentation: https://help.ubuntu.com * Management: https://landscape.canonical.com * Support: https://ubuntu.com/advantage This system has been minimized by removing packages and content that are not required on a system that users do not log into. To restore this content, you can run the 'unminimize' command. Last login: Mon Jul 25 09:51:42 2022 from 192.168.0.22
Теперь вы можете выполнить любую команду на сервере Telnet, используя Telnet.
Используйте telnet для проверки открытых портов
Вы также можете использовать Telnet для проверки открытых портов в удаленной системе.
Например, чтобы проверить порт 80 в удаленной системе (IP 192.168.0.100), выполните следующую команду:
Если порт 80 открыт, вы должны увидеть следующий вывод:
Trying 192.168.0.100. Connected to 192.168.0.100. Escape character is '^]'.
Если порт 80 заблокирован или служба Telnet не запущена. Вы должны увидеть следующий вывод:
Trying 192.168.0.100. telnet: Unable to connect to remote host: Connection refused
Используйте команду Telnet для проверки почтового сервера
Команда Telnet также очень полезна для тестирования почтового сервера. Подключиться к почтовому серверу с помощью Telnet
Если соединение установлено успешно, вы увидите ответ от другого сервера, подобный этому:
Trying 192.168.0.100.
Connected to 192.168.0.100.
Escape character is '^]'.
220 server1.example.com ESMTP Postfix (Debian/GNU)
Теперь вы можете ответить серверу с помощью команды ehlo, за которой следует ваше доменное имя отправителя. Пример:
Почтовый сервер покажет вам, какие методы он поддерживает.
250-server1.example.com
250-PIPELINING
250-SIZE
250-VRFY
250-ETRN
250-STARTTLS
250-AUTH PLAIN LOGIN
250-AUTH=PLAIN LOGIN
250-ENHANCEDSTATUSCODES
250-8BITMIME
250-DSN
250-SMTPUTF8
250 CHUNKING
Чтобы выйти из соединения, введите команду quit.
221 2.0.0 Bye
Connection closed by foreign host.
Полная последовательность команд:
Эта тестовая процедура полезна, если вы хотите узнать, не заблокированы ли почтовые службы (порт 25) вашим интернет-провайдером или центром обработки данных.
How To Install and Use Telnet Client In Linux and Windows

Telnet is easiest remote management protocol used in Computer networks. It remains popular even today because of its simplicity. Telnet is a client server protocol where clients uses telnet tool which to connect remote telnet server. This telnet server may be switch, router, windows operating system, linux server or a printer. In this tutorial we will look how to install and enable telnet with some usage examples.
Install
Ubuntu, Debian, Mint, Kali
We can install telnet package with the following command in deb based Linux distributions.
Fedora, CentOS, RHEL
We can install telnet package with yum command for rpm based distributions like Fedora, centOS and RHEL.
Windows
As windows operating system do not have online package manager telnet is provided by inline. By defualt telnet server and client applications are not enabled. We will enable the client where server can be enabled too. Follow these instructions.

- Click Start >Control Panel.
- Click Programs and Features.
- Click Turn Windows features on or off.
- In the Windows Features dialog box, check the Telnet Client check box.
Security
As telnet is old fashion protocol it provides some defects. One of the most important negative issue with telnet is its security features. Telnet do not have any encryption support as builtin. So telnet traffic can be easily eavesdropped during transmission. So do not rely telnet on insecure networks.
Connect Telnet Server
We will start by simply connecting a telnet server. The simplest form is just providing the host name or IP address of the telnet server. The syntax is like below. In this example telnet server is a Ubuntu 17.10 .

Connect Different Telnet Port
The default port for telnet is TCP 23 . By default it is not specified during connection. But in some cases telnet server may use different then 23. We can specify the port number by adding after the host name or IP address. In this example we will connect port number 2323 .
Specify Login Name
Most cases telnet servers requires authentication. In order to authenticate ourself we need to provide some user name and password. The regular usage is providing username and then put password interactively. We will use -l which stands for login.
$ telnet -l ismail 192.168.115.143

Interactive Shell
Telnet provides interactive shell where it provides its own environment. We can enter interactive shell just putting telnet command.
We can get help for interactive shell with help command. We can see that we will use open command and the hostname or IP address to connect telnet server.

We will connect to the localhost telnet server.