- Castles Vega3000
- Signature Capture
- New Order:
- Simple Charge:
- Auth Only:
- Signature Screen
- Standalone Mode
- Printer
- Select a Network
- Generate and Enter Pairing Code
- Unpairing the terminal (from the computer/browser)
- Unpairing the computer/browser from terminal
- Rescan for Networks
- Forget the Current Network
- Related Articles
- Настройка Wi-Fi Vega 3000
- Захват подписи
- Новый заказ:
- Простой платеж:
- Только аутентификация:
- Экран подписи
- Автономный режим
- Принтер
Castles Vega3000

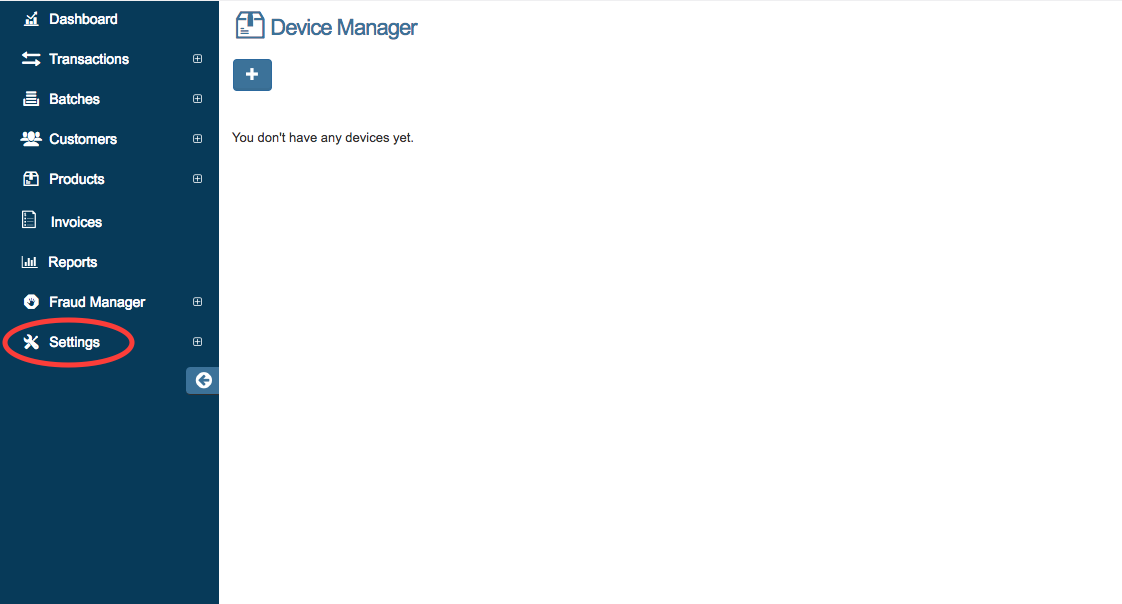
1.) To access the Device Manager, click on ‘Settings’ from your side menu bar then select ‘Device Manager’ on the drop down menu.
2.) A source key must be added first to connect your device (CASTLES VEGA3000). Go to ‘Settings’ from your side menu bar and then select ‘API Keys’ on the drop down menu. Click on ‘Add API Key’ to add a new source key.
3.) After a source key has been generated, return to the Device Manager section under Settings. Click on the ‘Add’ button to add a new Device. The following screen will appear to register device:
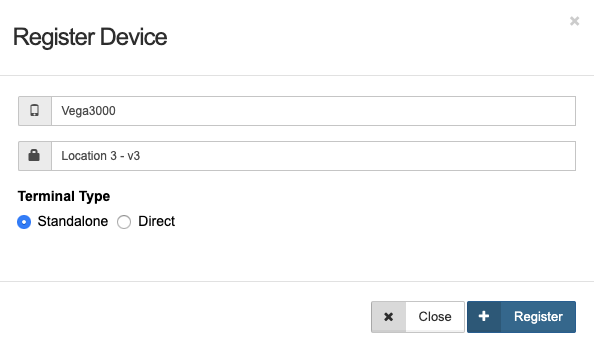
4.) Enter the Device’s Name, select the Source Key from the drop down menu as shown below, and select the Terminal Type as Standalone:
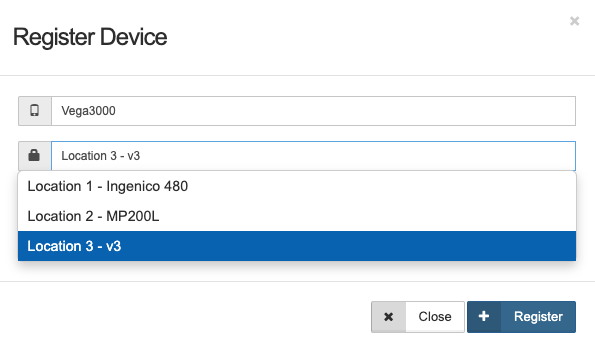
Once the Device Name, Source Key, and Terminal Type have been selected, click on ‘Register’. The Merchant Console will then generate a pairing code to pair your device to the Merchant Console.

The CASTLES VEGA3000 device will then ask you to enter the pairing code (shown in the Merchant Console):
5.) Once the pairing code has been entered, your device should be connected. In the Device Manager, the green icon in the top right of the box indicates that the device is connected.
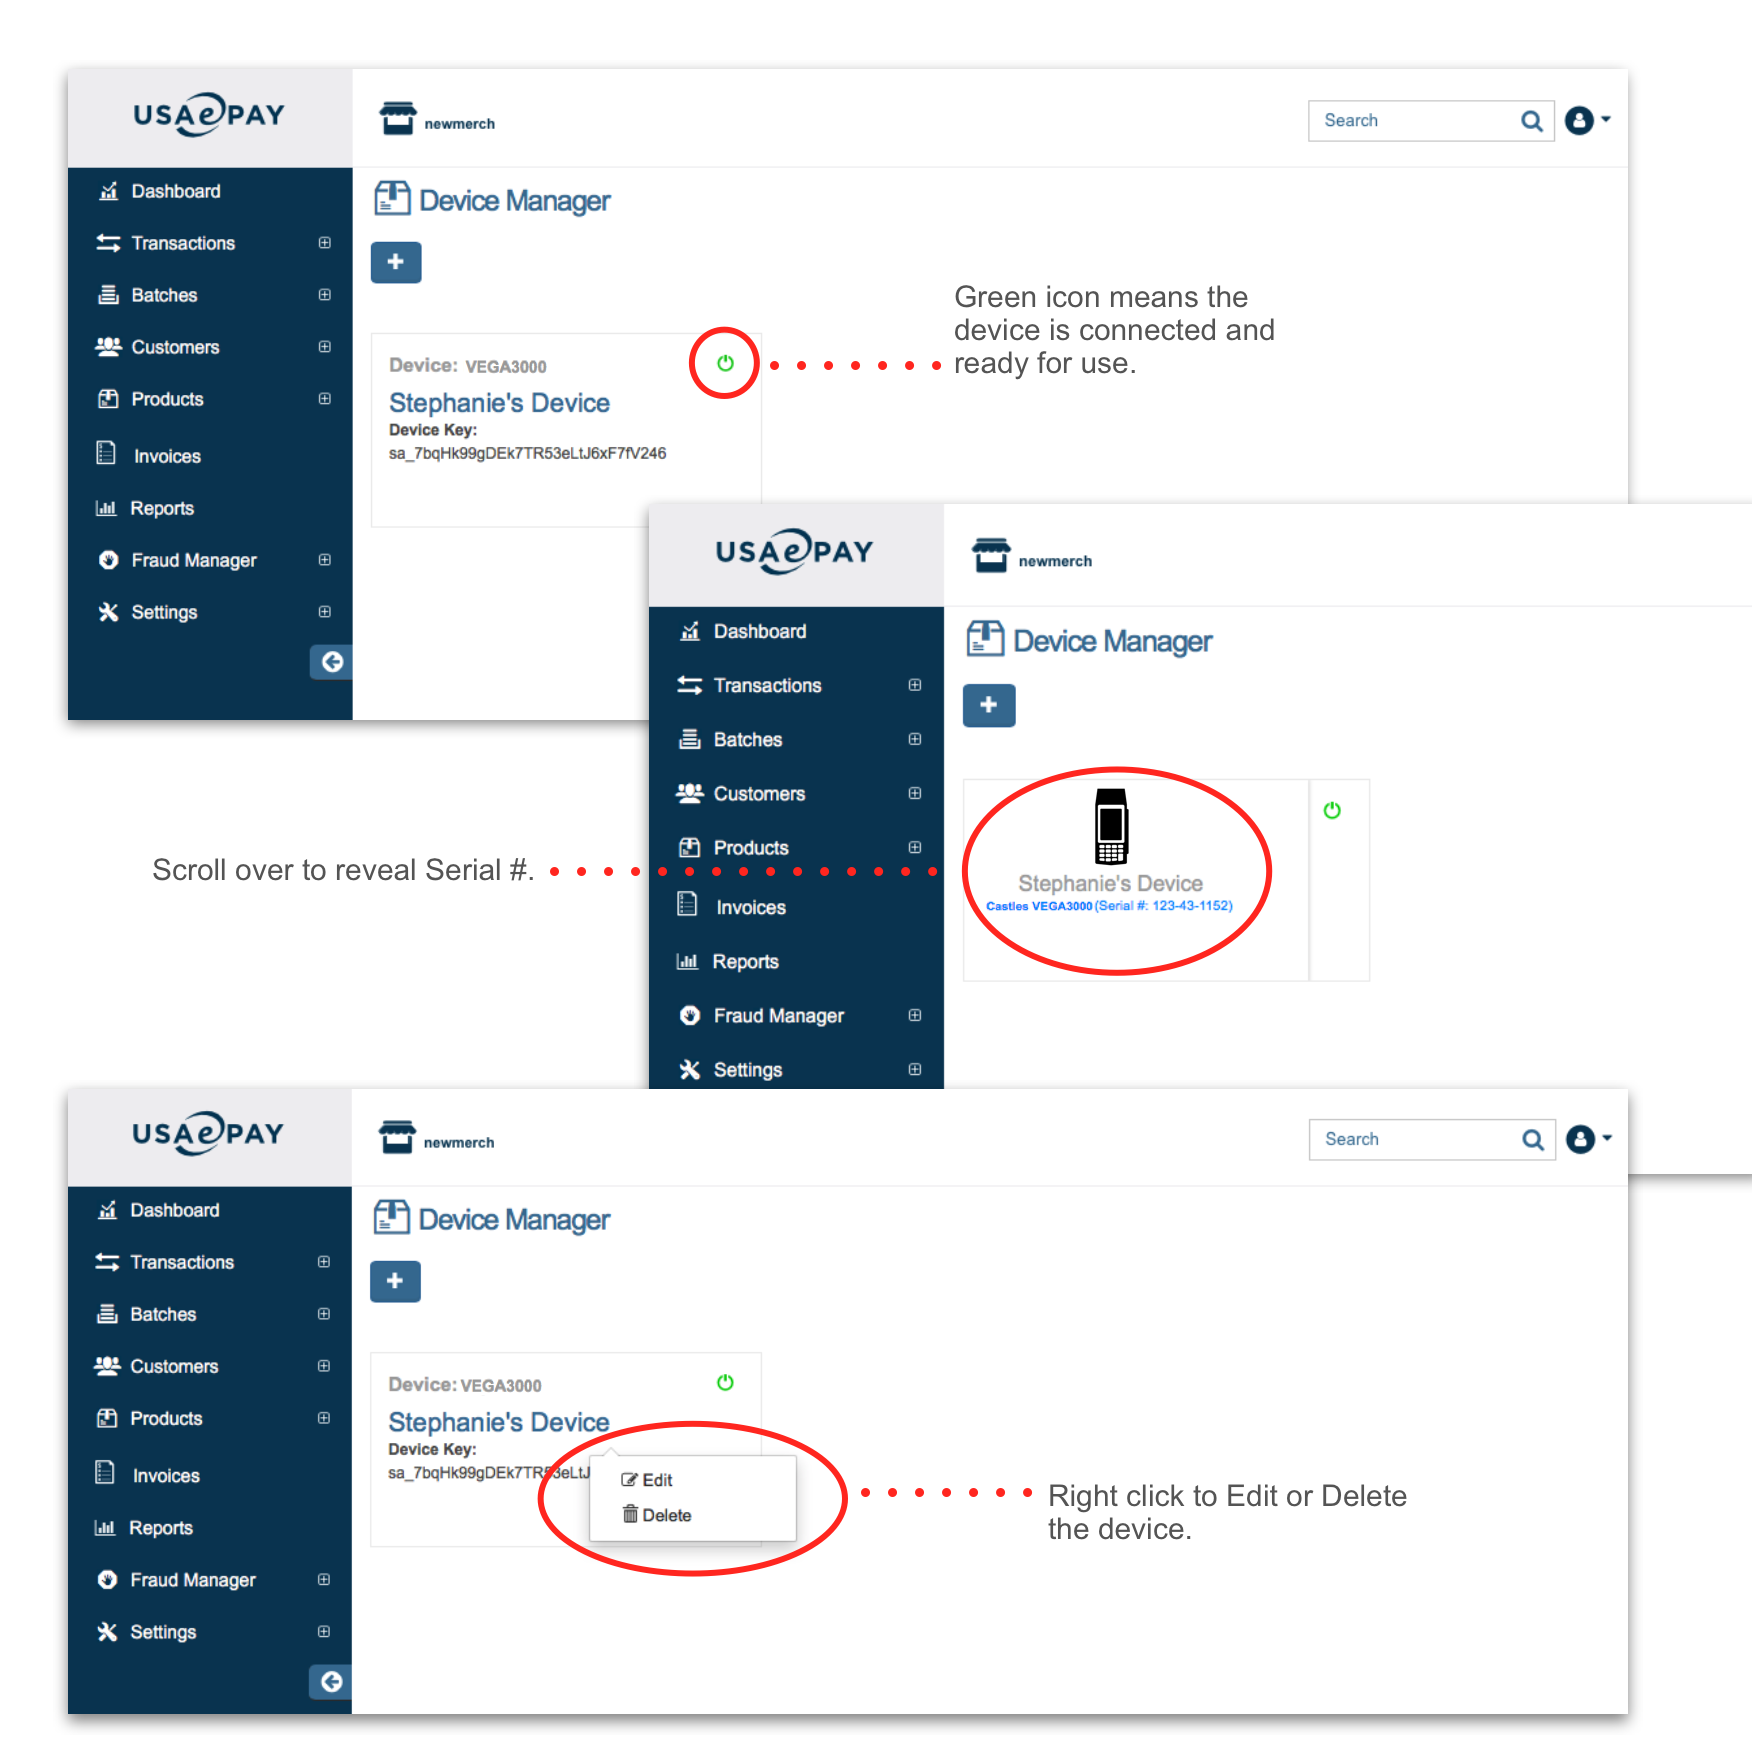
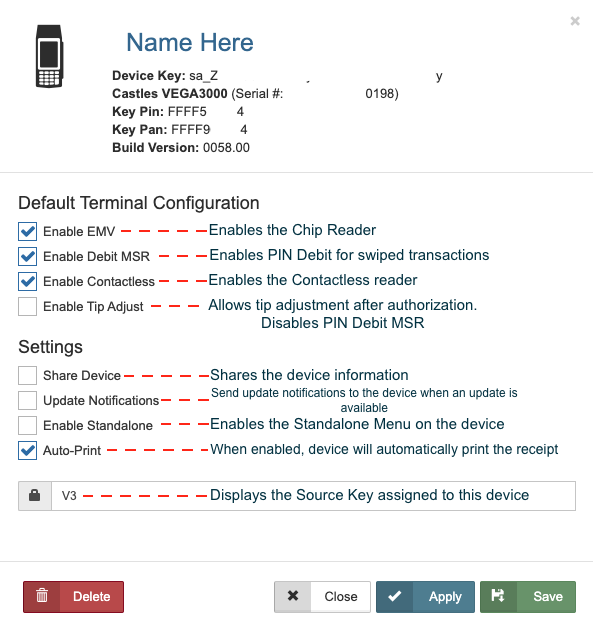
6.) Device Options: Click on the device to view the device settings. The following page with the device information and options will appear:
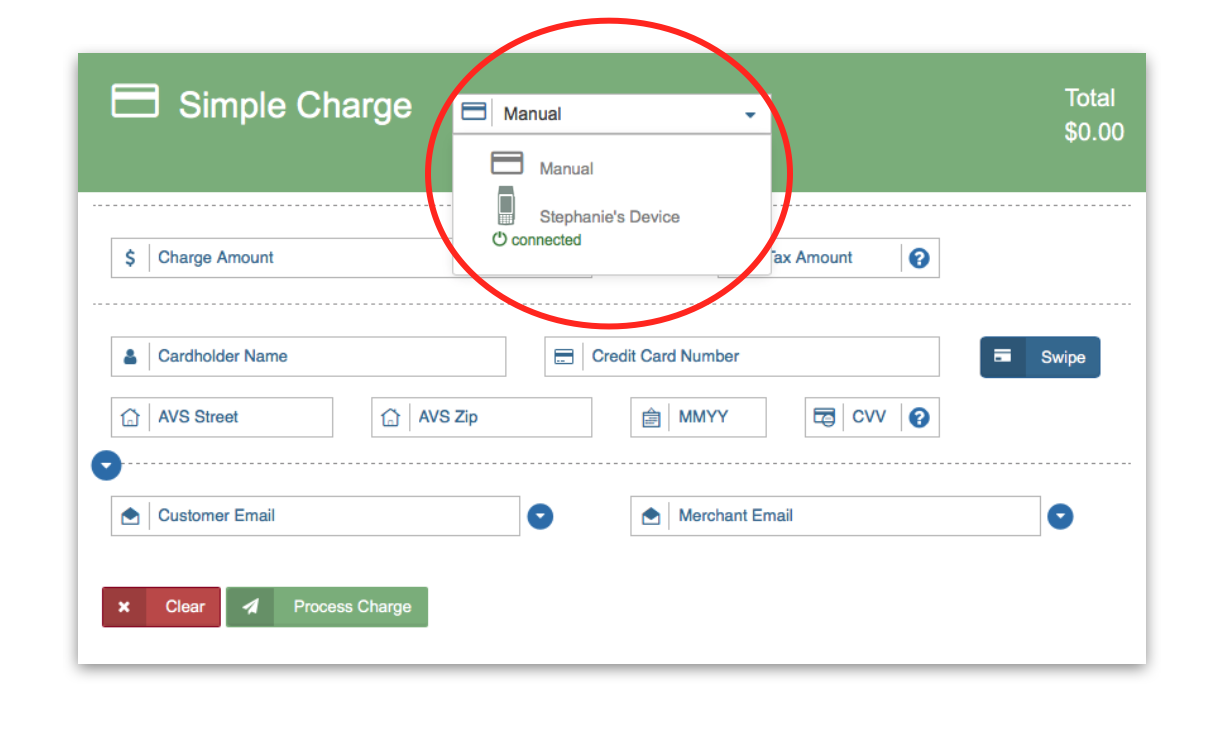
7.) Now that a device is connected to your Merchant Console, the Simple Charge option will appear under the ‘Transactions’ section of the Console.
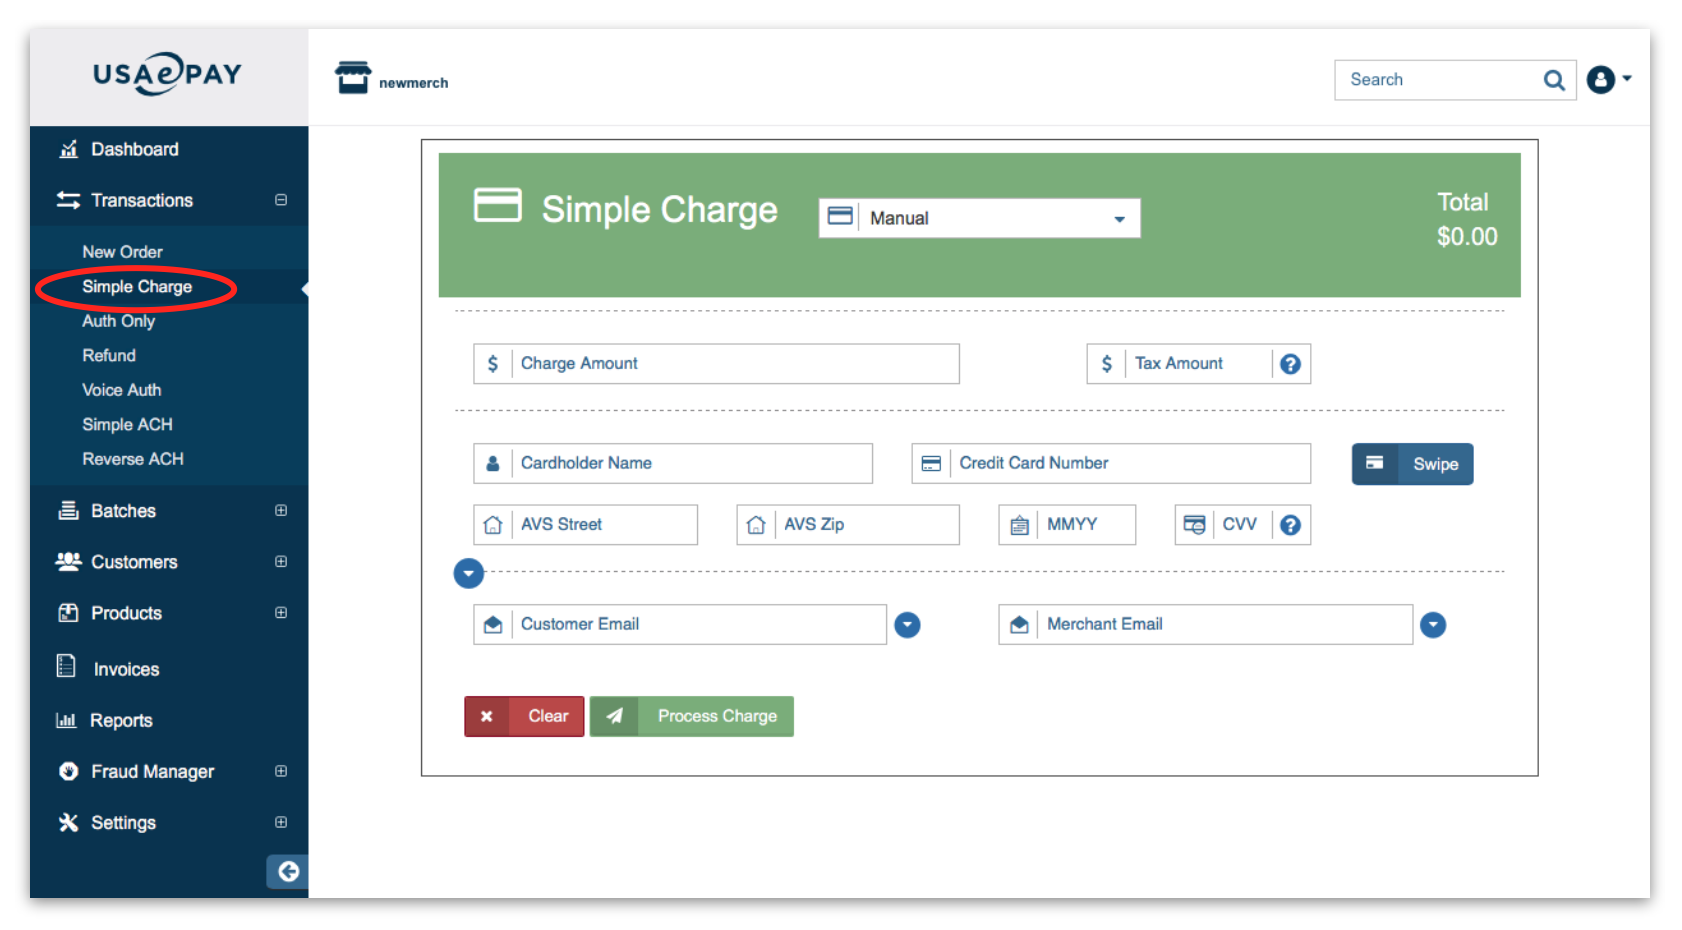
When you click on Simple Charge in the side menu, you can either enter the information manually or use your device to process the card. Click on «Manual» to reveal the drop down menu and select from the devices connected.
After all information has been entered, click on ‘Process Charge’ to process the transaction.
Signature Capture
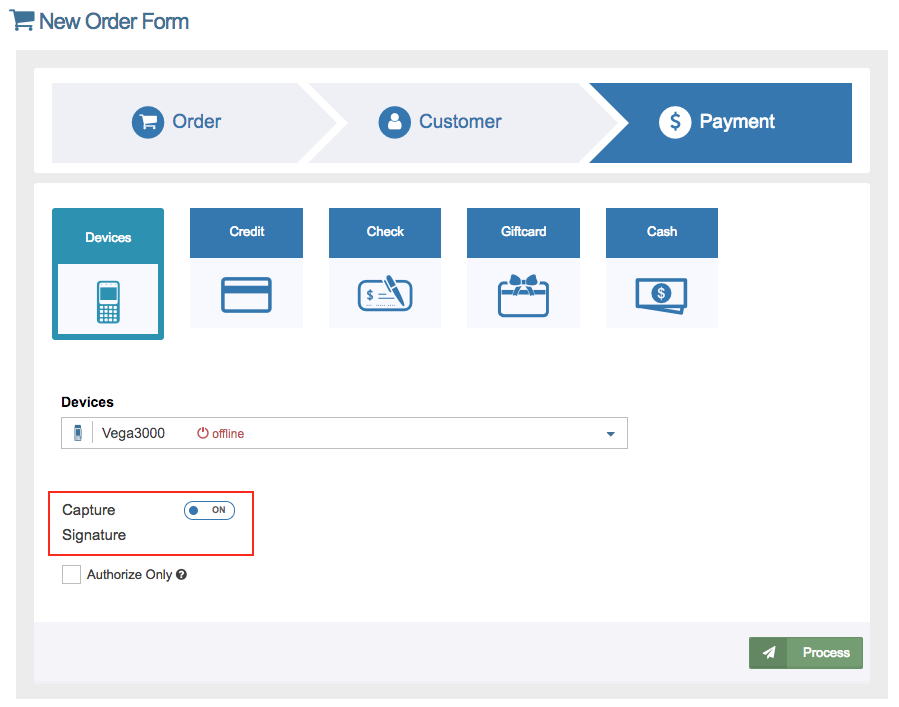
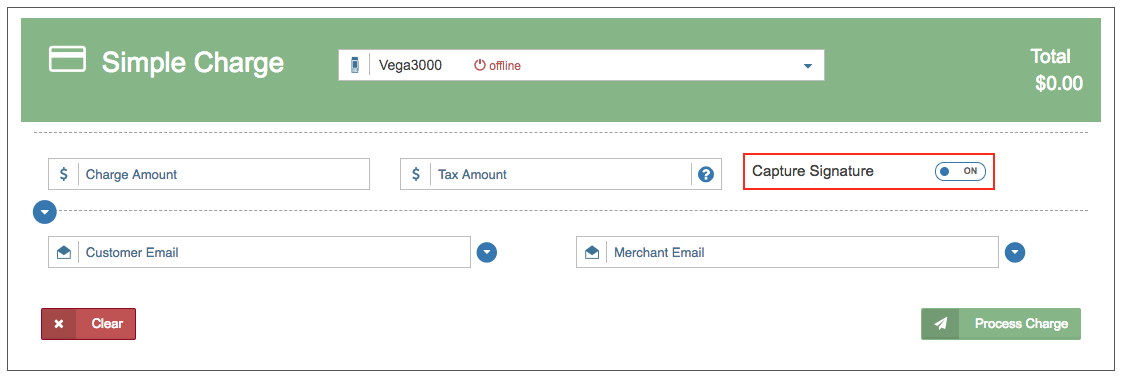
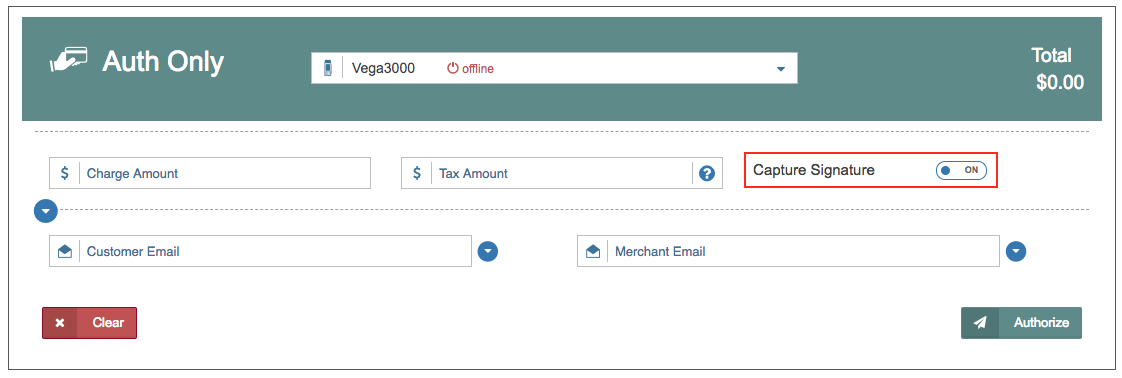
Signature capture will be possible on every Vega3000 model with the built-in touchscreen. This option will appear on New Order, Simple Charge, and Auth Only screens in the console, as well as in Standalone Mode.
New Order:
Simple Charge:
Auth Only:
Signature Screen
This is what the signature screen will look like on the Vega3000. After the customer is finished signing, press the green OK button to confirm the transaction. You may also skip the signature capture on the device by pressing the red cancel button on the device.
The signature will then appear in the Transaction Details.
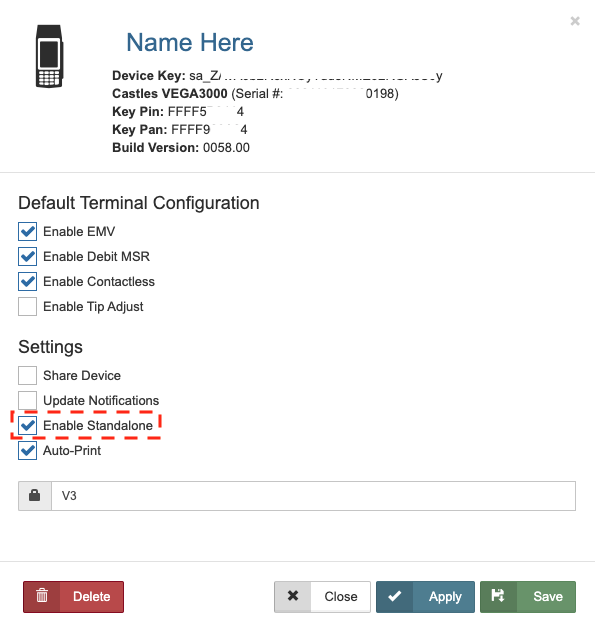
Standalone Mode
In order to activate Standalone Mode on your Vega3000 device, you will need to check «Enable Standalone» and click «Apply» or «Save». On your device, you will need to enter the Main Menu by holding down the ‘9’ key until you hear a second beep. Once in the Main Menu, you can simply press the cancel button to enter the Standalone Menu, as shown below.
This is the Standalone Menu. Here you will be able to complete an entire transaction from start to finish directly on the device.
- Option 1 allows you to start a credit card transaction. Once the transaction is completed, the device will prompt for signature.
- Option 2 allows you to record a cash transaction.
- These transactions will be reported in your Point of Sale report on the console.
The «Home» option at the bottom of the screen can be accessed by pressing the cancel button. This will take you to the Main Menu of the device while in Standalone Mode.
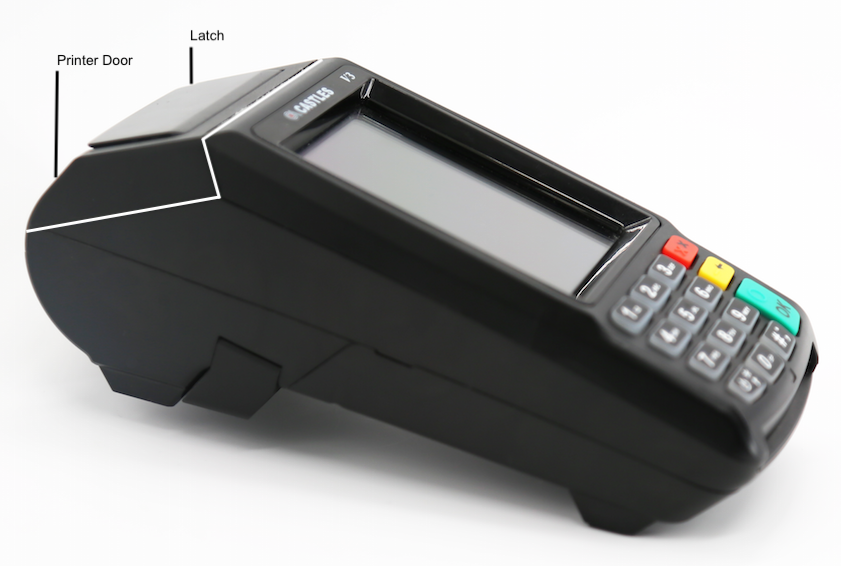
Printer

The built-in printer at the top of the device is capable of printing receipts for every transaction.
- The printer can hold a 50 ft paper roll with a width of 2 1/4 inches.
- Pulling up on the latch will open the printer door and push the door back down to close.
- The paper will feed through the seam where the printer door closes.
- There is no feed button on the device.
- The printer can also be disabled via the Device Manager.
Depending on the initial configuration of the device, your device may stall on the following screen instead of initially going to settings:
If your device goes to this screen, simply hold down the «9» key until you hear two beeps then release. You should then see the following:
Select «1» for Production, which will then lead you to the following screen:
Step 2: Connect to Network Note: The Vega3000 has the option to connect to the internet by wifi or ethernet port connection.
Option 1: Enable Ethernet Mode
To enable Ethernet mode, simply select option 1 «Ethernet» and make sure that you connect the device to an available ethernet port. No other configuration is needed.
Option 2: Enable WiFi Mode
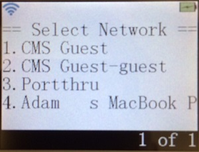
Select a Network
With WiFi mode enabled, the terminal should automatically detect available WiFi networks and display them as shown here:
Select the WiFi network to be used and press the green enter button:
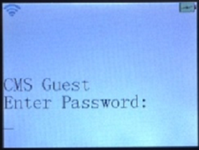
Enter the password for the network and click the green enter button. Repeatedly press a number on the keypad to cycle through upper and lower case letters listed on the key. Use the 0 key to cycle through symbols (such as !, $ etc). Selections will be entered after waiting for about one second. Press Enter when finished.
The terminal display will show the following once the terminal has connected to the network. If the Settings menu appears, simply press the Cancel button twice to exit the Settings menu and the Main Menu.
If the terminal has not yet been paired, you should see the following:
Once the terminal has been paired, you should see «Slyce» written across the screen. This means that the terminal is ready to process transactions.
Once the terminal has been connected to a WiFi network, it should automatically default to the selected network upon start-up. You should not have to re-enter the network password.
Switching Between WiFi Networks
To use a different network, you can either manually scan for the available networks, or you can choose to ‘forget’ the current network and let the terminal automatically scan for the available networks.
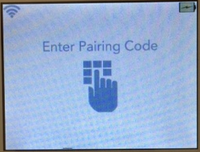
Step 3: Pairing to the payment plug-in Generate and Enter Pairing Code
Open your Point of Sale access point:
- If using Slyce Gateway, click Quick Sale, enter an amount, and click Next.
- Click Chip in the payment plug-in.
Enter the generated six digit pairing code into the terminal using the keypad.
Once the terminal is paired, the Swipe, Dip, or Tap screen will be displayed.
Continue the transaction following the instructions below: Processing Transactions
Step 4: Processing Transactions Run transactions by swiping, dipping, or tapping cards using the terminal.
- Click Chip
- If not yet completed, enter the pairing code into the terminal (click here for pairing instructions)
- Continue transaction by following prompts on the terminal.
- Swipe, Dip, or Tap to process a transaction.
- Once the transaction is approved, click More Options to print or email the receipt.
Step 5: Things to know about the device Note: Your device uses a two way pairing system that stores a unique pairing code both in the device and in the computer/browser that you are using. If at any time your terminal or your computer/browser becomes disconnected you will need to repair both the terminal and the computer/browser.
Unpairing the terminal (from the computer/browser)
To unpair the terminal, click the unpair button pictured here:
Click OK to unpair the terminal.
The plug-in will show the following before resetting to the screen with the Chip icon. Click Chip to begin pairing the terminal again.
If the above instructions do not work, you can manually unpair the terminal:
- Hold the down/Wi-Fi key until you hear a beep. This will bring up the Main Menu.
- Press ‘1’ to open the Settings.
- Press the down key.
- Press ‘1’ to unpair the terminal. Press the Enter button to unpair.
Unpairing the computer/browser from terminal
Press the «lock» symbol in the top left hand corner
Press «Remove» all your available cookies, this will delete the cookie that your old terminal pairing code is stored in
Rescan for Networks
- Hold down the WiFi key (the down arrow) until you hear the terminal beep, then release.
- Press 1 for Settings.
- Press 3 to Rescan WiFi networks. Note that pressing 3 will automatically forget the current network.
- Select the network to be used and enter the password as before.
Forget the Current Network
- Hold down the WiFi key (the down arrow) until you hear the terminal beep, then release.
- Press 1 for Settings.
- Press 2 to Manage WiFi networks.
- Select the network to be forgotten by pressing the corresponding number key
- Press 2 to Forget. This will disconnect the terminal from the current network.
- The terminal will automatically rescan for the available networks.
- Select the network to be used and enter the password as before.
Did you find it helpful? Yes No
Related Articles
Complete Merchant Solutions is a Registered ISO of Commercial Bank of California, Los Angeles, CA: Chesapeake Bank, Kilmarnock, VA: and Deutsche Bank Ag, New York, NY: Merrick Bank, South Jordan, UT American Express requires seperate approval
All trademarks, service marks and trade names that are referenced in this material are the property of their respective owners.Настройка Wi-Fi Vega 3000
1.) Чтобы получить доступ к Диспетчеру устройств, нажмите «Настройки» в боковой панели меню, затем выберите «Диспетчер устройств» в раскрывающемся меню.
2.) Для подключения устройства (CASTLES VEGA3000) необходимо сначала добавить исходный ключ. Перейдите в «Настройки» в боковой панели меню, а затем выберите «Ключи API» в раскрывающемся меню. Нажмите «Добавить ключ API», чтобы добавить новый исходный ключ.
3.) После создания исходного ключа вернитесь в раздел «Диспетчер устройств» в разделе «Настройки». Нажмите кнопку «Добавить», чтобы добавить новое устройство. Появится следующий экран для регистрации устройства:
4.) Введите имя устройства, выберите исходный ключ в раскрывающемся меню, как показано ниже, и выберите тип терминала как автономный:
После выбора имени устройства, исходного ключа и типа терминала нажмите «Зарегистрировать». Затем Merchant Console сгенерирует код сопряжения для подключения вашего устройства к Merchant Console.
Затем устройство CASTLES VEGA3000 попросит вас ввести код сопряжения (отображается в Merchant Console):
5.) После ввода кода сопряжения ваше устройство должно быть подключено. В диспетчере устройств зеленый значок в правом верхнем углу указывает на то, что устройство подключено.
6.) Параметры устройства: нажмите на устройство, чтобы просмотреть его настройки. Появится следующая страница с информацией об устройстве и параметрами:
7.) Теперь, когда устройство подключено к Merchant Console, в разделе «Транзакции» консоли появится опция «Простая оплата».
Когда вы нажимаете «Простая зарядка» в боковом меню, вы можете либо ввести информацию вручную, либо использовать свое устройство для обработки карты. Нажмите «Вручную», чтобы открыть раскрывающееся меню и выбрать подключенные устройства.
После того, как вся информация будет введена, нажмите «Обработать платеж», чтобы обработать транзакцию.
Захват подписи
Захват подписи будет возможен на каждой модели Vega3000 со встроенным сенсорным экраном. Этот параметр появится на экранах консоли «Новый заказ», «Простая оплата» и «Только аутентификация», а также в автономном режиме.
Новый заказ:
Простой платеж:
Только аутентификация:
Экран подписи
Вот так будет выглядеть экран подписи на Vega3000. После того, как клиент закончит подписывать, нажмите зеленую кнопку OK, чтобы подтвердить транзакцию. Вы также можете пропустить захват подписи на устройстве, нажав красную кнопку отмены на устройстве.
Подпись появится в разделе «Сведения о транзакции».
Автономный режим
Чтобы активировать автономный режим на устройстве Vega3000, вам необходимо установить флажок «Включить автономный режим» и нажать «Применить» или «Сохранить». На вашем устройстве вам нужно будет войти в Главное меню, удерживая нажатой клавишу «9», пока не услышите второй звуковой сигнал. Оказавшись в главном меню, вы можете просто нажать кнопку отмены, чтобы войти в автономное меню, как показано ниже.
Это отдельное меню. Здесь вы сможете завершить всю транзакцию от начала до конца прямо на устройстве.
- Вариант 1 позволяет начать транзакцию по кредитной карте. После завершения транзакции устройство запросит подпись.
- Вариант 2 позволяет записать операцию с наличными.
- Об этих транзакциях будет сообщено в отчете о торговой точке на консоли.
Доступ к опции «Домой» в нижней части экрана можно получить, нажав кнопку отмены. Вы перейдете в главное меню устройства в автономном режиме.
Принтер
Встроенный принтер в верхней части устройства может распечатывать квитанции для каждой транзакции.