Testing Java in Visual Studio Code is enabled by the Test Runner for Java extension. It’s a lightweight extension to run and debug Java test cases.
Overview
The extension supports the following test frameworks:
The Test Runner for Java works with the Language Support for Java™ by Red Hat and Debugger for Java extensions to provide the following features:
Run/Debug test cases
Customize test configurations
View test report
View tests in Testing Explorer
Requirements
Project Setup
Note: If you have already setup your Java test framework in your project, you can skip to the Features section.
Enable testing and adding test framework JARs to your project
Starting with Test Runner for Java version 0.34.0, you can enable a test framework for your unmanaged folder project (a project without any build tools) with just a few steps in the Testing Explorer:
Note: Currently this feature only supports unmanaged folders that do not contain any testing dependencies.
JUnit 4
Maven
Add following configuration into your pom.xml :
junitjunit(YOUR_JUNIT_VERSION)test
Gradle
Make sure following lines are added in your build.gradle :
If your project does not use any build tools, you can enable JUnit 4 via the Testing Explorer or by manually downloading the following JARs and adding them to the project classpath (via setting java.project.referencedLibraries , check Dependency management for more information):
You can check the official JUnit Wiki for more information about how to setup JUnit 4.
JUnit 5
The JUnit 5 team provides a collection of sample projects with different build tools. Check the junit5-sample repository if your project uses Maven or Gradle as your build tool.
Unmanaged folder
If your project does not use any build tools, you can enable JUnit 5 via the Testing Explorer or by manually including the junit-platform-console-standalone JAR in the project classpath (via setting java.project.referencedLibraries , check Dependency management for more information).
TestNG
Maven
Add following configuration into your pom.xml :
org.testngtestng(YOUR_TESTNG_VERSION)test
Gradle
Make sure following lines are added in your build.gradle :
If your project does not use any build tools, you can enable TestNG via the Testing Explorer or by manually downloading the following JARs and adding them to the project classpath (via setting java.project.referencedLibraries , check Dependency management for more information):
Features
Run/Debug test cases
The Test Runner for Java extension will generate shortcuts (the green play button) on the left side of the class and method definition. To run the target test cases, select the green play button. You can also right-click on it to see more options.
Testing Explorer
The Testing Explorer is a tree view to show all the test cases in your workspace. You can select the beaker button on the left-side Activity bar of Visual Studio Code to open it. You can also run/debug your test cases and view their test results from there.
Customize test configurations
Sometimes you may want to customize the configuration to run your test cases. To achieve this, you can add the configuration into your workspace settings under the section: java.test.config .
Currently the supported configurations are:
args: Specify the command-line arguments that will be passed to the test runner.
classPaths: The classpaths defined in this setting will be appended to the resolved classpaths.
env: Specify the extra environment variables when running the tests via a key-value object.
envFile: Specify the absolute path to a file containing environment variable definitions.
modulePaths: The modulepaths defined in this setting will be appended to the resolved modulepaths.
name: Specify the name of the configuration item. You can set the default configuration name via setting java.test.defaultConfig .
preLaunchTask: Specify the label of a task specified in tasks.json (in the workspace’s .vscode folder). The task will be launched before the start of testing.
sourcePaths: Specify the extra source paths when debugging the tests.
vmArgs: Specify the extra options and system properties for the JVM.
workingDirectory: Specify the working directory when running the tests.
testKind: Specify the targeting test framework for this test configuration. Supported values are junit , testng .
filters: Specify the test filters.
tags: Specify the tags to be included or excluded. Tags having ! as the prefix will be excluded. Note: This setting only takes effect when testKind is set to junit
More details can be found on the vscode-java-test Wiki.
View test results
After running/debugging the test cases, the state of the related test items will be updated in both editor decorations and the Testing Explorer.
You can trigger the command Test: Peek Output to peek the results view. You can select the links in the stack trace to navigate to the source location.
Generate tests
The extension provides features to help you scaffold test cases. You can find the entry in the editor context menu. Select Source Action. and then choose Generate Tests. .
If you trigger this source action from your main source code (test subject), you will be asked the test class’s fully qualified name and the methods you want to test. The extension will then generate the test code for you:
If you trigger the source action from your test source code, you will be asked which kinds of test methods you want to add. Including the lifecycle methods and the test method:
Test navigation
The extension provides features to help you navigate between your tests and test subjects. If your source code is contained in src/main/java or src/test/java , you can find the entry named Go to Test or Go to Test Subject in the editor context menu:
You can also find the command in the Command Palette ( ⇧⌘P (Windows, Linux Ctrl+Shift+P ) ) by searching for Java: Go to Test.
VS Code testing commands
There are other testing commands (for example, Run Tests in Current File) that can be found by searching for ‘Test:’ in the Command Palette ( ⇧⌘P (Windows, Linux Ctrl+Shift+P ) ).
VS Code testing settings
There are VS Code settings specific to testing that can be found by searching for ‘testing’ in the Settings editor ( ⌘, (Windows, Linux Ctrl+, ) ).
FAQ
If you meet any problem when using the extension, you can review the FAQ and our issue list to check if there is an answer to your problem.
Contributing and feedback
If you are interested in providing feedback or contributing directly to the code base, please read Contributing to Test Runner for Java, which covers the following:
Next steps
Read on to find out about:
Debugging — Find out how to debug your Java project with VS Code.
Extensions for Java — Learn about more useful Java extensions for VS Code.
How do I check my current Java version? There are several ways to check if Java is installed and which version is running on your system.
In this tutorial, learn how to check the Java version installed on Linux distros, including Ubuntu, CentOS, and Debian.
A user account with sudo privileges
Access to the command-line/terminal window
A version of Java
Method 1: Check the Java Version On Linux
To check the Java version on Linux Ubuntu/Debian/CentOS:
2. Run the following command:
3. The output should display the version of the Java package installed on your system. In the example below, OpenJDK version 11 is installed.
Note: If the output indicates there is no such package on the system, you can install it with the help of one of our guides – How to install Java on Ubuntu or How to Install Java on CentOS.
You can also check the version of the primary Java compiler – javac (pronounced “java-see”) with the command:
Method 2: Find Version by Checking Path Where Java is Installed
There are two ways to find the path of the Java directory.
The first option includes running a single command:
update-alternatives --list java
The system should respond with the path where Java is installed.
Note: This option may not work on CentOS systems. If you have issues finding the path of the Java directory with the command above, use the alternative outlined below.
Alternatively, you can use the whereis command and follow the symbolic links to find the Java path.
The output tells you that Java is located in /usr/bin/java.
2. List the content of the /usr/bin/java directory:
Inspecting the directory shows that /usr/bin/java is only a symbolic link for /etc/alternatives/java.
3. Just like in the previous step, list the content of the provided path by running:
Finally, the output displays /etc/alternatives/java is another symbolic link and that the real path of the Java directory is /usr/lib/jvm/java-11-openjdk-amd64/bin/java.
Method 3: Search for Java in the Installed Packages List
You can also prompt the system to list installed packages and search for Java, with its version number.
Find Java by listing all installed packages.
1. To generate a list of all installed packages, use the command:
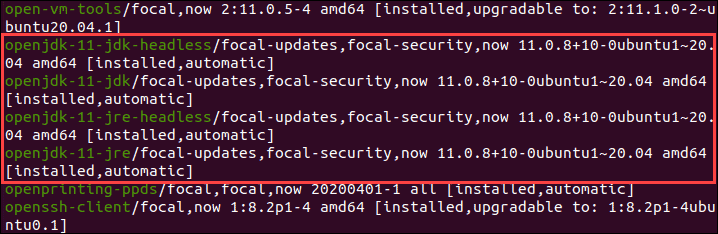
2. Scroll up/down until you find the Java packages as shown in this example.
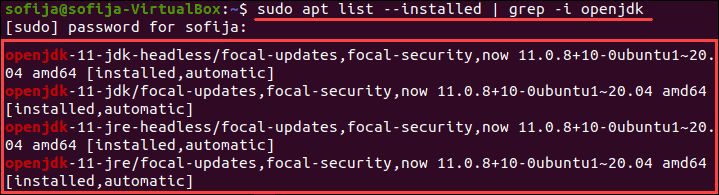
To avoid searching through all installed packages, list Java packages only. Prompt the system to list a specific software package. In this case, the package name is openjdk:
sudo apt list --installed | grep -i openjdk
Note: CentOS users need to modify the commands for listing installed packages for their package manager. Use the commands: sudo yum list installed and sudo yum list installed | grep -i openjdk instead.
With this article, you have successfully checked the Java version installed on Linux. We also covered checking the Java path and searching for Java among the installed packages.
Once the Java version is confirmed, you can start developing anything from lightweight mobile to desktop applications.
How to run testng test cases in UNIX/LINUX environment
I am new to automation testing and Testng framework.I am developing my test cases in java and in windows enviroment.I want to run these developed test cases in unix/linux enviroment.Can any one help me out with step by step process of this.Many thanks @PeterLawrey I have the below pom.xml which I am trying execute on unix
but I am getting below error [ERROR] Failed to execute goal org.apache.maven.plugins:maven-surefire-plugin:2.17:test (default-test) on project MDFSureManager: Execution default-test of goal org.apache.maven.plugins:maven-surefire-plugin:2.17:test failed: There was an error in the forked process [ERROR] org.testng.TestNGException: [ERROR] Cannot find class in classpath: TestCustomerResource