- How to Recover Deleted Files Using TestDisk in Linux
- Step 1: Creating TestDisk Data Log File
- Step 2: Choose Your Recovery Drive
- Step 3: Selecting the Partition Table Type
- Step 4: Select the Deleted File Source Drive Partition
- Step 5: Check the Deleted File Source Directory
- Step 6: Restore Deleted File in Linux
- Step 7: Paste the Recovered File to Directory
- Recover partitions and files with TestDisk
How to Recover Deleted Files Using TestDisk in Linux
We all know the feeling of looking for a file and not finding it, even in the trash. The trauma that comes with file and data loss should end thanks to the TestDisk – is a free, open-source software that was initially designed for recovering memory partitions and making non-bootable disks bootable again. It is useful for recovering data from partitions that are caused by human errors or viruses.
In this article, we will show you how to recover deleted files in Linux using the TestDisk data recovery tool. To use testdisk, you must have TestDisk installed on your Linux system using our article: How to Install and Use TestDisk Data Recovery Tool in Linux.
Once you’ve TestDisk installed on your Linux, you can verify the version of testdisk using the command.
Sample Output
TestDisk 7.0, Data Recovery Utility, April 2015 Christophe GRENIER [email protected]> http://www.cgsecurity.org Version: 7.0 Compiler: GCC 7.2 ext2fs lib: 1.44.1, ntfs lib: libntfs-3g, reiserfs lib: none, ewf lib: none, curses lib: ncurses 6.0 OS: Linux, kernel 4.15.0-55-generic (#60-Ubuntu SMP Tue Jul 2 18:22:20 UTC 2019) x86_64
Great! This confirms that we have successfully installed testdisk. Now proceed further to learn how to recover deleted files in Linux.
Step 1: Creating TestDisk Data Log File
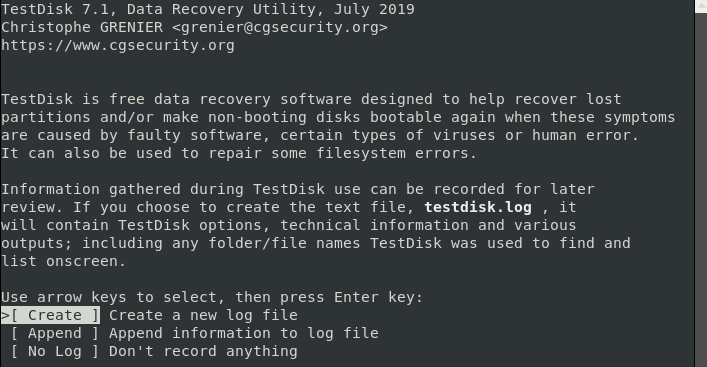
To recover deleted files, first you need to create a testdisk.log file, as this log data is essential as it contains useful information for recovering your data later.
The utility description screen has three options mentioned in detail below:
- ” option allows you to create a new log file.
Note: The Testdisk utility tool is beginner-friendly; it offers suggestions to the options on each screen. Choose the recommended options (highlighted). Press up and arrow keys to switch between the different options.
Select the ‘Create’ option as we need to create a new log file. Depending on the system security, the computer might prompt for sudo password to proceed with the recovery.
Step 2: Choose Your Recovery Drive
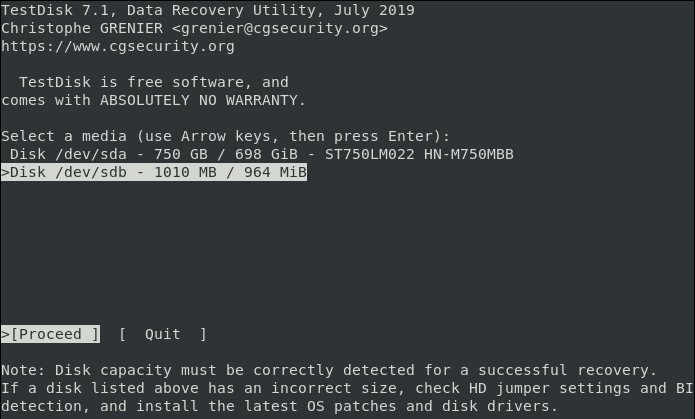
Testdisk will then display the disks attached to your system. The system displays each drive’s total storage space and its free space. Choose the drive where your file is stored then use the right and left arrow keys to navigate and select ‘Proceed‘. Next, press the ENTER button. In this case, the drive is an external flash drive labelled /dev/sdb .
Depending on the security permissions, your system may not display some drives. For such cases, click the “Sudo option”, which is beside the Proceed and Quit options.
Open the Sudo and enter your password. After successful password verification, the system will display all attached drives with their specs.
Step 3: Selecting the Partition Table Type
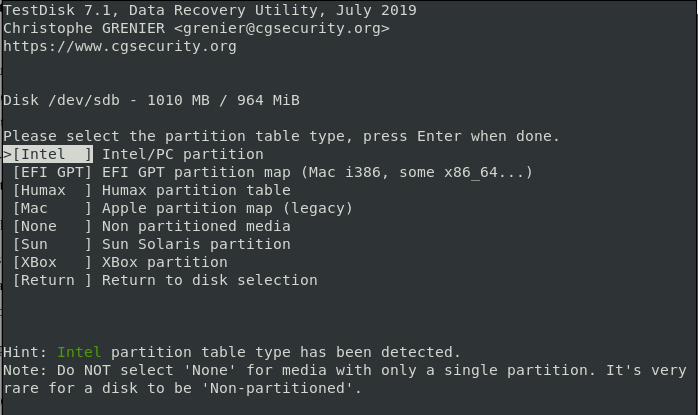
After selecting your drive, the next task is to identify the correct partition table. For beginners, it can be hard to identify the correct partition table type but you need not worry about this. The system will automatically predict and highlight the best choice.
Next, click ‘ENTER‘ to continue.
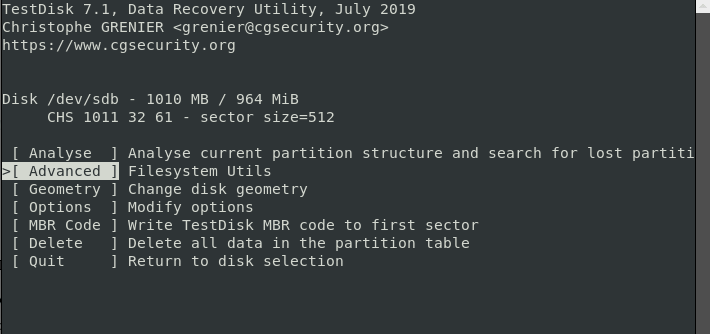
After indicating the correct drive and the partition type, the next screen window displays a list of recovery options. You can select any of the options from the screen depending on your preferences. Because we are recovering a deleted file, we will select the ‘Advanced’ option.
Step 4: Select the Deleted File Source Drive Partition
The screen in our picture allows you to choose the partition if your computer has many. Select your choice and hit ‘ENTER‘ to proceed. In this case, I’m using a removable flash drive with only 1 FAT32 partition.
Step 5: Check the Deleted File Source Directory
After the utility displays the system directories for all partitions, navigate to the specific directory you lost or deleted your file. For instance, if your file was saved in the “Documents” file, navigate to the Documents tab.
Tip: use the “back” arrow to navigate back to where you lost your files.
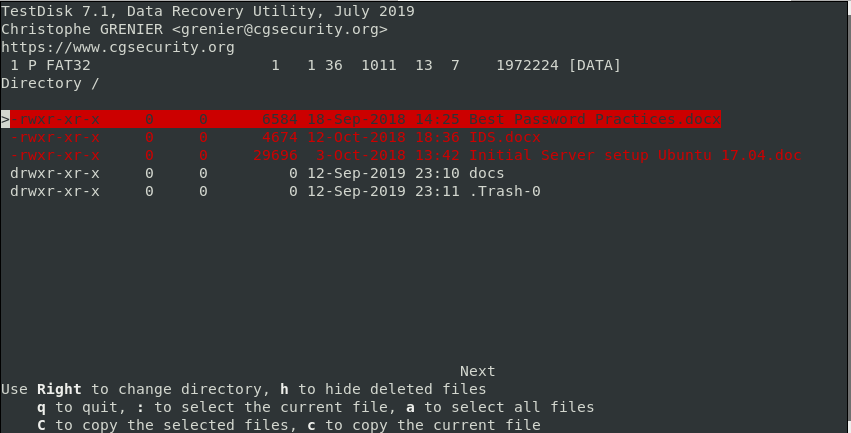
After navigating to the source directory, you will find the deleted files highlighted in red. Browse your file from the drop-down list and highlight or check it.
Step 6: Restore Deleted File in Linux
Copy the file you want to restore by pressing the letter c on your keyboard. In the previous image, the deleted file that I want to restore is called Best Password Practices.docx.
To copy the file, simply press the letter c on the keyboard.
Step 7: Paste the Recovered File to Directory
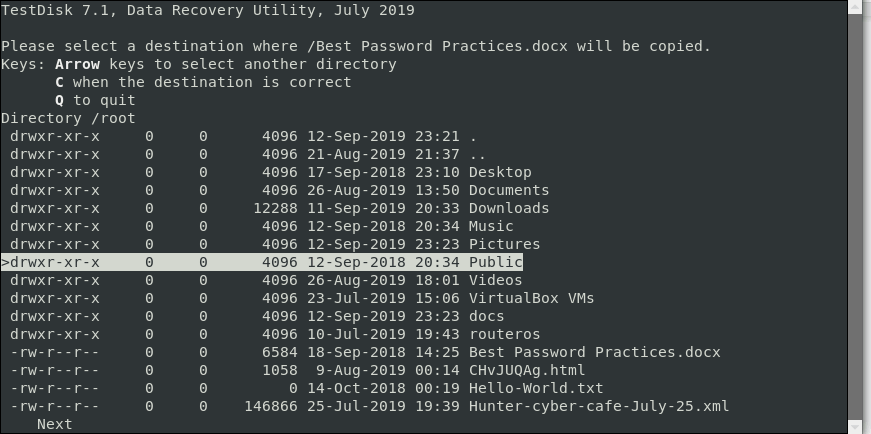
Testdisk utility will then display a list of locations that you can paste your copied file in order to recover it. Again, select the destination by scrolling and just like before, press C to paste it. In this case, the file is copied into the Public directory.
If all went well, you should get a notification below that the files were successfully copied.
To exit from Testdisk utility, select Quit, and press ENTER. This will take you back to the previous screen. Select Quit and press ENTER. Again, this takes you back and just like before, select Quit and press ENTER to exit completely from TestDisk.
And that’s how you can recover a deleted file in Linux using the testdisk utility tool. If you ever accidentally delete a file on your system, don’t panic, testdisk will come to your rescue.
Recover partitions and files with TestDisk
In How to prevent and recover from accidental file deletion in Linux, we addressed local and remote backups, how to reduce your file recovery drama with smart management of file deletion commands, and general best practices for responding to file recovery emergencies. Unfortunately, accidents happen, and hardware fails. One tool to turn to when it’s time to recover lost files or filesystems is TestDisk.
Note: If you don’t have a mandatory backup plan, implement one now. The first time you don’t have to resort to TestDisk because you have a backup image, the planning and preparation pay for themselves in both time and peace of mind.
TestDisk attempts to recover lost partition data and any lost files within the bounds of the recovered partition. This tool may be able to recover your data on its own, or you might use it in conjunction with Scalpel—a file extraction tool—by first using TestDisk to obtain a disk image, and then scanning the image for file types with Scalpel. You can find more on using Scalpel in an upcoming article.
TestDisk is less focused and more flexible than Scalpel, so how you use this tool depends on the situation. TestDisk is an interactive application, so begin by pointing it to the victim device or image. For example:
$ sudo ./testdisk_static /dev/sdx Disk /dev/sdx - 1939 MB / 1850 MiB - General UDisk Please select the partition table type, press Enter when done. [Intel ] Intel/PC partition >[EFI GPT] EFI GPT partition map (Mac i386, some x86_64. ) [Humax ] Humax partition table [Mac ] Apple partition map [None ] Non partitioned media [Sun ] Sun Solaris partition [XBox ] XBox partition [Return ] Return to disk selection TestDisk attempts to detect the correct partition map, but if you know better, you can override its guess with a specific location. Once you choose a partition scheme, TestDisk offers its main menu. Here you can analyze files, recover them, or modify the disk’s geometry and options. The typical workflow is to analyze and then recover.
Running TestDisk on an example lab thumb drive returns this analysis:
TestDisk 7.0, Data Recovery Utility, April 2015 Disk /dev/sdb - 1939 MB / 1850 MiB - CHS 1018 60 62 Partition Start End Size in sectors >D MS Data 2046 3788757 3786712 [wreck] D MS Data 75744 84543 8800 [NONAME] In this case, the lost partition was named wreck , and TestDisk successfully discovered its boundaries. If the only lost data you are recovering from is the loss of a partition map, then at this point, you can use this data to recreate that map using GNU Parted.
Successful analysis unlocks several new options in the Advanced menu. Armed with the partition’s boundaries, you can dump this partition’s data to an image file:
Partition Start End Size in sectors > 1 P Unknown 2048 3788766 3786719 [ Type ] >[Image Creation] [ Quit ] You can then use Scalpel on the image to recover individual files.
Alternatively, you may know the partition and filesystem type (Type), in which case you can dictate how TestDisk treats the data. Doing this can help TestDisk locate a backup Superblock, enabling you to use mkfs to recover the data like so:
Disk /dev/sdb - 1939 MB / 1850 MiB - CHS 1018 60 62 Partition Start End Size in sectors MS Data 2048 3788759 3786712 [wreck] superblock 32768, blocksize=4096 [wreck] superblock 98304, blocksize=4096 [wreck] superblock 163840, blocksize=4096 [wreck] superblock 229376, blocksize=4096 [wreck] superblock 294912, blocksize=4096 [wreck] To repair the filesystem using alternate superblock, run fsck.ext4 -p -b superblock -B blocksize device Or, you can use TestDisk to detect files with the List menu option:
Partition Start End Size in sectors > 1 P EFI System 2048 3788766 3786719 [Type] [Superblock] >[ List ] [Image Creation] [ Quit ] Using TestDisk is definitely a journey. As long as you previously made a backup of the drive you are attempting to rescue, this tool is generally safe to experiment with when trouble happens. If you’re only experimenting, though, it’s safest to do so on a separate, test machine.
And please do experiment. The experience you’ll gain from practicing is invaluable.
