- Рука помощи
- 1. Создание каталога для хранения данных tftp-сервера
- 2. Установка сервера
- 2.1 Установка tftpd-hpa
- 2.2 Установка atftpd
- 2.3 Установка и настройка tftpd
- 3. Устранение возможных проблем
- Заключение
- Ещё один блог сисадмина
- 5 комментариев:
- Installing and Configuring TFTP Server on Ubuntu
- Installing TFTP Server:
- Configuring TFTP Server:
- Testing TFTP Server:
- About the author
- Shahriar Shovon
Рука помощи
TFTP – простой протокол передачи файлов. В нем, в отличии от FTP, отсутствует авторизация. Используется в большей части для загрузки обновлений и конфигураций в сетевые устройства. В моей практике широко используется в работе с коммутаторами, также известно, что ряд АТС и телефонных аппаратов требуют наличия TFTP сервера для проверки обновлений и получения конфигурации при загрузке.
Предлагаю рассмотреть развертывание TFTP сервера на базе Ubuntu с учетом того, чтобы была возможность изменять его файлы посредством обычного FTP.
В Ubuntu доступно несколько TFTP-серверов, рассмотрим установку и настройку tftpd-hpa, atftpd и tftpd. Работать одновременно на 69 порту они не могут, так что Вам необходимо выбрать, какой именно сервер будет использоваться или в конфигурации указывать номер порта для каждого сервиса.
1. Создание каталога для хранения данных tftp-сервера
Я предлагаю пойти довольно простым путем. Создать пользователя tftp и в его домашней директории создать каталог, с которым будет работать tftp-сервера. Это обеспечит доступ по FTP при условии, если у Вас установлен FTP-сервер
# sudo adduser tftp
Добавляется пользователь «tftp» .
Добавляется новая группа «tftp» (1002) .
Добавляется новый пользователь «tftp» (1001) в группу «tftp» .
Создаётся домашний каталог «/home/tftp» .
Копирование файлов из «/etc/skel» .
Введите новый пароль UNIX:
Повторите ввод нового пароля UNIX:
passwd: password updated successfully
Changing the user information for tftp
Enter the new value, or press ENTER for the default
Full Name []: TFTP User
Room Number []:
Work Phone []:
Home Phone []:
Other []:
Данная информация корректна? [Y/n] y
# sudo mkdir /home/tftp/tftp
# sudo chown tftp:tftp /home/tftp/tftp/
Пароль, который Вы укажете при создании пользователя, в дальнейшем используется при доступе по FTP для пользователя tftp
2. Установка сервера
2.1 Установка tftpd-hpa
В файле /etc/default/tftpd-hpa изменяем путь к tftp-каталогу и опции работы. Пример файла конфигурации
TFTP_USERNAME=»tftp» #Имя нашего пользователя
TFTP_DIRECTORY=»/home/tftp/tftp» #Путь к каталогу
TFTP_ADDRESS=»:69″ # IP-адрес и порт на котором работает сервер
TFTP_OPTIONS=»—secure —create» #—create – дает возможность производить запись, если ее не указать возможно только чтение
Перезапускаем сервис, чтобы изменения вступили в силу
2.2 Установка atftpd
sudo apt-get install atftpd
sudo touch /var/log/atftpd
Правим файл конфигурации /etc/default/atftpd на
USE_INETD=false
OPTIONS=»—tftpd-timeout 300 —retry-timeout 5 —mcast-port 1758 —mcast-addr 239.239.239.0-255 —mcast-ttl 1 —maxthread 100 —verbose=5 —port 69 —user tftp –group tftp —logfile /var/log/atftpd /home/tftp/tftp»
В примере конфигурационного файла указано ведение логов в файл /var/log/atftpd, если это Вам не нужно, уберите —logfile /var/log/atftpd
2.3 Установка и настройка tftpd
Это наиболее простой tftp-сервер, работает, как сервис inetd
В файле конфигурации /etc/inetd.conf
Данный TFTP-сервер «умеет» только отдавать файлы, но не принимает их.
3. Устранение возможных проблем
Посмотреть сервис, который занимает порт tftp
Если при работе сервера возникают ошибки, возможно, проблемы с правами доступа к каталогу. Для исправления прав доступа выполните:
Заключение
Для работы я предлагаю выбирать tftpd-hpa или atftpd, они имеют возможность «тонкой настройки», позволяя легко и быстро добиться нужного результата. В примере настроек, описанных выше, Вы сможете, как получать файлы, так и записывать их на TFTP-сервер, что полезно в случае, если необходимо хранить резервные копии конфигурации сетевого оборудования.
Если у Вас возникли вопросы, задавайте их в комментариях.
Ещё один блог сисадмина
Пока нет ничего крупного, продолжу выкладывать мелкие памятки, сделанные для себя.
- Умеет работать автономно, без помощи inetd,
- Есть опция, разрешающая создание новых файлов, что полезно для сохранения резервных копий конфигурации оборудования.
После установки отредактируем файл /etc/default/tftpd-hpa, содержащий настройки сервера. Приведём его к следующему виду:
TFTP_USERNAME="tftp" TFTP_DIRECTORY="/var/tftp" TFTP_ADDRESS="0.0.0.0:69" TFTP_OPTIONS="--ipv4 --secure --create --umask 027 --permissive"
- create разрешает серверу создавать новые файлы,
- ipv4 предписывает ему ожидать подключений только на адресах IPv4,
- umask предписывает сбрасывать бит записи для группы и все биты доступа для остальных пользователей,
- permissive предписывает не проводить никаких проверок прав доступа к файлу сверх производимых операционной системой.
# mkdir /var/tftp # chown tftp:tftp /var/tftp
Можно также поменять домашний каталог пользователя tftp в файле /etc/passwd на /var/tftp.
Осталось перезапустить демона, чтобы он начал работу с новым каталогом:
5 комментариев:
Спасибо, помогло. А то замучили меня inetd и xinetd ( под ними циска чет не могла бэкап положить)
Эти две опции лучше убрать:
—umask 027 —permissive
С некоторых свичей бывает так , что файл создаётся , но по факту он пустой.
Явно что-то по правам доступа. Если убираешь — всё нормально.
—permissive разрешает tftp-серверу создавать файлы, без этой опции он будет писать только в те файлы, которые уже существуют.
Чушь несусветная. Создание файлов разрешает опция —create, это вроде бы как из самог названия опции должно быть понятно. Не надо фантазировать.
Я в ubuntu-16.04 сделал так:
TFTP_USERNAME=»tftp»
TFTP_DIRECTORY=»/home/user/tftp»
TFTP_ADDRESS=»0.0.0.0:69″
TFTP_OPTIONS=»—ipv4 —secure —create —umask 000 —permissive»
# mkdir /home/user/tftp
# usermod -a -G tftp user
# chmod –R 777 /home/user/tftp
Теперь все в домашнем коталоге
Анонимный, именно так и написано в тексте заметки. С кем спорите?
Installing and Configuring TFTP Server on Ubuntu
![]()
TFTP (Trivial File Transfer Protocol) is a simplified version of FTP (File Transfer Protocol). It was designed to be easy and simple. TFTP leaves out many authentication features of FTP and it runs on UDP port 69. As it is very lightweight, it is still used for different purposes.
TFTP is used in places where you don’t need much security. Instead, you need a way to easily upload files to and download files from the server. CISCO devices use TFTP protocol to store configuration files and CISCO IOS images for backup purposes. The network boot protocols such as BOOTP, PXE etc uses TFTP to boot operating systems over the network. Thin clients also use TFTP protocol for booting operating systems. Many electronics circuit boards, microprocessors also use TFTP to download firmware into the chip. Overall, TFTP has many uses even today.
In this article, I am going to show you how to install and configure TFTP server on Ubuntu. So, let’s get started.
Installing TFTP Server:
In this article, I am going to install the tftpd-hpa TFTP server package on Ubuntu (Ubuntu 19.04 in my case). The package tftpd-hpa is available in the official package repository of Ubuntu. So, you can easily install it with the APT package manager.
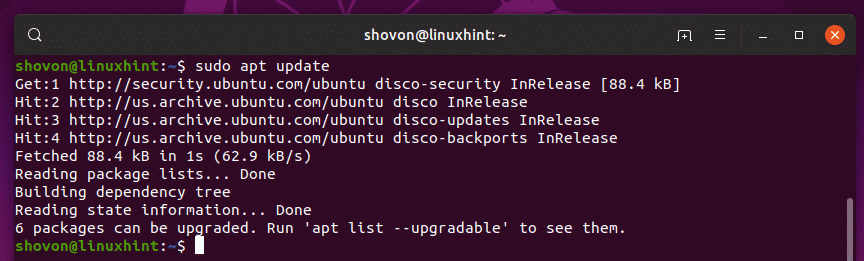
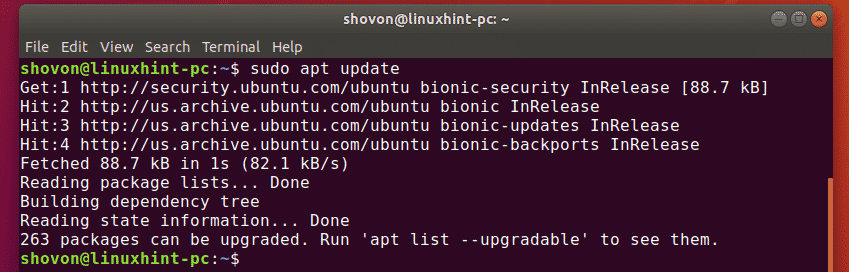
First, update the APT package repository cache with the following command:

The APT package repository cache should be updated.
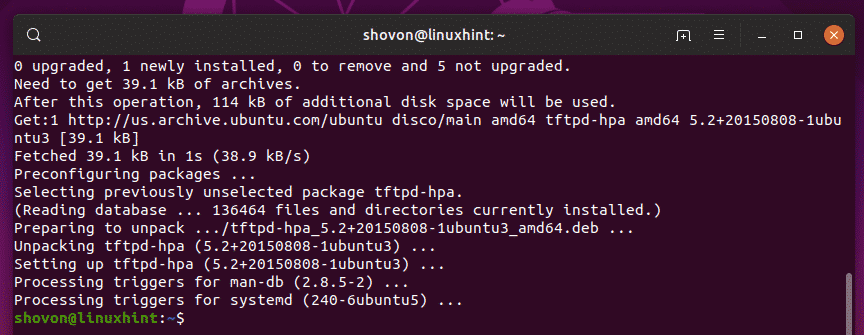
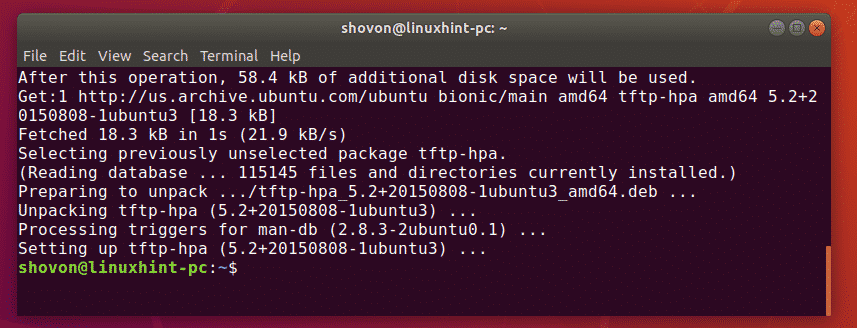
Now, install the tftpd-hpa package with the following command:

tftpd-hpa package should be installed.
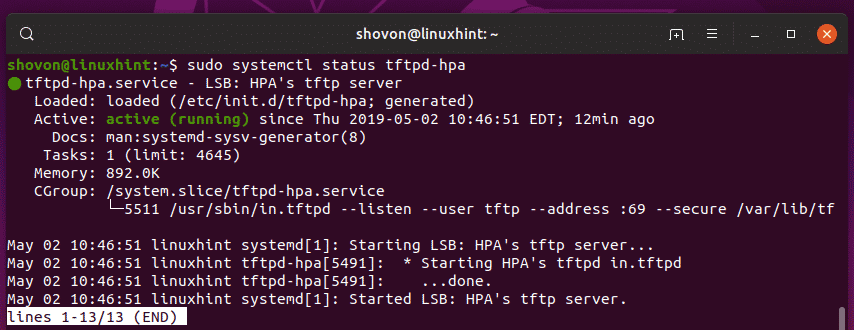
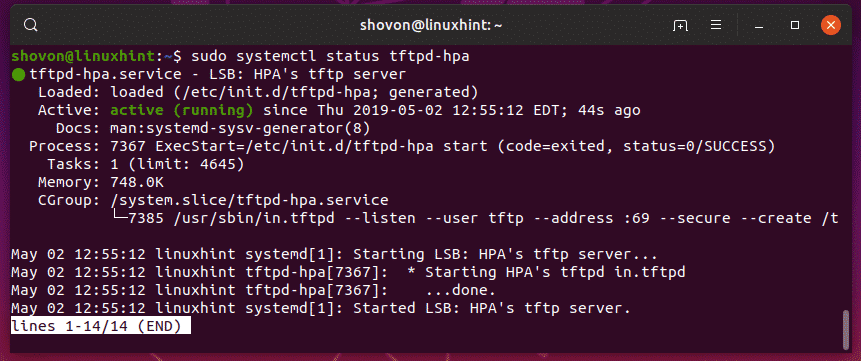
Now, check whether the tftpd-hpa service is running with the following command:

The tftpd-hpa service is running. So, TFTP server is working just fine. In the next section, I will show you how to configure it.
Configuring TFTP Server:
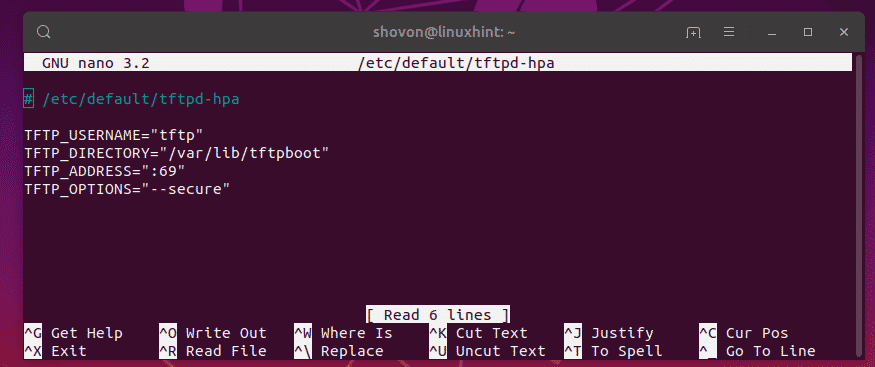
The default configuration file of tftpd-hpa server is /etc/default/tftpd-hpa. If you want to configure the TFTP server, then you have to modify this configuration file and restart the tftpd-hpa service afterword.
To modify the /etc/default/tftpd-hpa configuration file, run the following command:

The configuration file should be opened for editing. This is the default configuration of the TFTP server.
Here, TFTP_USERNAME is set to tftp. It means the TFTP server will run as the user tftp.
TFTP_DIRECTORY is set to /var/lib/tftpboot. It means /var/lib/tftpboot is the directory on this server which you will be able to accessing via TFTP.
TFTP_ADDRESS is set to :69. It means TFTP will run on port 69.
TFTP_OPTIONS is set to –secure. This variable sets the TFTP options. There are many options that you can use to configure how the TFTP server will behave. I will talk about some of them later. The –secure option means change the TFTP directory to what is set on the TFTP_DIRECTORY variable when you connect to the TFTP server automatically. This is a security feature. If you hadn’t set the –secure option, then you would have to connect to the TFTP server and set the directory manually. Which is a lot of hassle and very insecure.
Now, I only want to change the TFTP_DIRECTORY to /tftp and add the –create option to the TFTP_OPTIONS. Without the –create option, you won’t be able to create or upload new files to the TFTP server. You will only be able to update existing files. So, I think the –create option is very important.
The final configuration file should look as follows. Now, press + x followed by y and then to save the changes.

Now, you have to create a new directory /tftp. To do that, run the following command:

Now, change the owner and group of the /tftp directory to tftp with the following command:

Now, restart the tftpd-hpa service with the following command:

Now, check whether the tftpd-hpa service is running with the following command:

As you can see, the tftpd-hpa service is running. So, the configuration is successful.
Testing TFTP Server:
Now, to access the TFTP server, you need a TFTP client program. There are many TFTP client programs out there. You most likely will not need one other than for testing the TFTP server because the devices that will use the TFTP server will have the client program already installed on it. For example, CISCO routers and switches already have a TFTP client program installed.
For testing, I am going to use the tftp-hpa TFTP client in this article. I am going to upload an ISO image to the TFTP server and retrieve it later just to verify whether the TFTP server is working as expected.
To install the tftp-hpa TFTP client on Ubuntu, run the following commands:

The tftp-hpa client program should be installed.
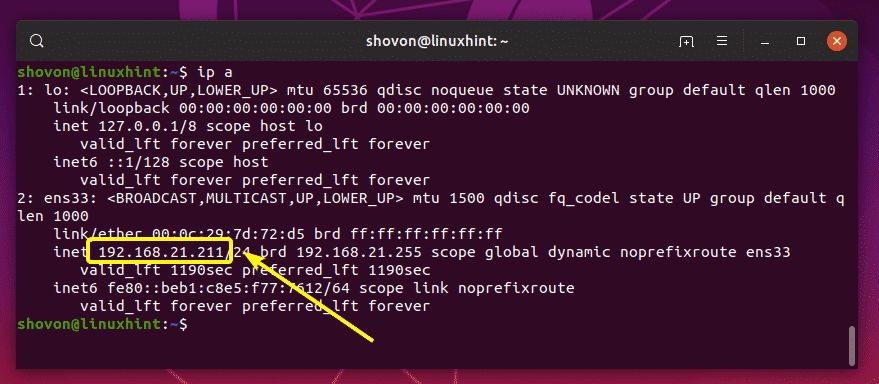
Now, run the following command on your TFTP server to find the IP address of the TFTP server.
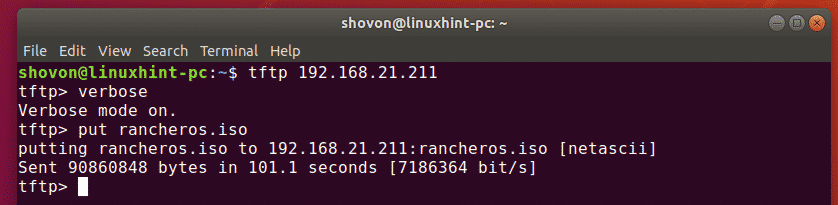
As you can see, the IP address of my TFTP server is 192.168.21.211. It will be different for you, so make sure to replace it with yours from now on.
Now, from your other computer, connect to the TFTP server with the following command:


Now, enable verbose mode with the following command:

Now, to upload a file (rancheros.iso) from the current working directory (from where you ran tftp command), run the following command:
As you can see, the file is being uploaded to the TFTP server.

I removed the file from my computer. Now, let’s try to download it from the tftp server.
To download the file (rancheros.iso) from the tftp server, run the following command:
The file is being downloaded.


The TFTP server is working as expected.
Finally, run the following command to exit out of the tftp shell.

So, that’s how you install and configure TFTP server on Ubuntu. Thanks for reading this article.
About the author
Shahriar Shovon
Freelancer & Linux System Administrator. Also loves Web API development with Node.js and JavaScript. I was born in Bangladesh. I am currently studying Electronics and Communication Engineering at Khulna University of Engineering & Technology (KUET), one of the demanding public engineering universities of Bangladesh.