Установка tftp сервера на CentOS 8 или RedHat 8
Сегодня статья будет маленькая. Вообще, на мой взгляд всё довольно просто, но поскольку CentOS8 вышел недавно, гайдов на него мало, а конкретно про tftp под CentOS я видел в Интернете много откровенно вредных советов, поэтому постараюсь задать трэнд на исправление ситуации прямо с момента выхода новой версии. Итак, приступим (к набору тёх жалких пяти команд, которые нам нужны). Для начала установим все требующиеся пакеты:
sudo dnf -y install xinetd tftp-server tftp vimТеперь создадим (или исправим) файл конфигурации xinetd так, чтобы он запускал сервер tftp при обращении к соответствующему порту, это можно делать через стандартный редактор vi, через nano, который большинству людей привычнее или через vim, отличающийся от входящего в состав системы по умолчанию vi тем, что имеет более широкий функционал, включая подсветку синтаксиса. Я предпочитаю последний пункт, поэтому последним словом в приведенной выше команде был именно этот редактор. Если кого-то устраивают имеющиеся в системе редакторы, vim можно не ставить (хотя помимо использования дополнительных 60 МБ дискового пространства, хуже он тоже не сделает).
Тут надо перейти в режим вставки текста (набрать :set paste и ввод), потом редактирования (клавиша Insert на клавиатуре), потом выделить приведенный ниже конфигурационный файл, скопировать и вставить в окно терминала.
Когда будете редактировать текст конфига, обратите пожалуйста внимание на аргумент server_args. В конце строки задан путь к каталогу, где будут лежать файлы, отдаваемые по tftp. Поменяйте этот каталог на тот, который должен использоваться у вас. Также сразу хочу сказать, что на работу с этим каталогом надо будет настроить tftp сервер в SeLinux, конфигурации «по умолчанию» для tftp сервера в CentOS’е нет. Сейчас я про настройку SeLinux писать не буду, потому что потом как-нибудь подготовлю отдельную статью на эту тему.
# default: off # description: The tftp server serves files using the trivial file transfer \ # protocol. The tftp protocol is often used to boot diskless \ # workstations, download configuration files to network-aware printers, \ # and to start the installation process for some operating systems. service tftp < socket_type = dgram protocol = udp wait = yes user = root server = /usr/sbin/in.tftpd server_args = -v -s /var/lib/tftpboot disable = no per_source = 11 cps = 100 2 flags = IPv4 >Далее, нажать Esc, а потом «:wq» и ввод.
sudo systemctl start xinetd sudo systemctl enable xinetd sudo firewall-cmd --permanent --zone=public --add-service=tftp && sudo firewall-cmd --reload Да, вешать в автозагрузку tftpd не требуется, хоть это и не совсем очевидно.
Далее, надо проверить, что всё работает. Создаём какой-нибудь файл и пытаемся его скачать (я делал для популярного пути хранения файлов, если он у вас другой — измените его тут):
echo passed > ~/test.txt sudo mv ~/test.txt /var/lib/tftpboot tftp 127.0.0.1 -c get test.txt cat test.txtЕсли в консоли появилось слово «passed», значит сервер работает. Если из локальной сети он при этом будет не доступен — разбирайтесь с зонами в firewalld, мы сделали доступ для зоны public, не всем доступ к tftp нужен именно из неё.
P.S. Если будут вопросы в комментариях, объясню как перевести centos 8 с firewalld на iptables, но ИМХО принципиальной разницы между ними нет.
Configure TFTP Server on CentOS 8
![]()
The full form of TFTP is Trivial File Transfer Protocol. It works just like FTP (File Transfer Protocol). But, TFTP does not have any security feature built in. TFTP is meant to run as a public (on the private network) configuration or firmware storage server. TFTP is also an essential part of setting up a network boot server. PXE and BOOTP network boot protocols uses TFTP for downloading the required boot files. In this article, I am going to show you how to configure CentOS 8 as a TFTP server. So, let’s get started.
Installing TFTP Server:
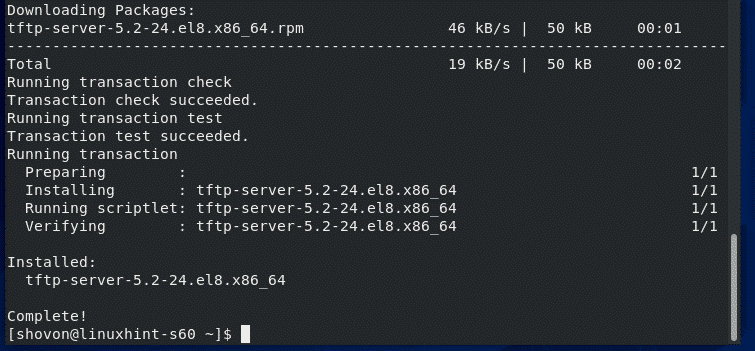
TFTP server package is available in the official package repository of CentOS 8. So, you can easily install it on CentOS 8.
First, update the CentOS 8 package repository cache with the following command:

Now, install TFTP server package with the following command:

To confirm the installation, press Y and then press .
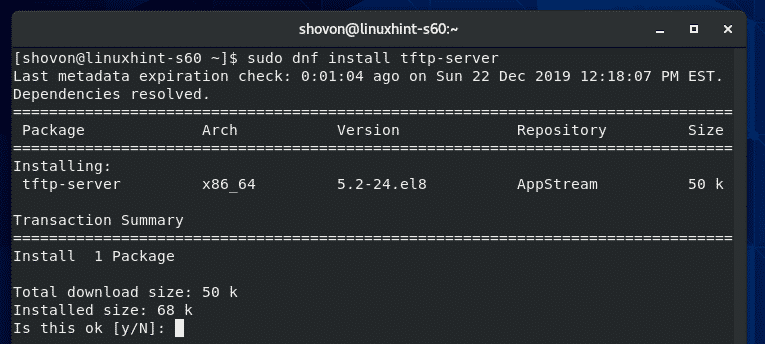
TFTP server package should be installed.
Configuring TFTP Server Service:
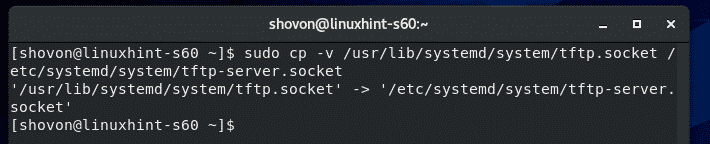
The default systemd service configuration of TFTP does not work correctly on CentOS 8. So, you have to create your own version of systemd service for TFTP server.
First, copy the default /usr/lib/systemd/system/tftp.service file to /etc/systemd/system/tftp-server.service with the following command:
$ sudo cp -v / usr / lib / systemd / system / tftp.service / etc / systemd / system / tftp-server.service

Then, copy the default /usr/lib/systemd/system/tftp.socket file to /etc/systemd/system/tftp-server.socket with the following command:
$ sudo cp -v / usr / lib / systemd / system / tftp.socket / etc / systemd / system / tftp-server.socket
Now, edit the /etc/systemd/system/tftp-server.service file with the following command:

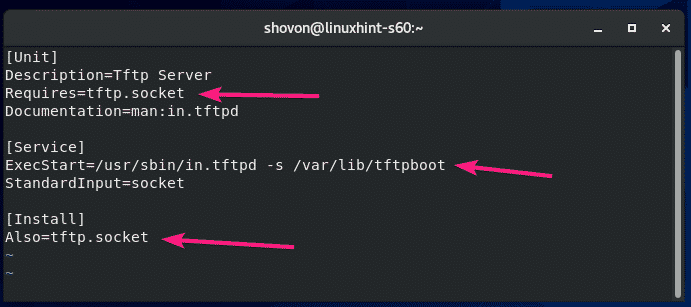
The default content of the tftp-server.service file is as follows. You have to change the lines as marked in the screenshot below.

Change Requires=tftp.socket to Requires=tftp-server.socket, change ExecStart=/usr/sbin/in.tftpd -s /var/lib/tftpboot to ExecStart=/usr/sbin/in.tftpd -c -p -s /var/lib/tftpboot and change Also=tftp.socket to Also=tftp-server.socket.
Here, ExecStart=/usr/sbin/in.tftpd -c -p -s /var/lib/tftpboot is used to run the TFTP server daemon. Here, the -c option is used to allow new files to be created in the TFTP server. The -p option is used to solve many of the file and directory permission issues. The -s option is used to set the TFTP server’s root directory. In this article, the TFTP root directory is /var/lib/tftpboot.
Once you change these lines, the tftp-server.service file should look as shown in the screenshot below.
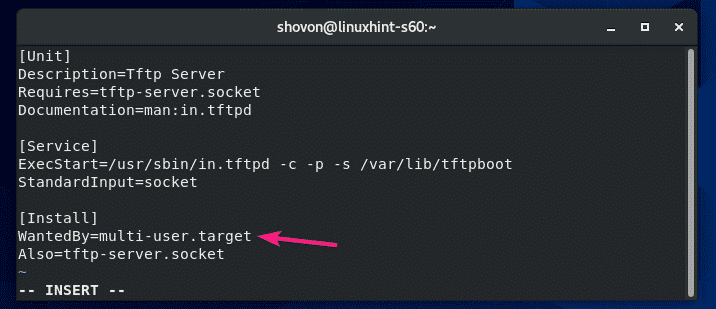
You also have to add a new line WantedBy=multi-user.target after the [Install] line.

The final tftp-server.service file should look as shown in the screenshot below.

Now, edit the /etc/systemd/system/tftp-server.socket file with the following command:

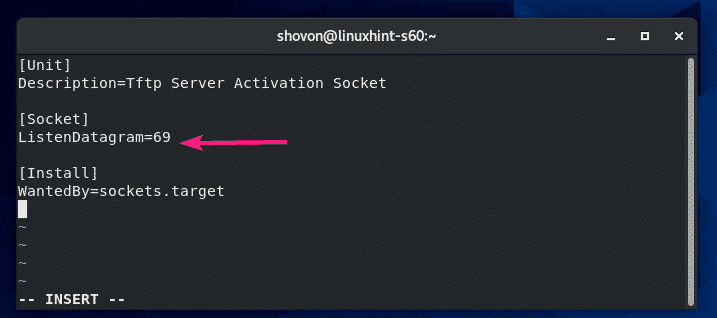
The default tftp-server.socket file should look as shown in the screenshot below.
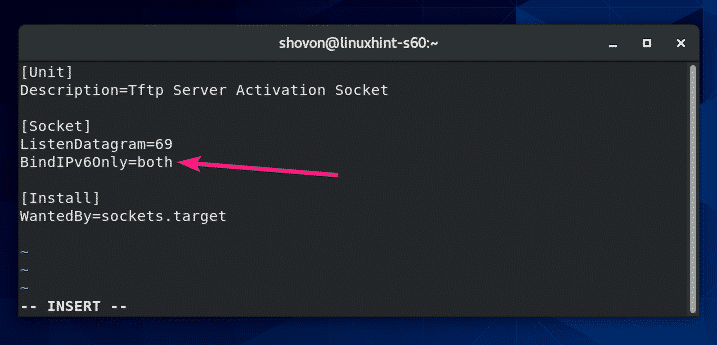
You have to add a new line BindIPv6Only=both after the ListenDatagram=69 line.

The final tftp-server.socket file should look as shown in the screenshot below.

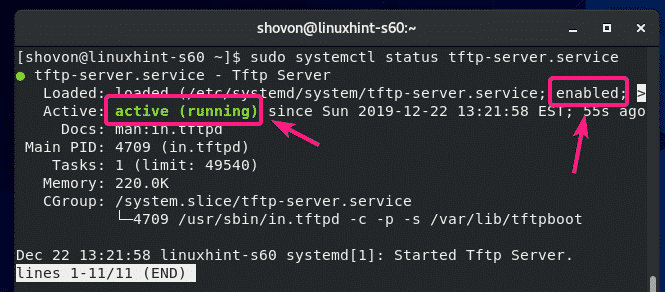
Now, check the status of the tftp-server service that you’ve just created with the following command:
As you can see, the tftp-server service is inactive (not running) and disabled (won’t automatically start on system boot).

Now, start the tftp-server service with the following command:

Also, add the tftp-server service to the system startup of your CentOS 8 machine with the following command:
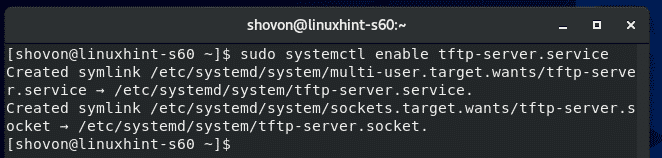
The tftp-server service should be active (running) and enabled (will automatically start on system boot).
If you have SELinux enabled, allow anonymous write access to the TFTP server with the following command:

NOTE: setsebool command may not be available on your CentOS 8 machine. If that’s the case, install the policycoreutils-python package with the following command:
Now, allow read, write and execute permission to the TFTP root directory /var/lib/tftpboot from any user with the following command:

Configuring the Firewall:
TFTP server runs on the UDP port 69.
If you have firewall configured on your CentOS 8 machine (which is very likely), you have to allow access to the UDP port 69 with the following command:

For the changes to take effect, run the following command:

Using the TFTP Server:
In order to access the TFTP server, you must know the IP address of your CentOS 8 machine.
You can find the IP address of your CentOS 8 machine with the following command:
In my case, the IP address is 192.168.20.129. It will be different for you. So, make sure to replace it with yours from now on.

In order to access the TFTP server, you must have a TFTP client program installed on the computer from where you want to access it.
On CentOS 8/RHEL 8, you can install the TFTP client program with the following command:

On Ubuntu/Debian and other Ubuntu/Debian based Linux distributions, you can install the TFTP client program with the following command:

In order to upload files to your TFTP server or download files from your TFTP server, you have to navigate to the directory where the file/files you want to upload to the TFTP server is available, or where you want to store the downloaded file/files from the TFTP server.
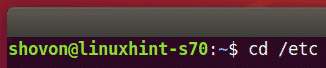
Let’s say, you want to upload some file/files from the /etc directory and also download and store some file/files to the /etc directory. So, navigate to the /etc directory with the following command:
To connect to the TFTP server, run the following command:


You can check the status of your connection with the following command:

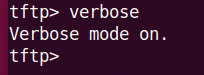
You can enable verbose mode with the following command:
To upload a file fstab (let’s say), run the following command:

If you want to download and store file/files to your /etc directory, you will have to run the tftp client program with sudo privileges.

To download the hosts file and store it to the /etc directory, run the following command:

This is how you configure TFTP server on CentOS 8 and use it. Thanks for reading this article.
About the author
Shahriar Shovon
Freelancer & Linux System Administrator. Also loves Web API development with Node.js and JavaScript. I was born in Bangladesh. I am currently studying Electronics and Communication Engineering at Khulna University of Engineering & Technology (KUET), one of the demanding public engineering universities of Bangladesh.
Настройка TFTP-сервера в CentOS 8
Полная форма TFTP — Тривиальный протокол передачи файлов. Он работает так же, как FTP (протокол передачи файлов). Но TFTP не имеет встроенной функции безопасности. TFTP предназначен для работы в качестве общедоступного (в частной сети) сервера конфигурации или встроенного программного обеспечения. TFTP также является важной частью настройки сетевого загрузочного сервера. Протоколы сетевой загрузки PXE и BOOTP используют TFTP для загрузки необходимых загрузочных файлов. В этой статье я собираюсь показать вам, как настроить CentOS 8 в качестве TFTP-сервера. Итак, начнем.
Установка TFTP-сервера:
Пакет TFTP-сервера доступен в официальном репозитории CentOS 8. Таким образом, вы можете легко установить его на CentOS 8.
Сначала обновите кэш хранилища пакетов CentOS 8 с помощью следующей команды:
Теперь установите пакет TFTP-сервера с помощью следующей команды:
Настройка службы TFTP-сервера:
Конфигурация службы systemd по умолчанию для TFTP не работает корректно в CentOS 8. Поэтому вы должны создать собственную версию службы systemd для сервера TFTP.
Сначала скопируйте файл /usr/lib/systemd/system/tftp.service по умолчанию в /etc/systemd/system/tftp-server.service с помощью следующей команды:
$ sudo cp — v / usr / lib / systemd / system / tftp . service / etc / systemd / system / tftp — server . service
Затем скопируйте файл /usr/lib/systemd/system/tftp.socket по умолчанию в /etc/systemd/system/tftp-server.socket с помощью следующей команды:
$ sudo cp — v / usr / lib / systemd / system / tftp . socket / etc / systemd / system / tftp — server . socket
Теперь отредактируйте файл /etc/systemd/system/tftp-server.service с помощью следующей команды:
$ sudo nano /etc/systemd/system/tftp-server.service
По умолчанию содержимое файла tftp-server.service выглядит следующим образом. Вы должны изменить строки, как отмечено на скриншоте ниже.
Requires=tftp.socket на Requires=tftp-server.socket , ExecStart = /usr/sbin/in.tftpd -s /var/lib/tftpboot на ExecStart = /usr/sbin/in.tftpd -c -p -s /var/lib/tftpboot и измените Also=tftp.socket на Also=tftp-server.socket
Здесь ExecStart = /usr/sbin/in.tftpd -c -p -s /var/lib/tftpboot используется для запуска демона TFTP-сервера. Здесь опция -c используется для разрешения создания новых файлов на TFTP-сервере. Параметр -p используется для решения многих проблем с правами доступа к файлам и каталогам. Опция -s используется для установки корневого каталога TFTP-сервера. В этой статье корневым каталогом TFTP является /var/lib/tftpboot .
После того, как вы измените эти строки, файл tftp-server.service должен выглядеть так, как показано на скриншоте ниже.
Вы также должны добавить новую строку WantedBy = multi-user.target после строки [Install] .

Окончательный файл tftp-server.service должен выглядеть так, как показано на скриншоте ниже.
Теперь отредактируйте файл /etc/systemd/system/tftp-server.socket с помощью следующей команды:
$ sudo nano /etc/systemd/system/tftp-server.socket
Файл tftp-server.socket по умолчанию должен выглядеть так, как показано на скриншоте ниже.
Вы должны добавить новую строку BindIPv6Only=both после строки ListenDatagram = 69 .
Окончательный файл tftp-server.socket должен выглядеть так, как показано на скриншоте ниже.
Теперь проверьте состояние только что созданной службы tftp-server с помощью следующей команды: