Прошиваем DD-WRT в D-Link DIR-300
Первое что нужно сделать — это узнать номер ревизии маршрутизатора (наклейка на обратной стороне).
У меня такая железка: D-Link DIR-300 H/W Version: A1, F/W: 1.03
Все дальнейшее описание прошивки предполагается что ревизия маршрутизатора A1. Для ревизии B1 способ прошивки несколько иной, читать тут: http://sergey-s-betke.blogs.novgaro.ru/networking/devices/d-link/dap-1150/proshivaem-d-link-proshivkoj-dd-wrt
Качаем необходимые файлы
Устанавливаем TFTP-сервер
Процедура прошивки проводилась на компьютере с OS Ubuntu. Требуется установленный TFTP-сервер.
$ sudo apt-get install tftp tftpd
Если необходимо — вносим изменения в конфигурационный файл /etc/inetd.conf
Складываем нужные нас файлы в папку /srv/tftp
$ sudo service openbsd-inetd start
Если работаем на Windows, то рекомендую http://tftpd32.jounin.net/
Перепрошивка
Включаем сетевой кабель в порт «INTERNET» (он же WAN), вторым концом в компьютер.
Отключаем питание D-link, зажимаем кнопку Reset, включаем питание. Через 30 сек отпускаем кнопку Reset.
Устанавливаем на компьютере новый IP-адрес:
$ sudo ifconfig eth0 192.168.20.80
$ telnet 192.168.20.81 9000 Trying 192.168.20.81. Connected to 192.168.20.81. Escape character is '^]'.
Нажимаем Enter, появляется приглашение. Вводим команду
RedBoot> load ap61.ram Using default protocol (TFTP) Entry point: 0x800410bc, address range: 0x80041000-0x800680d8
Telnet-сессия или зависнет или оторвется — это нормально.
НЕ выключая и НЕ перегружая маршрутизатор, переключаем кабель в разъем LAN1.
Меняем IP-адрес компьютера:
$ sudo ifconfig eth0 192.168.1.2
И снова подключаемся к D-link
$ telnet 192.168.1.1 9000 Trying 192.168.1.1. Connected to 192.168.1.1. Escape character is '^]'. DD-WRT>
Делаем следующее (примечание: выполнение команды fis занимает некоторое время, не нужно паниковать):
DD-WRT> fconfig -i Initialize non-volatile configuration - continue (y/n)? Y Run script at boot: false Use BOOTP for network configuration: true Default server IP address: Console baud rate: 9600 GDB connection port: 9000 Force console for special debug messages: false Network debug at boot time: false Update RedBoot non-volatile configuration - continue (y/n)? Y . Erase from 0xbffe0000-0xbfff0000: . . Program from 0x80ff0000-0x81000000 at 0xbffe0000: . DD-WRT> fis init About to initialize [format] FLASH image system - continue (y/n)? Y *** Initialize FLASH Image System . Erase from 0xbffe0000-0xbfff0000: . . Program from 0x80ff0000-0x81000000 at 0xbffe0000: . DD-WRT> ip_address -h 192.168.1.2 IP: 192.168.1.1/255.255.255.0, Gateway: 0.0.0.0 Default server: 192.168.1.2 DD-WRT> load -r -b % ap61.rom Using default protocol (TFTP) Raw file loaded 0x80080000-0x800a8717, assumed entry at 0x80080000 DD-WRT> fis create -l 0x30000 -e 0xbfc00000 RedBoot An image named 'RedBoot' exists - continue (y/n)? Y . Erase from 0xbfc00000-0xbfc30000: . . Program from 0x80080000-0x800a8718 at 0xbfc00000: . . Erase from 0xbffe0000-0xbfff0000: . . Program from 0x80ff0000-0x81000000 at 0xbffe0000: . DD-WRT> reset
После этого D-link перезагрузится и сессия прервется. Снова подключаемся телнетом к адресу 192.168.1.1 порт 9000 после того, как маршрутизатор перезапустится и будет ждать команд (на это нужно примерно 30 секунд).
$ telnet 192.168.1.1 9000 Trying 192.168.1.1. Connected to 192.168.1.1. Escape character is '^]'. DD-WRT> ip_address -h 192.168.1.2 IP: 192.168.1.1/255.255.255.0, Gateway: 0.0.0.0 Default server: 192.168.1.2 DD-WRT> fis init About to initialize [format] FLASH image system - continue (y/n)? y *** Initialize FLASH Image System . Erase from 0xbffe0000-0xbfff0000: . . Program from 0x80ff0000-0x81000000 at 0xbffe0000: . DD-WRT> load -r -b 0x80041000 linux.bin Using default protocol (TFTP) Raw file loaded 0x80041000-0x803ddfff, assumed entry at 0x80041000 DD-WRT> fis create linux . Erase from 0xbfc30000-0xbffcd000: . . Program from 0x80041000-0x803de000 at 0xbfc30000: . . Erase from 0xbffe0000-0xbfff0000: . . Program from 0x80ff0000-0x81000000 at 0xbffe0000: . DD-WRT> fconfig boot_script true boot_script: Setting to true Update RedBoot non-volatile configuration - continue (y/n)? Y . Erase from 0xbffe0000-0xbfff0000: . . Program from 0x80ff0000-0x81000000 at 0xbffe0000: . DD-WRT> fconfig boot_script_timeout 3 boot_script_timeout: Setting to 3 Update RedBoot non-volatile configuration - continue (y/n)? Y . Erase from 0xbffe0000-0xbfff0000: . . Program from 0x80ff0000-0x81000000 at 0xbffe0000: . DD-WRT> fconfig bootp false bootp: Setting to false Update RedBoot non-volatile configuration - continue (y/n)? Y . Erase from 0xbffe0000-0xbfff0000: . . Program from 0x80ff0000-0x81000000 at 0xbffe0000: . DD-WRT> fconfig bootp false bootp: Setting to false DD-WRT> fconfig Run script at boot: true Boot script: Enter script, terminate with empty line >> fis load -l vmlinux.bin.17 >> exec >> Enter script, terminate with empty line >> fis load -l linux >> exec >> Boot script timeout (1000ms resolution): 3 Use BOOTP for network configuration: false Gateway IP address: Local IP address: Local IP address mask: Default server IP address: Console baud rate: 9600 GDB connection port: 9000 Force console for special debug messages: false Network debug at boot time: false Update RedBoot non-volatile configuration - continue (y/n)? Y . Erase from 0xbffe0000-0xbfff0000: . . Program from 0x80ff0000-0x81000000 at 0xbffe0000: . DD-WRT> ip_address -h 192.168.1.1 IP: 192.168.1.1/255.255.255.0, Gateway: 0.0.0.0 Default server: 192.168.1.1 DD-WRT> reset
Теперь D-link перезагрузится и некоторое время будет недоступен.
Как загорится значок WAN — можно коннектиться браузером на 192.168.1.1. Имя пользователя и пароль по умолчанию — «root» и «admin» соответственно.
Удаленно сбрасываем пароль админа на оригинальной прошивке
Вход в администрирование без ввода пароля:
Сброс пароля на дефолтный удаленным способом:
Tftpd32 прошивка роутера d link
1 способ, через Web-интерфейс.
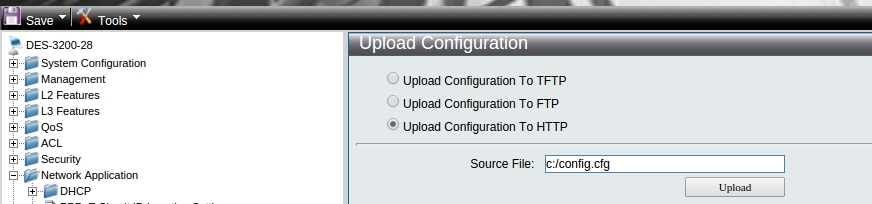
Для того, чтобы выгрузить конфигурационный файл, нужно зайти в раздел Tools — Upload Configuration. Затем нужно выбрать Upload Configuration To HTTP и ввести имя файла источника, который будет выгружен с коммутора(по умолчанию config.cfg). (Рисунок 1)
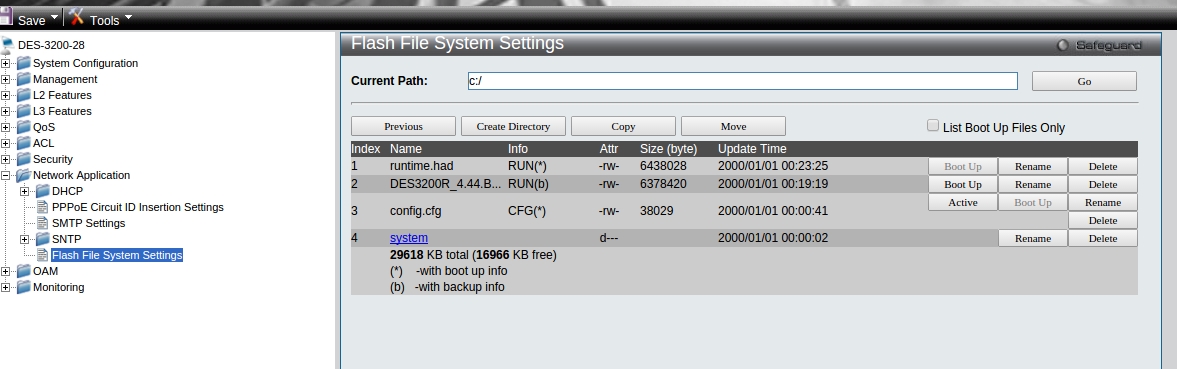
Посмотреть имя текущего файла конфигурации можно в разделе Network Application — Flash File System Settings (Рисунок 2)
Затем нажимаем кнопку Upload, и конфигурационный файл выгрузится с коммутатора в папку «Загрузки» на вашем компьютере.
Для того, чтобы загрузить полученный файл на коммутатор, нужно зайти в раздел Tools — Download Configuration. Затем нужно выбрать Download Configuration From HTTP, выбрать нужный файл у себя на компьютере, указать файл назначения в памяти коммутатора, в который будет загружена конфигурация (по умолчанию config.cfg). И затем нужно нажать кнопку Download.
2 способ, через Telnet.
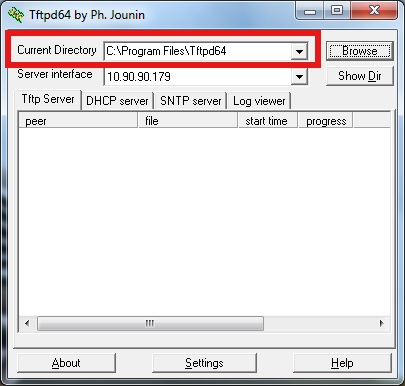
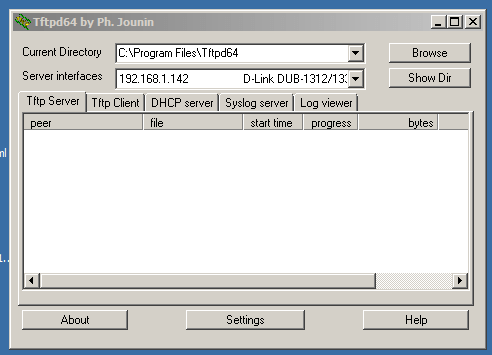
Сначала нужно запустить TFTP Server на своем ПК, для этого можно использовать утилиту TFTPD32. Адрес корневого каталога TFTP сервера можно задать вручную(Рисунок 3)
Затем нужно подключиться к коммутатору по telnet и ввести команду:
Command: upload cfg_toTFTP 10.90.90.179 dest_file conf.cfg
Connecting to server. Done.
Upload configuration. Done.
Success.
Где 10.90.90.179 — адрес вашего ПК,
conf.cfg — название создаваемого файла.
После этого, выгруженный файл конфигурации появится в корневом каталоге TFTP сервера.
Чтобы загрузить полученный файл на коммутатор, нужно выполнить следующую команду:
Command: download cfg_fromTFTP 10.90.90.179 src_file conf.cfg
Connecting to server. Done.
Download configuration. Done.
Success.
При этом конфигурационный файл должен лежать в корневом каталоге TFTP сервера.
How to Upgrade AP Firmware via TFTP Server — DWC-2000
Network Configuration:
This example will use the following devices and setup:
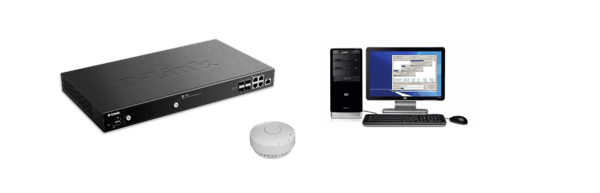
DWC-2000 – Unified Wireless Controller
DWL-6600AP — Unified Wireless N Simultaneous Dual-Band PoE Access Point
PC with tftp Server
Step 1 – Enter the web GUI interface of the DSR using its IP address in a web browser. In our example we have used the IP address of 192.168.1.168

Accept any certificate warnings you may see, this is perfectly normal and safe
Step 2 – We first need to download the latest firmware available from our website. We are going to download for the DWL-6600AP
Step 3 – Once done, you will need to install a tftp server. You may use the following link:
http://tftpd32.jounin.net/tftpd32_download.html
Step 3 – Open the tftp server and transfer or copy the firmware you had downloaded for the APs from our site to the following destination:
Current Directory: C:\Program Files\Tftpd64
Server interfaces: 192.168.1.142 (This is the IP of where the tftp Server resides)
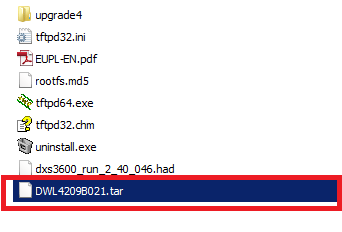
In our example we are going to upgrade the DWL-6600AP and use the above file. We have shortened the file name from:
DWL-6600AP_4_2_0_9_B021.tar
To
DWL4209B021.tar
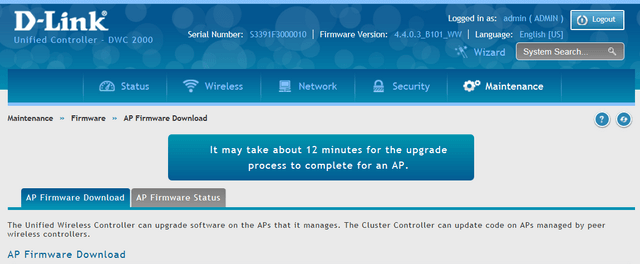
Step 4 – To upgrade the APs via tftp, you will need to go to the following menu:
Maintenance > Firmware > AP Firmware Download
Step 5 – Enter the following details as per the example below:
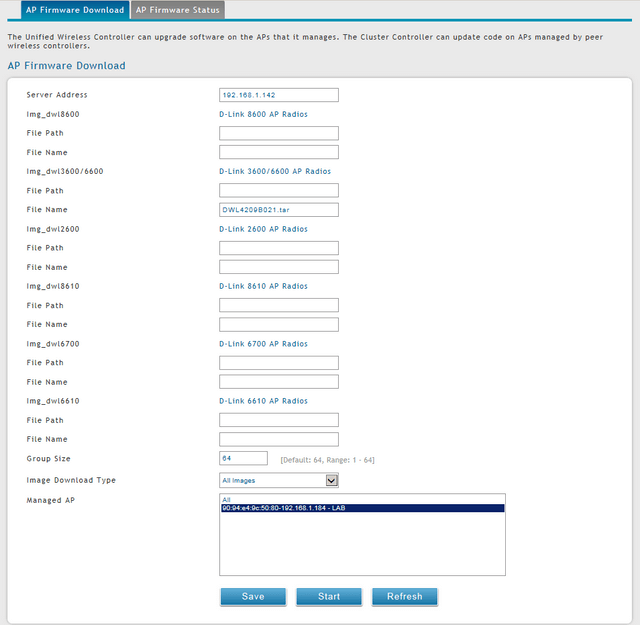
On “Managed AP”, you may either select “All” or select certain APs to upgrade. Our example, we have selected the DWL-6600AP
Step 6 – Once you have the above completed the above configuration, click “Save”

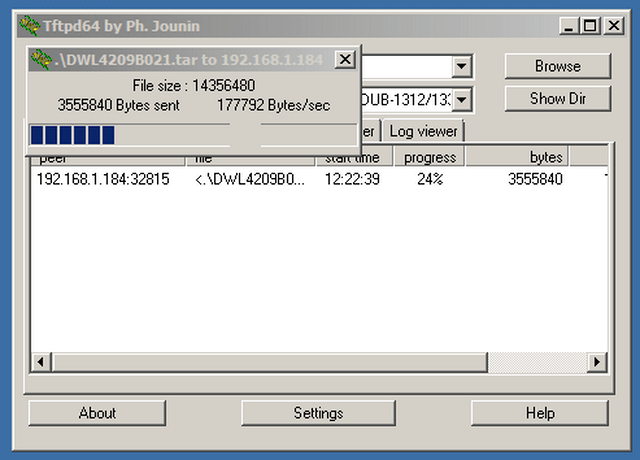
Step 7 – Click on “Start” and you should notice the transfer of files from the tftp server as per below
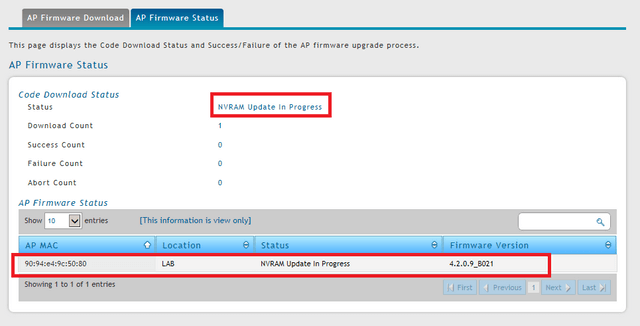
Step 7 – If you select “AP Firmware Status” you will notice the status as: “NVRAM Update in Progress”
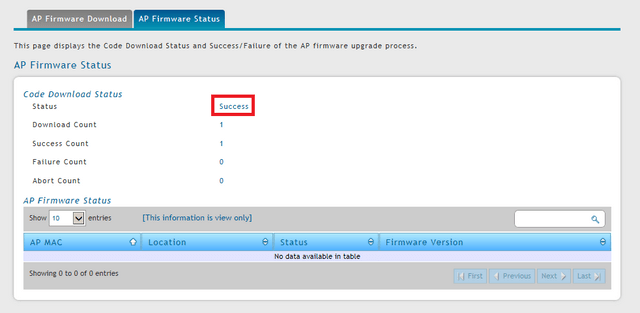
Step 8 – Once the upgrade has completed successfully, you should receive the following status:
Due to we have used a DWL-6600AP we need to upgrade the AP twice (because it has dual-Images)
Please note this will also apply to the following APs:
Other supported APs the firmware upgrade will ON LY need to be once
Note: If you have a failed success, please confirm the following:
1) You have clicked “Save” in Step 6
2) No firewall or and Antivirus program blocking the tftp server
3) Network connections are correct
4) Check Cables