- Ты еще не используешь tmux на полную! (Наверное)
- Что такое tmux
- Запуск и начало новой сессии
- Открытие нового окна
- Переходы между окнами
- Разделение окон и создание панелей
- Передвижение между панелями
- Передвижение между сессиями
- [Практическое использование] Переадресация отображаемого содержания в tmux
- [Практическое использование] Отображение названия ветки Git в статус-баре
- [Практическое использование] Отображение пути текущей операции
- [Практическое использование] Вызов сниппета
- Ссылка на настройки .tmux.conf
- Совместимость версий tmux
- Learn to Use the tmux Terminal Multiplexer on Oracle Linux
- Objectives
- What do you need?
- Install the tmux Terminal Multiplexer
- Start and connect to a tmux session
- Manage multiple tmux sessions
- Manage terminal window panes
- Manage split terminal window panes
- Reconnect to a tmux session over SSH
- 1. TMUX commands
- 1.3. Basic
- 1.4. Help
- 1.5. Reload
Ты еще не используешь tmux на полную! (Наверное)
Привет, Хабр! Представляю вашему вниманию перевод статьи «(たぶん)君はまだtmuxの真の力を引き出せていない».
Что такое tmux
tmux — терминальный мультиплексор. Когда работаешь на машине, использующей SSH, исполняешь увесистую программу, но хочешь без прекращения исполнения перейти к другой задаче и т.д., то tmux может очень пригодиться.
Но возможности tmux на этом на этом не заканчиваются. Есть различные удобные варианты использования tmux, что я и хочу продемонстрировать на примерах ниже.
Базовая идея похожа на моды в Vim. С помощью prefix’a (зарезервированные key bindings или привязка клавиш) можно изменить мод, по умолчанию используется привязка ctrl + b.
Запуск и начало новой сессии
Если ваша ОС — Ubuntu или Debian, вы можете установить tmux командой `sudo apt-get install tmux`. На MacOS — brew install tmux.
Открытие нового окна
Создав сессию в tmux, вы также можете создавать новые окна. Стандартная связка — «ctrl +b + c». Если вы сохранили свой prefix, можете использовать связку «prefix + c». Скорее всего, значение “c” — create, отсюда и такая связка.
Переходы между окнами
Можно также свободно переключаться между созданными окнами. Стандартные связки для этого — «prefix + p» (p — previous) и «prefix + n» (n — next).
Использовать prefix не всегда удобно, поэтому я для себя кастомизировал связки клавиш для перехода между окнами: shift + rightKey для следующего окна и shift + leftKey для предыдущего.
Разделение окон и создание панелей
Разделение окон в tmux похоже на разделение в vim. Вы делите окно на несколько панелей, тем самым в одном окне можно открыть vim, в другом htop, а в третьем выполнять программу.
Без привязки клавиш, команды для разделения окна — prefix + «split-window -h», prefix + «split-window -v».
Так как прописывать это каждый раз не особо хочется, я сделал для себя хоткеи в виде prefix + «-«, prefix + «|».
Передвижение между панелями
Стандартные команды для передвижения между панелями сложноваты, не очень удобны в обращении, поэтому я и в этом случае назначил свои хоткеи: ctrl + shift + upKey, ctrl + shift + downKey, ctrl + shift + rightKey, ctrl + shift + leftKey.
Передвижение между сессиями
С помощью связки клавиш ctrl + t можно вызвать список сессий, а клавишами ↑ ↓ выбрать нужную сессию.
[Практическое использование] Переадресация отображаемого содержания в tmux
По сути, tmux является своего рода виртуальным терминалом, содержащимся в директории /dev/pts/. Для каждой панели создается директория такого же формата.
Другими словами, если мы определим каждой панели, можно переадресовать потоки stdout и stderr с панели X раздельно — один на панель Y, другой на панель Z.
Таким образом можно выводить на разные панели stderr и stdout программы, которые вы пишете, а также использовать терминал как лог операций.
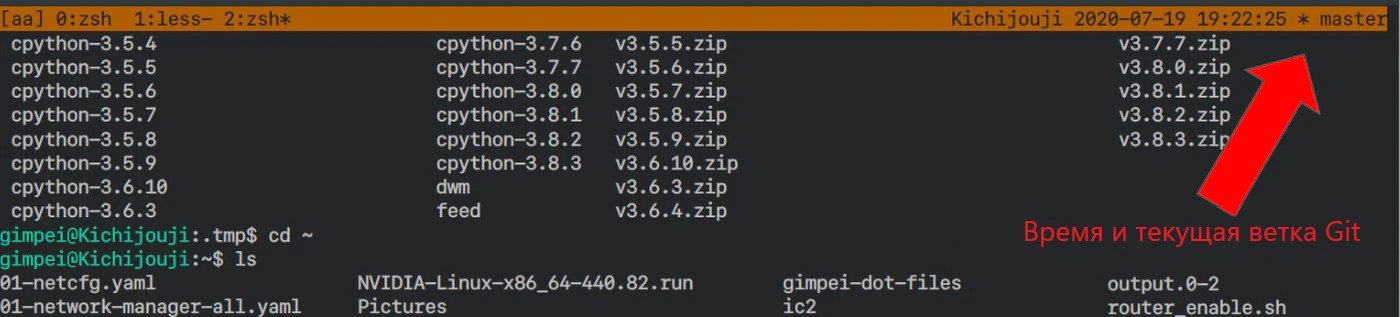
[Практическое использование] Отображение названия ветки Git в статус-баре
Это лайфхак, который использует возможность чтения Shellscript и Python script из .tmux.conf — файла конфигурации tmux.
Статус-бар можно настроить следующей командой:
set-option -g status-right '# #(tmux run-shell "tmux_hook --default true --git-path #")'# — это, очевидно, имя хоста, а tmux run-shell запускает настраиваемый скрипт, который возвращает value в настройки статус-бар.
tmux_hook — это файл, который я создал для отображения времени и текущей ветки Git, но он, по сути, может вернуть любую текстовую информацию. Например, если правильно настроить, можно в статус-баре отображать даже таймлайн своего твиттера.
[Практическое использование] Отображение пути текущей операции
Часто, прыгая по терминалу, хочется понять, в какой ты директории, в каком пути она содержится.
Не хочется для этого лишний раз прописывать pwd, поэтому можно отобразить путь текущей операции в том же месте, где отображается путь до текущей панели.

[Практическое использование] Вызов сниппета
Несмотря на то, что tmux является менеджером сессий с функцией разделения терминала, он может выполнять некоторые функции IDE (круто, не правда ли?). Вы можете забиндить свои хоткеи на специальную настройку send-keys и вызвать их в терминале.
Например, если настроить send-keys как на моем примере ниже, можно просто нажать prefix + 1 и вывести команды import, необходимые для работы с python.
bind -T prefix -n 1 send-keys "import os\nimport sys\n"Ссылка на настройки .tmux.conf
Совместимость версий tmux
Иногда случается, что некоторые настройки tmux не работают — в этом случае, его версия может быть либо слишком новой, либо слишком старой.
Все вышеописанное и конфиг, на который я оставил ссылку, — для tmux версии 2.8 и выше. Если у вас что-либо не работает, проверьте, подходит ли вам данная версия.
Если вы соберетесь самостоятельно что-то отлаживать, то прежде всего стоит обратиться к man tmux — самой надежной документации по tmux на данный момент.
Ссылка на оригинал данной статьи тут
Мы будем очень рады, если вы расскажете нам, понравилась ли вам данная статья, понятен ли перевод, была ли она вам полезна?
Learn to Use the tmux Terminal Multiplexer on Oracle Linux
This tutorial provides step-by-step procedures for controlling multiple terminal windows in the same persistent session.
By default, terminating your SSH connection also terminates any remote terminal sessions started by that connection. If you use a terminal multiplexer, you can preserve those sessions for yourself and others to reuse. You can also manage more complex tasks from a single SSH connection, as a terminal multiplexer can provide browser-style tabs for each task, and even divide up your screen with multiple terminal sessions called “panes”.
In previous versions of Oracle Linux, you might have encountered a similar tool called screen , but in this tutorial you will explore tmux . This tutorial is targeted at users of Oracle Linux 8 or later.
Objectives
Upon completion of this Lab you will be able to:
- Connect and disconnect from a persistent tmux session
- Display, hide, and switch between multiple terminals in the same tmux session
- Manage several persistent tmux sessions
What do you need?
Install the tmux Terminal Multiplexer
Note: When using the free lab environment, see Oracle Linux Lab Basics for connection and other usage instructions.
Install the tmux package on your instance by using the package manager, as follows:
Start and connect to a tmux session
Note: tmux sessions are not preserved between reboots, so they are best suited for persistent remote servers.
The tmux command rearranges your terminal window, with a green band running along the bottom that lists the currently active panes. By default, sessions and panes are ordered numerically, according to dynamically assigned ID numbers that count upwards from zero.
All tmux sessions are hosted in a background service, so that means you can reconnect to them if your connection times out, or if your user account has previously logged off.
- Detach by pressing Ctrl+b, and then the d key.
- Reattach to your persistent tmux session:
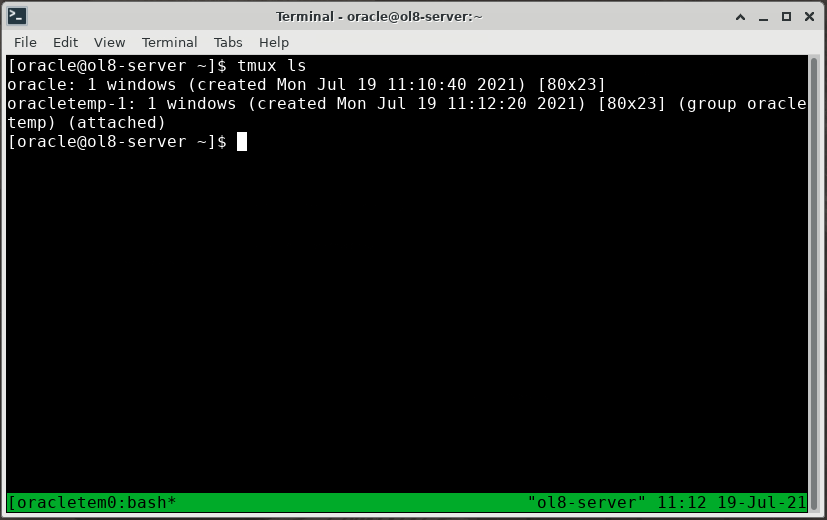
You can run tmux ls from inside or outside tmux to verify which sessions are available for you to reopen.
Manage multiple tmux sessions
Note: You cannot create nested tmux sessions by default, so always ensure that you have detached from your current tmux session before attempting to create or connect to any other tmux sessions.
tmux rename-session -t 0 oracle - Detach by pressing Ctrl+b, and then the d key.
- Create a new tmux session called oracletemp :
- Detach by pressing Ctrl+b, and then the d key.
- List your open sessions:
Manage terminal window panes
Terminal window panes behave much like web browser tabs, where you can create, delete, and switch between them. Unlike a web browser, you must use keyboard shortcuts to perform those actions.
- Create a new terminal window by pressing Ctrl+b, and then the c key.
- Switch to the next window by pressing Ctrl+b, and then the n key. You should notice an asterisk move between each numbered tab as you switch.
- Switch to the previous window by pressing Ctrl+b, and then the p key.
- Switch to the second window by pressing Ctrl+b, and then then the 1 key.
- Close the second window by pressing Ctrl+b, and then the ampersand (&) key. Confirm the action.
- Rename the first window by pressing Ctrl+b, and then the comma (,) key. Set the new name to lab .

Manage split terminal window panes
You can split the current terminal window pane to suit your workflow. For example, you could input commands on one half of the terminal pane, and review the output for those commands on the other half.
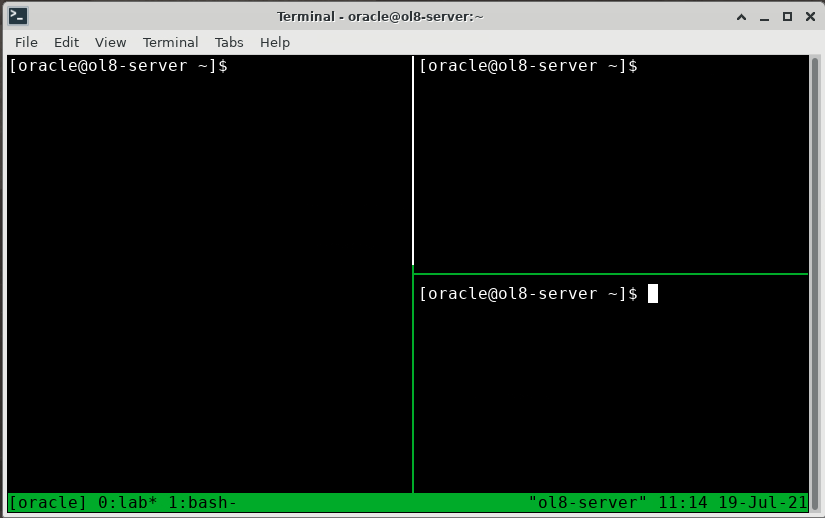
- You can split the current pane vertically by pressing Ctrl+b, and then the modulo (%) key.
- You can split the current pane horizontally by pressing Ctrl+b, and then the quotation mark (“) key.
- You can switch between split panes by pressing Ctrl+b, and then the direction keys on your keyboard.
- You can close any of the panes by pressing Ctrl+b, and then the x key. Confirm the action.
Reconnect to a tmux session over SSH
- Detach by pressing Ctrl+b, and then the d key.
- Run the exit command to end the SSH connection.
- Press the up direction key, and then reuse the command you previously executed to start a new SSH connection:
1. TMUX commands
First, create a file ‘.tmux.conf’ in the ‘home’ folder. Here, The command ‘ctrl-b’ is replaced with ‘crtl-a’ along with some other changes.
# ~/.tmux.conf # unbind default prefix and set it to ctrl-a unbind C-b set -g prefix C-a bind C-a send-prefix # make delay shorter set -sg escape-time 0 #### key bindings #### # reload config file bind r source-file ~/.tmux.conf \; display ".tmux.conf reloaded!" # quickly open a new window bind N new-window # synchronize all panes in a window bind y setw synchronize-panes # pane movement shortcuts (same as vim) bind h select-pane -L bind j select-pane -D bind k select-pane -U bind l select-pane -R # enable mouse support for switching panes/windows set -g mouse-utf8 on set -g mouse on #### copy mode : vim #### # set vi mode for copy mode setw -g mode-keys vi # copy mode using 'Esc' unbind [ bind Escape copy-mode # start selection with 'space' and copy using 'y' bind -t vi-copy 'y' copy-selection # paste using 'p' unbind p bind p paste-buffer
1.3. Basic
Below commands can be used in terminal for various ‘tmux’ operations e.g. start and stop etc.,
| Command | Description |
|---|---|
| tmux | start tmux |
| tmux new -s | start tmux with |
| tmux ls | shows the list of sessions |
| tmux a # | attach the detached-session |
| tmux a -t | attach the detached-session to |
| tmux kill-session –t | kill the session |
| tmux kill-server | kill the tmux server |
Press ‘ctrl-a’ and then type the commands from the below tables,