- In this lab, we will configure WIFI in Cisco packet tracer and we will be enabling the laptop for wireless connection using a wireless router
- Лабораторная работа №5: Cisco Packet Tracer: Wi-Fi (10.05.2018)
- Настройка модели
- Возможно, Вам будет интересно почитать:
- 1 комментарий к “ Лабораторная работа №5: Cisco Packet Tracer: Wi-Fi ”
- Configure access point in Cisco packet tracer
In this lab, we will configure WIFI in Cisco packet tracer and we will be enabling the laptop for wireless connection using a wireless router
Configuring a wireless router and creating a wireless network is easy in a packet tracer. It is almost the same as configuring the home wireless router.
There are varieties of wireless devices given in the packet tracer so we will select the wireless router WRT300N from the list.
Now, we have to configure the wireless router. Most of the settings are already configured on the wireless router required to establish a wireless network however, we can change the configuration as per our requirement and enable features like an access list, MAC address filtering, firewall, etc.
We can change the DHCP scope as per our requirements however in this lab but we will keep those settings to default.
SSID is configured as ‘default’ but we will change that to ‘packet’ and wireless security is disabled by default on the router so we will enable security and set up a password.
WPA2personal security mode has been selected and password packet123 has been configured on the router.
After configuring the router, we must save the setting. The save button is not visible on the screen until we scroll down.
Now, we will configure the laptops so they can join the wireless network.
By default, the laptop does not have a WPC300N module installed and there is no extra space to install the module so we have to remove the Ethernet module and replace it with a WPC300N module.
Before changing the module, the laptop must be powered off otherwise, the module cannot be changed.
If we will not change any setting on the router then changes are not required on the laptop as well because the laptop is preconfigured with the SSID and a password is not required so the laptop will establish the connection with the router just by installing the wireless module.
As we have changed the SSID and password on the router, we should configure the laptop with the required information.
The laptop will establish a connection when configured with the appropriate SSID and password. Now, we can open the GUI of the wireless router on the web browser of the laptop.
We have to enter the IP address of the server in the web browser and then the browser will ask for the username and password, which is admin for both. After the successful authentication, we will be able to configure the router on a laptop.
Лабораторная работа №5: Cisco Packet Tracer: Wi-Fi (10.05.2018)
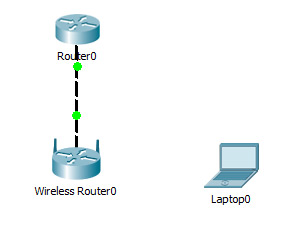
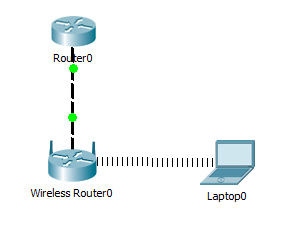
Создать модель локальной сети, состоящей из обычного домашнего wi-fi роутера и маршрутизатора, который имитирует провайдера Интернета. Использовать интерфейс Fast Ethernet. Добавим ещё пользовательское устройство, например ноутбук. Установим модуль wi-fi (WPC300N) в ноутбук.
Настройка модели
1)Настройки маршрутизатора провайдера Router0 (жирным выделено то, что необходимо ввести с клавиатуры:
Router>en
Router#
Router#conf t
Enter configuration commands, one per line. End with CNTL/Z.
Router (config)#int fa0/0
Router (config-if)#ip address 210.210.0.1 255.255.255.252
Router (config-if)#no shutdown
Router (config-if)#
%LINK-5-CHANGED: Interface FastEthernet0/0, changed state to up
%LINEPROTO-5-UPDOWN: Line protocol on Interface FastEthernet0/0, changed state to up
Router (config-if)#end
Router#
%SYS-5-CONFIG_I: Configured from console by console
Router#wr mem
Building configuration.
[OK]
2)Настройки домашнего wi-fi маршрутизатора Wireless Router0
выполняется с помощью веб интерфейса.
Настройка внешнего интерфейса во вкладке Setup показана на рисунке.

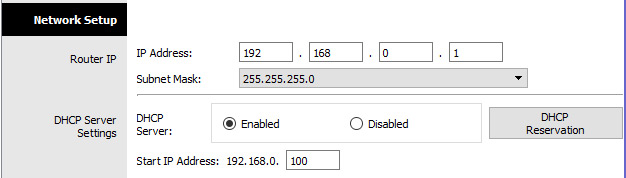
Настройка локальной сети (Network Setup)
Выбираем по умолчанию ip-адрес 192.168.0.1, маска 24-битная 255.255.255.0, разрешён DHCP-сервер, начало раздачи с адреса 192.168.0.100 и всё. После чего незабываем сохранить настройки, нажать на кнопку внизу формы Save Settings.
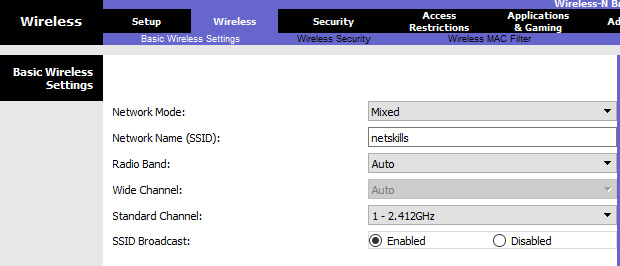
Настройки во вкладке Wireless, т.е. wi-fi. Выбираем основные настройки вайфая: режим (mode), мы выбираем смешанный (mixed); идентификатор сети (SSID) — netskills; ширина канала (Radio Band) — auto; частоту — 1-2.412HGz; видимость сети (SSID Broadcast) — видимая (enable). Сохраняем настройки.
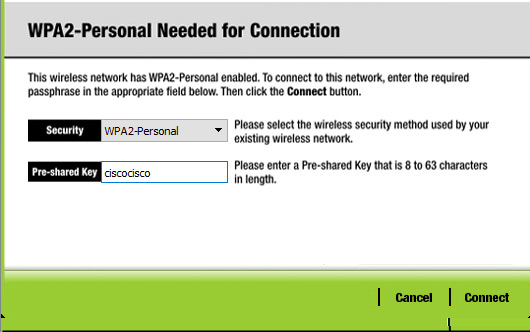
Переходим ко вкладке Wireless Security. Выбираем режим шифрования WPA2 Personal, алгоритм шифрования AES, ключевое слово для выбранного режима шифрования не менее 8 символов. Сохраняем.

3)Настройка wi-fi адаптера на ноутбуке. Вкладка Desktop->PC Wireless->Connect. Смотрим доступные нам сети. Нажимаем кнопку Connect для подключения к сети netskills.
Если настройки произведены верно, то появиться пунктирная линия между wi-fi маршрутизатором и ноутбуком как на рисунке.
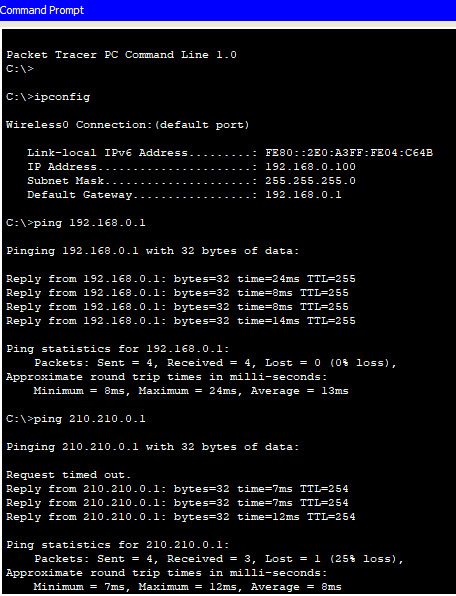
Введём на ноутбуке в командной строке команду ipconfig, чтобы проверить правильность настроек. Из рисунка видно, что DHCP- сервер присвоил правильный ip 192.168.0.100 Пропингуем шлюз (wi-fi маршрутизатор) и пропингуем адрес интернет провайдера. На рисунке видно, что в обоих случаях пинг идёт.
При этом NAT мы не использовали, так как практически на всех wi-fi маршрутизаторах NAT используется по умолчанию.
Если у вас возникли трудности с выполнением задания, вы всегда сможете найти толкового исполнителя здесь: work-zilla.com
Кол-во просмотров: 52955
Возможно, Вам будет интересно почитать:
1 комментарий к “ Лабораторная работа №5: Cisco Packet Tracer: Wi-Fi ”
Configure access point in Cisco packet tracer
A wireless access point allows devices to connect to the network wirelessly so to connect different devices to the access point, we have to configure the access point for basic settings.
We can configure port 1 of the access point for the wireless-related settings.
By default, SSID is configured as default and authentication is disabled and the same is configured on end devices available so we just have to add the devices to the map and they will connect to the access point immediately because the devices are preconfigured with the required settings however If we have changed the SSID and enabled the authentication then we have to connect the device with the available SSID and also for authentication, the password must be entered.
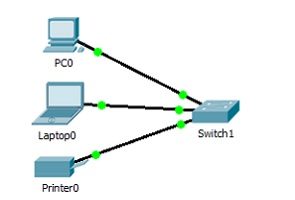
To connect the Laptop or PC, we have to remove the Ethernet module and add the wireless module so these devices can support wireless connectivity while the other two devices have the wireless module preconfigured.
In the above image, you can see the 3 different devices are connected to the access point however they are not yet assigned the IP address.
Usually, routers provide more functionality as compared to access points e.g. routers can be configured with an access list and many more services like the quality of service, DNS, MAC address filtering, etc.
Routers available these days in the market have the ability to behave like an access point as well but normally in a large organization, access points are preferred due to their specific role and ease of configuration.
In big organizations, multiple access points are used to cover a large area so that access can be provided to users at every location.
The wireless router has the ability to assign dynamic IP addresses however repeater cannot assign IP addresses so to establish connectivity between different devices; we have to assign an IP address from the same network range.
If we want to assign the IP addresses dynamically then we can either add a wireless router to the network or configure a DHCP server.
We can also define the wireless range on the access point. By default, the access point is configured with a range of 140 meters so to reduce or increase the range, we can modify this setting.