How To Install Tomcat9 On Linuxmint 18.3
Apache Tomcat is an open source web server and servlet container developed by the Apache Software Foundation. It executes Java servlets and renders Web pages that include Java Server Page coding and it is one of the most popular web servers used by the Java developers. It is so simple to install Tomcat9 on Linux Mint 18.3 and this tutorial covers the ground on the same process.
In order to install Tomcat, it is really very essential to install Java, so make sure you run the following command.
linuxhelp ~ # apt-get install default-jdk Reading package lists. Done Building dependency tree Reading state information. Done The following additional packages will be installed: ca-certificates-java default-jdk-headless default-jre default-jre-headless openjdk-8-jdk openjdk-8-jdk-headless openjdk-8-jre openjdk-8-jre-headless Suggested packages: default-java-plugin openjdk-8-demo openjdk-8-source visualvm icedtea-8-plugin fonts-ipafont-gothic fonts-ipafont-mincho fonts-wqy-zenhei Recommended packages: . . Processing triggers for libc-bin (2.23-0ubuntu9) . Processing triggers for ca-certificates (20170717~16.04.1) . Updating certificates in /etc/ssl/certs. 0 added, 0 removed done. Running hooks in /etc/ca-certificates/update.d. done. done. Once it is done, you can check if it’ s installed properly by making use of the following command which displays the version of Java.
linuxhelp ~ # java -version openjdk version " 1.8.0_151" OpenJDK Runtime Environment (build 1.8.0_151-8u151-b12-0ubuntu0.16.04.2-b12) OpenJDK 64-Bit Server VM (build 25.151-b12, mixed mode) After that, you should create a user for Tomcat.
linuxhelp ~ # useradd -r tomcat9 --shell /bin/false And then, you need to enter into /opt location to download the apache-tomcat9.
linuxhelp ~ # cd /opt/ linuxhelp opt # Now, you shall download tomcat9 package by using the wget command in the following manner.
linuxhelp opt # wget http://www-eu.apache.org/dist/tomcat/tomcat-9/v9.0.6/bin/apache-tomcat-9.0.6.tar.gz --2018-03-24 04:37:07-- http://www-eu.apache.org/dist/tomcat/tomcat-9/v9.0.6/bin/apache-tomcat-9.0.6.tar.gz Resolving www-eu.apache.org (www-eu.apache.org). 195.154.151.36, 2001:bc8:2142:300:: Connecting to www-eu.apache.org (www-eu.apache.org)|195.154.151.36|:80. connected. HTTP request sent, awaiting response. 200 OK Length: 9494739 (9.1M) [application/x-gzip] Saving to: ‘ apache-tomcat-9.0.6.tar.gz’ apache-tomcat-9.0.6.tar.gz 100%[===================================================================> ] 9.05M 43.8MB/s in 0.2s 2018-03-24 04:37:37 (43.8 MB/s) - ‘ apache-tomcat-9.0.6.tar.gz’ saved [9494739/9494739] After that, make sure you extract the downloaded file by using the following command.
linuxhelp opt # tar -xzf apache-tomcat-9.0.6.tar.gz linuxhelp opt # ls apache-tomcat-9.0.6 apache-tomcat-9.0.6.tar.gz You should also create the symbolic link for an extracted directory by making use of the following command.
linuxhelp opt # ln -s apache-tomcat-9.0.6 tomcat-latest And then, you should change the ownership of the extracted directory by running the following command.
linuxhelp opt # chown -hR tomcat9: tomcat-latest apache-tomcat-9.0.6 Next, you should create a user for manager and admin in the tomcat-user file as follows.
linuxhelp opt # vim tomcat-latest/conf/tomcat-users.xml < role rolename=" manager-gui" /> < role rolename=" admin-gui" /> < user username=" admin" password=" password" roles=" manager-gui,admin-gui" /> Next, make an entry to allow the server.
linuxhelp opt # vim tomcat-latest/webapps/manager/META-INF/context.xml < Context antiResourceLocking=" false" privileged=" true" >< Valve className=" org.apache.catalina.valves.RemoteAddrValve" allow=" 127.d+.d+.d+|::1|0:0:0:0:0:0:0:1|192.168.7.232" /> < Manager sessionAttributeValueClassNameFilter=" java.lang.(?:Boolean|Integer|Long|Number|String)|org.apache.catalina.filters.CsrfPreventionFilter$LruCache(?:$1)?|java.util.(?:Linked)?HashMap" /> < /Context>linuxhelp opt # vim tomcat-latest/webapps/host-manager/META-INF/context.xml < Context antiResourceLocking=" false" privileged=" true" >< Valve className=" org.apache.catalina.valves.RemoteAddrValve" allow=" 127.d+.d+.d+|::1|0:0:0:0:0:0:0:1|192.168.7.232" /> < Manager sessionAttributeValueClassNameFilter=" java.lang.(?:Boolean|Integer|Long|Number|String)|org.apache.catalina.filters.CsrfPreventionFilter$LruCache(?:$1)?|java.util.(?:Linked)?HashMap" /> < /Context>
Configure daemon file for start and stop tomcat service.
linuxhelp opt # vim /etc/systemd/system/tomcat.service [Unit] Description=Tomcat9 After=network.target [Service] Type=forking User=tomcat9 Group=tomcat9 Environment=CATALINA_PID=/opt/tomcat-latest/tomcat9.pid Environment=JAVA_HOME=/usr/lib/jvm/java-1.8.0-openjdk-amd64 Environment=CATALINA_HOME=/opt/tomcat-latest Environment=CATALINA_BASE=/opt/tomcat-latest Environment=" CATALINA_OPTS=-Xms512m -Xmx512m" Environment=" JAVA_OPTS=-Dfile.encoding=UTF-8 -Dnet.sf.ehcache.skipUpdateCheck=true -XX:+UseConcMarkSweepGC -XX:+CMSClassUnloadingEnabled -XX:+UseParNewGC" ExecStart=/opt/tomcat-latest/bin/startup.sh ExecStop=/opt/tomcat-latest/bin/shutdown.sh [Install] WantedBy=multi-user.target ~ ~ ~ And then, reload daemon with the help of the following command.
linuxhelp opt # systemctl daemon-reload You shall now start the Tomcat service by running the following command.
linuxhelp opt # systemctl start tomcat.service Also, you need to enable the Tomcat service through the following command.
linuxhelp opt # systemctl enable tomcat.service Created symlink from /etc/systemd/system/multi-user.target.wants/tomcat.service to /etc/systemd/system/tomcat.service. 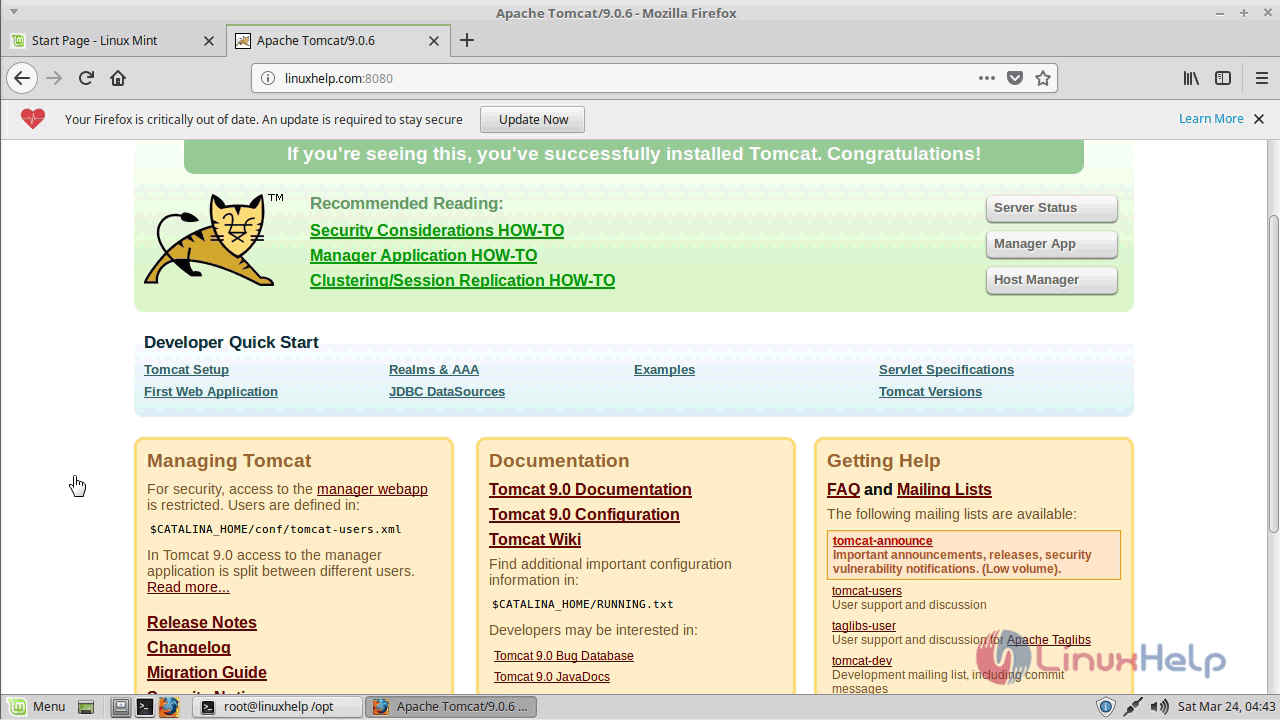
Now, open your browser and give localhost:8080 as the URL. The home page of Tomcat appears on your screen.
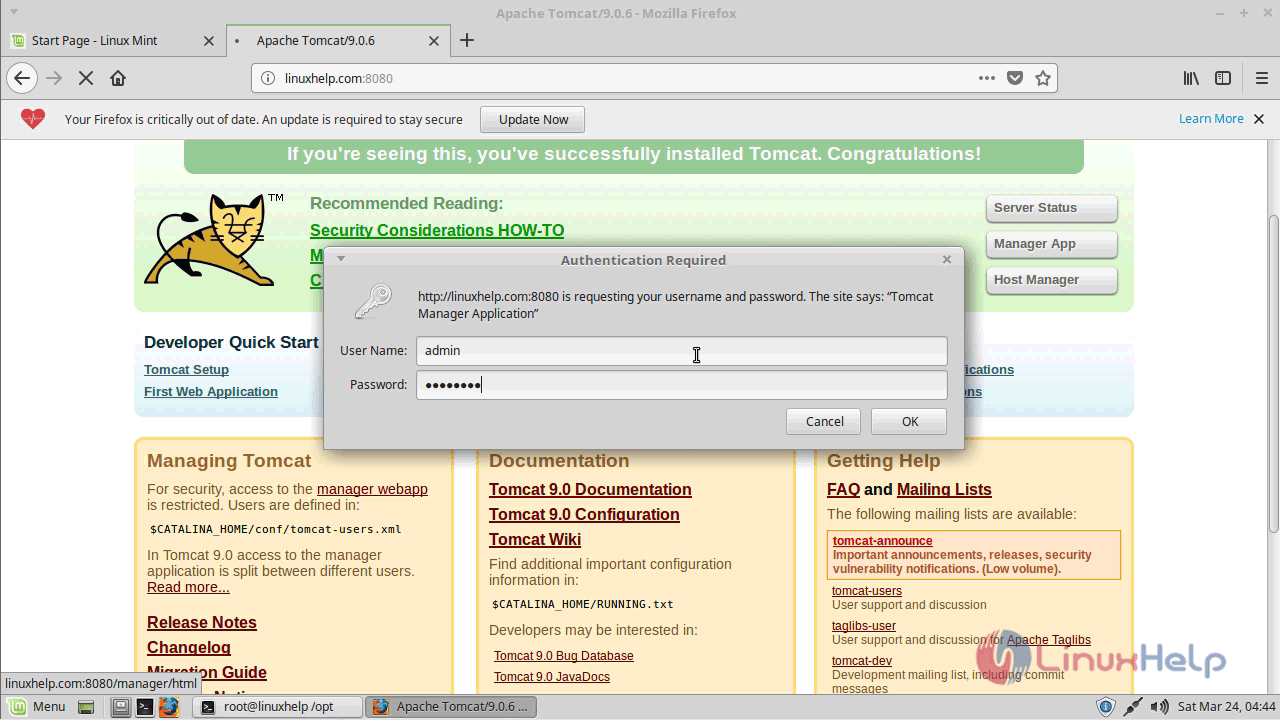
If you want to open the manager app, then click on it. And give your login credentials in the popup that appears.
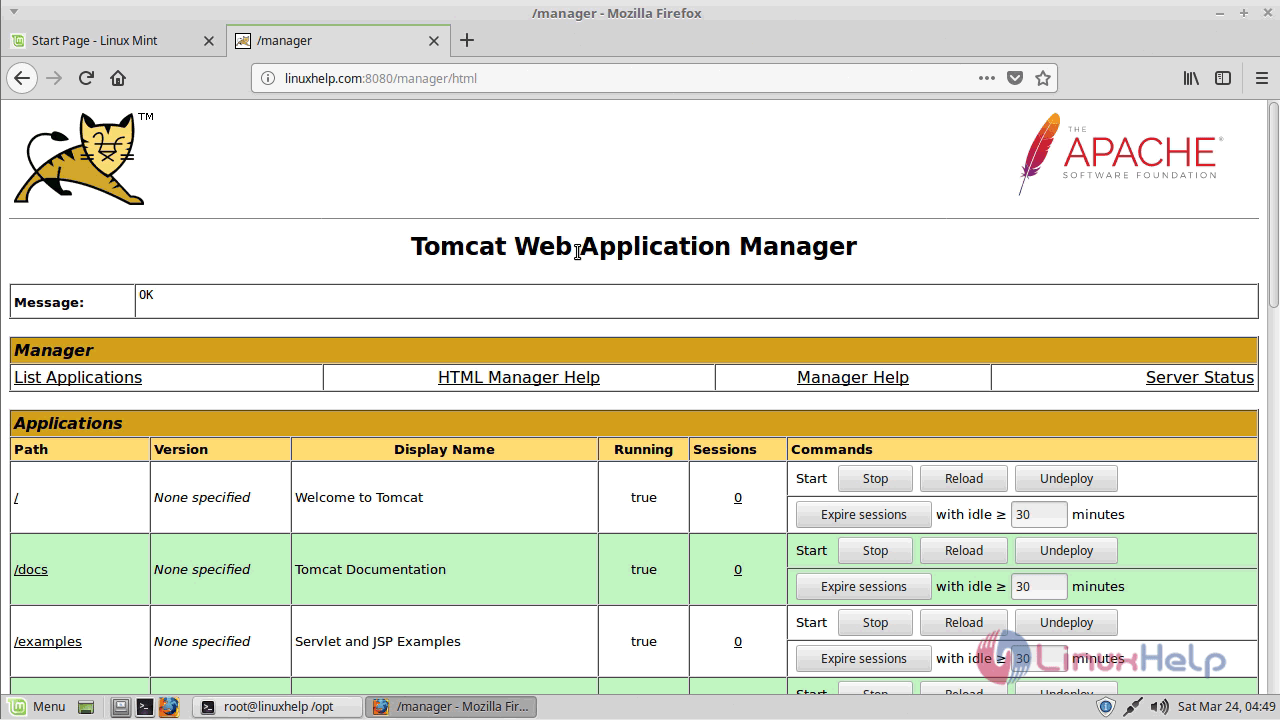
The Manager page of Tomcat now appears.
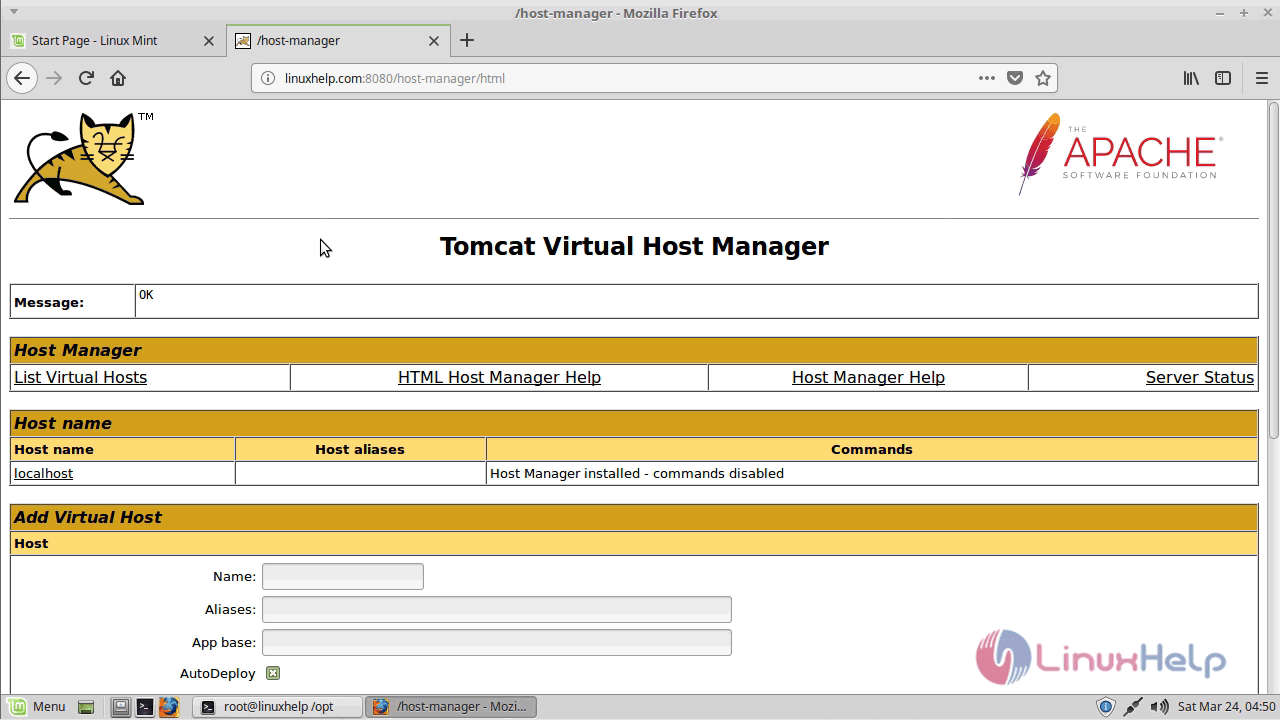
If you want to open the VirtualHost for the admin panel, then click on Host manage. 
With this, the installation of Tomcat9 on Linux Mint 18.3 comes to an end.
How To Install Apache Tomcat on Linux Mint 21

In this tutorial, we will show you how to install Apache Tomcat on Linux Mint 21. For those of you who didn’t know, Apache Tomcat is an open-source Java servlet container. Tomcat is developed and maintained by a free group of developers under the Apache Software Foundation’s auspices and is licensed under the Apache License 2.0.
This article assumes you have at least basic knowledge of Linux, know how to use the shell, and most importantly, you host your site on your own VPS. The installation is quite simple and assumes you are running in the root account, if not you may need to add ‘ sudo ‘ to the commands to get root privileges. I will show you the step-by-step installation of an Apache Tomcat on Linux Mint 21 (Vanessa).
Prerequisites
- A server running one of the following operating systems: Linux Mint 21 (Vanessa).
- It’s recommended that you use a fresh OS install to prevent any potential issues.
- SSH access to the server (or just open Terminal if you’re on a desktop).
- A non-root sudo user or access to the root user . We recommend acting as a non-root sudo user , however, as you can harm your system if you’re not careful when acting as the root.
Install Apache Tomcat on Linux Mint 21 Vanessa
Step 1. Before running the tutorial below, it’s important to make sure your system is up to date by running the following apt commands in the terminal:
sudo apt update sudo apt install software-properties-common apt-transport-https wget ca-certificates gnupg2
Apache Tomcat required Java installation. Now run the following command to install Java to your system using the following command:
sudo apt install default-jdk
Check the currently installed version by simply running the command below:
For additional resources on installing Java, read the post below:
Step 3. Installing Apache Tomcat on Linux Mint 21.
By default, Apache Tomcat is not available on the Linux Mint 21 base repository. Now we download the Apache Tomcat package from the official page using the wget command below:
wget https://dlcdn.apache.org/tomcat/tomcat-10/v10.0.23/bin/apache-tomcat-10.0.23.tar.gz
Next, extract the downloaded archive:
tar xvf apache-tomcat-10.0.23.tar.gz
Then, move it to the /usr directory using the following command:
sudo mv apache-tomcat-10.0.23 /usr/share/apache-tomcat
Next, create a user for Apache Tomcat and give ownership:
sudo useradd -M -d /usr/share/apache-tomcat tomcat sudo chown -R tomcat /usr/share/apache-tomcat
Step 4. Configure Apache Tomcat
Now allow access to Apache Tomcat UI from your IP address:
sudo nano /usr/share/apache-tomcat/webapps/manager/META-INF/context.xml
Allow specific IP address by adding it to the line:
Do the same with the following file:
sudo nano /usr/share/apache-tomcat/webapps/host-manager/META-INF/context.xml
To allow any IP address to access remove the added IP above:
Next, we set up a secure Apache Tomcat dashboard:
sudo nano /usr/share/apache-tomcat/conf/tomcat-users.xml
Add the following file above
Step 5. Create Systemd for Apache Tomcat
Now we create systemd unit for tomcat to start/stop and restart service:
sudo nano /etc/systemd/system/tomcat.service
[Unit] Description=Tomcat After=syslog.target network.target [Service] Type=forking User=tomcat Group=tomcat Environment=JAVA_HOME=/usr/lib/jvm/default-java Environment='JAVA_OPTS=-Djava.awt.headless=true' Environment=CATALINA_HOME=/usr/share/apache-tomcat Environment=CATALINA_BASE=/usr/share/apache-tomcat Environment=CATALINA_PID=/usr/share/apache-tomcat/temp/tomcat.pid ExecStart=/usr/share/apache-tomcat/bin/catalina.sh start ExecStop=/usr/share/apache-tomcat/bin/catalina.sh stop [Install] WantedBy=multi-user.target
Save and close the file, then reload systemd daemon:
sudo systemctl daemon-reload sudo systemctl enable tomcat sudo systemctl status tomcat
Step 6. Configure Firewall.
Now we set up an Uncomplicated Firewall (UFW) with Tomcat to allow public access on default web port 8080:
sudo ufw allow OpenSSH sudo ufw allow 8080 sudo ufw enable
Step 7. Accessing Apache Tomcat Web Interface.
Once successfully installed, open your web browser and access the OwnCloud installation wizard using the URL http://your-IP-address:8080 . You will be redirected to the following page:

Congratulations! You have successfully installed Apache Tomcat. Thanks for using this tutorial for installing the latest version of Apache Tomcat on the Linux Mint system. For additional help or useful information, we recommend you check the official Apache website.
If you don’t have time to do all of this stuff, or if this is not your area of expertise, we offer a service to do “VPS Manage Service Offer”, starting from $10 (Paypal payment). Please contact us to get the best deal!