- Set TOR Exit Node – TOR Browser, Country Code, Specific Node
- Editing “torrc” settings file
- Set TOR Exit Node to Specific Country
- Check “torrc” File Settings Application
- Connect to Specific TOR Exit Node from Specific Country
- Related Posts:
- How to Run Your Own Tor Node
- Tor Node Setup
- Installing Tor Node
- Frequently Asked Questions About Running A Tor Node
Set TOR Exit Node – TOR Browser, Country Code, Specific Node
If you use TOR and you want your browser Geolocation changed you can set TOR Exit Node to specific Country or Server instead of using the default settings. Using Specific Exit Node can slow down your speed and compromise your privacy, since all your traffic is going always through restricted list of nodes.
Affiliate: Experience limitless no-code automation, streamline your workflows, and effortlessly transfer data between apps with Make.com.
Editing “torrc” settings file
Full path to the file that needs to be changed:
..\Tor Browser\Browser\TorBrowser\Data\Tor\torrc
You can edit it with regular notepad.
By default, it should be empty.
Set TOR Exit Node to Specific Country
Add the next line in the “torrc” file:
“StrictNodes 1” – Means TOR will use only this country exit nodes.
Note: If there are several Exit Nodes in that country, TOR will connect you to the fastest available.
For example, if you want to set TOR Exit Node to Australia:
If you want to set several countries (Australia + Canada):
ExitNodes StrictNodes 1 ExitNodes StrictNodes 1
If no nodes are available for that country – TOR will not connect. In this case, you can set “StrictNodes 0”. “0” means TOR will try to connect to the Exit Node, but if it is not available, it will connect to the Exit Node in default settings.
TOR is using ISO Standard country codes. Full list on Wikipedia ISO Standard Country Codes.
HackerTarget TOR Exit Node Visualization – shows you visualized map of the TOR Exit nodes worldwide.
Check “torrc” File Settings Application
To check if TOR is indeed using the exit node that you selected navigate in TOR to TOR Project Browser Check.
This should show you the IP of the Exit Node that is currently used and that it is indeed working.
Click on “Relay Search” this should navigate you to a link like that:
https://metrics.torproject.org/rs.html#search/128.0.0.1
“128.0.0.1” is an example. It should be the IP of your Exit Node.
On the node details page you will see: Advertised Bandwidth, Host Name, Country, Uptime, AS Name / Number, Exit Policies, Platform, History, etc.
A simpler method would be using any Online Service that shows you your IP address and Geolocation – Google “What Is My IP”. Try using several services to see that they are showing the same. Save one of them for future uses, so you will not search them again.
Connect to Specific TOR Exit Node from Specific Country
To check for all the available Exit Nodes in a specific country, you can use the link similar to the one from above on “metrics.torproject.org”, using this country’s ISO code. Example for Australia:
https://metrics.torproject.org/rs.html#search/country:au
The results will filter by “Advertised Bandwidth”, but you can click on any column header to filter it by other variables. You can change the country in the search field if you need.
To set the specific TOR Exit Node – edit the “torrc” file:
“128.0.0.1” is IP example – use IP address of the actual Exit Node.
Note: No need for “StrictNodes 1” here.
A problem with specific Exit Nodes: If it does not allow traffic on port 80 or 443 – you will not be able to browse the web.
Related Posts:
How to Run Your Own Tor Node
The Onion Router (Tor) is run by a volunteer network of individuals who give up their computers and bandwidth to keep it going. Millions of people around the world rely on Tor to protect their online privacy and access various websites anonymously.
Having your own Tor node or relay gives you the opportunity to provide other users with online privacy and security while gaining some additional benefits:
- Your work contributes to distributing the load on the network as well as improving speed and responsiveness.
- Repurposing old technology, like a laptop or Raspberry Pi, reduces e-waste.
- Knowing you’re helping those just like yourself; people who need anonymity; can make you feel good.
However, it’s important to know the potential risks as well. Many criminals also choose to take advantage of the anonymity provided by the Tor service. As the data will be passing through your IP address, you could get a spotlight on yourself you wouldn’t otherwise have. It may be wise to pre-empt a call from your ISP and inform them in advance of your plans to run a Tor node.
Tor Node Setup
It shouldn’t take much time or technical expertise to configure the entire setup. Setting up a Tor node is not difficult, but there are several steps you must perform first.
The first step is to gather some basic information about your internet connection, then choose the server you want to use. When it comes to actual bandwidth, it’s best not to trust your ISP. To obtain accurate download and upload speeds, you should instead use a service like speedtest.net.
You should test the speeds during peak times to get an accurate idea of how much bandwidth you’ll have during heavy traffic periods. You will also need to consider your monthly data limits if your contract does not include unlimited bandwidth.
If your network uses a proxy server, NAT or router firewall, you should not forget about that, as you may need to configure port forwarding.
In the same way, if any applications transmit sensitive information, they should be hidden. It would be wise to be mindful of the ports that are in use on the network and ensure there are no conflicts.
The next step is to choose the hardware and operating system on which your Tor node will run. Ideally, you’ll need a minimum of 250KBps of download bandwidth, although the more is better. A 64-bit architecture should also be used for the hardware.
You can choose any operating system you want, but Debian (or Ubuntu) would be your best option. You can install Tor in several ways. You could install snap and then install Tor that way. However, in this guide, we will be using Debian’s Tor package that makes installation very straightforward.
The following instructions will show you how to set up a Middle/Guard relay on the Tor network. Since exit nodes carry a higher level of liability, we will focus on the middle nodes as they are less likely to attract the attention of law enforcement and your ISP.
Installing Tor Node
One of the first things we will need to do is update the system and ensure that any dependencies we will need are installed.
This can be done with the following command:
sudo apt update && sudo apt upgrade && sudo apt install unattended-upgrades apt-listchanges apt-transport-https gpg -yWe will need to edit some files to ensure the unattended-upgrades also pulls from the Tor repo.
sudo nano /etc/apt/apt.conf.d/50unattended-upgradesYou should remove the contents of this file and replace it with the text below:
Unattended-Upgrade::Origins-Pattern < "origin=Debian,codename=$,label=Debian-Security"; "origin=TorProject"; >; Unattended-Upgrade::Package-Blacklist < >; Unattended-Upgrade::Automatic-Reboot "true";Important security patches will now be downloaded automatically, but some patches may require a reboot before takings full effect. Due to the nature of Unattended-Upgrade’s, this will reboot the system as soon as it’s needed. So it’s not recommended to run this on a server where uptime is a consideration.
To avoid random reboots, add the following line to the bottom of the 50unattended-upgrades file. This will wait until a time when you are not likely to be using the server (e.g. 2 am).
Unattended-Upgrade::Automatic-Reboot-Time "02:00";Next, edit the following file and insert the text below:
sudo nano /etc/apt/apt.conf.d/20auto-upgradesAPT::Periodic::Update-Package-Lists "1"; APT::Periodic::AutocleanInterval "5"; APT::Periodic::Unattended-Upgrade "1"; APT::Periodic::Verbose "1";And test the Unattended-Upgrade’s to ensure success:
Although you can install Tor directly from the Debian repositories with the apt command, this might not always give you the latest stable version of Tor. For this reason, we recommend installing Tor from the repository managed by the Tor Project.
Binaries are available for amd64, arm64, and i386 in the package repository. By inspecting the output of the following command, you can verify that your operating system can run the binary:
Either amd64, arm64, or i386 should be the output. This repository does not support any other CPU architecture. ARM architecture (armhf) images are not available in the package repository. Tor can be built from source, or check the Debian hosted repositories for an alternative version of it.
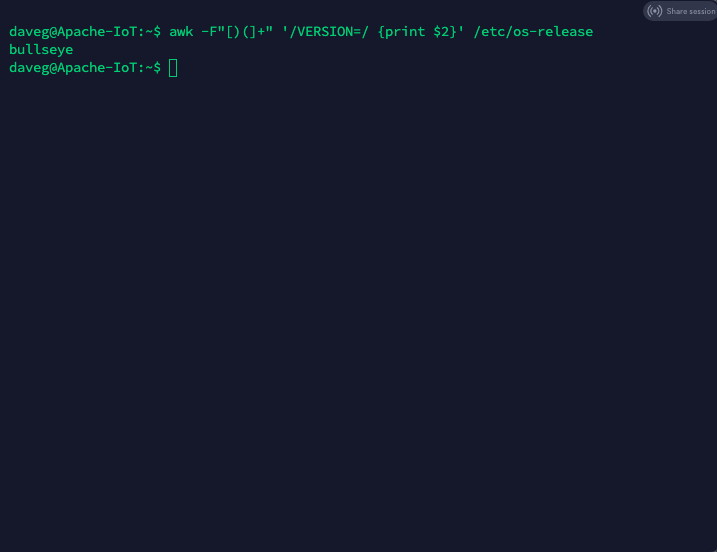
Different versions of Debian are given different codenames, ie, Buster, Bullzeye. You will need to check what version you are using with the following command:
awk -F"[)(]+" '/VERSION=/ ' /etc/os-releaseThe output should look like the image below:
Use the following command to make a new file:
sudo nano /etc/apt/sources.list.d/tor.listPlace the two lines below into the file and replace “” with the codename you obtained with the previous command:
deb [signed-by=/usr/share/keyrings/tor-archive-keyring.gpg] https://deb.torproject.org/torproject.org main deb-src [signed-by=/usr/share/keyrings/tor-archive-keyring.gpg] https://deb.torproject.org/torproject.org mainBy running the following command, you can add the GPG key that was used to sign the packages, this command needs to be run as root. Use the following command to switch to the root account:
wget -O- https://deb.torproject.org/torproject.org/A3C4F0F979CAA22CDBA8F512EE8CBC9E886DDD89.asc | gpg --dearmor | tee /usr/share/keyrings/tor-archive-keyring.gpg >/dev/nullIt is time to install the Tor node, but first, we must update the packages database. After that, we will install a package to help maintain the signing key.
sudo apt update && sudo apt install tor deb.torproject.org-keyring -yNow edit the config files before starting the Tor node, you can do so with the following command:
The only values that will need changing are the following:
- Nickname – This is used internally to help you identify the node.
- ContactInfo – This is used to contact you if your relay or bridge is misconfigured or something else goes wrong. It’s worth noting that this information is made publicly available, you may want to use another email to obscure any personally identifiable information and reduce the risk of receiving spam emails.
- ORPort – This TCP port is used for incoming connections, it must be accessible from outside the network, you may need to set up port forwarding.
- SocksPort – This should only be set to “0” if you don’t plan on running any other applications in conjunction with Tor, things like Nyx will not work with this option set to “0”.
- ExitRelay – When set to “0” this will disallow relay exits, ensuring you run as a middle node in the Tor network.
Once the file has been updated with the necessary information, you can go ahead and start the Tor node you have just installed. This can be done with the following commands:
sudo systemctl enable torFor those who wish to install nyx, that will allow you to monitor the Tor node, please follow these instructions:
Uncomment the line for “ControlPort” – it should default to port: 9051
Next, you will need to create a strong password, store this somewhere safe as you may need to reference it later.
Using the Linux command line, create a hash of the password you have just made, this can be done with the following command:
Once you have the hashed version of the password, edit the torrc file once again, this time, uncomment the “HashedControlPassword” and input the hashed password value you have received.
Then enter the following commands to restart the Tor node:
Once the server boots backup again, log in and using the command line, enter the following command followed by the un-hashed version of the password you created earlier.
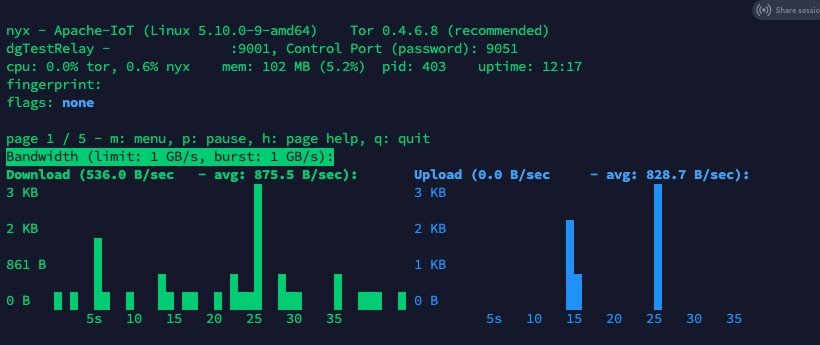
You will see a screen where you can monitor the bandwidth that is coming into and leaving the Tor node that you have created.
Frequently Asked Questions About Running A Tor Node
Tor servers and nodes on the Tor network can be set up fairly easily. With a little Linux knowledge and a good walkthrough guide of How To Setup A Tor Node you can be up and running within minutes.
It is the first node in a series of relays, so the entry node is the only point in the network where the user can be identified. The destination of the traffic can not be deciphered, only that they are using the Tor network.
The IP address of a middle relay will not show up as the source of traffic, even when malicious users use the Tor network for illegal purposes. You can, therefore, run a middle relay from home, on a dedicated server, or with another service.
The Tor exit node is the node at the end of the Tor network, it’s the last node that handles traffic before it is sent to the internet. An exit node can be monitored by snoopers, but they are not able to identify the source of the traffic.