primaryobjects / tplink-archer-t4u.md
The following steps will install the Linux Mint driver for the TP-Link Archer T4U Plus AC1300 USB Wifi adapter.
Installing the TP-Link Archer T4U Driver
sudo apt-get install build-essential dkms git clone https://github.com/Mephysto666/rtl8822bu cd rtl8822bu sudo dkms add .
Creating symlink /var/lib/dkms/88x2bu/1.1/source -> /usr/src/88x2bu-1.1 DKMS: add completed. sudo dkms install -m 88x2bu -v 1.1
Kernel preparation unnecessary for this kernel. Skipping. Building module: cleaning build area. 'make' all KVER=5.4.0-66-generic. cleaning build area. DKMS: build completed. 88x2bu.ko: Running module version sanity check. - Original module - No original module exists within this kernel - Installation - Installing to /lib/modules/5.4.0-66-generic/kernel/drivers/net/wireless/ depmod. DKMS: install completed. sudo service NetworkManager restart
You should now be able to see the new TP-Link 802.11ac NIC in the Wifi Connections in the bottom-right corner of your desktop. Optionally, you can right-click the Wifi icon in your system tray and select Network Settings to see the new TP-Link Wi-Fi adapter listed.
Upgrade Steps for Newer Linux Kernels
Linux kernel 5.15.0.58-generic and Linux Mint 21 Venessa / Vera use the following driver installation steps.
Using with an xfinitywifi Hot Spot
After installing the driver and successfully connecting to your new adapter, you may choose to connect to the xfinitywifi hotspot, which requires a login before providing Internet access.
If you attempt to access the Internet from Chrome, you may see an error ERR_QUIC_PROTOCOL. The solution to this is to login to the xfinitywifi service, as shown below.
- In Chrome, navigate to chrome://flags
- Search for Experimental QUIC protocol.
- Select Disable.
- Navigate to any web page and you should be directed to the xfinitywifi sign-in page.
- Enter your account login to connect to the Internet.
If the sign-in button fails to work, open Firefox and repeat steps 4-5.
TP-Link USB WiFi Adapter for PC (Archer T4U Plus)
Dual Band Wireless Network Adapter
Desktop with 2.4GHz/5GHz High Gain 5dBi Antennas
Supports Windows 10/8.1/8/7, Mac OS, Linux
How to install the Omada Controller on the Linux system
![]()
Updated 06-27-2022 03:54:45 AM 108630
Note: This article is based on the Ubuntu system.
This article is suitable for Omada Controller v3 and below.
For Omada SDN Controller v5.0.29 and above, please refer to FAQ 3272.
For Omada SDN Controller v4, please refer to FAQ 2917.
Omada Controller is a software which is used to manage the EAP. It supports both Windows and Linux system. This article will introduce how to install the software on Linux system to you.
This article is mainly divided into the following parts:
1. Download and Extract
Please go to the official website of TP-Link to download the Omada Controller, we recommend you to download the latest version. Then we can find this download file in the Downloads file by default.

Then please run the Terminal as administrator, change directory to Downloads file and extract the Controller software.

(1) Here are some explanations about the commands:
· “su” means running the Terminal as administrator.
· “ls” is used to list documents in current file.
· “tar zxvf Omada_Controller_v3.2.1_linux_x64.tar.gz” means to unzip the compressed file. (“Omada_Controller_v3.2.1_linux_x64.tar.gz” is the file name of compressed file of Controller.)
(2) You can also right click the file and choose “Extract Here” to extract the Controller file.
After decompression, we can see another file named “Omada_Controller_v3.2.1_linux_x64” in Downloads.
Change directory to “Omada_Controller_v3.2.1_linux_x64” and we can see “install.sh” in the unzipped file.
Run “bash install.sh”. When you see “Install Omada Controller succeeded!”, that means you have installed the Omada Controller successfully.
During installation, it will ask you whether to restore the database if there is any backup database in the folder /opt/tplink/eap_db_backup.

(1) Please install “jsvc” and “curl” first before you run the Omada Controller, or you cannot run it successfully. You can use “apt-get install jsvc” and “apt-get install curl” to install them.


(2) This software also needs to use netstat command, if your operation system doesn’t have net-tools (which includes netstat command), you can use “apt install net-tools” to install net-tools.
Here are some commands that can help you check/change the status of Omada Controller.
· tpeap status — show the status of Controller;
· tpeap start — start the Omada Controller;
· tpeap stop —stop running the Omada Controller.

After you start the Omada Controller, you can browse URL http://localhost:8088 to access the web management page of the Controller.
When you see “Welcome to use Omada Controller” in the web, please follow the wizard to set up your Omada Controller.

4. Uninstallation
If you want to uninstall the Omada Controller, you can go to the installation path /opt/tplink/EAPController, and run the command “bash uninstall.sh”.
During the uninstallation, you can choose whether to backup the database. The backup folder is /opt/tplink/eap_db_backup.

Is this faq useful?
Your feedback helps improve this site.
What’s your concern with this article?
- Dissatisfied with product
- Too Complicated
- Confusing Title
- Does not apply to me
- Too Vague
- Other
We’d love to get your feedback, please let us know how we can improve this content.
We appreciate your feedback.
Click here to contact TP-Link technical support.
Subscribe TP-Link takes your privacy seriously. For further details on TP-Link’s privacy practices, see TP-Link’s Privacy Policy.
Be The First To Get Exclusive Deals & News
Часто задаваемые вопросы при установке драйвера для Wi-Fi адаптера под ОС Linux.
![]()
Дата последнего обновления: 01-16-2018 08:22:18 AM 374579
В: Я не знаком с ОС Linux. Как я могу настроить адаптер на моей ОС Linux?
О: TP-Link предоставляет руководство по настройке/установке устройства в файлах драйверов. Следуйте инструкциям руководства, чтобы установить его. Или загрузите его здесь: https://static.tp-link.com/Installation for linux driver_RTL.pdf
В: Что мне делать, если при выполнении команды появляется ошибка «permission denied» / «доступ запрещен» ?
О: Для выполнения команды используйте учетную запись «root» или команду «sudo».
В: Почему возникает ошибка “mkdir: cannot create directory ‘/etc/Wireless/RT2870STA/’: No such file or directory” (“mkdir: не удаётся создать директорию ‘/etc/Wireless/RT2870STA/’: данный файл или каталог отсутствует”), когда я выполняю команду “sudo bash load.sh”?
О: Обычно это происходит, когда не удается создать папку “RT2870STA” в “etc/Wireless/”. Чтобы избежать этого, в первую очередь используйте команду “chmod 777 /etc/Wireless” для авторизации.
В: Какие устройства поддерживают последнюю версию ядра Linux?
О: На данный момент только адаптер Archer T9UH получил обновленный драйвер с поддержкой ядра 4.4.6 (Linux 2.6.18-4.4.6)
В: Что следует делать, если мне не удается установить драйвер, потому что моя OS Linux не соответствует версии ядра, указанной на официальном веб-сайте, или мне не удаётся установить драйвер из-за ошибок, которые мне не удаётся понять?
О: Поскольку Linux является системой с открытым кодом и множеством версий и вариаций, мы не можем гарантировать, что драйвер будет работать на именно на вашей версии Linux. Тем не менее, многие разработчики предоставляют свои собственные драйвера на форумах Linux. Мы рекомендуем использовать их.
Вы можете попробовать загрузить драйвер с ресурса Github: (Для T2U/T2UH/T1U)
Дополнительная информация
Был ли этот FAQ полезен?
Ваш отзыв поможет нам улучшить работу сайта.
Что вам не понравилось в этой статье?
- Недоволен продуктом
- Слишком сложно
- Неверный заголовок
- Не относится к моей проблеме
- Слишком туманное объяснение
- Другое
Как мы можем это улучшить?
Спасибо за обращение
Нажмите здесь, чтобы связаться с технической поддержкой TP-Link.
Подписаться на рассылку Мы с ответственностью относимся к вашим персональным данным. Полный текст положения об обработке персональных данных доступен здесь. С нашими условиями использования и программой улучшения пользовательского опыта можно ознакомиться здесь.
How to Install a TP-LINK Adapter on Linux Ubuntu

I successfully installed a driver of an old TP-LINK adapter, Archer T4UH V1, on my Linux Ubuntu 16.04 system. Since the model is a little old and there is no official guide for this driver installation, I think it may be a good idea to share my experience here to help more people.
My Adapter Model is Archer T4UH V1 and my OS Version is Linux Ubuntu 16.04. Here’s how I did it.
1. Use “sudo su” in terminal to get root authority then continue the steps to find the model of chipset which is usually the name of the driver
2. Plug the adapter to a USB slot. Then check out the OS details by “cat /proc/version”. The log shows the information of the kernel version, 4.15.0-43-generic and gcc version, 5.4.0.

3. Get the PID/VID of the unrecognized adapter using the command “lsusb”.

4. Google the PID / VID to get the corresponding chipset the code represents.

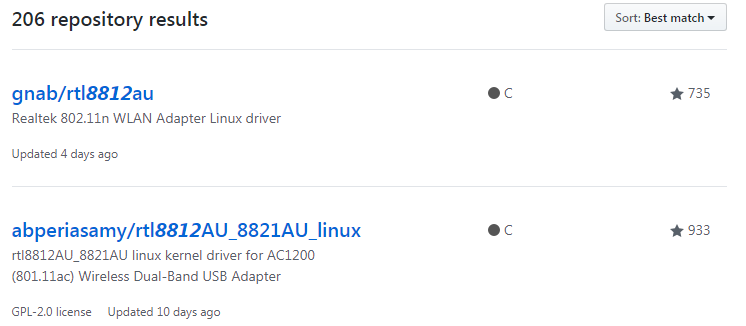
5. On wikidevi, a user-editable database for computer hardware, I finally got what the chipset is. As shown below, the chipset of Archer T4UH is rtl8812au.

6. Click the link on the same chart above to get an available Linux driver.
7. Download a driver and then click the folder to open a terminal. Get root authority as described in step 1. The below snapshot implies I have succeeded in loading the driver folder (/Download/rtl8812au-master).

8. Then compile the corresponding driver by “make”.

Note: If the system reminds you of lacking relevant files, install them using the command “apt-get install XXXX”. (XXXX means libelf-dev libelf-devel or elfutils-libelf-devel in my case.)
9. After compiling, I found a new file named 8812au.ko in this folder. Then I loaded the driver and “lsmod” indicated the driver had been added to the kernel.
$ modprobe lib80211
$ modprobe cfg80211
$ cp 8812au.ko /lib/modules/ 4.15.0-43-generic /kernel/drivers/net/wireless/
$ modprobe 8812au.ko // Or insmod 8812au.ko

10. For convenience, I wanted the driver to automatically load at boot, so I added it to the boot file.

Finally you see I have connected to a Wi-Fi called Deco M5 and can enjoy the internet.