- 10+ traceroute command in Linux [Cheat Sheet]
- How to install traceroute
- Install traceroute on CentOS, RHEL, Fedora
- Install traceroute on Ubuntu and Debian
- Syntax to use traceroute command
- Different examples to use traceroute command
- 1. Trace the route to a network host
- 2. Trace the route using IPv4
- 3. Trace the route using IPv6
- 4. Use ICMP ECHO
- 5. Specify the maximum number of hops
- 6. Specify the interface
- 7. Do not fragment packets
- 8. Set the wait time
- 9. Set the number of probe packets per hop
- 10. Do not resolve IP addresses to their domain names
- 11. Specify the destination port
- 12. Set the full packet length
- Conclusion
- How to install and run traceroute on Ubuntu
- How to install traceroute on Ubuntu
- How to use traceroute
- How to set number of probes using traceroute command
- How to limit the number of Hops using traceroute command
- How to limit probes using traceroute command
- How to adjust Hop response rate using traceroute command
- How to adjust the size of the packet using the traceroute command
- How to set number of Hops using traceroute command -f option
- How to adjust pause time between probes using traceroute command
- Conclusion
- Tracert in linux ubuntu
- Трассировка в Linux
- Для CentOS и RedHat
- Для Debian и Ubuntu
- Популярные Похожие записи:
10+ traceroute command in Linux [Cheat Sheet]
traceroute is a command-line tool that displays the routes taken by network packets to reach the given host. It also helps to find slow traffic between source and destination. traceroute can come in handy when troubleshooting connectivity issues.
How to install traceroute
traceroute command is not available by default on most Linux distributions. You can use the following commands to install traceroute on your system.
Install traceroute on CentOS, RHEL, Fedora
$ sudo dnf install traceroute Install traceroute on Ubuntu and Debian
$ sudo apt install traceroute Syntax to use traceroute command
The syntax for the traceroute command is as follows:
host indicates the name or IP address of the destination host.
Different examples to use traceroute command
1. Trace the route to a network host
You can specify the domain name or IP address to trace the route to a network host.
The following example prints the route taken by packets to reach the host golinuxcloud.com .
$ traceroute golinuxcloud.com Sample Output:

The traceroute command displays the IP addresses through which the packets pass and the time taken by packets to reach the destination.
There are three instances of time in milliseconds as traceroute sends three packets in each hop.
If the destination is not reached, it prints asterisks like in hop 9. It can be caused due to a firewall blocking the network.
2. Trace the route using IPv4
The -4 option enables only IPv4 tracerouting to a network host.
$ traceroute -4 golinuxcloud.com Sample Output:

3. Trace the route using IPv6
The -6 option allows you to use IPv6 protocol to trace the route to a network host.
$ traceroute -6 gtraolinuxcloud.com Sample Output:
~]# traceroute -6 2a00:8a00:4000:293::1e0 traceroute to 2a00:8a00:4000:293::1e0 (2a00:8a00:4000:293::1e0), 30 hops max, 80 byte packets 1 2a00:8a00:4000:293::1e0 (2a00:8a00:4000:293::1e0) 0.074 ms 0.019 ms 0.016 ms Or alternatively we can also use traceroute6 as shown below:
~]# traceroute6 2a00:8a00:4000:293::1e0 traceroute to 2a00:8a00:4000:293::1e0 (2a00:8a00:4000:293::1e0), 30 hops max, 80 byte packets 1 2a00:8a00:4000:293::1e0 (2a00:8a00:4000:293::1e0) 0.063 ms 0.017 ms 0.016 ms 4. Use ICMP ECHO
By default, the traceroute command uses the UDP ports for tracerouting. To use ICMP ECHO instead of UDP, run the command with -I option.
$ traceroute -I golinuxcloud.com Sample Output:

5. Specify the maximum number of hops
The default maximum hops number is 30. You can change its value using the -m option.
$ traceroute -m hop_num golinuxcloud.com Sample Output:

6. Specify the interface
With -i flag, you can specify the interface you want to use to send packets to a host.
$ traceroute -i interface google.com Sample Output:

7. Do not fragment packets
The -F option tells traceroute not to fragment probe packets.
$ traceroute -F golinuxcloud.com Sample Output:

8. Set the wait time
You can use the -w option to define time in seconds to wait for a response to the next hop. The default value is 5.0 seconds. The float point value is also allowed.
$ traceroute -w time golinuxcloud.com Sample Output:

9. Set the number of probe packets per hop
The -q option lets you specify the number of probe packets for a hop. The default is 3.
$ traceroute -q num golinuxcloud.com Sample Output:
The following example sends two packets in each hop to a host.

10. Do not resolve IP addresses to their domain names
The -n option forces the traceroute command not to map IP addresses to their domain names when displaying them.
$ traceroute -n golinuxcloud.com Sample Output:

11. Specify the destination port
The -p option is used to specify the destination port number for UDP tracing. The default port value is 33434.
$ traceroute -p port_num golinuxcloud.com Sample Output:

12. Set the full packet length
The default value of the full packet length is equal to the length of an IP header plus 40. You can change it by passing a new length to the traceroute command.
$ traceroute golinuxcloud.com packetlen Sample Output:

Conclusion
Now you should have understood how to use traceroute command to track the packet’s route to a network host. We have discussed the most common options used in traceroute commands. We hope you find this tutorial helpful.
If you have any confusion, let us know in the comment section.
How to install and run traceroute on Ubuntu
![]()
Network or system administrators have to properly look after the network, as they are supposed to provide an uninterrupted service within a network or system. For this, they must undergo several network checks to continuously monitor the network performance; several diagnostic tools allow network administrators to check the connectivity over the network, such as ping. However, another command is used for network diagnostics that is “traceroute” in Linux and macOS, while the same command is named “tracert” on windows OS. Traceroute command maps the route data from the source to the destination; the traceroute command is used to trace the paths that data packets take from their source point to destination point. In this detailed guide, we will explore the use of the traceroute command in Ubuntu with several examples.
How to install traceroute on Ubuntu
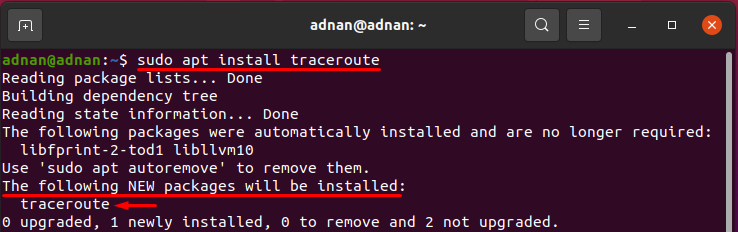
If you have not installed the traceroute, it will report an error upon execution. So, you must have to install it before applying the command: to install traceroute; execute the following command:
The syntax of the traceroute command is mentioned below:
How to use traceroute
Once it is installed, you can use it in Ubuntu; before getting into details; let’s look at the basic use of traceroute:
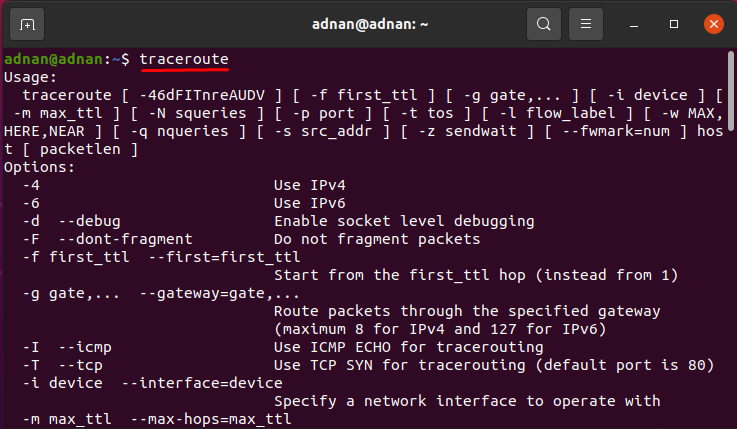
You can use the following command to get the complete usage of traceroute:
Moreover, the following command will show the tracerouting for youtube.com
There are few important notions that we can get from the output; there are few values on the first line of the output that is described below in bullets:
- The IP address of the destination
- Number of Hops: it is a numeric value and shows how much time the traceroute will try to reach the destination (the default value is 30)
- Number of Probes you are sending per Hop or number of packets per Hop (default value is 3)
- The last major point is about the size of packets you are sending. (its default value is 60bytes)

These all values can be set according to your requirement:
The traceroute command supports a list of options that can be inserted for various purposes; have a look at them:
How to set number of probes using traceroute command
You can set the number of Probes that are being passed: by default, 16 probes are passed simultaneously; you can adjust them using the “-N” option: the command given below will set the number to 10:

How to limit the number of Hops using traceroute command
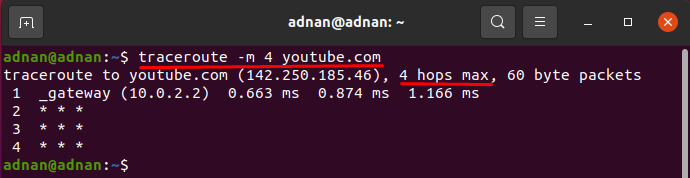
By default, there are 30 Hops; but you can set your own value by using the “-m” option: for instance, the command below will check the website for only 4Hops to reach the destination. You can observe the tracerouting is executed only until 4Hops.
How to limit probes using traceroute command
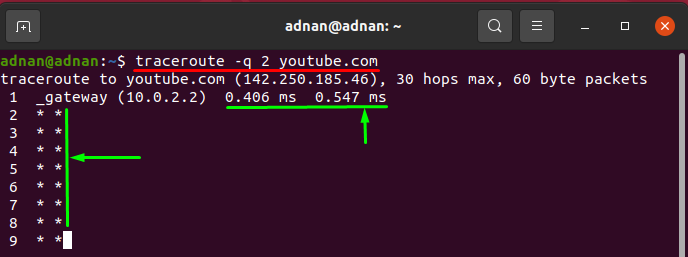
You can set a number of probes using the “-q” flag with traceroute, by default, three probes are displayed at every Hop: this option can be adopted when you want quick responses:
The command below will limit the number of probes to 2:
How to adjust Hop response rate using traceroute command
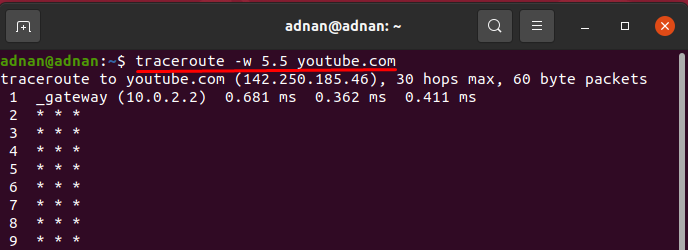
With the help of the “-w” option, you can increase the number of seconds that each Hop must wait to show the result. It gets only float values, so you have to pass a floating number (6.0, 6.5); and it is foreseen that increasing the number of Hop times will show a better response: the command given below will set the wait time of 5.5ms for each Hop:
How to adjust the size of the packet using the traceroute command
You can adjust the size of packets being sent per Hop; the default size is 60byte; the following command will resize packets to 50bytes.

How to set number of Hops using traceroute command -f option
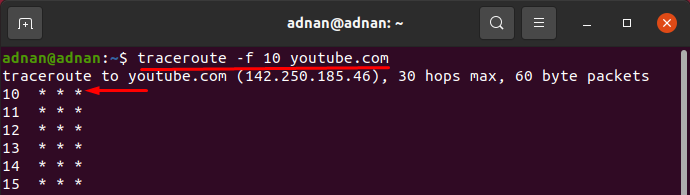
The “-f” option of the traceroute command will print the result from the Hop number that you specify; you can choose the number of Hops from where the result will be displayed: for instance, the example shown below will start printing the result from the 10th Hop.
How to adjust pause time between probes using traceroute command
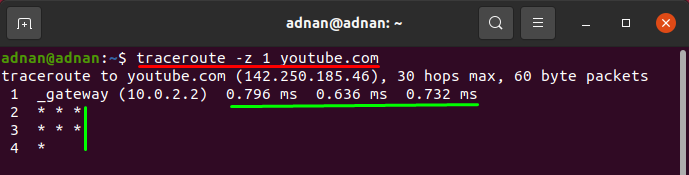
You can set pause time between probes; the default time is 0ms, but you can change it using the (-z) traceroute switch; the command given below will print Hops one by one with the time gap of 1ms:
Conclusion
Various network diagnostics tools are available such as traceroute and ping in Ubuntu. In networking, it is the duty of network admins to take care of the network; traceroute is one of the key tools for system or network admins. This guide provides a brief explanation of the traceroute command; with the help of the traceroute command, one can determine the delays in responses of network paths and look for routing loops (if present) in the network.
Tracert in linux ubuntu
Командой tracert мы инициируем отправку пакетов данных тому получателю, который указали – это может быть адрес сайта, имя компьютера в сети или IP-адрес. При этом пакеты проходят через все промежуточные системы (обычно это специальные сетевые устройства – машрутизаторы) между нашим компьютером и получателем. Таким образом, мы устанавливаем маршрут до пункта назначения и, что гораздо более важно – определяем время отклика (значение в миллисекундах) каждого промежуточного узла.
Таким образом можно установить, в каком месте цепочки находится проблема. Если пакеты не доходят до самого пункта назначения – значит, проблема в нем. Если цепочка обрывается на середине – проблема в каком-то из промежуточных маршрутизаторов. При этом с другого компьютера или по другому маршруту (если такой существует) наш отвалившийся сайт может быть доступен. Если пакеты не выходят за пределы сети нашего провайдера – стало быть, там и проблема.
Трассировка в Linux
В linux за трассировку отвечает пакет traceroute. Первое что сделаем это поставим пакет. Для этого достаточно полнить простенькую команду.
Для CentOS и RedHat
Для Debian и Ubuntu
![]()
Как сделать трассировку в Ubuntu-Debian-CentOS с помощью traceroute-01
Сделаем трассировку до Яндекса. traceroute ya.ru. Видим пошло построение маршрута.

Как сделать трассировку в Ubuntu-Debian-CentOS с помощью traceroute-02
Как видите команда очень похожа на команду из операционной системы Windows. Данная команда очень сильно вам поможет в решении сетевых проблем, так что трассировка вам в помощь.
Популярные Похожие записи:
- Установка NuGet в Windows
 Установка DIG в Windows, за минуту
- Большая потеря пакетов на виртуальной машине ESXI
- Настройка сети в CentOS 8, за минуту
- Ошибка активации 0xC004F034 на KMS сервере
- Ошибка Log Disk Exhaustion on vCenter 7, 100% решение