- Changing a hostname permanently in Ubuntu
- 8 Answers 8
- In Ubuntu 18.04 LTS
- 1. Edit /etc/cloud/cloud.cfg
- 2. Run hostnamectl
- 3. Reboot
- Change hostname permanently without reboot
- Change Hostname on Ubuntu 18.04
- Definition
- Prerequisites
- Change the Hostname
- Verify your Changes
- Как изменить Hostname (имя компьютера)
- Просмотр текущего Hostname
- Как изменить Hostname
- Способ 1. Используем команду hostnamectl
- Способ 2. Редактируем файлы /etc/hostname и /etc/hosts
- Проверка результата
- Как временно изменить Hostname
- How to Change Hostname on Ubuntu 20.04
- How to Check Current Hostname on Ubuntu 20.04
- Temporarily Change Hostname on Ubuntu 20.04
- Change Hostname on Ubuntu 20.04 (No Reboot Required)
- Step 1: Use set-hostname to Change the Hostname
- Step 2: Use hostnamectl to Confirm the Change
- Step 3: Change the Pretty Hostname (Optional)
- Change Hostname on Ubuntu 20.04 – Alternative Method (Reboot Required)
- Step 1: Open /etc/hostname and Change the Hostname
- Step 2: Open /etc/hosts and Change the Hostname
- Step 3: Reboot the System
- Change Hostname on Ubuntu 20.04 Using GUI
- Как изменить имя компьютера Ubuntu
- Требования к имени компьютера
- Как изменить имя компьютера
- Не меняется имя компьютера
- Выводы
Changing a hostname permanently in Ubuntu
I want to create a shell script that can change the hostname of my Ubuntu permanently. Whenever I use the hostname New_hostname command, it returns to the original hostname after I restart the machine. I found out that the only way I can change this permanently is by modifying the file in /etc/hostname and save it. Is there some way I can do this using a shell script only? I also have a password.
usermod —login new_name old_name . But don’t, it would mess up your homedir and quite some other stuff.
8 Answers 8
The hostnamectl combines setting the hostname via the hostname command and editing /etc/hostname . Unfortunately, editing /etc/hosts still has to be done separately.
what is the use of setting hostname in production When in production, I have seen some people do hostnamectl set-hostname
echo "myNewHostName" > /etc/hostname in any shell with root access near you..
In Ubuntu 18.04 LTS
Hostname changing via SSH is reverted after reboot in Ubuntu 18.04. Make permanent change as following way.
1. Edit /etc/cloud/cloud.cfg
sudo nano /etc/cloud/cloud.cfg Set preserve_hostname to true
2. Run hostnamectl
hostnamectl set-hostname new-host-name 3. Reboot
Change hostname permanently without reboot
127.0.0.1 persistent_host_name /etc/hostname
Apply changes Immediately
$ sudo hostname persistent_host_name Check changes
$ hostname persistent_host_name Typically, you would need to change it in these files:
If you are using some advanced printers, also here:
This is why I would recommend doing it manually — but search the old hostnames first. To find all occurrences in /etc:
sudo grep -iRI "_OLDHOSTNAME_" /etc 2>/dev/null Then change the _OLDHOSTNAME_ in every occurrence. Done.
To chaneg the Hostname permanet in ubuntu machine
Type the hostname inside the file you want to set for the machine
After saving the document run this command
Then edit the /etc/hosts file
type the ip hostname inside the file
Then Logout of of the machine and relogin into the machine
If you just want to change host name, because its getting displayed as a command prompt in the terminal. Then you can replace \h in PS1 with «desired_host_name» in ~/.bashrc
Like in ~/.bashrc put this line at end of file:
export PS2="continue-> "; export PS1="\u@3050:~$ "; Change Hostname on Ubuntu 18.04
Definition
A hostname is a label that identifies a machine on the network. You shouldn’t use the same hostname on two different machines on a same network.
Prerequisites
Change the Hostname
Change the hostname using hostnamectl command. If you want to change the hostname to new_hostname
sudo hostnamectl set-hostname new_hostname It will not change the hostname directly. You want to preserve the changes permanently then you have to edit cloud.cfg file
sudo nano /etc/cloud/cloud.cfg # This will cause the set+update hostname module to not operate (if true) preserve_hostname: true Save the file and close your editor.
Verify your Changes
You can verify your changes using command hostnamectl it will show new_hostname under Static hostname
Как изменить Hostname (имя компьютера)

Hostname (имя компьютера, имя хоста) задается во время установки системы Linux. Hostname определяет название компьютера и используется преимущественно для идентификации компьютера в сети. Нельзя назначать два одинаковых Hostname для компьютеров в одной сети.
Просмотр текущего Hostname
Чтобы показать текущий Hostname можно использовать команду hostname без параметров:
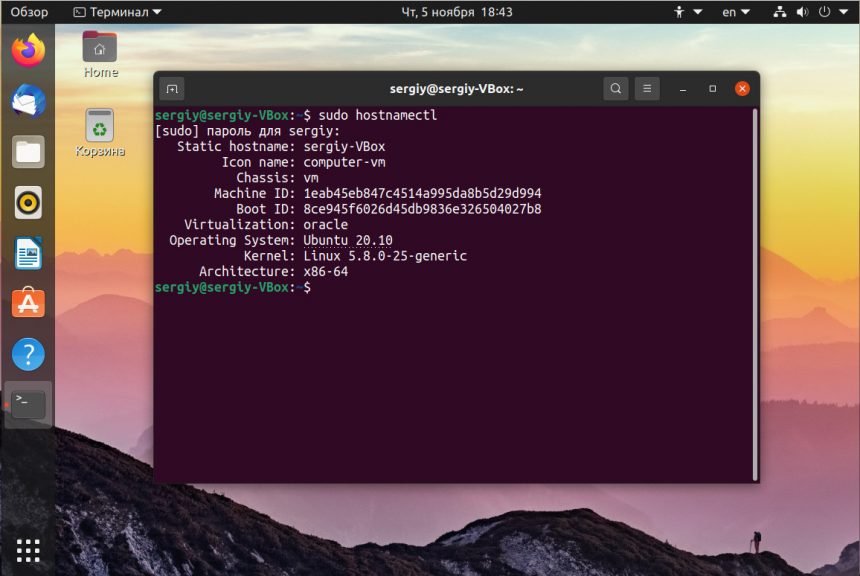
Также Hostname можно отобразить командой hostnamectl :
Как изменить Hostname
Рассмотрим, как изменить Hostname двумя разными способами.
Способ 1. Используем команду hostnamectl
Во многих systemd-based дистрибутивах (например, в Ubuntu Linux) есть утилита hostnamectl .
Воспользуемся командой hostnamectl , чтобы установить новое значение Hostname равным pingvinus . Используется аргумент set-hostname:
sudo hostnamectl set-hostname pingvinusСпособ 2. Редактируем файлы /etc/hostname и /etc/hosts
Еще один способ изменения Hostname — это ручное редактирование файла /etc/hostname и файла /etc/hosts .
Сначала выполните команду (вместо pingvinus укажите свое значение):
Отредактируем файл /etc/hostname для редактирования в редакторе nano, выполняем команду:
Измените текущее значение в файле на новое. Сохраните изменения и закройте файл. Это можно сделать, нажав Ctrl+C , затем Y и Enter .
Hostname прописывается также в файле /etc/hosts , поэтому нужно изменить его значение в этом файле. Откроем файл:
Найдите строку вида « 127.0.0.1 ваш_hostname » и впишите новое имя хоста. Сохраните изменения и закройте файл.
Проверка результата
Чтобы проверить, изменилось ли значение Hostname, откройте новое окно терминала и введите команду:
Как временно изменить Hostname
Чтобы изменить Hostname в текущей работающей системе Linux, но до первой перезагрузки, можно использовать просто команду hostname , указав ей новое значение имени хоста:
How to Change Hostname on Ubuntu 20.04
A hostname is a user-generated custom name which identifies a computer system in a network. In Ubuntu 20.04, users assign a hostname to the machine during OS setup.
You may decide to change your computer’s hostname for several reasons. For example, no two computers on a network can have the same hostname and, if you find yourself in this situation, you will have to change the hostname to avoid a network conflict.
In this tutorial, you will learn how to change a hostname on Ubuntu 20.04 using the Linux command line or GUI.

- Ubuntu 20.04 installed
- An account with sudo privileges
- Access to the command line for non-GUI methods
How to Check Current Hostname on Ubuntu 20.04
To check the current hostname of your Ubuntu system, use one of two available commands.

- The other command, hostnamectl , displays additional information about your computer system.
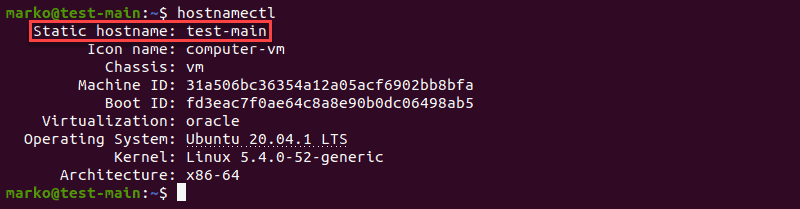
The Static hostname line displays your machine’s hostname.
Note: Valid hostnames are between 2 and 64 characters in length. They can contain only letters, numbers, periods, and hyphens, but must begin and end with letters and numbers only.
Temporarily Change Hostname on Ubuntu 20.04
Use the hostname command to make a temporary change to your computer’s hostname.
In the terminal, type the following, replacing new-hostname with the name you choose:
sudo hostname new-hostnameIf successful, this step will not provide any output. To confirm the result of the process, check the current system hostname:

Change Hostname on Ubuntu 20.04 (No Reboot Required)
If you wish to permanently change the hostname without rebooting your computer, use the hostnamectl command.
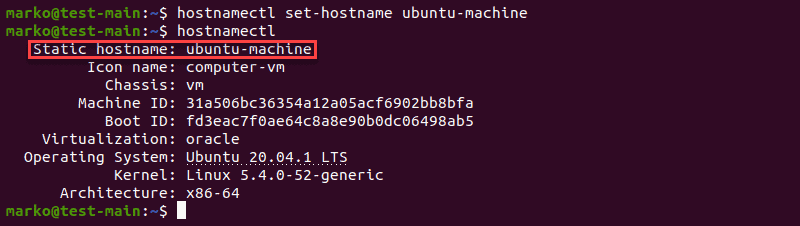
Step 1: Use set-hostname to Change the Hostname
Type the following command:
hostnamectl set-hostname new-hostnameUse your own hostname choice instead of new-hostname .
Step 2: Use hostnamectl to Confirm the Change
Just like the hostname command, if successful, hostnamectl set-hostname does not produce any output. Therefore, use hostnamectl to check the result.
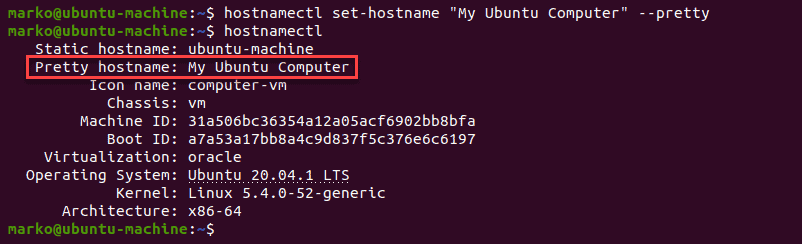
Step 3: Change the Pretty Hostname (Optional)
A “pretty” hostname is the hostname presented to the user, not to another computer on a network. A computer system identifies another computer only by its static hostname.
Note: The pretty hostname does not have the naming limitations of its static counterpart – any UTF-8 value is permitted.
To change a machine’s “pretty” hostname, use the same hostnamectl command with the —pretty option:
hostnamectl set-hostname "new-hostname" --prettyReplace new-hostname with your own UTF-8 value.
After checking the result with hostnamectl , you will notice an additional line in the output, listing the computer’s “pretty” hostname.
Note: The “pretty” hostname is stored in /etc/machine-info. Updating this file is another way to perform this optional step.
Change Hostname on Ubuntu 20.04 – Alternative Method (Reboot Required)
Another way to permanently change the hostname is by editing two configuration files:
The changes take effect immediately after system reboot.
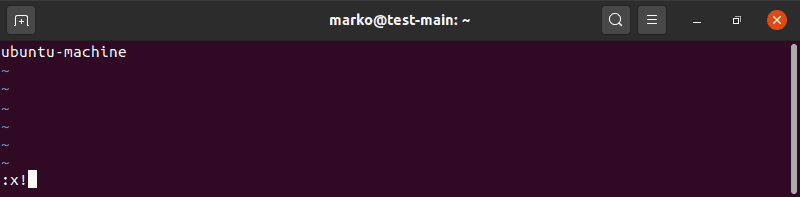
Step 1: Open /etc/hostname and Change the Hostname
Edit the file with a text editor of your choice. In this example, we will be using the Vim editor:
The /etc/hostname file contains only the current hostname. Replace it with your new choice.
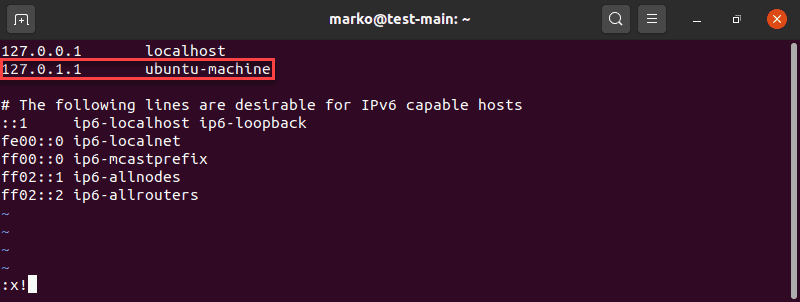
Step 2: Open /etc/hosts and Change the Hostname
Now edit the /etc/hosts file in the same way.
The file /etc/hosts maps hostnames to IP addresses. Look for the hostname you wish to change and simply replace it with your new choice.
Step 3: Reboot the System
Reboot your computer to apply the changes:
Note: If you use the Cloud-Init package ( cloud-init ) to run a cloud instance of Ubuntu, you need to perform another step before rebooting. Go to /etc/cloud/cloud.cfg file and make sure the line preserve_hostname is set to TRUE .
Change Hostname on Ubuntu 20.04 Using GUI
The Ubuntu GUI also provides a way to edit the system hostname:
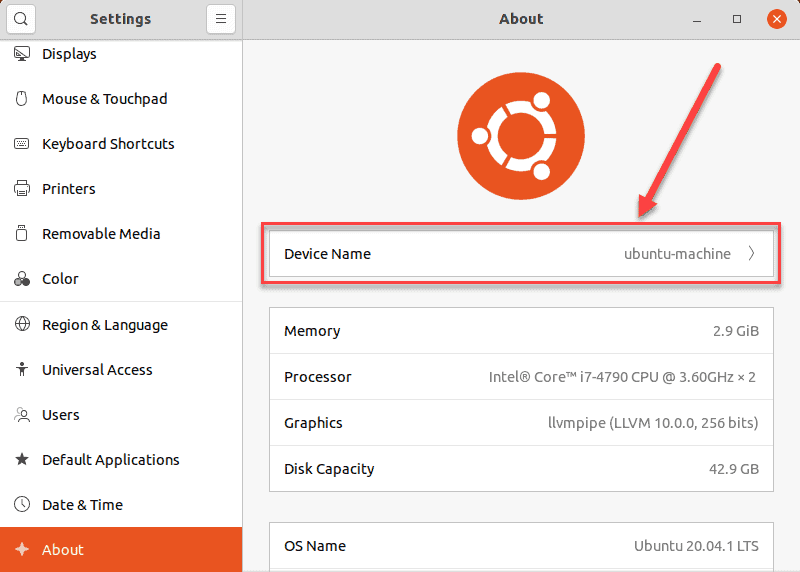
1. First, navigate to Settings > About.

2. Now, locate the Device Name field.
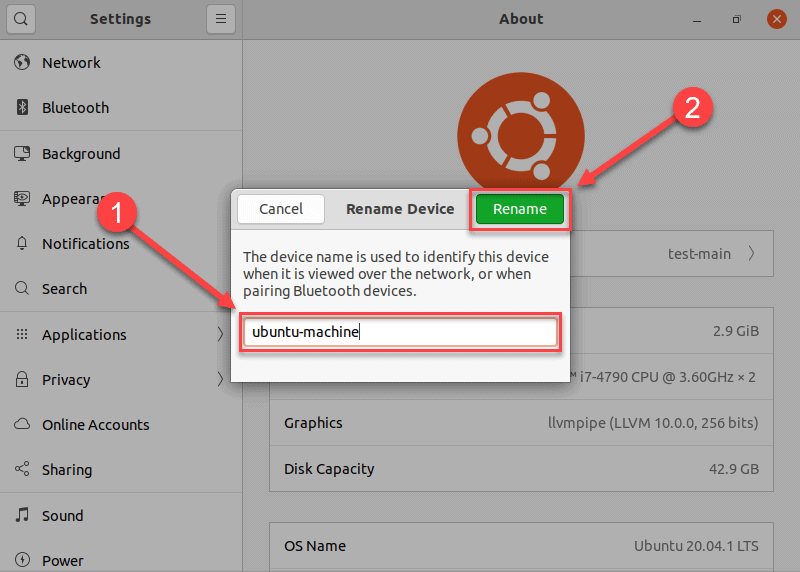
3 Clicking the Device Name field opens the Rename Device dialogue box.
4. In the Rename Device dialogue box, replace the current hostname with a new one and confirm your choice by clicking the Rename button. This action permanently changes the hostname.
This article presented three methods in which you can change the hostname on your Ubuntu 20.04 machine, using the command line or GUI. All the methods are simple and straightforward, so you can choose whichever one fits your use case best.
Как изменить имя компьютера Ubuntu
Имя компьютера или по-другому, имя хоста устанавливается во время установки системы. Оно используется для идентификации компьютера в локальной сети, например, передается службой NetBIOS как имя сервера Samba, а также вы будете постоянно видеть его в терминале перед приглашением ввода команды.
Если вы задали не такое имя как хотите во время установки, то изменить имя компьютера Ubuntu не так уж сложно, но графических инструментов для этого в системе придумано не было, поэтому придется делать все через терминал.
Требования к имени компьютера
Вы можете использовать практически любое имя компьютера, но для него есть некоторые ограничения. Не желательно использовать два одинаковых имени компьютера в одной локальной сети, иначе могут возникнуть проблемы с различными интернет-сервисами и самая очевидная — вы не сможете понять где какой компьютер.
Второе ограничение — имя компьютера может содержать только буквы английского алфавита от a до z, цифры от 0 до 9, а также символы дефиса и точки. Начинаться и заканчиваться имя должно только буквой или цифрой, а не символом подчеркивания. Имя хоста регистронезависимо, поэтому COMPUTER и computer будут означать одно и то же. По длине стоит ограничение от 2 до 69 символов, но этого вполне достаточно.
Как изменить имя компьютера
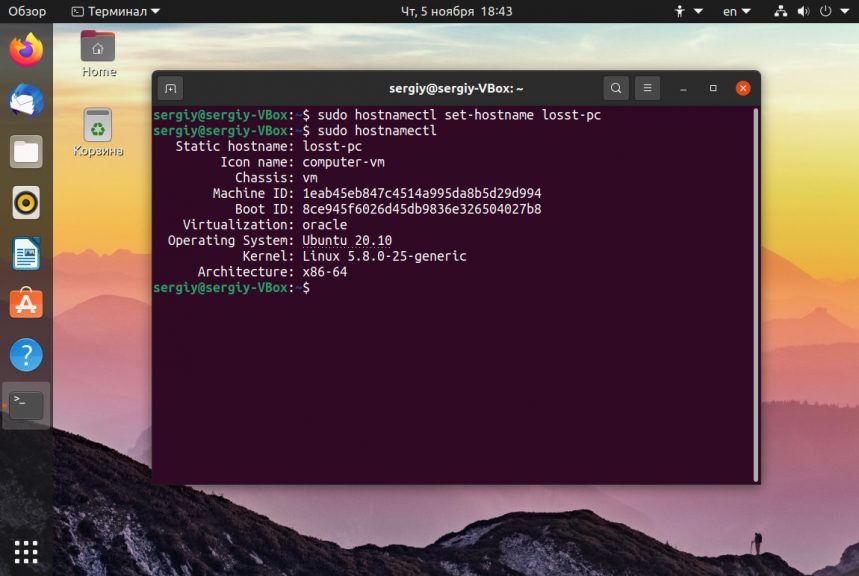
Посмотреть текущее имя компьютера можно выполнив команду hostnamectl без параметров:
Изменить имя хоста Ubuntu можно несколькими способами. Самый простой способ установить имя компьютера, которое сохранится только до перезагрузки можно использовать команду hostname, которой в параметре нужно передать новое имя. Например:
Но после перезагрузки все вернется как было раньше. Чтобы сделать изменения постоянными нужно изменить содержимое двух файлов. /etc/hostname и /etc/hosts:

Удалите старое имя из этого файла и пропишите новое. Затем сохраните изменения.
В современных версиях Ubuntu вы можете использовать команду hostnamectl, в отличие от первого варианта изменения сохранятся после перезагрузки:
sudo hostnamectl set-hostname новое_имя
Затем откройте второй файл:
Здесь немного сложнее, найдите строку:
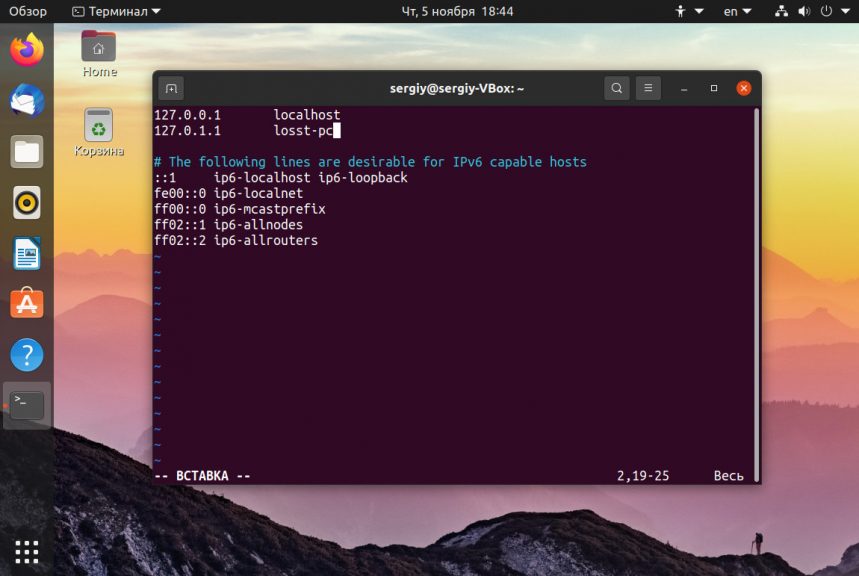
И замените старое имя на новое, после этого необходимо перезагрузить компьютер. Если вы не хотите перезагружать систему, то вы можете просто перезагрузить сервис управления входом пользователей:
systemctl restart systemd-logind.service
Теперь все должно работать правильно. Но это не единственный способ сменить имя хоста в Ubuntu.
Не меняется имя компьютера
Если вы поменяли имя компьютера, а после перезагрузки восстанавливается все как было, например, какое-то там dhcpcd0-pc, то, скорее всего, виноват NetworkManager. Здесь решение либо удалить эту программу, либо изменить имя хоста Ubuntu с помощью NetworkManager. Для этого выполните:
sudo vi /etc/NetworkManager/NetworkManager.conf
И добавьте в файл такие строки:

Теперь после перезагрузки NetworkManager поменяет имя хоста Ubuntu на правильное и больше проблем с этим не будет.
Выводы
Вот и все, теперь вы знаете как сменить имя компьютера Ubuntu. Для этого есть вполне достаточно способов, чтобы вы могли выбрать именно то, что нужно. Если у вас остались вопросы, спрашивайте в комментариях!
Обнаружили ошибку в тексте? Сообщите мне об этом. Выделите текст с ошибкой и нажмите Ctrl+Enter.