- Install Ubuntu Server
- 2. Requirements
- 3. Boot from install media
- 4. Choose your language
- 5. Choose the correct keyboard layout
- 6. Choose your install
- 7. Networking
- 8. Configure storage
- 9. Select a device
- 10. Confirm partitions
- 11. Confirm changes
- 12. Set up a Profile
- 13. Install software
- 14. Installation complete
- 15. What next?
- Finding help
- These releases of Ubuntu are available
- Basic installation
- Preparing to install
- System requirements
- Perform a system back up
- Download the server ISO
- Create a bootable USB
- Boot the installer
- Using the installer
Install Ubuntu Server
Ubuntu Server is a variant of the standard Ubuntu you already know, tailored for networks and services. It’s just as capable of running a simple file server as it is operating within a 50,000 node cloud.
Unlike the installation of Ubuntu Desktop, Ubuntu Server does not include a graphical installation program. Instead, it uses a text menu-based process. If you’d rather install the desktop version, take a look at our Install Ubuntu desktop tutorial.
This guide will provide an overview of the installation from either a DVD or a USB flash drive.
For a more detailed guide on Ubuntu Server’s capabilities and its configuration, take a look at our the Community Ubuntu Server documentation.
2. Requirements
You’ll need to consider the following before starting the installation:
- Ensure you have at least 2GB of free storage space.
- Have access to either a DVD or a USB flash drive containing the version of Ubuntu Server you want to install.
- If you’re going to install Ubuntu Server alongside data you wish to keep, ensure you have a recent backup.
See the server guide pages for more specific details on hardware requirements. We also have several tutorials that explain how to create an Ubuntu DVD or USB flash drive.
3. Boot from install media
To trigger the installation process, perform the following:
- Put the Ubuntu DVD into your DVD drive (or insert the USB stick or other install media).
- Restart your computer.
After a few moments, you should see messages like those shown below on the screen…

Most computers will automatically boot from USB or DVD, though in some cases this is disabled to improve boot times. If you don’t see the boot message and the “Welcome” screen which should appear after it, you will need to set your computer to boot from the install media.
There should be an on-screen message when the computer starts telling you what key to press for settings or a boot menu. Depending on the manufacturer, this could be Escape , F2 , F10 or F12 . Simply restart your computer and hold down this key until the boot menu appears, then select the drive with the Ubuntu install media.
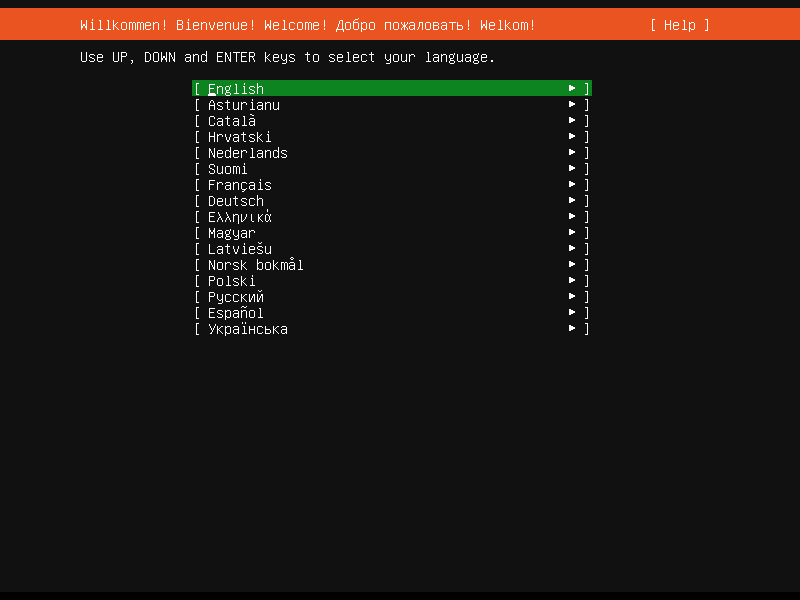
4. Choose your language
After the boot messages appear, a ‘Language’ menu will be displayed.

As the message suggests, use the Up , Down and Enter keys to navigate through the menu and select the language you wish to use.
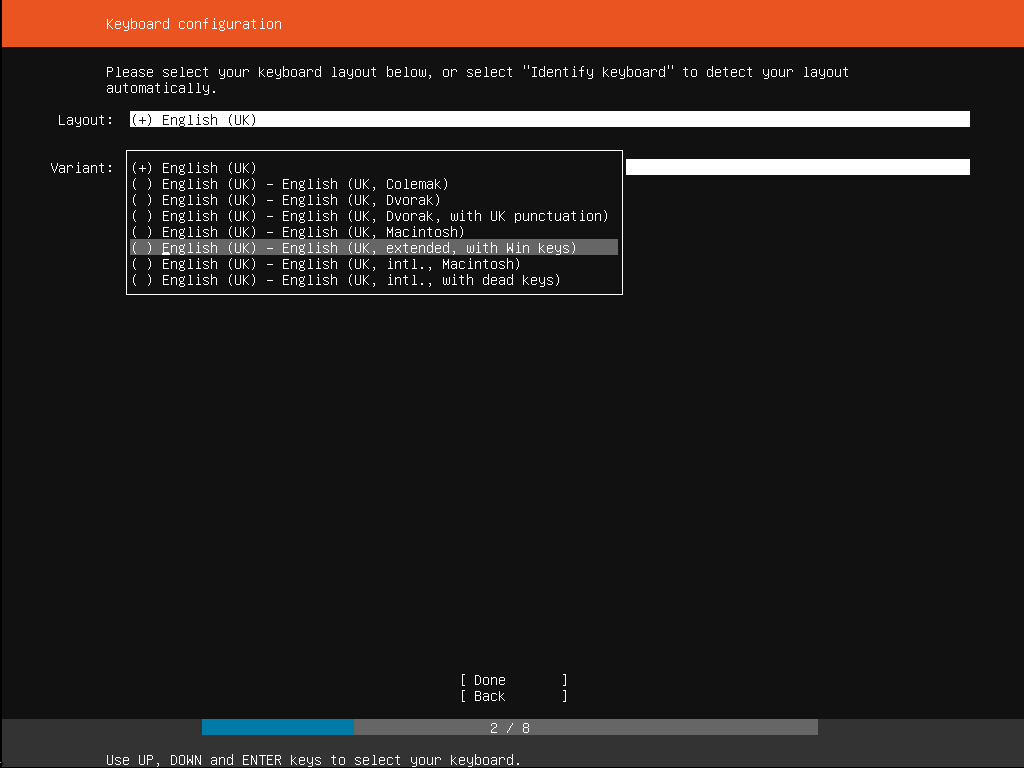
5. Choose the correct keyboard layout
Before you need to type anything in, the installer will next display a menu asking you to select your keyboard layout and, if applicable, the variant.

If you don’t know which particular variant you want, just go with the default — when Ubuntu Server has been installed you can test and change your preferences more easily if necessary.
6. Choose your install
Now we are ready to select what you want to install. There are three options in the menu:
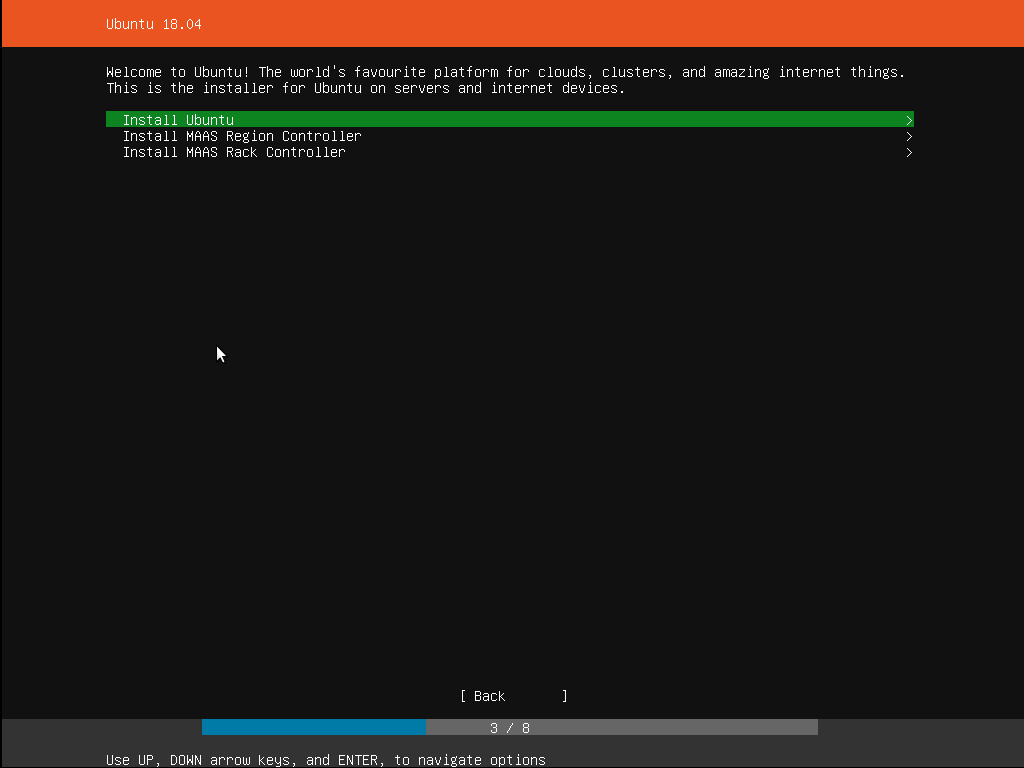
The bottom two options are used for installing specific components of a Metal As A Service (MAAS) install. If you are installing MAAS, you should check out the MAAS documentation for more information on this! The rest of this tutorial assumes you select the first option, Install Ubuntu .
7. Networking
The installer will automatically detect and try to configure any network connections via DHCP.

This is usually automatic and you will not have to enter anything on this screen, it is for information only.
If no network is found, the installer can continue anyway, it just won’t be able to check for updates. You can always configure networking after installation.
8. Configure storage
The next step is to configure storage. The recommended install is to have an entire disk or partition set aside for running Ubuntu.

If you need to set up a more complicated system, the manual option will allow you to select and reorganise partitions on any connected drives.
Note that Ubuntu no longer requires a separate partition for swap space, nor will the automated install create one.
9. Select a device
This menu will allow you to select a disk from the ones detected on the system.

To help identification, the drives will be listed using their system ID. Use the arrow keys and enter to select the disk you wish to use.
10. Confirm partitions
With the target drive selected, the installer will calculate what partitions to create and present this information…
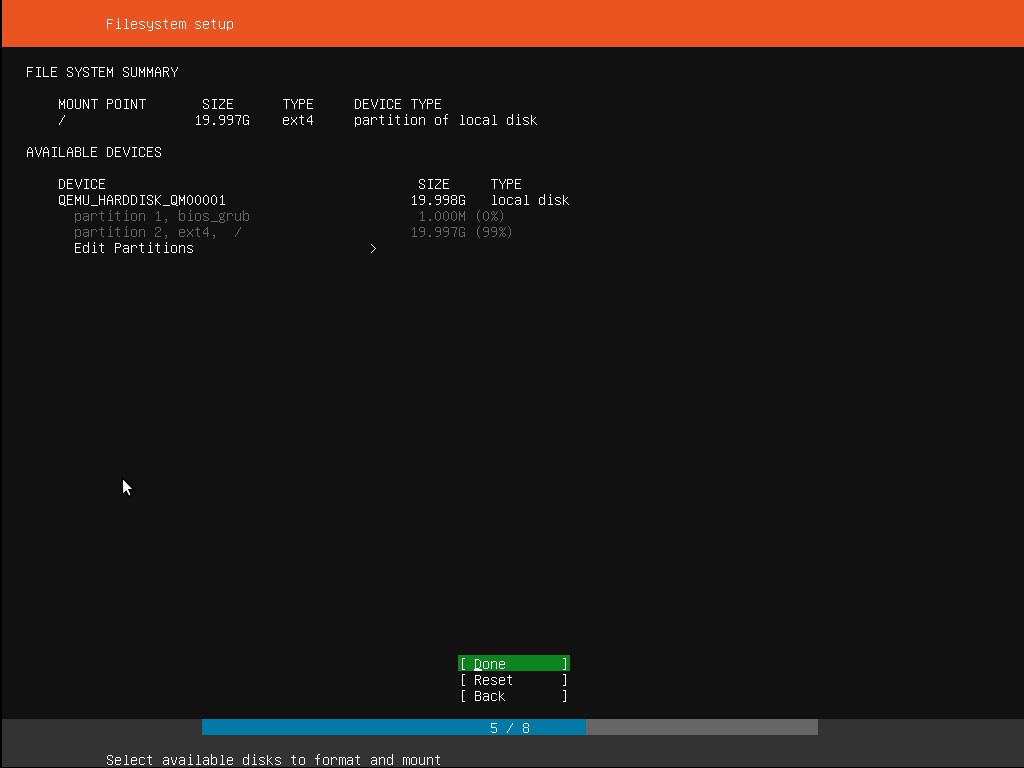
If this isn’t what you expected to see (e.g., you have selected the wrong drive), you should use the arrow keys and enter to select Back from the options at the bottom of the screen. This will take you back to the previous menu where you can select a different drive.
It is also possible to manually change the partitions here, by selecting Edit Partitions . Obviously you should only select this if you are familiar with how partitions work.
When you are happy with the disk layout displayed, select Done to continue.
11. Confirm changes
Before the installer makes any destructive changes, it will show this final confirmation step. Double check that everything looks good here and you aren’t about to reformat the wrong device!

There is no “Undo” for this step, once you confirm the changes, the indicated devices will be overwritten and any contents may be lost
12. Set up a Profile
The software is now being installed on the disk, but there is some more information the installer needs. Ubuntu Server needs to have at least one known user for the system, and a hostname. The user also needs a password.

There is also a field for importing SSH keys, either from Launchpad, Ubuntu One or Github. You simply need to enter the username and the installer will fetch the relevant keys and install them on the system ready for use (e.g. secure SSH login to the server).
13. Install software
Once you have finished entering the required information, the screen will now show the progress of the installer. Ubuntu Server now installs a concise set of useful software required for servers. This cuts down on the install and setup time dramatically. Of course, after the install is finished, you can install any additional software you may need.

14. Installation complete
When the install is complete, you will see a message like this on the screen.

Remember to remove the install media, and then press enter to reboot and start the server. Welcome to Ubuntu!
15. What next?
With Ubuntu Server installed, you can now carry on and build that file-server or multi-node cluster we mentioned!
If you are new to Ubuntu Server, we’d recommend reading the Server Guide.
You can also check out the latest on Ubuntu Server, and what others are using it for on the Ubuntu Server pages.
Finding help
The Ubuntu community, for both desktop and server, is one of the friendliest and most well populated you can find. That means if you get stuck, someone has probably already seen and solved the same problem.
Try asking for help in one of the following places:
Alternatively, if you need commercial support for your server deployments, take a look at Ubuntu Advantage.
These releases of Ubuntu are available
There are 2 types of Ubuntu releases: Interim and LTS. Each Ubuntu LTS is maintained for 10 years total: 5 years of standard support + 5 years of ESM. Interim releases are maintained for 9 months.
For the Ubuntu release cycle please see: The Ubuntu lifecycle and release cadence.
We are happy to provide hosting for the following projects via the cdimage server. While they are not commercially supported by Canonical, they receive full support from their communities.
The cdimage server also hosts releases of other Ubuntu images not found on this server, such as builds for less popular architectures and other non-standard and unsupported images. For Ubuntu Desktop and Server on popular architectures, please see the links above instead.
Name Last modified Size Description
14.04.6/ 2020-08-18 08:05 — Ubuntu 14.04.6 LTS (Trusty Tahr) 14.04/ 2020-08-18 08:05 — Ubuntu 14.04.6 LTS (Trusty Tahr) 16.04.7/ 2020-08-18 17:01 — Ubuntu 16.04.7 LTS (Xenial Xerus) 16.04/ 2020-08-18 17:01 — Ubuntu 16.04.7 LTS (Xenial Xerus) 18.04.6/ 2023-06-01 08:53 — Ubuntu 18.04.6 LTS (Bionic Beaver) 18.04/ 2023-06-01 08:53 — Ubuntu 18.04.6 LTS (Bionic Beaver) 20.04.6/ 2023-03-22 14:31 — Ubuntu 20.04.6 LTS (Focal Fossa) 20.04/ 2023-03-22 14:31 — Ubuntu 20.04.6 LTS (Focal Fossa) 22.04.2/ 2023-07-12 09:16 — Ubuntu 22.04.1 LTS (Jammy Jellyfish) 22.04/ 2023-07-12 09:16 — Ubuntu 22.04.1 LTS (Jammy Jellyfish) 22.10/ 2022-10-20 17:11 — Ubuntu 22.10 (Kinetic Kudu) 23.04/ 2023-07-14 11:53 — Ubuntu 23.04 (Lunar Lobster) bionic/ 2023-06-01 08:53 — Ubuntu 18.04.6 LTS (Bionic Beaver) focal/ 2023-03-22 14:31 — Ubuntu 20.04.6 LTS (Focal Fossa) jammy/ 2023-07-12 09:16 — Ubuntu 22.04.1 LTS (Jammy Jellyfish) kinetic/ 2022-10-20 17:11 — Ubuntu 22.10 (Kinetic Kudu) lunar/ 2023-07-14 11:53 — Ubuntu 23.04 (Lunar Lobster) streams/ 2021-10-21 13:49 — trusty/ 2020-08-18 08:05 — Ubuntu 14.04.6 LTS (Trusty Tahr) xenial/ 2020-08-18 17:01 — Ubuntu 16.04.7 LTS (Xenial Xerus)
Basic installation
This chapter provides an overview of how to install Ubuntu Server Edition. You can also refer to this guide on how to operate the installer for more information on using the installer, and to this screen-by-screen reference guide for more information about each of the installer screens.
Preparing to install
This section explains various aspects to consider before starting the installation.
System requirements
Ubuntu Server Edition provides a common, minimalist base for a variety of server applications, such as file/print services, web hosting, email hosting, etc. This version supports four 64-bit architectures:
- amd64 (Intel/AMD 64-bit)
- arm64 (64-bit ARM)
- ppc64el (POWER8 and POWER9)
- s390x (IBM Z and LinuxONE)
The recommended system requirements are:
- CPU: 1 gigahertz or better
- RAM: 1 gigabyte or more
- Disk: a minimum of 2.5 gigabytes
Perform a system back up
Before installing Ubuntu Server Edition you should make sure all data on the system is backed up.
If this is not the first time an operating system has been installed on your computer, it is likely you will need to re-partition your disk to make room for Ubuntu.
Any time you partition your disk, you should be prepared to lose everything on the disk should you make a mistake or something goes wrong during partitioning. The programs used in installation are quite reliable, most have seen years of use, but they also perform destructive actions.
Download the server ISO
You can obtain the amd64 server download from https://releases.ubuntu.com/. Select the version you wish to install and select the “server install image” download. Note that the server download includes the installer.
There are platform specific how-to guides for installations on:
Create a bootable USB
There are many ways to boot the installer but the simplest and most common way is to create a bootable USB stick to boot the system to be installed with (tutorials for other operating systems are also available).
Boot the installer
Plug the USB stick into the system to be installed and start it.
Most computers will automatically boot from USB or DVD, though in some cases this is disabled to improve boot times. If you don’t see the boot message and the “Welcome” screen which should appear after it, you will need to set your computer to boot from the install media.
There should be an on-screen message when the computer starts telling you what key to press for settings or a boot menu. Depending on the manufacturer, this could be Escape , F2 , F10 or F12 . Simply restart your computer and hold down this key until the boot menu appears, then select the drive with the Ubuntu install media.
After a few moments, the installer will start in its language selection screen.
Using the installer
The installer is designed to be easy to use and have sensible defaults so for a first install you can mostly just accept the defaults for the most straightforward install:
- Choose your language
- Update the installer (if offered)
- Select your keyboard layout
- Do not configure networking (the installer attempts to configure wired network interfaces via DHCP, but you can continue without networking if this fails)
- Do not configure a proxy or custom mirror unless you have to in your network
- For storage, leave “use an entire disk” checked, and choose a disk to install to, then select “Done” on the configuration screen and confirm the install
- Enter a username, hostname and password
- On the SSH and snap screens, select “Done”
- You will now see log messages as the install is completed
- Select restart when this is complete, and log in using the username and password provided