- How can I determine if Apache is installed on a system?
- 7 Answers 7
- [Quick Guide] How to check if Apache is running
- BitLaunch
- BitLaunch
- Check if Apache is running on Ubuntu/Debian
- Check if Apache is running on RHEL/Fedora
- Check if Apache is running on Windows
- The Linux export command — What does it do and how do you use it?
- Steps to follow after launching your anonymous VPS
- 3 Ways to Check Apache Server Status and Uptime in Linux
- 1. Systemctl Utility
- 2. Apachectl Utilities
- On Debian/Ubuntu
- On RHEL/CentOS
- 3. ps Utility
- Install and Configure Apache
- What you’ll learn
- What you’ll need
- 2. Installing Apache
- 3. Creating Your Own Website
- 4. Setting up the VirtualHost Configuration File
- 5. Activating VirtualHost file
- End result
How can I determine if Apache is installed on a system?
I have Linux Mint on my computer but I don’t know how to find out whether Apache2 is on it or where it is actually installed. I run my web browser (PHP installed) with http://localhost as a URL and it works.
7 Answers 7
dpkg --get-selections | grep apache It lists all installed packages that contain «apache» in their name. For example:
apache2 install apache2-doc install apache2-mpm-prefork install apache2-utils install apache2.2-bin install apache2.2-common install libapache2-mod-php5 install libapache2-svn install It indicates that the package apache2 is installed on the system.
Another approach, to find any running HTTP daemon on the default port would be:
sudo lsof -nPi | grep ":80 (LISTEN)" Which lists something like:
apache2 1026 root 4u IPv6 3739 0t0 TCP *:80 (LISTEN) apache2 3966 www-data 4u IPv6 3739 0t0 TCP *:80 (LISTEN) apache2 4014 www-data 4u IPv6 3739 0t0 TCP *:80 (LISTEN) apache2 4015 www-data 4u IPv6 3739 0t0 TCP *:80 (LISTEN) apache2 4016 www-data 4u IPv6 3739 0t0 TCP *:80 (LISTEN) In my experience, the Apache binary is located in /usr/sbin on most installations.
To check whether if apache is running or not (the status), type:
sudo service apache2 status This only works where Apache is installed as a ( sysv etc) service; which admittedly will cover a lot of cases.
Just do a which httpd as user root.
As I recall, Mint is based on Ubuntu, so you should be able to check apt-cache policy apache2 :
$ apt-cache policy apache2 apache2: Installed: (none) Candidate: 2.2.20-1ubuntu1.1 Version table: 2.2.20-1ubuntu1.1 0 500 http://us.archive.ubuntu.com/ubuntu/ oneiric-updates/main amd64 Packages 500 http://security.ubuntu.com/ubuntu/ oneiric-security/main amd64 Packages 2.2.20-1ubuntu1 0 500 http://us.archive.ubuntu.com/ubuntu/ oneiric/main amd64 Packages In this case, you can see it’s not installed on my system. If you haven’t asked for it to be installed, it’s probably not — I doubt it’s part of the default distribution.
[Quick Guide] How to check if Apache is running
Need to know whether Apache is running? This guide will show you how to check in just a few seconds.
BitLaunch
BitLaunch
![[Quick Guide] How to check if Apache is running](https://bitlaunch.io/blog/content/images/size/w300/2022/11/DALL-E-2022-11-28-11.15.37.png)
Apache is one of the world’s most popular web servers, but though it’s easy to install and configure, some confusion can arise when trying to figure out how to check if Apache is still running.
This quick guide will shine a light on the process on Ubuntu, CentOS, and Windows.
Check if Apache is running on Ubuntu/Debian
There’s an easy, foolproof way to check whether Apache is active on Ubuntu: systemctl. Just run this command:
sudo systemctl status apache2 This should also work on CentOS, despite it being Red Hat-based.
Check if Apache is running on RHEL/Fedora
On some versions of RedHat-based systems, you can still use systemctl to check the status of Apache, but you need to query httpd instead:
sudo systemctl status httpdCheck if Apache is running on Windows
On Windows, you can use Task Manager to see if the Apache process is active. After pressing Ctrl + Shift + Esc, start typing either «httpd.exe» or «apache.exe» and see if they appear on the list.
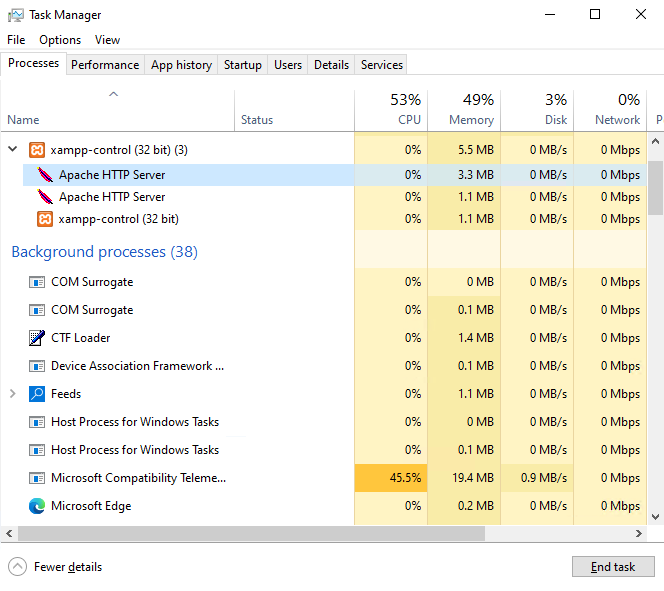
If they do, then Apache is running.
If you’re still unsure, you can check the IP address of the server on port 80 in your local browser:
The Linux export command — What does it do and how do you use it?
The Linux export command is designed to mark environment variables that should be passed to child processes. Here’s how to use it.

Steps to follow after launching your anonymous VPS
Here’s everything you should do after launching your anonymous VPS to ensure its smooth functioning and continued security.
3 Ways to Check Apache Server Status and Uptime in Linux
Apache is a world’s most popular, cross platform HTTP web server that is commonly used in Linux and Unix platforms to deploy and run web applications or websites. Importantly, it’s easy to install and has a simple configuration as well.
In this article, we will show how to check Apache web server uptime on a Linux system using different methods/commands explained below.
1. Systemctl Utility
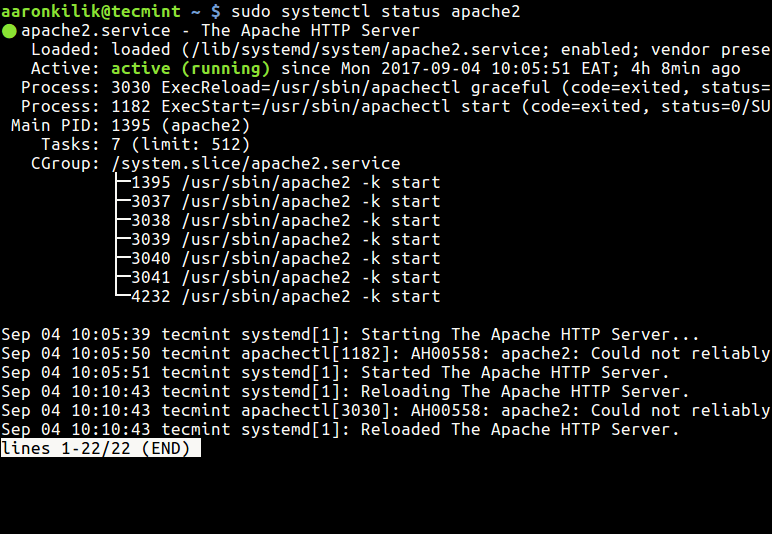
Systemctl is a utility for controlling the systemd system and service manager; it is used it to start, restart, stop services and beyond. The systemctl status sub-command, as the name states is used to view the status of a service, you can use it for the above purpose like so:
$ sudo systemctl status apache2 #Debian/Ubuntu # systemctl status httpd #RHEL/CentOS/Fedora
2. Apachectl Utilities
Apachectl is a control interface for Apache HTTP server. This method requires the mod_status (which displays info about the server is performing including its uptime) module installed and enabled (which is the default setting).
On Debian/Ubuntu
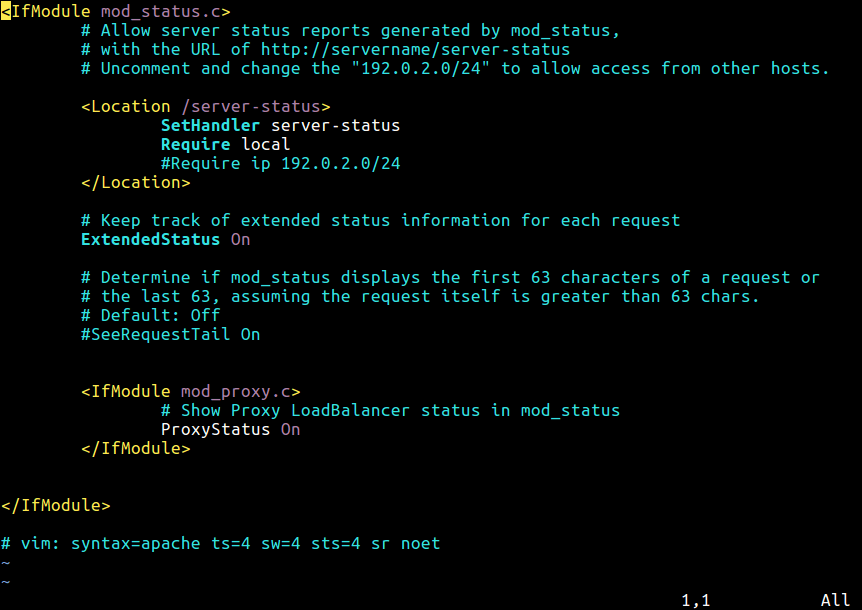
The server-status component is enabled by default using the file /etc/apache2/mods-enabled/status.conf.
$ sudo vi /etc/apache2/mods-enabled/status.conf
On RHEL/CentOS
To enable server-status component, create a file below.
# vi /etc/httpd/conf.d/server-status.conf
and add the following configuration.
SetHandler server-status #Require host localhost #uncomment to only allow requests from localhost
Save the file and close it. Then restart the web server.
If you are primarily using a terminal, then you also need a command line web browser such as lynx or links.
$ sudo apt install lynx #Debian/Ubuntu # yum install links #RHEL/CentOS
Then run the command below to check the Apache service uptime:
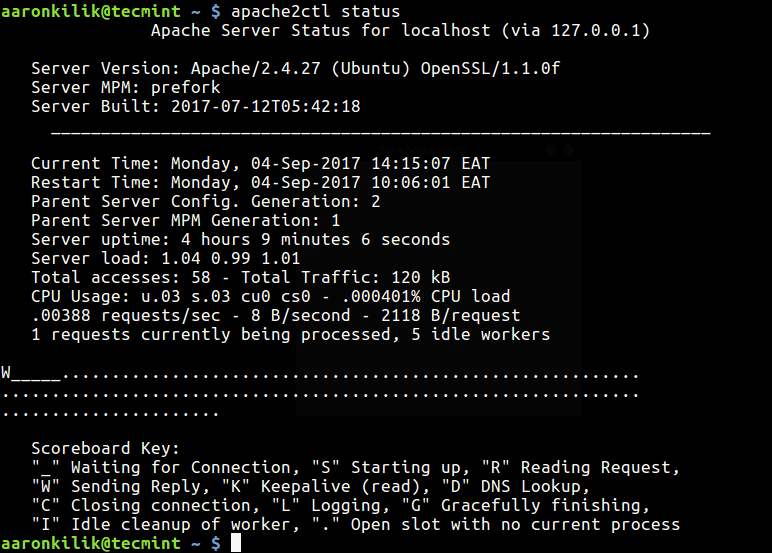
Alternatively, use the URL below to view the Apache web server status information from a graphical web browser:
http://localhost/server-status OR http:SERVER_IP/server-status
3. ps Utility
ps is a utility which shows information concerning a selection of the active processes running on a Linux system, you can use it with grep command to check Apache service uptime as follows.
- -e – enables selection of every processes on the system.
- -o – is used to specify output (comm – command, etime – process execution time and user – process owner).
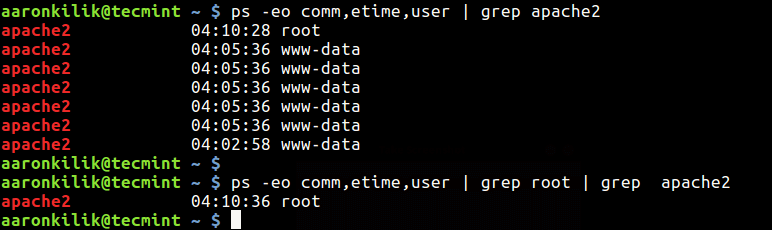
# ps -eo comm,etime,user | grep apache2 # ps -eo comm,etime,user | grep root | grep apache2 OR # ps -eo comm,etime,user | grep httpd # ps -eo comm,etime,user | grep root | grep httpd
The sample output below shows that apache2 service has been running for 4 hours, 10 minutes and 28 seconds (only consider the one started by root).
Lastly, check out more useful Apache web server guides:
In this article, we showed you three different ways to check Apache/HTTPD service uptime on a Linux system. If you have any questions or thoughts to share, do that via the comment section below.
Install and Configure Apache
Apache is an open source web server that’s available for Linux servers free of charge.
In this tutorial we’ll be going through the steps of setting up an Apache server.
What you’ll learn
What you’ll need
- Ubuntu Server 16.04 LTS
- Secure Shell (SSH) access to your server
- Basic Linux command line knowledge
Got everything ready? Let’s move on to the next step!
Originally authored by Aden Padilla
2. Installing Apache
To install Apache, install the latest meta-package apache2 by running:
sudo apt update sudo apt install apache2 After letting the command run, all required packages are installed and we can test it out by typing in our IP address for the web server.

If you see the page above, it means that Apache has been successfully installed on your server! Let’s move on.
3. Creating Your Own Website
By default, Apache comes with a basic site (the one that we saw in the previous step) enabled. We can modify its content in /var/www/html or settings by editing its Virtual Host file found in /etc/apache2/sites-enabled/000-default.conf .
We can modify how Apache handles incoming requests and have multiple sites running on the same server by editing its Virtual Hosts file.
Today, we’re going to leave the default Apache virtual host configuration pointing to www.example.com and set up our own at gci.example.com .
So let’s start by creating a folder for our new website in /var/www/ by running
We have it named gci here but any name will work, as long as we point to it in the virtual hosts configuration file later.
Now that we have a directory created for our site, lets have an HTML file in it. Let’s go into our newly created directory and create one by typing:
cd /var/www/gci/ nano index.html Paste the following code in the index.html file:
I'm running this website on an Ubuntu Server server!
Now let’s create a VirtualHost file so it’ll show up when we type in gci.example.com .
4. Setting up the VirtualHost Configuration File
We start this step by going into the configuration files directory:
cd /etc/apache2/sites-available/ Since Apache came with a default VirtualHost file, let’s use that as a base. ( gci.conf is used here to match our subdomain name):
sudo cp 000-default.conf gci.conf Now edit the configuration file:
We should have our email in ServerAdmin so users can reach you in case Apache experiences any error:
ServerAdmin yourname@example.com We also want the DocumentRoot directive to point to the directory our site files are hosted on:
The default file doesn’t come with a ServerName directive so we’ll have to add and define it by adding this line below the last directive:
This ensures people reach the right site instead of the default one when they type in gci.example.com .
Now that we’re done configuring our site, let’s save and activate it in the next step!
5. Activating VirtualHost file
After setting up our website, we need to activate the virtual hosts configuration file to enable it. We do that by running the following command in the configuration file directory:
You should see the following output
Enabling site gci. To activate the new configuration, you need to run: service apache2 reload root@ubuntu-server:/etc/apache2/sites-available# To load the new site, we restart Apache by typing:
End result

Now is the moment of truth, let’s type our host name in a browser. Hooray!
Further reading: