- Install and Configure Apache
- What you’ll learn
- What you’ll need
- 2. Installing Apache
- 3. Creating Your Own Website
- 4. Setting up the VirtualHost Configuration File
- 5. Activating VirtualHost file
- End result
- How to Start, Stop, or Restart Apache Server on Ubuntu
- Ubuntu 18.04, 16.04, and Debian 9.x Commands
- Start Apache Web Server
- Stop Apache Web Server
- Restart Apache Web Server
- Ubuntu 14.10 or older Debian
- Start Apache
- Stop Apache
- Restart Apache
- How To Install the Apache Web Server on Ubuntu 18.04 [Quickstart]
- Prerequisites
- Step 1 — Installing Apache
- Step 2 — Adjusting the Firewall
- Step 3 — Checking your Web Server
- Step 4 — Setting Up Virtual Hosts (Recommended)
- Conclusion
Install and Configure Apache
Apache is an open source web server that’s available for Linux servers free of charge.
In this tutorial we’ll be going through the steps of setting up an Apache server.
What you’ll learn
What you’ll need
- Ubuntu Server 16.04 LTS
- Secure Shell (SSH) access to your server
- Basic Linux command line knowledge
Got everything ready? Let’s move on to the next step!
Originally authored by Aden Padilla
2. Installing Apache
To install Apache, install the latest meta-package apache2 by running:
sudo apt update sudo apt install apache2 After letting the command run, all required packages are installed and we can test it out by typing in our IP address for the web server.

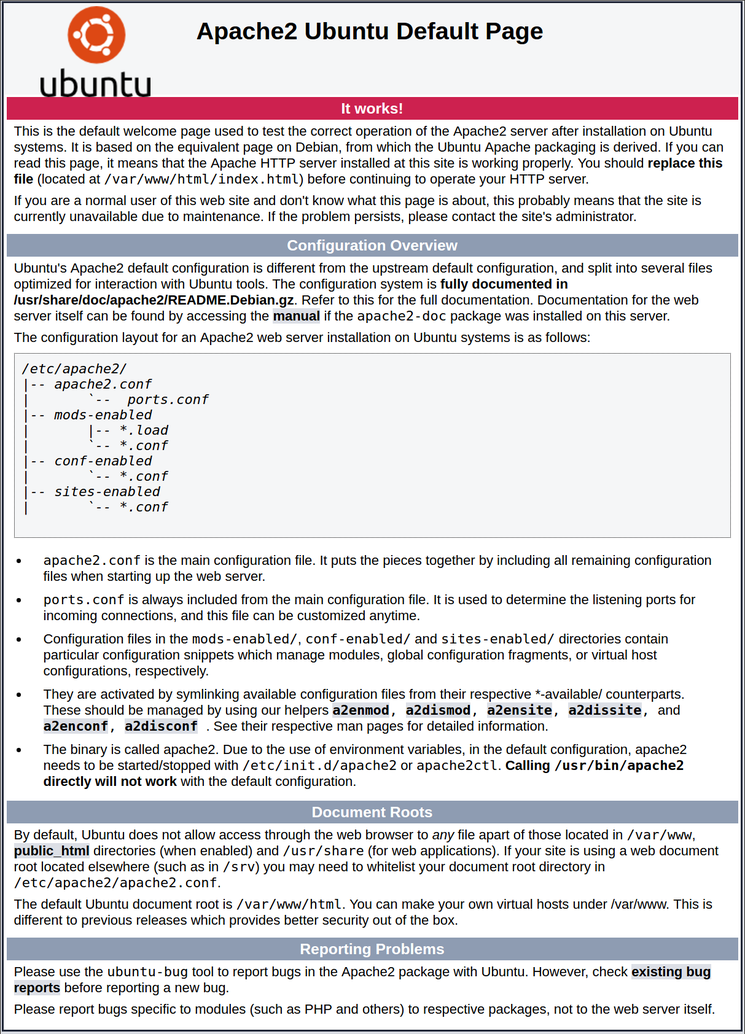
If you see the page above, it means that Apache has been successfully installed on your server! Let’s move on.
3. Creating Your Own Website
By default, Apache comes with a basic site (the one that we saw in the previous step) enabled. We can modify its content in /var/www/html or settings by editing its Virtual Host file found in /etc/apache2/sites-enabled/000-default.conf .
We can modify how Apache handles incoming requests and have multiple sites running on the same server by editing its Virtual Hosts file.
Today, we’re going to leave the default Apache virtual host configuration pointing to www.example.com and set up our own at gci.example.com .
So let’s start by creating a folder for our new website in /var/www/ by running
We have it named gci here but any name will work, as long as we point to it in the virtual hosts configuration file later.
Now that we have a directory created for our site, lets have an HTML file in it. Let’s go into our newly created directory and create one by typing:
cd /var/www/gci/ nano index.html Paste the following code in the index.html file:
I'm running this website on an Ubuntu Server server!
Now let’s create a VirtualHost file so it’ll show up when we type in gci.example.com .
4. Setting up the VirtualHost Configuration File
We start this step by going into the configuration files directory:
cd /etc/apache2/sites-available/ Since Apache came with a default VirtualHost file, let’s use that as a base. ( gci.conf is used here to match our subdomain name):
sudo cp 000-default.conf gci.conf Now edit the configuration file:
We should have our email in ServerAdmin so users can reach you in case Apache experiences any error:
ServerAdmin yourname@example.com We also want the DocumentRoot directive to point to the directory our site files are hosted on:
The default file doesn’t come with a ServerName directive so we’ll have to add and define it by adding this line below the last directive:
This ensures people reach the right site instead of the default one when they type in gci.example.com .
Now that we’re done configuring our site, let’s save and activate it in the next step!
5. Activating VirtualHost file
After setting up our website, we need to activate the virtual hosts configuration file to enable it. We do that by running the following command in the configuration file directory:
You should see the following output
Enabling site gci. To activate the new configuration, you need to run: service apache2 reload root@ubuntu-server:/etc/apache2/sites-available# To load the new site, we restart Apache by typing:
End result

Now is the moment of truth, let’s type our host name in a browser. Hooray!
Further reading:
How to Start, Stop, or Restart Apache Server on Ubuntu
Apache is part of the popular LAMP (Linux, Apache, MySQL, PHP) stack of software. It is included with the latest version of Ubuntu 18.04 by default.
This guide will show you how to start, stop, and restart Apache service on Ubuntu using the terminal.

- Access to a user account with sudo or root privileges
- An installed and configured Apache installation
- The apt package manager, included by default
- A command-line/terminal window (Ctrl-Alt-T)
Ubuntu 18.04, 16.04, and Debian 9.x Commands
Start Apache Web Server
For Ubuntu users with versions 16.04 and 18.04 and Debian 9.x users, use the following commands in the terminal window to start Apache:
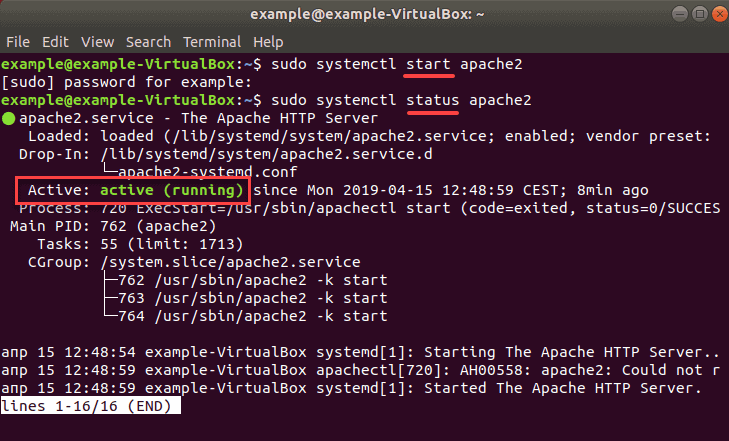
sudo systemctl start apache2Check status to see whether Apache is enabled with the command:
sudo systemctl status apache2If it is running, it should display the message active (running) as in the image below.
Stop Apache Web Server
Use the following commands in the terminal window to stop Apache:
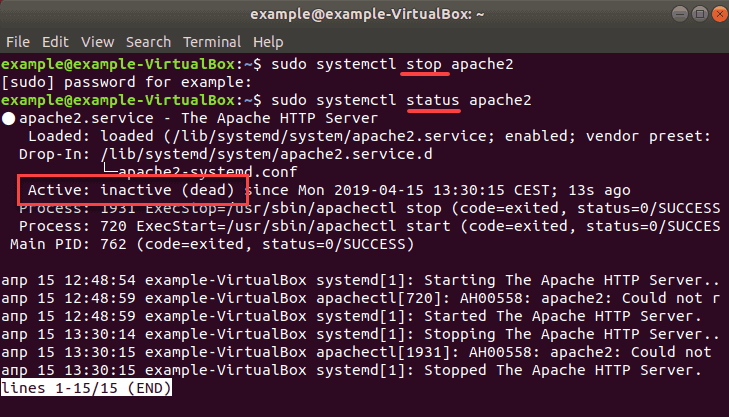
sudo systemctl stop apache2Check status to see whether Apache is disabled with the command:
sudo systemctl status apache2If it has stopped running, it should display the message inactive (dead) as in the image below.
Note: Learn how to check Apache version via CLI, WHM or cPanel.
Restart Apache Web Server
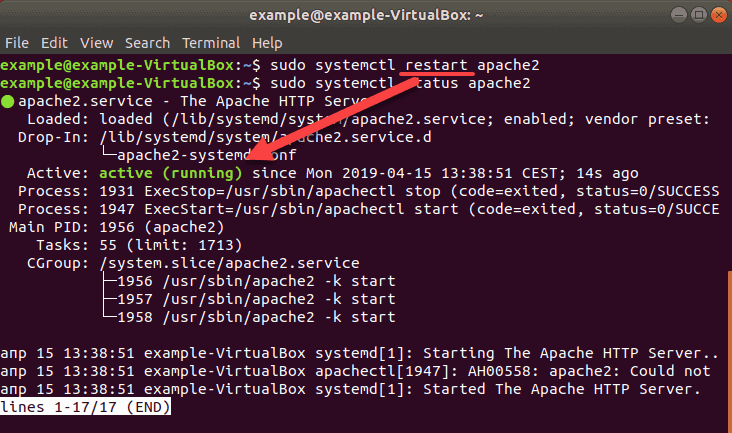
To restart Apache use the command:
sudo systemctl restart apache2If Apache was previously disabled, a status check will show that it is up and running again.
Ubuntu 14.10 or older Debian
Start Apache
For Ubuntu and Debian users with an older version, use the following commands in the terminal window to start Apache:
sudo service apache2 startsudo /etc/init.d/apache2 startCheck status to see whether Apache is enabled with the command:
sudo service apache2 statussudo /etc/init.d/apache2 statusIt should display the message active (running).
Stop Apache
To stop Apache use the following command:
sudo service apache2 stopsudo /etc/init.d/apache2 stopCheck status to see whether Apache is disabled with the command:
sudo /etc/init.d/apache2 statusIt should display the message inactive (dead) as in the image below.
Restart Apache
To restart Apache use the command:
sudo service apache2 restartsudo /etc/init.d/apache2 restartNote: The restart command can take several moments to complete, depending on the complexity of your server configuration. If you’re running a large or complex server configuration, this can cause disruptions for users who rely on the server.
Starting, stopping and restarting the Apache service on Ubuntu is straightforward. Knowing how to do these basic tasks from the terminal line makes the task faster and easier.
Goran combines his leadership skills and passion for research, writing, and technology as a Technical Writing Team Lead at phoenixNAP. Working with multiple departments and on various projects, he has developed an extraordinary understanding of cloud and virtualization technology trends and best practices.
In this SIMPLE Updated Tutorial Learn How to restart, start, & stop Apache web server on the CentOS 7 Linux operating system. Find out how now!
ModSecurity is an Open-source firewall application for Apache. Learn how to Setup & Configure ModSecurity on Apache (Debian, Ubuntu, CentOS).
MySQL is an open-source relational database server tool for Linux operating systems. It is widely used.
How To Install the Apache Web Server on Ubuntu 18.04 [Quickstart]
![How To Install the Apache Web Server on Ubuntu 18.04 [Quickstart]](https://www.digitalocean.com/_next/static/media/intro-to-cloud.d49bc5f7.jpeg)
The Apache HTTP server is the most widely-used web server in the world. It provides many powerful features, including dynamically loadable modules, robust media support, and extensive integration with other popular software.
In this guide, you will install the Apache web server on an Ubuntu 18.04 server. For a more detailed version of this tutorial, please refer to How To Install the Apache Web Server on Ubuntu 18.04.
Prerequisites
Before you begin this guide, you should have the following:
- An Ubuntu 18.04 server and a regular, non-root user with sudo privileges. Additionally, you will need to enable a basic firewall to block non-essential ports. You can learn how to configure a regular user account and set up a firewall for your server by following our initial server setup guide for Ubuntu 18.04.
When you have an account available, log in as your non-root user to begin.
Step 1 — Installing Apache
Apache is available within Ubuntu’s default software repositories. You can install it using conventional package management tools.
Update your local package index:
Install the apache2 package:
Step 2 — Adjusting the Firewall
Check the available ufw application profiles:
OutputAvailable applications: Apache Apache Full Apache Secure OpenSSH Enable the most restrictive profile that will still allow the traffic you’ve configured, permitting traffic on port 80 (normal, unencrypted web traffic):
OutputStatus: active To Action From -- ------ ---- OpenSSH ALLOW Anywhere Apache ALLOW Anywhere OpenSSH (v6) ALLOW Anywhere (v6) Apache (v6) ALLOW Anywhere (v6) Step 3 — Checking your Web Server
Check with the systemd init system to make sure the service is running by entering:
Output● apache2.service - The Apache HTTP Server Loaded: loaded (/lib/systemd/system/apache2.service; enabled; vendor preset: enabled) Drop-In: /lib/systemd/system/apache2.service.d └─apache2-systemd.conf Active: active (running) since Tue 2018-04-24 20:14:39 UTC; 9min ago Main PID: 2583 (apache2) Tasks: 55 (limit: 1153) CGroup: /system.slice/apache2.service ├─2583 /usr/sbin/apache2 -k start ├─2585 /usr/sbin/apache2 -k start └─2586 /usr/sbin/apache2 -k start Access the default Apache landing page to confirm that the software is running properly through your IP address:
You should see the default Ubuntu 18.04 Apache web page:
Step 4 — Setting Up Virtual Hosts (Recommended)
When using the Apache web server, you can use virtual hosts (similar to server blocks in Nginx) to encapsulate configuration details and host more than one domain from a single server. You will set up a domain called your_domain, but you should replace this with your own domain name. To learn more about setting up a domain name with DigitalOcean, see our introduction to DigitalOcean DNS.
Create the directory for your_domain :
Assign ownership of the directory:
The permissions of your web roots should be correct if you haven’t modified your unmask value, but you can make sure by typing:
Create a sample index.html page using nano or your preferred text editor:
Inside, add the following sample HTML:
Success! The your_domain virtual host is working!
Save and close the file when you are finished.
Make a new virtual host file at /etc/apache2/sites-available/ your_domain .conf :
Add in the following configuration block, updated to include your new directory and domain name in place of your_domain :
ServerAdmin webmaster@localhost ServerName your_domain ServerAlias your_domain DocumentRoot /var/www/your_domain ErrorLog $/error.log CustomLog $/access.log combined Save and close the file when you are finished.
Enable your virtual host file with a2ensite :
Disable the default site defined in 000-default.conf :
Test for configuration errors:
You should see the following output:
Restart Apache to implement your changes:
Apache should now be serving your domain name. You can test this by navigating to http:// your_domain , where you should see something like this:

Conclusion
Now that you have your Apache web server installed, you have many options for the type of content to serve and the technologies you want to use to create a richer experience.
If you’d like to build out a more complete application stack, check out this article on how to configure a LAMP stack on Ubuntu 18.04.
Thanks for learning with the DigitalOcean Community. Check out our offerings for compute, storage, networking, and managed databases.