stemy72 / wifi-on-ubuntu-server-20.md
I want to run Ubuntu server 20 on my laptop. This by default does not use X windows, so there is no desktop environment. It also by default does not enable wifi. Servers don’t usually need wifi and desktop environments, right?
I’m using a Lenovo ThinkPad T510. I followed the instructions on the Ubuntu website for creating a bootable USB stick.
On the T510 I had to go into the bios and move USB up the list so it would boot from the stick.
Install desktop environment (optional — I did not do this)
There are plenty of choices, one is:
sudo apt install xubuntu-desktop Wifi Networks device not managed
This is based on a pretty poor understanding of what’s going on. Here’s what I guesstimate to be the situation.
As of Ubuntu 17, networking is managed by either of two approaches: NetworkManager or networkd .
Added to this, netplan is also used. See netplan.io
netplan reads YAML config files and generates config files for NetworkManager or networkd , depending on your preferences.
Also required, apparently, is wpasupplicant .
$ sudo nmcli radio wifi on $ sudo nmcli radio wifi enabled Check your devices are all recognised, even if they’re not currently being «managed»:
$ sudo iwconfig lo no wireless extensions. enp0s25 no wireless extensions. wlp3s0 IEEE 802.11 ESSID:"my-router-name" Mode:Managed Frequency:2.412 GHz Access Point: 71:5F:58:2F:79:97 Bit Rate=58.5 Mb/s Tx-Power=15 dBm Retry short limit:7 RTS thr:off Fragment thr:off Power Management:off Link Quality=50/70 Signal level=-60 dBm Rx invalid nwid:0 Rx invalid crypt:0 Rx invalid frag:0 Tx excessive retries:12 Invalid misc:59 Missed beacon:0 wlp3s0 is the wifi device in my laptop. If yours doesn’t appear. good luck with that. Maybe try ifconfig up wlp3s0
Check your wifi is capable of detecting nearby routers:
$ sudo iwlist wlp3s0 scan wlp3s0 Scan completed : Cell 01 - Address: 70:4F:57:3F:78:87 Channel:1 Frequency:2.412 GHz (Channel 1) Quality=50/70 Signal level=-60 dBm Encryption key:on ESSID:"my-router-name" .
Again, if your output is different here, good luck!
My /etc/netplan/01-netcfg.yaml looks like this, note that it renders config files for NetworkManager . This should enable the network widget in the XFCE desktop. If this doesn’t work, you can try renderer: networkd . That’s fine, but the desktop widget will not work, and you’ll need to use the command line to view and connect to networks. In this case, running sudo netplan try followed by sudo netplan apply seems to reliably re-connect to known networks if connection is lost. (Connections are lost very easily, e.g. on waking from sleep.)
# This file describes the network interfaces available on your system # For more information, see netplan(5). network: version: 2 # renderer: networkd renderer: NetworkManager wifis: wlp3s0: dhcp4: yes access-points: "my-router-name": password: "" "some-other-router": password: "plain-text-password" "Public Hotspot With No Password": <>
Do not be distracted by /etc/network/interfaces ! Mine looks like this, note what the comments say, and note that there is nothing else in apart from the comments, i.e. it does nothing:
# ifupdown has been replaced by netplan(5) on this system. See # /etc/netplan for current configuration. # To re-enable ifupdown on this system, you can run: # sudo apt install ifupdown ifupdown is not on my system.
Running this seemed to get things working:
sudo su - netplan apply service network-manager restart This is confusing. The netplan config file renders for networkd yet restarting the network-manager seems to apply the netplan changes to NetworkManager.
At some point I think I also restarted the wpa_supplicant service:
sudo su - service wpa_supplicant restart As of now the wifi is working perfectly. I have not yet rebooted. I notice that the wifi indicator panel in XFCE still says «WiFi Networks device not managed», but I think that’s because it’s checking with NetworkManager , which is not being used.
Much random stabbing in the dark was involved, including the following, I have little idea if these were necessary but this is what Google led me to do:
rfkill unblock wifi systemctl disable systemd-networkd-wait-online.service systemctl mask systemd-networkd-wait-online.service Useful stuff for debugging:
root@at420:~# service netplan-wpa@wlp3s0 status ● netplan-wpa@wlp3s0.service - WPA supplicant for netplan wlp3s0 Loaded: loaded (/lib/systemd/system/netplan-wpa@.service; indirect; vendor preset: enabled) Active: active (running) since Sat 2018-06-30 11:41:10 BST; 32min ago Main PID: 2971 (wpa_supplicant) Tasks: 1 (limit: 4390) CGroup: /system.slice/system-netplan\x2dwpa.slice/netplan-wpa@wlp3s0.service └─2971 /sbin/wpa_supplicant -c /run/netplan/wpa-wlp3s0.conf -iwlp3s0 Jun 30 11:41:10 t420 systemd[1]: Started WPA supplicant for netplan wlp3s0. Jun 30 11:41:10 t420 wpa_supplicant[2971]: Successfully initialized wpa_supplicant Jun 30 11:41:14 t420 wpa_supplicant[2971]: wlp3s0: SME: Trying to authenticate with 71:5F:58:2F:79:97 (SSID='' freq=2412 MHz) Jun 30 11:41:14 t420 wpa_supplicant[2971]: wlp3s0: Trying to associate with 71:5F:58:2F:79:97 (SSID='' freq=2412 MHz) Jun 30 11:41:14 t420 wpa_supplicant[2971]: wlp3s0: Associated with 71:5F:58:2F:79:97 Jun 30 11:41:14 t420 wpa_supplicant[2971]: wlp3s0: CTRL-EVENT-SUBNET-STATUS-UPDATE status=0 Jun 30 11:41:14 t420 wpa_supplicant[2971]: wlp3s0: WPA: Key negotiation completed with 71:5F:58:2F:79:97 [PTK=CCMP GTK=TKIP] Jun 30 11:41:14 t420 wpa_supplicant[2971]: wlp3s0: CTRL-EVENT-CONNECTED - Connection to 71:5F:58:2F:79:97 completed [id=0 id_str=] service wpa_supplicant status ● wpa_supplicant.service - WPA supplicant Loaded: loaded (/lib/systemd/system/wpa_supplicant.service; enabled; vendor preset: enabled) Active: active (running) since Sat 2018-06-30 11:27:51 BST; 49min ago Main PID: 1135 (wpa_supplicant) Tasks: 1 (limit: 4390) CGroup: /system.slice/wpa_supplicant.service └─1135 /sbin/wpa_supplicant -u -s -O /run/wpa_supplicant Jun 30 11:27:50 t420 systemd[1]: Starting WPA supplicant. Jun 30 11:27:51 t420 wpa_supplicant[1135]: Successfully initialized wpa_supplicant Jun 30 11:27:51 t420 systemd[1]: Started WPA supplicant. Set Ubuntu Server to Connect to a Wi-Fi
![]()
As we know, this is the era of the Internet. Wherever we go, whatever we do, we are somehow connected to the internet sector. Every device we use for social media, software, and operating systems may need the internet. Every Operating system needs the internet to download files, install and configure updates, etc. Similar to many operating systems, Ubuntu needs a Wi-Fi network, as well. Inside this article, you’ll discover how to use the GUI and console in Ubuntu to join a Wi-Fi network. This seems helpful if you’re running Ubuntu on a server and do not have any connection to a conventional computer. Now, let’s start.
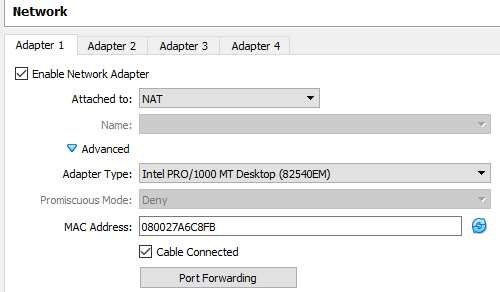
First, we need to check and do some configuration settings for the Ubuntu 20.04 system. We will start from the Oracle Virtual Box interface. So, we have opened the Oracle Virtual Box in our system. Within the Virtual Box, you have to open the Ubuntu Server settings by clicking on the “Settings” icon on the right side. The following window will pop up. Tap on the “Network” option at the left panel of this screen. Tap on the “Adapter1” option on the right pane. Tick the “Enable Network Adapter” option, as shown. Select the “NAT” option from the drop-down list revealed on the screen. Select the Adapter type from the drop-down list and check to mark the Cable Connected option. Apply the changes by tapping on the “OK” button. Now, the network configurations have been applied:
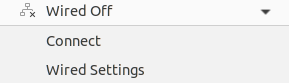
Next, to connect the required Wi-Fi network with your Ubuntu 20.04 system, you need to log in from the Ubuntu system after starting it. After the successful login, you will see an icon of a little triangle at the top right-corner side of your Ubuntu 20.04 desktop. Tap on that sign, and the following dialogue will appear. You have to tap on the Wired Off option to explore it:

Upon expanding the “Wired Off” option, we have two options: Connect and Wired Settings. Tap on the Connect option to connect your Ubuntu 20.04 system with the wired connection or Wi-Fi connection you currently have. You can also check the settings of connection by using the “Wired Settings” option:
Within the Wired Settings, we have chosen the “Network” option. You will see the following screen on your end. You can see that the Wired Connection is 1000 MB per second and is connected to the Ubuntu 20.04 system. You can also see that the VPN is not set, and the network proxy settings are off now. You can change anything you want:

Connect to Wi-Fi by Command Line:
The very first step to link your Ubuntu 20.04 system with a Wi-Fi network on your end is to list all the wireless network connections that are found on the network. So, you need to open the shell console of the Ubuntu 20.04 system using the popular shortcut key, “Ctrl+Alt+T”, on the Linux desktop. After the Linux shell is launched, you need the configuration command to show the configured wireless extensions on your Ubuntu system.
You will see a list of available wireless extensions. The output of the iwconfig command shows that there are no wireless extensions found so far in our system. Your case can be different. You may find an interface like “wlp2s0” in your output having some wireless connection. This interface doesn’t need to have already been connected to Wi-Fi or not. If not, you have to connect it. Another command to find the wireless network interfaces of your system is provided below:

Now, we need to check the network configuration files from the netplan directory of our system. So, you have to use the list command to list out all the configuration files stored in the “netplan” folder. The command for this purpose has been shown in the attached photo. The output shows that the netplan directory contains a single configuration file for the networks.

Now, we need to check and edit this listed configuration file above for a wireless Wi-Fi connection we have found in the above examples, i.e., “wlp2s0”. To do so, we will be using the “sudoedit” command with the path to the file “01-network-manager-all.yaml”. This “sudoedit” command has been used to open the file without any restriction according to the sudo rights of editing. After editing, when you close the file, it will show you the status of the file, i.e., changed for editing happened or unchanged for no editing done on the file.

Now, the file is opened in the editor. We have to add the following lines in the file. You can see the name “Jazim-Anabia-Momin” is the SSID name of our network. You can use yours. Then, we have added the password to this Wi-Fi connection. Next, save the editing with Ctrl+S.

Now, return to the terminal using the “Ctrl+X” shortcut in the sudo editor. Applying the edited configuration for network interfaces on our Ubuntu 20.04 system. We need to use the netplan command with the keyword “apply” as per the displayed image below:

After the previous command, if you are still facing some exceptions, then you have to use the debug command shown in the following image with the “apply” keyword. You will see the following debugging command output.

By using the IP instruction, as shown in the image, you should be allowed to see the Wi-Fi adapter linked to the Wi-Fi network if everything worked well.

Conclusion:
Finally, we can say that this article has a bundle of methods to connect the Ubuntu server to a Wi-Fi connection in your circle. We have discussed the GUI method to connect the Ubuntu server to the Wi-Fi connection by changing its configuration settings and editing its network Wi-Fi settings. Plus, we have discussed some commands to connect the Ubuntu server with a Wi-Fi connection. We hope you found this article useful. Check other Linux Hint articles for more tips and information.
About the author
Omar Farooq
Hello Readers, I am Omar and I have been writing technical articles from last decade. You can check out my writing pieces.