- How to install Ubuntu 22.04 Server on VirtualBox
- Steps to install Ubuntu 22.04 Server on VirtualBox
- 1. Download Ubuntu 22.04 Server LTS ISO
- 2. Do you have VirtualBox?
- 3. Create Virtual Machine
- Create New VM
- Name Virtual Machine
- Set RAM for VM
- Create a Virtual Hard disk
- 4. Start Ubuntu 22.04 server Virtual Machine
- 5. Add Ubuntu 22.04 server ISO to VirtualBox
- 6. Grub Menu to select and boot the OS
- 7. Install Ubuntu 22.04 on VirtualBox
- 8. Ubuntu Server standard or minimized
- 9. Network Connections VirtualBox
- 10. Erase disk and Install Ubuntu 22.04 server
- 11. Set Username and password
- 12. Select the Ubuntu Server package to install (optional)
- 13. Install VirtualBox Guest Additions
- 14. Switch to root user and set a password
- FAQ
- Install Ubuntu server in a virtual machine
- Installing missing kernel modules
How to install Ubuntu 22.04 Server on VirtualBox
Ubuntu 22.04 LTS Linux server is the latest long-term supported server OS from Canonical developers. Although, yet most of the server users are resorting currently on Ubuntu 20.04 LTS, however, for those who want to try out the Jammy Jellyfish on a Virtual machine before moving to it, this article will help them.
Most of the users would already be familiar with VirtualBox, if not, then it is an open-source project from Oracle to run virtual machines on all popular operating systems such as Windows, Linux, macOS, and FreeBSD.
Steps to install Ubuntu 22.04 Server on VirtualBox
Estimated reading time: 11 minutes
1. Download Ubuntu 22.04 Server LTS ISO
First, we must have a bootable ISO file of Ubuntu 22.04 Server jammy jellyfish Linux. For that, we can visit the official Image download page of Ubuntu. On the page, click on the button given for Downloading the ISO file.
2. Do you have VirtualBox?
Of course, to install Ubuntu 22.04 server Virtual machine on VBox, we also need to have VirtualBox installed on our existing host operating system. For Windows users, the installation of VirtualBox is just like any other software once you have the setup from its official website. Whereas Debian, Ubuntu, and its based Linux users can see our article on – VirtualBox installation on the Linux system.
3. Create Virtual Machine
Once you have installed the VirtualBox or if you already have then simply run it.
Create New VM
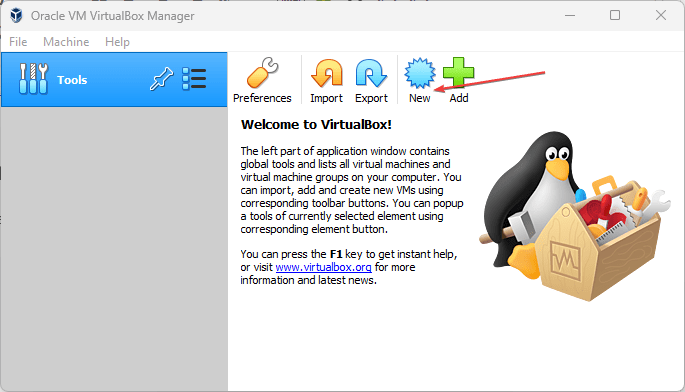
After that click on the “New” button to create a fresh Virtual machine.
Name Virtual Machine
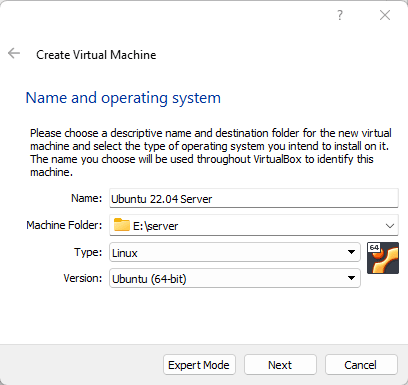
Give some name to your virtual machine such as “Ubuntu 22.04” where select Type- Linux and version to Ubuntu.
Set RAM for VM
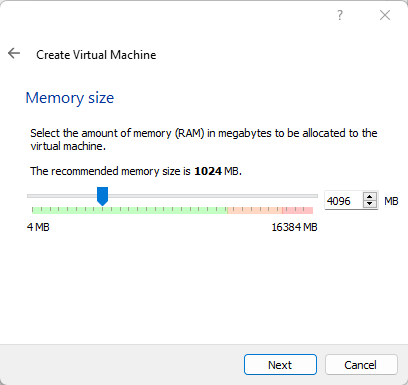
If you are planning to install Ubuntu 22.04 Server with Desktop interface then for good performance and if your host system allows, then set the RAM to 4GB or less as per your system configuration.
Create a Virtual Hard disk
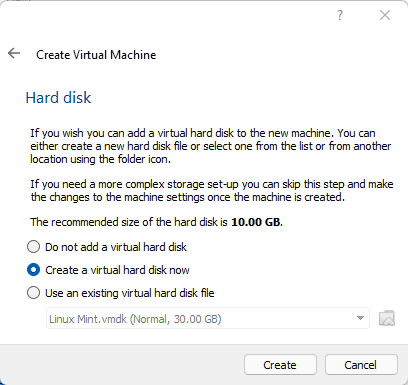
Let the “Create a virtual hard disk now” option be selected and move to the next step.
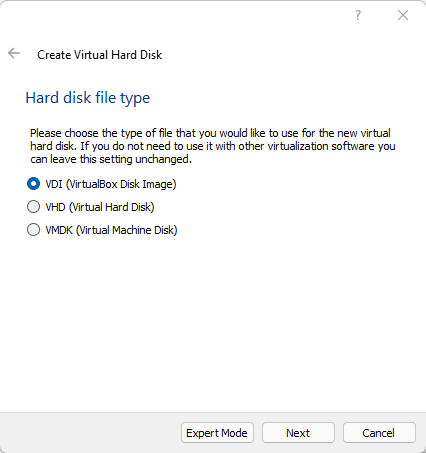
If you have any plan to use the Virtual hard disk later in VMware then go for VMDK otherwise let the default option VDI be selected.
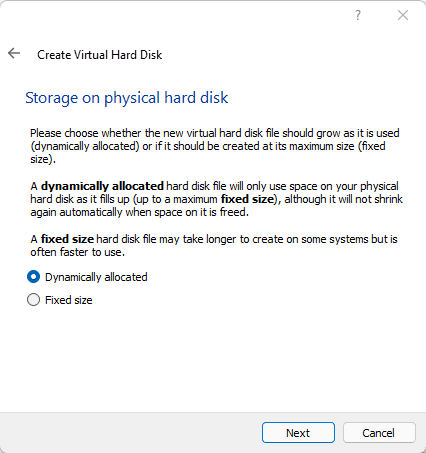
Also, let the default “Dynamic Allocated” option be selected as it is. Allocate around 30GB of virtual space.
4. Start Ubuntu 22.04 server Virtual Machine
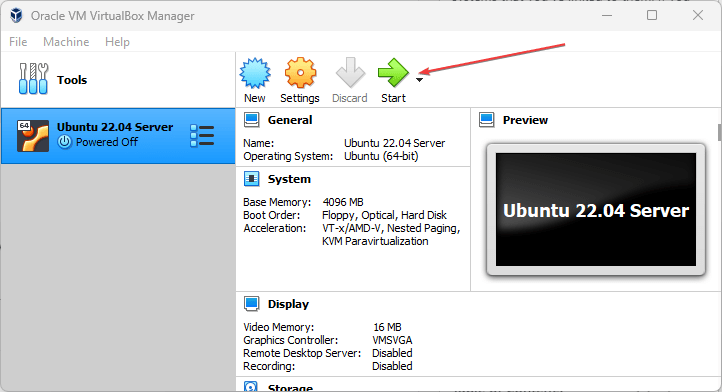
Finally, once all the above steps are done, you will see a newly created virtual machine on your VirtualBox. Select that from the left side panel and hit the Start button.
5. Add Ubuntu 22.04 server ISO to VirtualBox
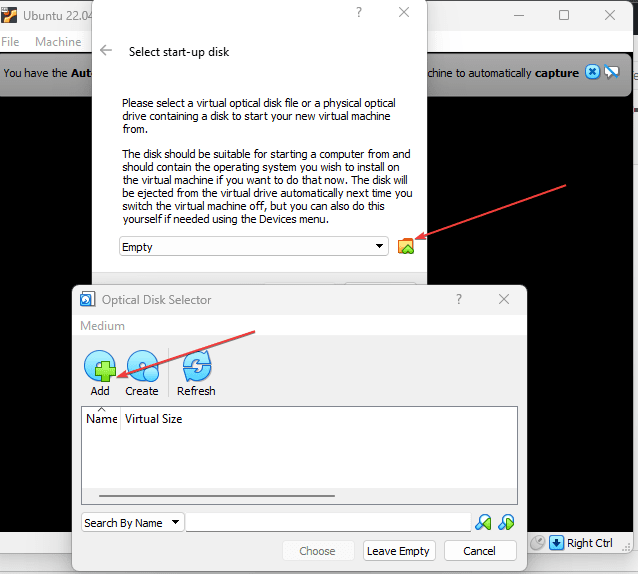
Now, we need to select the downloaded Ubuntu 22.04 ISO file as a Start-up disk to boot our Virtual machine with that. For that click on the “Folder” icon.
After clicking on the Folder icon, a pop-up window will open to add the ISO image file. Click on the “Add” button and then select your downloaded ISO file.
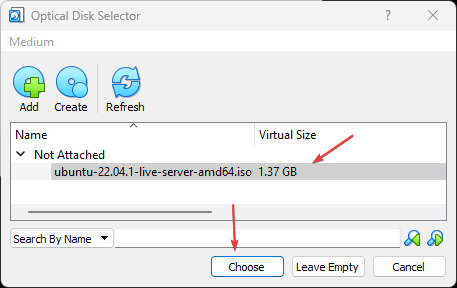
As you have done this, the same ISO image will show in the “ISO Image selection ” area. Scroll to your added Ubuntu 22.04 LTS image and hit the Choose button.
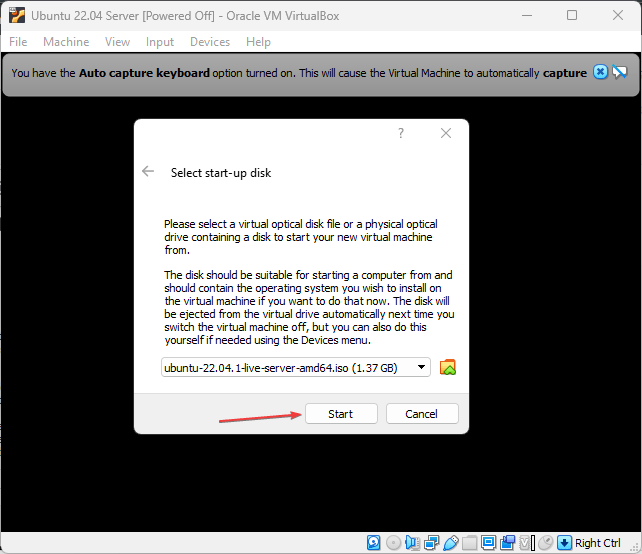
Finally, click on the Start button.
6. Grub Menu to select and boot the OS
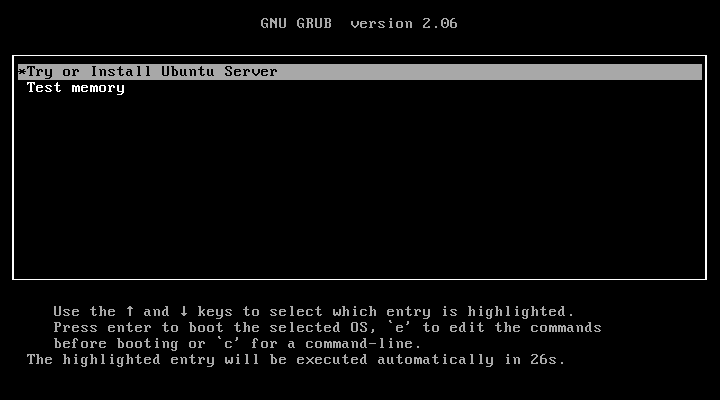
Once the virtual machine is started, you will see the Grub menu as the first screen to select “Try or Install Ubuntu Server” to boot with it.
7. Install Ubuntu 22.04 on VirtualBox
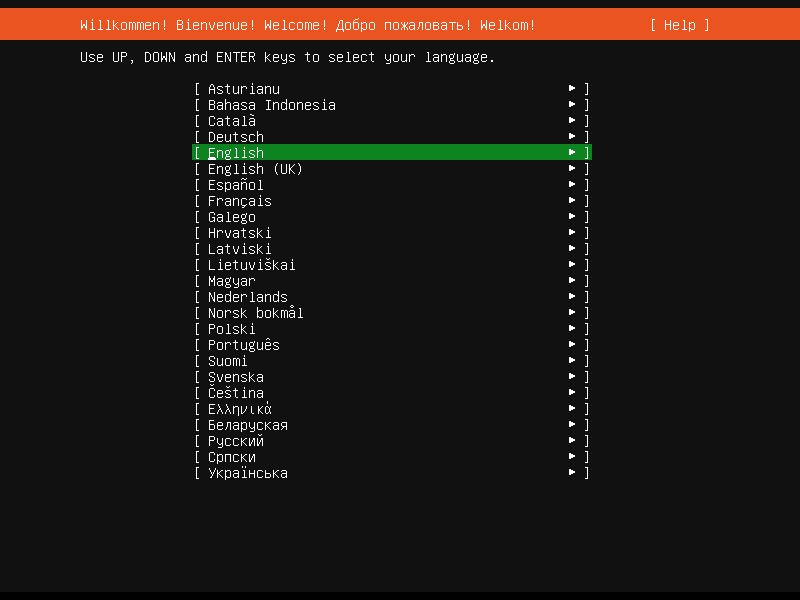
Finally, from the installation wizard, select the language, by default it will be English. In the next step, let the default keyboard layout be selected, and just press the Enter key to move further.
8. Ubuntu Server standard or minimized
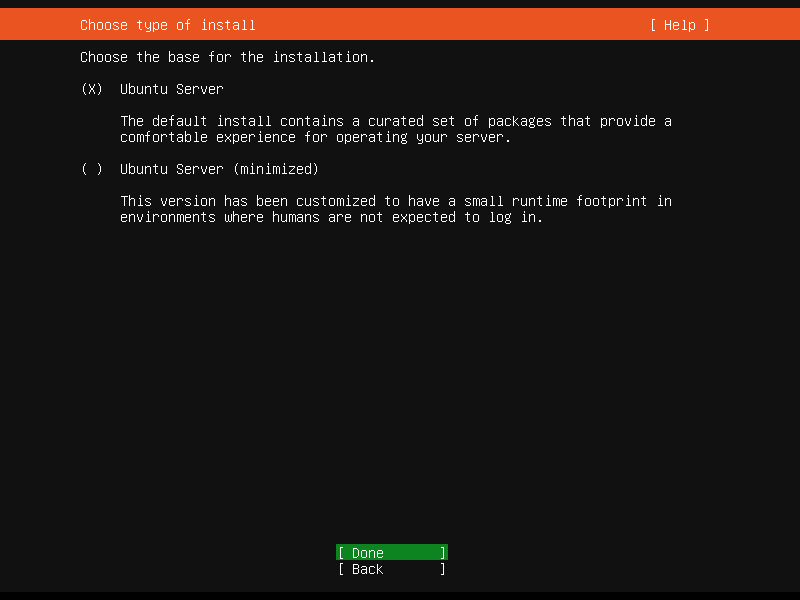
In the next step, the installation wizard will ask you what type of server installation do you want? It is recommended to let the default option be selected and simply hit the Enter key.
9. Network Connections VirtualBox
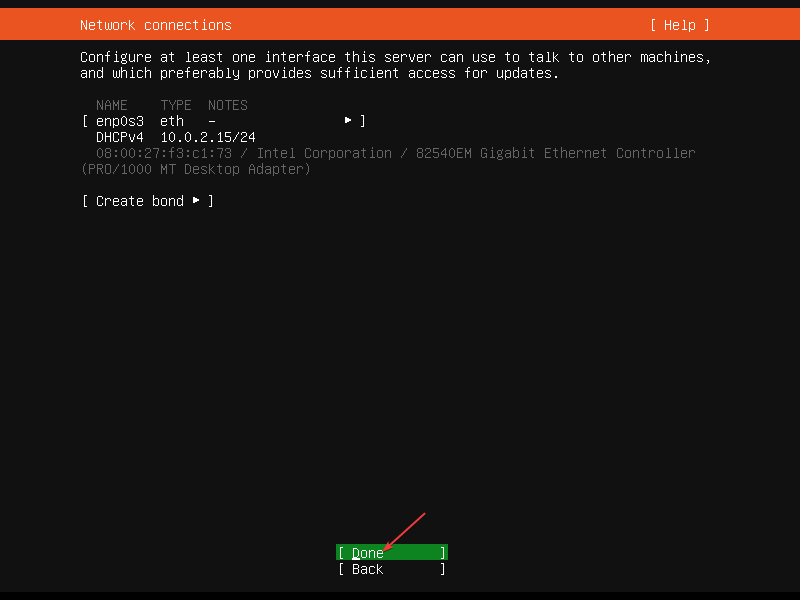
Ubuntu server will automatically identify the connected network and select the same to use. If you want to customize that then use the arrow key and manually select the Adapter you want to use.
Skip the Proxy in the next step and hit the Enter key again.
After that again press the Enter key to let the system select the default Ubuntu Mirror to fetch packages.
10. Erase disk and Install Ubuntu 22.04 server
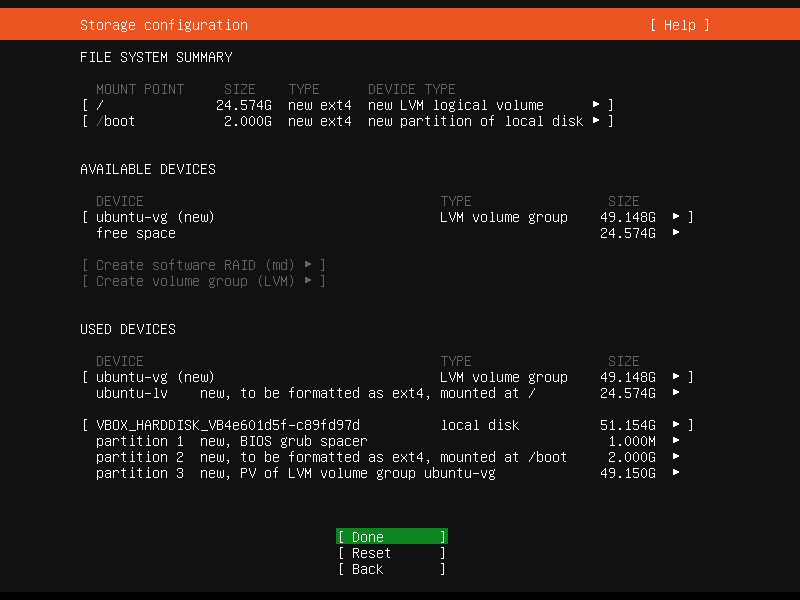
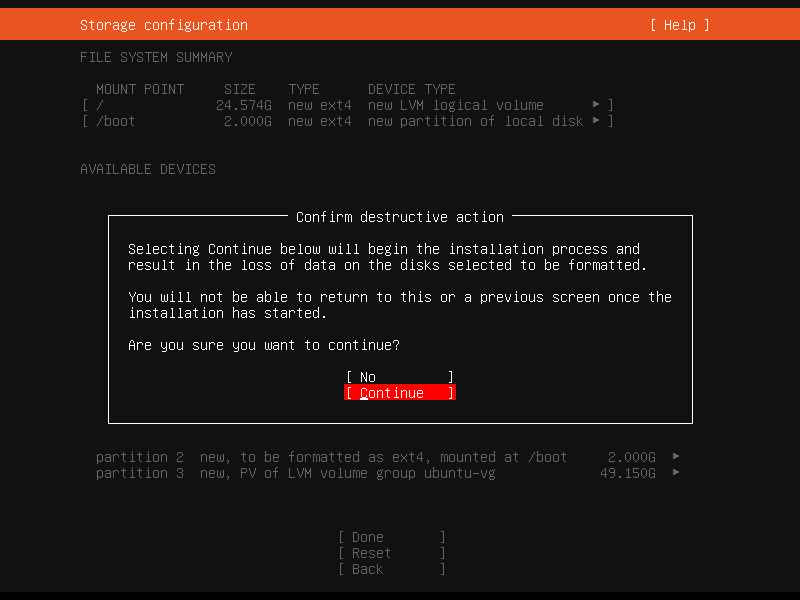
Now, the system will show the entire attached virtual hard disk where it is planning to install the Ubuntu server. Use the TAB key to select the DONE option and hit the Enter key.
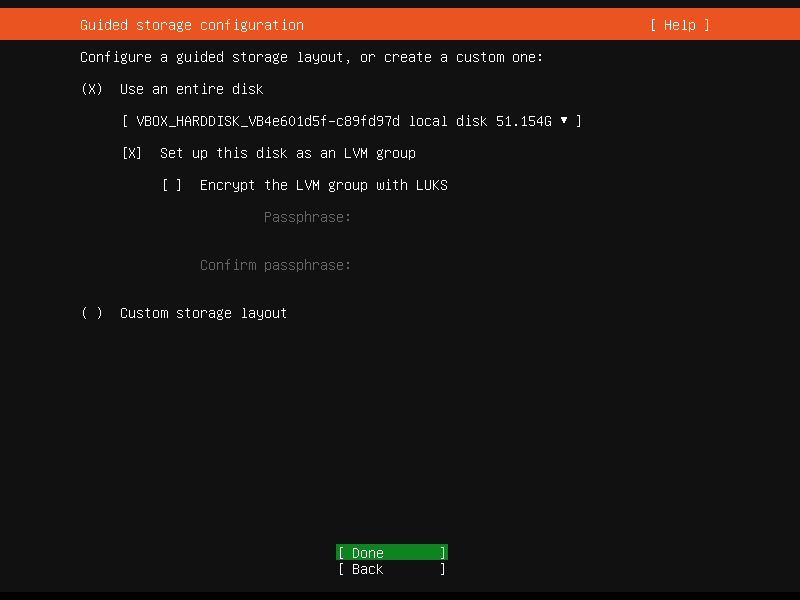
11. Set Username and password
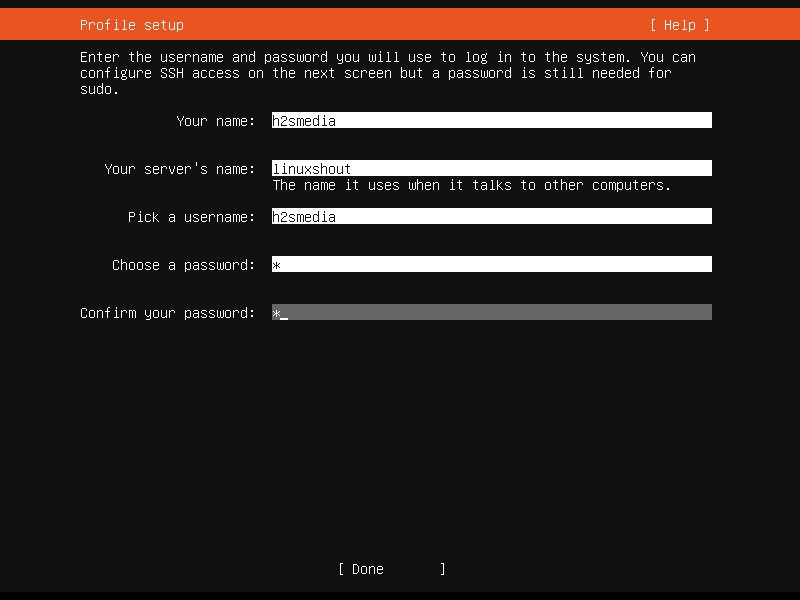
Soon, you will have the Profile Setup area from where we can create a user for our Server.
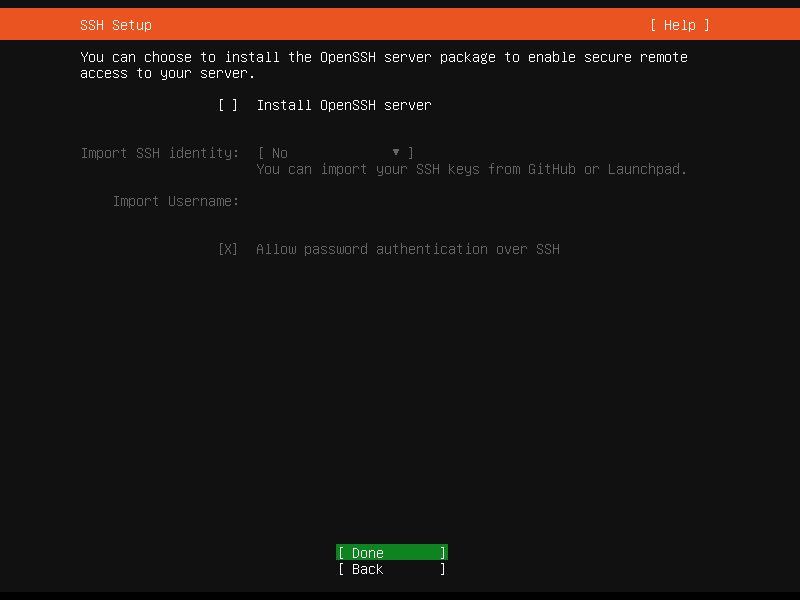
After that, if you want to access the server remotely using the SSH then you can select the “Install OpenSSH Server” using arrow keys and spacebar otherwise simply select the “DONE” and move forward because we can install it later.
12. Select the Ubuntu Server package to install (optional)
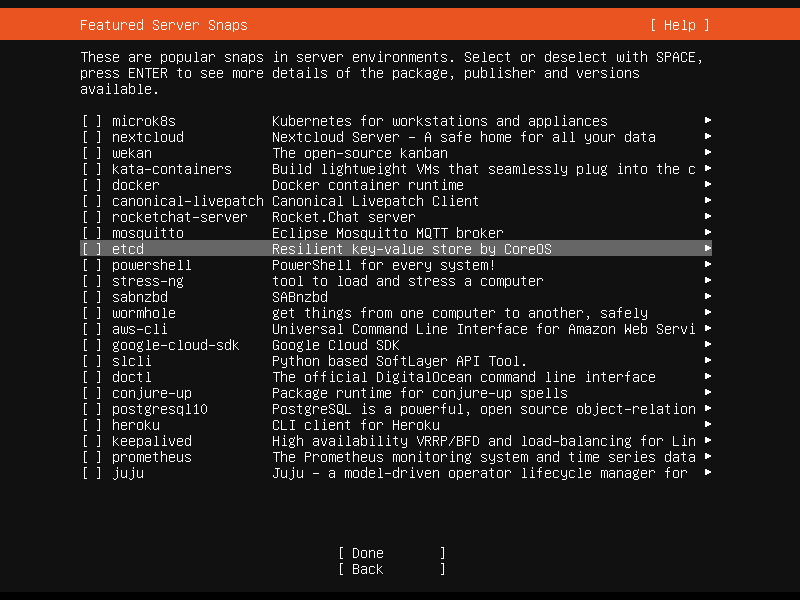
Do you want to install some popular and common server software packages such as Docker? Then you can select them here otherwise, leave them unselected and select the Done option.
Move next and the system will start the installation process of the Ubuntu 22.04 server on VirtualBox as a Virtual Machine.
13. Install VirtualBox Guest Additions
Access your Ubuntu server terminal and with an active internet connection on your virtual machine to run the given commands:
sudo apt install virtualbox-guest-additions-iso virtualbox-guest-utils virtualbox-dkmsfor Extension pack:
sudo apt install virtualbox-ext-packRestart the system…
14. Switch to root user and set a password
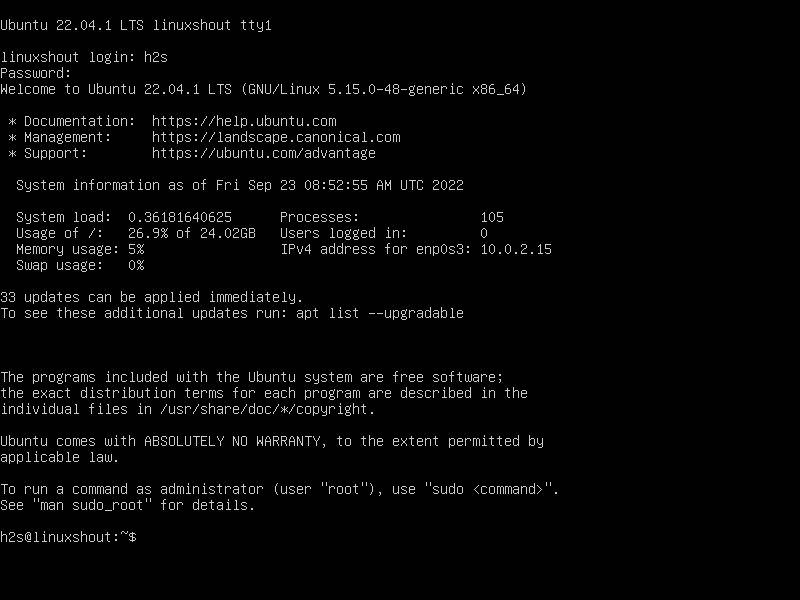
As you reboot the Ubuntu server virtual machine, a login interface will appear. Enter the details of the user you have created while installing it.
Set Ubuntu root user password
Enter the new password for your root user.
FAQ
Yes, we can run Virtual machines on an Ubuntu server with the help of a virtualization module called KVM (Kernel-based Virtual Machine). Whereas those who have a GUI Desktop server can use VirtualBox or VMware Player workstation.
To create a VirtualBox server in Linux, we need to install some Server OS distros on it such as Ubuntu server, RedHat, Fedora, OpenSUSE, and more… In this article, you can see how we have installed the Ubuntu 22.04 Server on VirtualBox.
Yes, Linux servers are not only free and open source but consume less Memory and offer an easy-to-use command line package manager to install thousands of packages. That is the reason most of the hosting and cloud servers are running on Linux.
Multipass can launch and run virtual machines and configure them with cloud-init like a public cloud. uses Hyper-V on Windows, QEMU and HyperKit on macOS and LXD on Linux for minimal overhead and the fastest possible start time. It uses images tuned for cloud usage
Yes, Ubuntu Server is free to use for both Commercial and Personal projects. However, if an Enterpise want can buy extended security, certified compliance and 24×7 support for their Ubuntu server running infrastructure from Ubuntu.
Yes, of course; we can install Ubuntu server on Laptops, Desktops or even on virtual machines like any other Linux distro.
No, Multipass is not a hypervisor instead a tool to quickly create Ubuntu VM environment and manage it with cloud-init. In simple, it is a platfrom that uses hypervisor such as KVM, HyperKit and Hyper-v to create virtual machines instantly.
Other Articles:
Install Ubuntu server in a virtual machine
These instructions use VirtualBox as an example. Instructions for other virtual machines are likely to be similar.
There is a version of the Ubuntu server that is optimized for usage within a virtual machine. It is provided on the Ubuntu Server edition LiveCD. The LiveCD image (.iso) found here can be downloaded onto your hard drive. It can then be installed directly into your virtual machine from the hard drive. Alternatively, you can also burn the .iso image onto a CD and install Ubuntu Server into the virtual machine from the CD. Both methods work identically during the Ubuntu Server installation process.
VirtualBox supports both 32 and 64-bit guest OSs. See this list for known supported operating systems. However, if your host OS is 32-bit you cannot run 64-bit guest OSs. Other virtual machines may have similar limitations, so in general a 32-bit Ubuntu OS is safest.
Note that the «minimal virtual machine» install of Ubuntu Server 10.04 doesn’t recognize the SATA disk controller which VirtualBox 3.2.8 uses by default. If you find you can’t boot your new installation and get dropped to an initramfs prompt on first boot, stop the VM and reconfigure it to use a SCSI disk controller instead as described here.
*Start the virtual machine you created in the previous step.
- The «First Run Wizard» will prompt for the location of the installation disk -> Next -> CD/DVD-ROM device (ticked) ->
- select the CD-ROM drive (if you burned the LiveCD (.iso) image onto a physical CD), or
- browse for the folder where you stored the (.iso) image onto your hard drive, if you did not burn it to a physical CD
* Install Ubuntu server virtual machine edition:
- Choose language: English ->
- Important: note this step carefully! Select the minimal virtual machine installation mode:
- Click the F4 (modes) key ->Install a minimal virtual machine ->
- Install Ubuntu Server
- Select your installation options. When asked about partitioning, use the guided partitioning method and use the entire disk. This uses the entire virtual machine disk (which is 8 GB or whatever size you created when creating the virtual machine), not the entire physical hard drive disk.
- Task selection. A menu will appear to select options for additional packages to be installed along with the server. Make sure these packages are starred use the space button to select them and the arrow keys to go up or down the list) before completing the installation.
- (Optional) You will be prompted to enter an MySQL root user password during the LAMP server package installation. This password becomes important later on (in some instances). Record your chosen MySQL password in a safe location. Do not use your primary user password as the MySQL password; it ought to be unique.
* Finish the remainder of the Ubuntu server installation. At the conclusion the Ubuntu system will automatically reboot within the virtual machine. When it restarts, you will then have a fully function Ubuntu Server within the virtual machine. Immediately update the operating system:
sudo apt-get update sudo apt-get upgrade
Installing missing kernel modules
The kernel package installed by the «minimal virtual machine» option only contains a small number of modules. It’s possible you may need one of the «missing» modules to get extra hardware supported. (In my case I wanted to access my MacBook Pro’s internal USB Bluetooth device from Ubuntu.)
You *don’t* have to build the modules yourself, you can simply install the associated «linux-image-extra-virtual» package and all the missing modules will be installed (at the cost of some extra disk space). (The description of the package currently implies a kernel image is also installed but that’s not the case.)
Ubuntu_as_Guest_OS (последним исправлял пользователь 36-225-88-36 2015-01-08 01:12:38)
The material on this wiki is available under a free license, see Copyright / License for details
You can contribute to this wiki, see Wiki Guide for details
