- How to set up a wifi-direct connection between android and linux?
- Method 1: Using Wifi Direct on Android
- Step 1: Declare Wifi-Direct Permissions
- Step 2: Create a Wifi-Direct Manager
- Step 3: Register Broadcast Receiver
- Step 4: Discover Peers
- Step 5: Connect to a Peer
- Step 6: Create a Server Socket
- Step 7: Advertise Service
- Step 8: Discover Services
- Step 9: Connect to a Service
- Method 2: Using Wifi Direct on Linux
- Step 1: Check if your Linux device supports Wifi Direct
- Step 2: Install the necessary packages
- Step 3: Configure the Wifi Direct interface
- Step 4: Create a Wifi Direct group
- Step 5: Connect your Android device to the Wifi Direct group
- Step 6: Transfer files between devices
- Method 3: Using an Application to Connect Android and Linux Devices
- Step 1: Add Permissions to the Android Manifest
- Step 2: Create a WiFi-Direct Connection on Android
- Step 3: Connect to the Linux Device
- Step 4: Create a Server Socket on Linux
- Step 5: Create a Client Socket on Android
- Step 6: Send and Receive Data
- Use Bluetooth Tethering to Connect Ubuntu to Android’s WiFi
- Connecting Ubuntu to Android’s WiFi via Bluetooth
- Доступ к данным на Android посредством WiFi
- Примечания
How to set up a wifi-direct connection between android and linux?
Establishing a Wi-Fi Direct connection between an Android device and a Linux device can be challenging. Wi-Fi Direct is a technology that allows for peer-to-peer connections to be established between devices without the need for an intermediate router or access point. This technology can be used to connect a range of devices, including Android smartphones and Linux-based computers. In this article, we will explore the steps needed to set up a Wi-Fi Direct connection between an Android device and a Linux device.
Method 1: Using Wifi Direct on Android
Step 1: Declare Wifi-Direct Permissions
Add the following permissions to your AndroidManifest.xml file:
uses-permission android:name="android.permission.ACCESS_WIFI_STATE" /> uses-permission android:name="android.permission.CHANGE_WIFI_STATE" /> uses-permission android:name="android.permission.ACCESS_NETWORK_STATE" /> uses-permission android:name="android.permission.CHANGE_NETWORK_STATE" /> uses-permission android:name="android.permission.INTERNET" /> uses-permission android:name="android.permission.ACCESS_FINE_LOCATION" /> uses-permission android:name="android.permission.ACCESS_COARSE_LOCATION" />Step 2: Create a Wifi-Direct Manager
Create a WifiP2pManager object and a Channel object to manage Wifi-Direct connections:
WifiP2pManager wifiP2pManager = (WifiP2pManager) getSystemService(Context.WIFI_P2P_SERVICE); WifiP2pManager.Channel channel = wifiP2pManager.initialize(this, getMainLooper(), null);Step 3: Register Broadcast Receiver
Register a broadcast receiver to receive Wifi-Direct events:
BroadcastReceiver receiver = new WifiDirectBroadcastReceiver(wifiP2pManager, channel, this); IntentFilter intentFilter = new IntentFilter(); intentFilter.addAction(WifiP2pManager.WIFI_P2P_STATE_CHANGED_ACTION); intentFilter.addAction(WifiP2pManager.WIFI_P2P_PEERS_CHANGED_ACTION); intentFilter.addAction(WifiP2pManager.WIFI_P2P_CONNECTION_CHANGED_ACTION); intentFilter.addAction(WifiP2pManager.WIFI_P2P_THIS_DEVICE_CHANGED_ACTION); registerReceiver(receiver, intentFilter);Step 4: Discover Peers
Discover available Wifi-Direct peers:
wifiP2pManager.discoverPeers(channel, new WifiP2pManager.ActionListener() @Override public void onSuccess() // Code for when the discovery initiation is successful goes here. // No services have actually been discovered yet, so this method // can often be left blank. Code for peer discovery goes in the // onReceive method, detailed below. > @Override public void onFailure(int reasonCode) // Code for when the discovery initiation fails goes here. // Alert the user that something went wrong. > >);Step 5: Connect to a Peer
Connect to a Wifi-Direct peer:
WifiP2pConfig config = new WifiP2pConfig(); config.deviceAddress = device.deviceAddress; config.wps.setup = WpsInfo.PBC; wifiP2pManager.connect(channel, config, new WifiP2pManager.ActionListener() @Override public void onSuccess() // Code for when the connection request succeeds goes here. > @Override public void onFailure(int reason) // Code for when the connection request fails goes here. // Alert the user that the connection failed. > >);Step 6: Create a Server Socket
Create a server socket to listen for incoming connections:
ServerSocket serverSocket = new ServerSocket(0); int port = serverSocket.getLocalPort();Step 7: Advertise Service
Advertise the service to other Wifi-Direct peers:
WifiP2pDnsSdServiceInfo serviceInfo = WifiP2pDnsSdServiceInfo.newInstance( SERVICE_NAME, SERVICE_TYPE, serviceRecord); wifiP2pManager.addLocalService(channel, serviceInfo, new WifiP2pManager.ActionListener() @Override public void onSuccess() // Code for when the service is successfully advertised goes here. > @Override public void onFailure(int reason) // Code for when the service advertising fails goes here. > >);Step 8: Discover Services
Discover available services on other Wifi-Direct peers:
wifiP2pManager.setDnsSdResponseListeners(channel, new WifiP2pManager.DnsSdServiceResponseListener() @Override public void onDnsSdServiceAvailable(String instanceName, String registrationType, WifiP2pDevice srcDevice) // Code for when a service is discovered goes here. > >, new WifiP2pManager.DnsSdTxtRecordListener() @Override public void onDnsSdTxtRecordAvailable(String fullDomainName, MapString, String> record, WifiP2pDevice device) // Code for when a TXT record is available goes here. > >); wifiP2pManager.discoverServices(channel, new WifiP2pManager.ActionListener() @Override public void onSuccess() // Code for when the service discovery initiation is successful goes here. > @Override public void onFailure(int reason) // Code for when the service discovery initiation fails goes here. > >);Step 9: Connect to a Service
Connect to a service on another Wifi-Direct peer:
WifiP2pConfig config = new WifiP2pConfig(); config.deviceAddress = device.deviceAddress; config.wps.setup = WpsInfo.PBC; wifiP2pManager.connect(channel, config, new WifiP2pManager.ActionListener() @Override public void onSuccess() // Code for when the connection request succeeds goes here. > @Override public void onFailure(int reason) // Code for when the connection request fails goes here. // Alert the user that the connection failed. > >);Method 2: Using Wifi Direct on Linux
Step 1: Check if your Linux device supports Wifi Direct
First, make sure your Linux device supports Wifi Direct. You can check this by running the following command in the terminal:
iw list | grep "Supported interface modes" -A 8If you see «P2P-client» and «P2P-GO» in the output, it means your device supports Wifi Direct.
Step 2: Install the necessary packages
Next, you need to install the necessary packages to enable Wifi Direct on Linux. Run the following command in the terminal:
sudo apt-get install wireless-tools hostapd wpasupplicantStep 3: Configure the Wifi Direct interface
Now, you need to configure the Wifi Direct interface on your Linux device. Run the following commands in the terminal:
sudo ip link set wlp2s0 down sudo iw dev wlp2s0 set type managed sudo ip link set wlp2s0 up sudo iw dev wlp2s0 interface add p2p0 type __p2p sudo ip link set p2p0 up sudo iw dev p2p0 set channel 6Note: Replace «wlp2s0» with the name of your Wifi interface.
Step 4: Create a Wifi Direct group
To create a Wifi Direct group, you need to run the following command in the terminal:
sudo wpa_cli -i p2p0 p2p_group_addThis will create a new Wifi Direct group and return the group ID.
Step 5: Connect your Android device to the Wifi Direct group
On your Android device, go to Settings > Wi-Fi > Wi-Fi Direct. Your Linux device should appear in the list of available devices. Tap on it to connect.
Step 6: Transfer files between devices
Once the devices are connected, you can transfer files between them using standard file transfer methods.
Method 3: Using an Application to Connect Android and Linux Devices
To set up a WiFi-Direct connection between Android and Linux, we can use an application that facilitates the connection. Here are the steps to do it:
Step 1: Add Permissions to the Android Manifest
In the AndroidManifest.xml file, add the following permissions:
uses-permission android:name="android.permission.ACCESS_WIFI_STATE" /> uses-permission android:name="android.permission.CHANGE_WIFI_STATE" /> uses-permission android:name="android.permission.ACCESS_NETWORK_STATE" /> uses-permission android:name="android.permission.CHANGE_NETWORK_STATE" /> uses-permission android:name="android.permission.INTERNET" />Step 2: Create a WiFi-Direct Connection on Android
Create a WiFi-Direct connection on Android using the following code:
WifiP2pManager wifiManager = (WifiP2pManager) getSystemService(Context.WIFI_P2P_SERVICE); WifiP2pManager.Channel wifiChannel = wifiManager.initialize(this, getMainLooper(), null); wifiManager.discoverPeers(wifiChannel, new WifiP2pManager.ActionListener() @Override public void onSuccess() // Peer discovery started > @Override public void onFailure(int reasonCode) // Peer discovery failed > >);Step 3: Connect to the Linux Device
Connect to the Linux device using the following code:
WifiP2pConfig config = new WifiP2pConfig(); config.deviceAddress = "00:11:22:33:44:55"; // Replace with the MAC address of the Linux device config.wps.setup = WpsInfo.PBC; // Set the Wi-Fi Protected Setup (WPS) method wifiManager.connect(wifiChannel, config, new WifiP2pManager.ActionListener() @Override public void onSuccess() // Connection successful > @Override public void onFailure(int reasonCode) // Connection failed > >);Step 4: Create a Server Socket on Linux
Create a server socket on Linux using the following code:
sudo apt-get install netcat-traditional nc -l 8888Step 5: Create a Client Socket on Android
Create a client socket on Android using the following code:
Socket socket = new Socket(); socket.bind(null); socket.connect((new InetSocketAddress("192.168.49.1", 8888)), 5000); // Replace with the IP address of the Linux deviceStep 6: Send and Receive Data
Send and receive data between Android and Linux using the following code:
// Send data from Android to Linux OutputStream outputStream = socket.getOutputStream(); outputStream.write("Hello from Android".getBytes()); // Receive data from Linux to Android InputStream inputStream = socket.getInputStream(); byte[] buffer = new byte[1024]; int bytesRead = inputStream.read(buffer); String data = new String(buffer, 0, bytesRead);That’s it! You have successfully set up a WiFi-Direct connection between Android and Linux using an application.
Use Bluetooth Tethering to Connect Ubuntu to Android’s WiFi
There are those times when for one reason or the other (e.g electricity shortage and expired data plan,) one needs to access the internet urgently to do work especially one that requires a laptop.
I, for example, need to be online when I write my articles so I can research properly and sometimes my mobile router isn’t with me. Such an emergency can be handled if you’ve got a smartphone with internet access and so today, we will show you how to tether WiFi from your Android device to your Ubuntu desktop.
Connecting Ubuntu to Android’s WiFi via Bluetooth
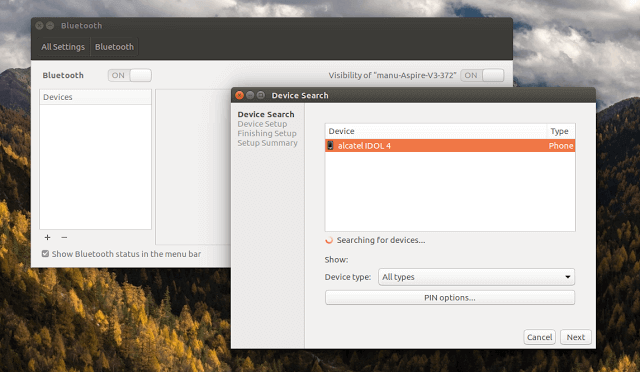
1. First switch on Bluetooth on both devices, next on Ubuntu – Go to Bluetooth settings and click ‘+’ to connect to your phone.
2. Select your Android device and click ‘Next‘ to continue.
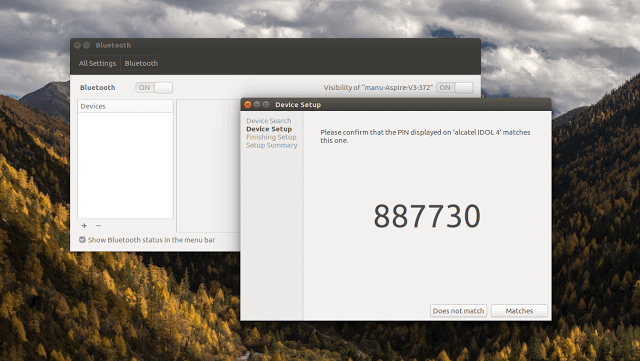
3. A dialogue box will pop up asking you to confirm that the pin displayed on your Android device matches the one one showing on your Ubuntu screen. If it does, click the ‘Matches‘ button.
4. Now both devices will proceed to pair and when that is complete you can now share your phone’s WiFi with your Ubuntu system by enabling Bluetooth tethering on your Android device following these steps:
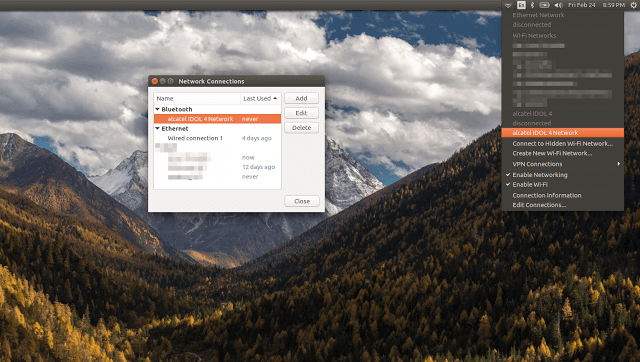
- Settings ->Wireless & networks -> Tethering & portable hotspot -> Bluetooth tethering
- Launch Network Connections from your WiFi dropdown and select to ‘Edit Connections‘
- Double-click to enable the Bluetooth submenu
- Select your Andriod phone’s network from your WiFi list and you’re good to go
You should know, that you can browse anything you want, but the connection will not be as fast as typical WiFi speeds. Use this as a fall-back method in case you need to access the internet when you’re offline.
I hope this walk through was simple enough? Please feel free to ask questions in the comments section and to also add tips if you have any.
Доступ к данным на Android посредством WiFi
После долгих и безуспешных попыток «подружить» мой телефон на Android с Ubuntu, решил пойти другим путем: раз уж есть роутер, к которому оба эти устройства подключаются, то почему не возпользоваться этим? Для этого на самом телефоне нужно установить ftp server и подключиться к нему с компьютера. По запросу «ftp» в Google Play нашлась бесплатная программа с оригинальным названием ftp server (The Olive Tree). После установки, на экране появляется большой значек включения, при нажатии на который, чуть ниже появляются необходимые нам данные:
Теперь осталось запустить Nautilus, выбрать в меню Файл → соединиться с сервером и ввести необходимые данные:
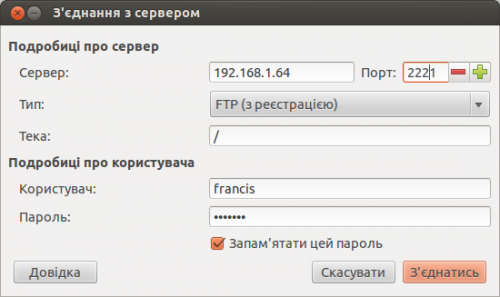
Будьте внимательны: у меня, после введения пароля, номер порта почему-то самопроизвольно возвращался к 21. Приходилось править снова.
После установления соединения получаем доступ к файлам на нашем телефоне:

Чтобы не вводить данные при каждом соединении, добавьте в Закладки.
По умолчанию корневым каталогом сервера считается карточка памяти, и именно ее содержимое открывается в Nautilus после соединения. Это можно поменять в настройках самой программы на телефоне. Также можно поменять имя пользователя, пароль, порт, разрешать ли доступ без аутентификации (по умолчанию, разрешен) и т.п.
Доступ возможен не только через файловый менеджер, но и, например, через интернет-браузер:
