- Ubuntu Wiki
- Installing ZFS on Ubuntu
- Rationale
- Use cases
- Setup a ZFS storage pool
- What you’ll learn
- What you’ll need
- 2. Installing ZFS
- 3. Creating a ZFS Pool
- Choosing Drives to Pool
- Creating a Pool
- 4. Checking Pool Status
- 5. Removing the pool
- 6. That’s all!
- Further reading
- Install ZFS Filesystem on Ubuntu 20.04
- ZFS features
- Installing ZFS Filesystem on Ubuntu
- Creating the ZFS storage pool
- Removing the ZFS storage pool
- About the author
- Karim Buzdar
Ubuntu Wiki
ZFS is a combined file system and logical volume manager designed and implemented by a team at Sun Microsystems led by Jeff Bonwick and Matthew Ahrens. Its development started in 2001 and it was officially announced in 2004. In 2005 it was integrated into the main trunk of Solaris and released as part of OpenSolaris. Currently, as of January 2015, it is native to Solaris, OpenSolaris, OpenIndiana, illumos, Joyent SmartOS, OmniOS, FreeBSD, Debian GNU/kFreeBSD systems, NetBSD, OSv and supported on Mac OS with MacZFS.
The name «ZFS» originally stood for «Zettabyte File System». Currently it can store up to 256 ZiB (zebibytes).
Installing ZFS on Ubuntu
The ZFS filesystem is available for Ubuntu as either a FUSE module or a native kernel module. The kernel module is provided by default. To install the user-level tools, simply install:
sudo apt install zfsutils-linux
For all current versions from 16.04 onward.
In addition to be able to have ZFS on root, install:
sudo apt install zfs-initramfs
Rationale
Ubuntu server, and Linux servers in general compete with other Unixes and Microsoft Windows. ZFS is a killer-app for Solaris, as it allows straightforward administration of a pool of disks, while giving intelligent performance and data integrity.
ZFS does away with partitioning, EVMS, LVM, MD, etc. The available disks (of any size) are used to the best of their ability. Compression can be used to increase bandwidth. (q.v. Reiser 4, and cloop?)
- State-of-the-art unsurpassed data reliability (including silent corruption detection and automatic data repair, if available) from end to end, thanks to transparent checksums in parent block pointers
- Elimination of the RAID5 write hole that usually requires battery-powered disk technology or UPS technology to keep RAID arrays consistent in case of power failures
- Online array reconstruction / reassemble, in a fraction of the time usually required to reconstruct an array, thanks to reconstruction dependent on contents rather than on disk topology
- Online check (scrub) and online resilver of faulty, to verify and preserve the validity of on-disk data in the face of silent disk data corruption
- Automatic deduplication and compression of data, selectable per volume or filesystem according to administrator policy
- Dynamic striping across all devices to maximize throughput
- Copy-on-write design makes most disk writes sequential
- Multiple block sizes, automatically chosen to match workload
- Explicit I/O priority with deadline scheduling
- Globally optimal I/O sorting and aggregation
- Multiple independent prefetch streams with automatic length and stride detection for maximum streaming performance
- Unlimited, instantaneous read/write snapshots
- Parallel, constant-time directory operations
Use cases
- Dani is a sys admin for a medium-size business. She spends 20% of her time planning/changing/administering/repairing the disk arrays of three servers. With ZFS, this time is cut in half.
- Power user Petra has a four-disk RAID5 workstation. Parity calculations make this a fairly slow set-up because of the number of writes of small files. She upgrades to ZFS and sees performance benefits, because small files are mirrored instead of included in parity calculations.
- Manuel has a mirrored disk array. Fluctuations in his computer’s PSU are causing silent data corruption errors. ZFS detects the errors and reports back those errors to Manuel, protecting the data already on disk from further corruption.
- Andreas has a disk that has suffered a partial failure. Since he chose a policy of two copies for his personal file system volume, he may be able to recover some of his latest personal data without having to resort to tape backups.
- John has an 18-disk SAS array configured to run mirrored, each nine-disk group containing one RAIDZ2 leg. One of the disks experiences a catastrophic disk motor failure. John deactivates the disk online, replaces it with a fresh one, activates that disk, then uses the ZFS zpool replace command to replace the faulty disk. ZFS automatically reconstructs the data on that disk with zero downtime and minimal data transfer or performance impact to the array.
ZFS (последним исправлял пользователь seth-arnold 2019-01-22 22:16:08)
Setup a ZFS storage pool
ZFS is a combined file system and logical volume manager originally designed and implemented by a team at Sun Microsystems led by Jeff Bonwick and Matthew Ahrens. Features of ZFS include protection against data corruption, high storage capacity (256 ZiB), snapshots and copy-on-write clones and continuous integrity checking to name but a few. If you are dealing with large amounts of data, or providing a backing filesystem for virtualisation, ZFS is a great choice.
This guide will go through the process of installing ZFS on Ubuntu 16.04 LTS and setting up a storage pool.
What you’ll learn
What you’ll need
Ready? Let’s head over to the next step!
Originally authored by Aden Padilla.
2. Installing ZFS
The main components of ZFS are maintained as a standard Ubuntu package, so to install simply run:
sudo apt install zfsutils-linux After that, we can check if ZFS was installed correctly by running:
You should see output similar to the following:
![]()
Now that we’re done installing the required packages, let’s create a storage pool!
3. Creating a ZFS Pool
Choosing Drives to Pool
Check installed drives by running:
Carefully note down the device names of drives you want to pool.

These are the two drives we’re going to pool:
Creating a Pool
There are two types of simple storage pools we can create. A striped pool , also called RAID-0 , in which the data is stored in “stripes” across all drives, or a mirrored pool , also called RAID-1 , in which a complete copy of all data is stored separately on each drive. Striped pools are not fault tolerant whereas mirrored pools can survive the failure of one drive. Striped pools have twice the storage capacity of mirrored pools and have better performance than mirrored pools.
To create a striped pool, we run:
sudo zpool create new-pool /dev/sdb /dev/sdc To create a mirrored pool, we run:
sudo zpool create new-pool mirror /dev/sdb /dev/sdc In both examples, new-pool is the name of the pool.

Sometimes an error like this might pop up:
Add “ -f ” to the end of the zpool create command to override it.
A mirrored pool is usually recommended as we’d still be able to access our data if a single drive fails. However, this means that we’ll only get the capacity of a single drive. A striped pool , while giving us the combined storage of all drives, is rarely recommended as we’ll lose all our data if a drive fails. You can also opt for both, or change the designation at a later date if you add more drives to the pool.
The newly created pool is mounted at /new-pool . You can select a different mount point using the -m option:
sudo zpool create -m /usr/share/pool new-pool mirror /dev/sdb /dev/sdc The newly mounted pool will appear to Ubuntu as any other part of the filesystem.
4. Checking Pool Status
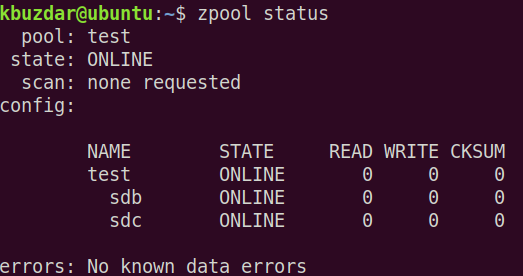
You can check the status of ZFS pools with:

This is the status of our newly created pool:
5. Removing the pool
If you are finished with the pool, you can remove it. Beware that this will also remove any files that you have created within the pool!
sudo zpool destroy new-pool You can confirm that the pool has been removed by checking the filesystem and by running the status check again:
6. That’s all!
Congratulations, you have updated your Ubuntu install with a cutting edge new filesystem! You have found out:
- How to install the ZFS utilities
- How to identify which drives to use in a ZFS pool
- The basic types of ZFS pools
- How to create and mount a pool
- How to remove the pool once you no longer need it
Be sure to check back on this site for more tutorials on using ZFS!
Further reading
Install ZFS Filesystem on Ubuntu 20.04
![]()
ZFS is a file system created by Sun Microsystems. It was first shipped with Solaris but now available in other LINUX and UNIX operating systems. ZFS uses virtual storage pools known as zpools that can deal with the storage and management of a large amount of data. In this article, we will explain how to install the ZFS file system on Ubuntu OS. We will cover the following topics:
- Installing the ZFS file system
- Creating the ZFS storage pool
- Removing the ZFS storage pool
ZFS features
Let’s take a look at some of the features of ZFS file system:
- High storage capacity
- Data integrity
- Protection against data corruption
- Efficient data protection
- Date compression
Note: We have explained the procedure and commands on Ubuntu 20.04 LTS (Focal Fossa).
Installing ZFS Filesystem on Ubuntu
We will be using the command line Terminal application for the installation of the ZFS filesystem. To launch the command line Terminal, use the Ctrl+Alt+T keyboard shortcut.
Now to install the ZFS filesystem on Ubuntu, issue the following command in Terminal:
When prompted for the password, provide the sudo password.
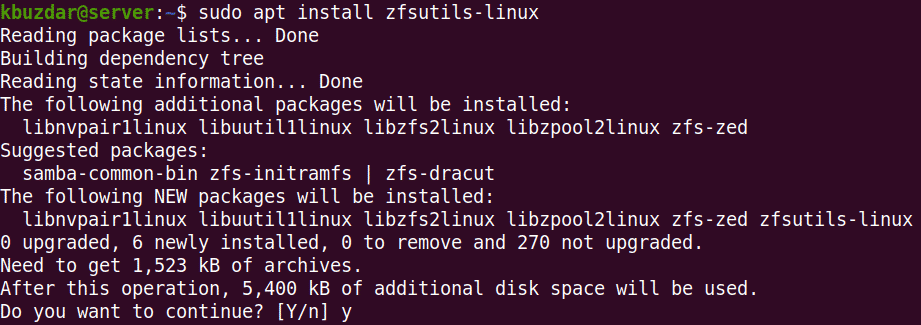
After running the above command, the system might ask for confirmation that if you want to continue the installation or not. Press y to continue; after that, the package will be installed on your system.
To verify ZFS file system installation, issue the following command in Terminal:
You will see the output similar to the following:

Creating the ZFS storage pool
After the installation is completed, we will now create a storage pool for our drives. Here are the steps to do so:
1. First, find out the names of the drives for the pool. Use the following command in Terminal to do so:
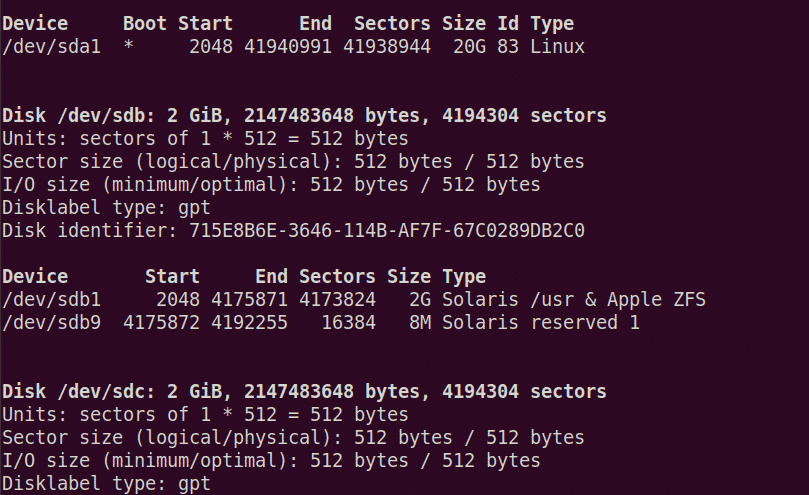
You will see the drives listed in the output. Note down the drive names that you want to pool. From the above output, we can see that there are two drives /dev/sdb and /dev/sdc are listed. We will create the storage pool using these two drives.
There are two types of storage pools: Striped and mirror. In the striped pool, data is stored in the striped across all devices. While in a mirrored pool, the copy of the data is stored across devices that make them fault-tolerant.
To create the striped pool, use the following syntax:
To create the mirror pool, use the following syntax:
If any error occurs, try forcing the command using the -f option after the zpool create command.
In the following example, we will create the striped pool named “test” using the /dev/sdb and /dev/sdc.

To find out where the pool has been mounted, use the following command in Terminal:

From the above command, we can see that the pool has been mounted at the /test. You can also change the mount point for the pool using the following syntax:
For example, to set export/zfs as the new mount point, the command would be:

Then use the following command to verify if the mount point has changed:

You can also create the directories under the storage pool. For example, to create a directory named files under the storage pool, the command would be:

To view all the ZFS storage pools on the system, you can use the following command in Terminal:
It lists all the pools along with their size, space usage, health, and some other information.

To view all the configurations and status of each device in the ZFS storage pool, use the following command in Terminal:
If you experience some issues related to drives in the pool, you can use the events option. Issue the following command in Terminal to view events associated with a specific pool:
Removing the ZFS storage pool
If you no longer need the pool, you can remove it. However, note that removing the pool will also remove the files contained within it.
Use the following command syntax to remove the storage pool:
In this article, you have learned how to install the ZFS file system on Ubuntu 20.04 LTS (Focal Fossa). You have also learned how to create a storage pool in the ZFS file system and remove it when you no longer need it.
About the author
Karim Buzdar
Karim Buzdar holds a degree in telecommunication engineering and holds several sysadmin certifications. As an IT engineer and technical author, he writes for various web sites. He blogs at LinuxWays.