Disable and Remove Unwanted Services on RHEL/CentOS 7 Minimal Installation
RHEL/CentOS 7 minimal installation for servers comes with some default pre-installed services, such as Postfix Mail Transfer Agent daemon, Avahi mdns daemon (multicast Domain Name System) and Chrony service, which is responsible to maintain system clock.
Now comes to the question.. Why wed need to disable all these services. if they are pre-installed? One of the main reason would be to increase system security level degree, the second reason is system final destination and the third is system resources.
Requirements
If you are planning to use your newly installed RHEL/CentOS 7 to host, let’s say, a small website which runs on Apache or Nginx, or to provide network services like DNS, DHCP, PXE boot, FTP server, etc or other services that don’t require to run Postifx MTA daemon, Chrony or Avahi daemon, then why we should keep all these unnecessary daemons installed or even running on your server.
The main external services that your server truly requires to run after you perform a minimal installation would be just a SSH daemon, in order to allow remote logins on system, and, in some cases, NTP service, to accurately synchronize your server internal clock with external NTP servers.
Disable/Remove Postfix MTA, Avahi and Chrony Services
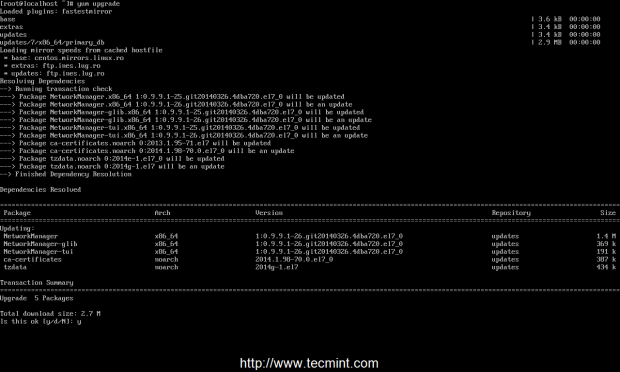
1. After the installation finishes, login on your server with root account or a user with root privileges and perform a system update, to make sure that your system is up-to-date with all packages and security patches.
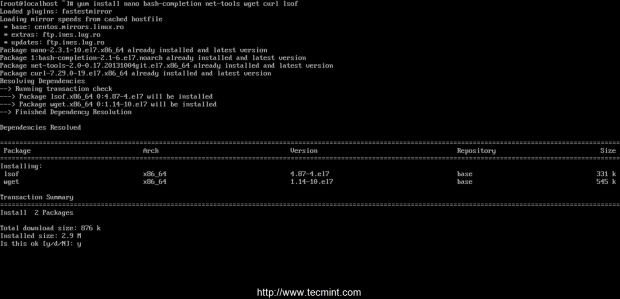
2. The next step would be to install some useful system utilities using YUM Package Manager, such as net-tools (this package provides the older
but good ifconfig command), nano text editor, wget and curl for URL transfers, lsof (to list your open files) and bash-completion, which auto completes typed commands.
# yum install nano bash-completion net-tools wget curl lsof
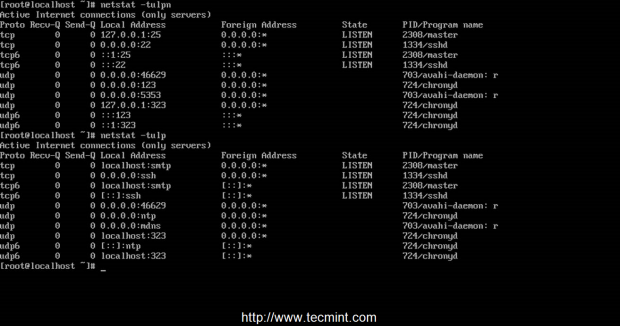
3. Now you can start disabling and remove pre-installed unwanted services. First of all get a list of all your enabled and running services by running netstat command against TCP, UDP and Listen state network sockets.
# netstat -tulpn ## To output numerical service sockets # netstat -tulp ## To output literal service sockets
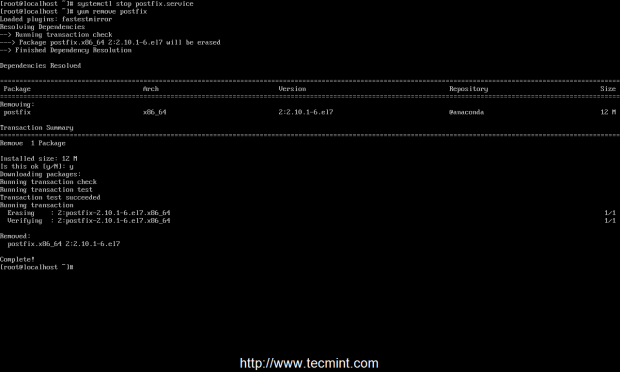
4. As you can see Postfix is started and listens on localhost on port 25, Avahi daemon binds on all network Interfaces and Chronyd service binds on localhost and all network interfaces on different ports. Proceed with Postfix MTA service removal by issuing the following commands.
# systemctl stop postfix # yum remove postfix
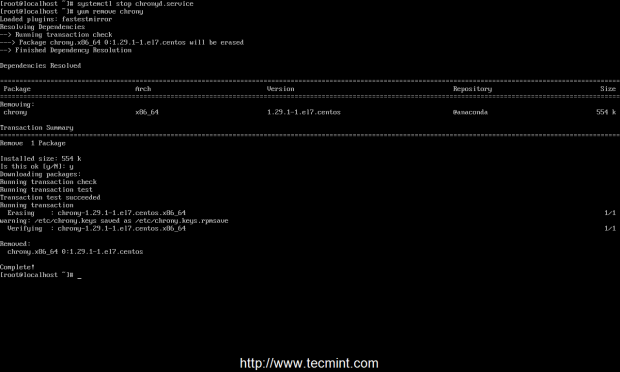
5. Next remove Chronyd service, which will be replaced by NTP server, by issuing the following commands.
# systemctl stop chronyd # yum remove chrony
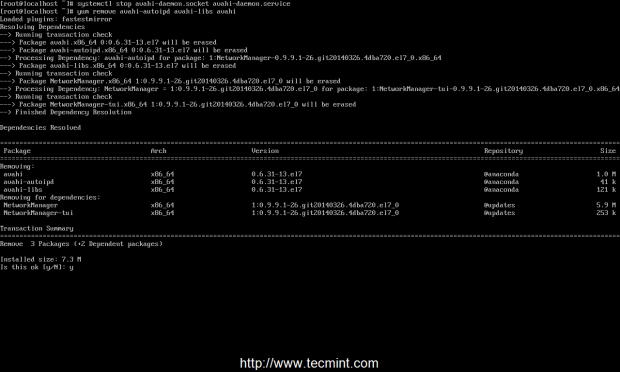
6. Now it’s time to remove Avahi daemon. Looks like in RHEL/CentOS 7 Avahi daemon is strongly tight and depends on Network Manager service. Performing Avahi daemon removal can leave your system without any network connections.
So, pay extra attention to this step. If you really need automatic network configuration provided by Network Manager or you need to edit your interfaces
through nmtui network and interface utility, then you should only stop and disable Avahi daemon and perform no removal at all.
If you still want to completely remove this service then you must manually edit network configuration files located in /etc/sysconfig/network-scripts/ifcfg-interface_name, then start and enable networking service.
Issue the following commands to remove Avahi mdns daemon. Caution: Do not attempt to remove Avahi daemon if you connected through SSH.
# systemctl stop avahi-daemon.socket avahi-daemon.service # systemctl disable avahi-daemon.socket avahi-daemon.service
--------- Stop here if you don't want removal --------- # yum remove avahi-autoipd avahi-libs avahi
7. This step is required only if you removed Avahi daemon and your network connections crashed and you need to manually configure Network Interface Card again.
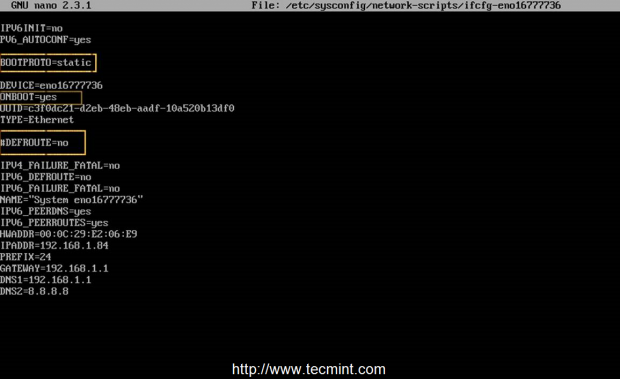
To edit your NIC to use IPv6 and static IP Address, go to /etc/sysconfig/network-scripts/ path, open NIC interface file (usually the first card is named ifcfg-eno1677776 and is already configured by Network Manager) and use the following excerpt as a guide in case your
network interface has no configuration.
IPV6INIT=no IPV6_AUTOCONF=yes BOOTPROTO=none DEVICE=eno16777736 ONBOOT=yes UUID=c3f0dc21-d2eb-48eb-aadf-10a520b13df0 TYPE=Ethernet #DEFROUTE=no IPV4_FAILURE_FATAL=no IPV6_DEFROUTE=no IPV6_FAILURE_FATAL=no NAME="System eno16777736" IPV6_PEERDNS=yes IPV6_PEERROUTES=yes HWADDR=00:0C:29:E2:06:E9 IPADDR=192.168.1.25 NETMASK=255.255.255.0 GATEWAY=192.168.1.1 DNS1=192.168.1.1 DNS2=8.8.8.8
The most important settings here you should take into consideration are:
- BOOTPROTO – Set to none or static – for static IP Address.
- ONBOOT – Set to yes – to bring up your interface after reboot.
- DEFROUTE – Statement commented with a # or completely removed – do not use default route (If you use it here you should add “DEFROUTE: no” to all network interfaces, not used as the default route).
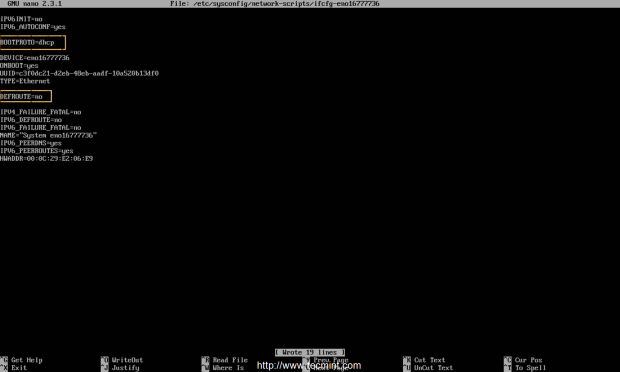
8. If your infrastructure has an DHCP Server that automatically assigns IP Addresses, use the following excerpt for Network Interfaces Configuration.
IPV6INIT=no IPV6_AUTOCONF=yes BOOTPROTO=dhcp DEVICE=eno16777736 ONBOOT=yes UUID=c3f0dc21-d2eb-48eb-aadf-10a520b13df0 TYPE=Ethernet ##DEFROUTE=no IPV4_FAILURE_FATAL=no IPV6_DEFROUTE=no IPV6_FAILURE_FATAL=no NAME="System eno16777736" IPV6_PEERDNS=yes IPV6_PEERROUTES=yes HWADDR=00:0C:29:E2:06:E9
Same as the configuration with Static IP Address, assure that BOOTPROTO is set to dhcp, DEFROUTE statement is commented or removed and the device is configured to automatically start on boot. If you don’t use IPv6 just remove or comment all the lines containing IPV6.
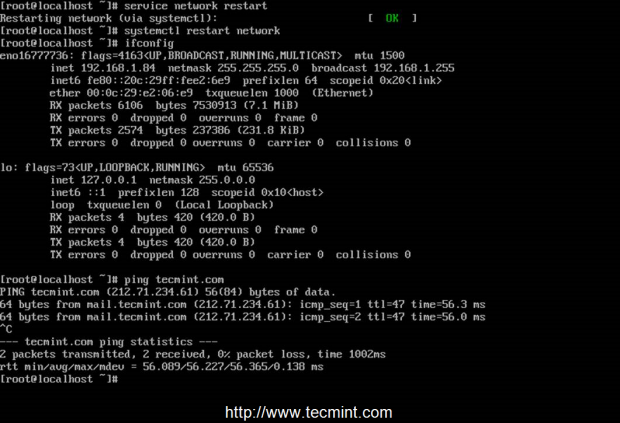
9. In order to apply the new configurations for your network interfaces you must restart network service. After you restart network daemon use ifconfig
or ip addr show command to get your interface settings and try to ping a domain name to see if network is functional.
# service network restart ## Use this command before systemctl # chkconfig network on # systemctl restart network # ifconfig # ping domain.tld
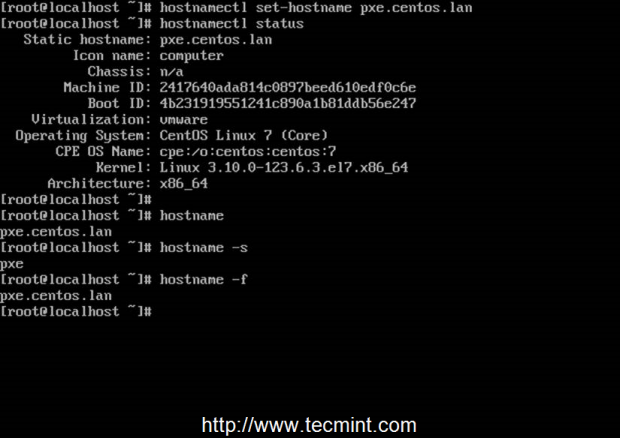
10. As a final setting make sure you set up a name for system hostname using hostnamectl utility and review your configuration with hostname command.
# hostnamectl set-hostname FQDN_system_name # hostnamectl status # hostname # hostname -s ## Short name # hostname -f ## FQDN name
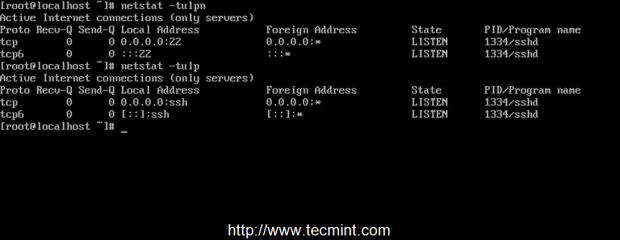
11. That’s all! As a final test run netstat command again to get a look of what services are running on your system.
# netstat -tulpn # netstat -tulp
12. Besides SSH server, if your network uses DHCP to pull dynamic IP configurations, a DHCP Client should run and be active on UDP ports.
13. As an alternative to netstat utility you can output your running network sockets with the help of Sockets Statistics command.
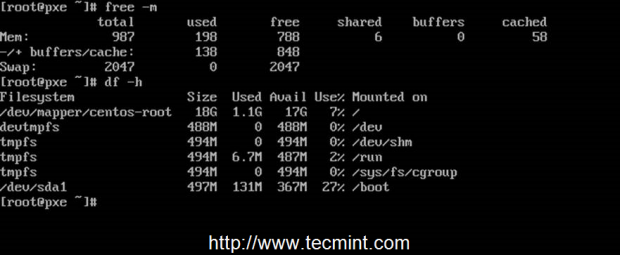
14. Reboot your server and run systemd-analize command to determine your system boot-up time performance and, also, use free and Disk
Free command to display RAM and HDD statistics and top command to see a top of the most used system resources.

Congratulations! Now you have a clean minimal RHEL/CentOS 7 system environment with less services installed and running and more resources available for future configurations.
How to remove systemd services
If I install a new service then decide I don’t want that application anymore and delete it, the service is still listed in the output from systemctl as error. Where is this coming from and how can I remove them thoroughly?
7 Answers 7
My recipe for service obliteration (be careful with the rm statements!)
systemctl stop [servicename] systemctl disable [servicename] rm /etc/systemd/system/[servicename] rm /etc/systemd/system/[servicename] # and symlinks that might be related rm /usr/lib/systemd/system/[servicename] rm /usr/lib/systemd/system/[servicename] # and symlinks that might be related systemctl daemon-reload systemctl reset-failed It is possible that the systemd service ‘wraps’ the old style scripts in /etc/init.d, so you may want to clean that up too, but that is not where systemd services live.
Be aware that there are multiple locations where Systemd unit files are stored, notably /usr/lib/systemd/system and also /etc/systemd/system/ . For reference see: access.redhat.com/documentation/en-US/Red_Hat_Enterprise_Linux/…
Right, I forgot to disable before removing the unit files. BTW, to find all unit files to remove, I inspect the output of systemctl cat [servicename] .
You are probably looking for reset-failed :
$ sudo systemctl reset-failed $ From the systemd man page:
reset-failed [PATTERN. ]
Reset the «failed» state of the specified units, or if no unit name is passed, reset the state of all units. When a unit fails in some way (i.e. process exiting with non-zero error code, terminating abnormally or timing out), it will automatically enter the «failed» state and its exit code and status is recorded for introspection by the administrator until the service is restarted or reset with this command.
This is the only correct answer. The other ones with more upvotes and the check mark are workarounds.
This was exactly what I needed. The service apparently was removed, but the failed state was still kicking around.
It sounds like this just resets the state for a service that should no longer exist. You should very likely delete the service files themselves, not simply change the state of a service you no longer want.
Sounds like you uninstalled it, but didn’t remove the systemd hook:
# systemctl disable [servicename]
Adding on to @mark-lakata’s answer and keeping in mind the attentiveness required for the rm command. [chkconfig] can simplify the process!(click here to read about chkconfig)
To re-iterate the list of commands:
- systemctl stop [servicename]
- chkconfig [servicename] off OR for newer systems systemctl disable [servicename]
- systemctl daemon-reload
- systemctl reset-failed
Note: The 1st command is optional depending on whether you want keep the service running in the present session or not (as for this question the command should be used).
The 2nd command takes care of both disabling and removing (following the symlinks) the service.
chkconfig was the original command to enable/disable SysVinit services. In systems using systemd , it may be present as a backward compatibility command; but the native systemctl command is just as simple: systemctl disable [servicename]
Okay, but the reason for me using this command is, you then don’t have to explicitly run the rm command
A simple Oneliner could be:
service=YOUR_SERVICE_NAME; systemctl stop $service && systemctl disable $service && rm /etc/systemd/system/$service && systemctl daemon-reload && systemctl reset-failed Set service to your desired service that should be deleted. E.g. service=gunicorn.service
+1 for a single operation. This could easily be set in a script with the service string as argument, simplifying the process.
Removing a service from systemd :
Systemd uses unit (file to define services) to remove a service the unit have to be removed. here is a list of unit locations :
/etc/systemd/system/ (and sub directories) /usr/local/etc/systemd/system/ (and sub directories) ~/.config/systemd/user/ (and sub directories) /usr/lib/systemd/ (and sub directories) /usr/local/lib/systemd/ (and sub directories) /etc/init.d/ (Converted old service system) Refresh systemd :
systemctl daemon-reload systemctl reset-failed Ghost services (not-found) :
Systemd can list ghost (not-found) services even if the unit is deleted for many reasons
- unit still present on one of the systemd directory
- unit does not exit but a file link is still present on one of the systemd directory
- the service is used in other unit(s)*
(*) if a service is mentioned in other unit but does not exist systemd will still list that service with the state not-found even if there is not unit file. you can search what unit is using that service with a text search and edit those units (not recommended if you plan to install that service later)
Sources: Linuxhacks.org
Disclosure: I am the owner of Linuxhacks.org
