- How do I remove/delete a virtualenv?
- 22 Answers 22
- Removing an Environment
- 1. Remove the Python environment
- 2. Create an env. with another Python version
- 3. List all Python versions on my machine
- Работа в virtualenv Python
- Активация окружения
- Проверка активации
- Проверка версии
- Деактивация
- Удаление вируального окружения
- How to Delete virtualenv in Python : Only 2 Steps
- How to create a VirtualEnv in python
- How to Delete virtualenv (Virtual Environment ) in python
- Step 1: Deactivate the virtual environment
- Step 2: Delete the venv directory
- Conclusion
- Join our list
How do I remove/delete a virtualenv?
I created an environment with the following command: virtualenv venv —distribute Trying to remove it with the following command: rmvirtualenv venv does not work. I do an ls on my current directory and I still see venv The only way I can remove it seems to be: sudo rm -rf venv Note that the environment is not active. I’m running Ubuntu 11.10. Any ideas? I’ve tried rebooting my system to no avail.
honk: sudo rmvirtualenv venv is not a valid command. Not sure why I thought a reboot would help. I’m fairly new, to be a honest.
Note that you can also remove all currently installed packages, but keep the virtual environment itself if you have virtualenvwrapper installed: $ virtualenv —clear path_to_my_venv . I use this from time to time to make sure I don’t have anything manually installed, like an old dependency no longer in requirements.txt .
The sudo should not be necessary under normal circumstances. The whole point of a virtual environment is that you can manipulate it using your regular user account.
22 Answers 22
«The only way I can remove it seems to be: sudo rm -rf venv «
That’s it! There is no command for deleting your virtual environment. Simply deactivate it and rid your application of its artifacts by recursively removing it.
Note that this is the same regardless of what kind of virtual environment you are using. virtualenv , venv , Anaconda environment, pyenv , pipenv are all based the same principle here.
It’s worth noting that if you are using pip to install dependencies, you might want to pip freeze a dependency list and keep at the top level directory. If you later choose to deploy your application, you won’t have a bit of trouble.
Why is this accepted and with this much votes, when the correct answer is just bellow? Maybe this was for an older version of virtualenvwarpper
@jsbueno He was using virtualenv, not virtualenvwrapper (they are not the same program). At the time, virtualenv provided no interface for clean up; you had to do it yourself.
From a suggested edit: «I think this is not strictly speaking valid for conda environments, as Anaconda makes other changes on file system which won’t be covered by ‘rm -rf. ‘, e.g. user-specific environments.txt file may also need to be edited?»
Just to echo what @skytreader had previously commented, rmvirtualenv is a command provided by virtualenvwrapper , not virtualenv . Maybe you didn’t have virtualenvwrapper installed?
rmvirtualenv is a command for virtualenvwrapper. It won’t work if you don’t have that installed.
Using virtualenvwrapper, to remove an environment, in the $WORKON_HOME :
You must use deactivate before removing the current environment.
You can remove all the dependencies by recursively uninstalling all of them and then delete the venv.
source venv/bin/activate pip freeze > requirements.txt pip uninstall -r requirements.txt -y deactivate rm -r venv/ And critically only do this if you are not sharing the system’s pip ! (Otherwise you will uninstall all of your system packages.)
Actually there should be no need to separately pip uninstall if you are removing all the packages by way of rm anyway. Skipping that stepealso avoids the risk pointed out in the previous comment.
If you are using pyenv, it is possible to delete your virtual environment:
@giorgio in my case pyenv uninstall
I need to correct myself: On some systems pyenv uninstall
Simply delete the virtual environment from the system:
(There’s no special command for it)
Works on me. Make sure to deactivate first if your virtual environment is still running. (your virtual env)>deactivate >rm -rf «your virtual env»
Removing an Environment
Removing a virtual environment is simply done by deactivating it and deleting the environment folder with all its contents:
(ENV)$ deactivate $ rm -r /path/to/ENV @Sébastien No, you should not need sudo or similar privileges unless you also used them to set up the environment in the first place, which would usually be an error.
1. Remove the Python environment
There is no command to remove a virtualenv so you need to do that by hand, you will need to deactivate if you have it on and remove the folder:
2. Create an env. with another Python version
When you create an environment the python uses the current version by default, so if you want another one you will need to specify at the moment you are creating it. To make and env. with Python 3.X called MyEnv just type:
Now to make with Python 2.X use virtualenv instead of venv :
python2.X -m virtualenv MyEnv 3. List all Python versions on my machine
If any of the previous lines of code didn’t worked you probably don’t have the specific version installed. First list all your versions with:
If you didn’t find it, install Python 3.X using apt-get :
sudo apt-get install python3.X Работа в virtualenv Python

В этой статье мы обсудим работу в виртуальном окружении.
Установку virtualenv мы рассматривали в предыдующей статье
Предположим, вы находитесь в директории virtualenvs внутри которой создано виртуальное окружение для Python3, которое называется test_env
Активация окружения
Чтобы активировать вируальное окружение test_env из стандартоной cmd в Windows выполните
Если Вы используете PowerShell выполните
При успешной активации слева в командной строке появится название виртуального окружения в круглых скобках (test_env)
(test_env) PS C:\Users\Andrei\virtualenvs>
Если ничего не произошло прочитайте совет в моей статье
Проверка активации
Название окружения может и не появиться в скобках в приглашении терминала.
Чтобы проверить активировалось ли виртуальное окружение или нет — можно выполнить следующие команды
python
>>>import sys
>>>sys.prefix
‘/home/andrei/pytest/venv’
>>>sys.base_prefix
‘/home/andrei/.pyenv/versions/3.9.5’
sys.prefix отличается от sys.base_prefix значит используется Python из виртуального окружения.
Если вы запускаете скрипт в Pycharm изучите вывод терминала
Process finished with exit code 0
— это путь до использованного Python
Если бы я запустил скрипт не из виртуального окружения вместо этого пути был бы путь
Проверка версии
Первое, что стоит сделать после первого входа в новое окружение — это проверить версию Python и Pip
pip 20.1.1 from C:\Users\Andrei\virtualenvs\test_env\lib\site-packages\pip (python 3.8)
Проверим, какие модули установлены в новом вирутальном окружении
Package Version ———- ——- pip 20.1.1 setuptools 46.4.0 wheel 0.34.2
Модулей всего три, это означает, что действительно, что-то изменилось.
Сравните с количеством модулей, которое установленов системе из урока pip
Установим requests в виртуальном окружении
python -m pip install requests
Collecting requests Downloading requests-2.23.0-py2.py3-none-any.whl (58 kB) |████████████████████████████████| 58 kB 609 kB/s Collecting urllib3!=1.25.0,!=1.25.1,=1.21.1 Downloading urllib3-1.25.9-py2.py3-none-any.whl (126 kB) |████████████████████████████████| 126 kB 2.2 MB/s Collecting chardet=3.0.2 Downloading chardet-3.0.4-py2.py3-none-any.whl (133 kB) |████████████████████████████████| 133 kB 2.2 MB/s Collecting certifi>=2017.4.17 Downloading certifi-2020.4.5.2-py2.py3-none-any.whl (157 kB) |████████████████████████████████| 157 kB 3.2 MB/s Collecting idna=2.5 Downloading idna-2.9-py2.py3-none-any.whl (58 kB) |████████████████████████████████| 58 kB 1.6 MB/s Installing collected packages: urllib3, chardet, certifi, idna, requests Successfully installed certifi-2020.4.5.2 chardet-3.0.4 idna-2.9 requests-2.23.0 urllib3-1.25.9
Проверим какие пакеты установились
Package Version ———- ———- certifi 2020.4.5.2 chardet 3.0.4 idna 2.9 pip 20.1.1 requests 2.23.0 setuptools 46.4.0 urllib3 1.25.9 wheel 0.34.2
request подтянул за собой ещё четыре пакета: certifi, chardet, idna, urllib3
Проверить куда установился requests в этом окружении можно командой
python -m pip show requests
Name: requests Version: 2.23.0 Summary: Python HTTP for Humans. Home-page: https://requests.readthedocs.io Author: Kenneth Reitz Author-email: me@kennethreitz.org License: Apache 2.0 Location: c:\users\andrei\virtualenvs\test_env\lib\site-packages Requires: chardet, certifi, urllib3, idna Required-by:
Деактивация
Чтобы выйти из виртуального окружения используем команду
python -m pip show requests
WARNING: Package(s) not found: requests
Можно увидеть, что глобально requests вообще не установлен
Начиная с версии Python 3.6 рекомендуется создавать виртуальные окружения командой
Заново активируется окружение так же, например, для PowerShell
(myvenv) PS C:\Users\Andrei\virtualenvs>
Не знаю как у Вас, а у меня в PowerShell (myvenv) , созданный с помощью venv подсвечен зелёным, а test_env, созданный с помощью virtualenv остаётся серым.
Удаление вируального окружения
Чтобы удалить виртуальное окружение — просто удалите папку
How to Delete virtualenv in Python : Only 2 Steps

In python, you do most of the code in a custom-created virtual environment for a specific project. It makes the other projects separate from the other. All the modules installed in the virtual environment will not have effects on the other virtual environments. Let’s say you have already created a virtual environment for python then how you can delete that virtual environment? In this entire post, you will learn how to Delete virtualenv in python with steps.
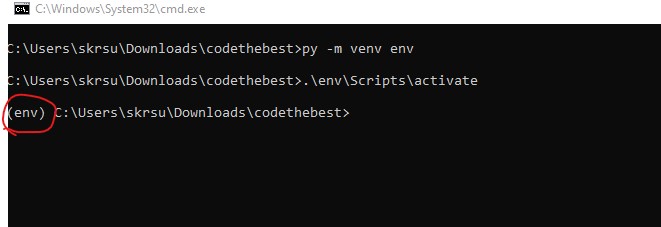
How to create a VirtualEnv in python
Before going to the deletion part let’s first know how you can create a virtual environment in python. You can create a virtual environment using the py command.
Go to your path of the directory and Open your terminal. After that run the below command to create virtualenv in python.
It will create a virtual environment for the name env. After that, you have to activate it to use this virtual environment.
Now you will see the ( env ) before the path in the terminal. 
You can also know the path of the virtual environment using the below command. It will list out all the paths of the python installed in your system.
How to Delete virtualenv (Virtual Environment ) in python
The above part was for the creation of a virtual environment in python. In this section, you will know the various solution to delete virtualenv in python.
Step 1: Deactivate the virtual environment
The first step before deleting virtualenv is to deactivate the environment you have created. To do you have to use the deactivate command.
Type the below command to deactivate venv.
Now you will not see the (env) before the directory path. It means the virtual environment is deleted.
deactivate C:\Users\skrsu\Downloads\codethebest>Step 2: Delete the venv directory
After deactivating the virtualenv now remove the directory that were containing all the files after the creation of the env environment.
Run the below line of code to remove the directory.
Conclusion
Creation of the virtualenv is very simple but the deletion can take much time if you do not know how to perform it. The above steps will help you to delete virtualenv in python.
I hope this tutorial has helped you to achieve the task that you want. If you have any queries then you can contact us for help.
Join our list
Subscribe to our mailing list and get interesting stuff and updates to your email inbox.
We respect your privacy and take protecting it seriously
Thank you for signup. A Confirmation Email has been sent to your Email Address.