- Programming UDP sockets in C on Linux – Client and Server example
- Simple UDP Server
- UDP Client
- Conclusion
- 16 Comments
- Send and Receive UDP packets via Linux CLI
- Expectations:
- Netcat Command:
- General Set Up Diagram:
- Send UDP packet:
- Start Server:
- Start Client:
- Check Connection:
- Send UDP packets:
- Check packets in Wireshark:
- Other command to send UDP packets:
- Conclusion:
- References:
- About the author
- Bamdeb Ghosh
- RELATED LINUX HINT POSTS
- Linux TCP/UDP Client & Server Connections using Netcat
- Setup
- Netcat options
- UDP
- 👉 Any questions? Please comment below.
Programming UDP sockets in C on Linux – Client and Server example
This article describes how to write a simple echo server and client using udp sockets in C on Linux/Unix platform.
UDP sockets or Datagram sockets are different from the TCP sockets in a number of ways.
The most important difference is that UDP sockets are not connection oriented. More technically speaking, a UDP server does not accept connections and a udp client does not connect to server.
The server will bind and then directly receive data and the client shall directly send the data.
Simple UDP Server
So lets first make a very simple ECHO server with UDP socket. The flow of the code would be
socket() -> bind() -> recvfrom() -> sendto()
/* Simple udp server */ #include //printf #include //memset #include //exit(0); #include #include #define BUFLEN 512 //Max length of buffer #define PORT 8888 //The port on which to listen for incoming data void die(char *s) < perror(s); exit(1); >int main(void) < struct sockaddr_in si_me, si_other; int s, i, slen = sizeof(si_other) , recv_len; char buf[BUFLEN]; //create a UDP socket if ((s=socket(AF_INET, SOCK_DGRAM, IPPROTO_UDP)) == -1) < die("socket"); >// zero out the structure memset((char *) &si_me, 0, sizeof(si_me)); si_me.sin_family = AF_INET; si_me.sin_port = htons(PORT); si_me.sin_addr.s_addr = htonl(INADDR_ANY); //bind socket to port if( bind(s , (struct sockaddr*)&si_me, sizeof(si_me) ) == -1) < die("bind"); >//keep listening for data while(1) < printf("Waiting for data. "); fflush(stdout); //try to receive some data, this is a blocking call if ((recv_len = recvfrom(s, buf, BUFLEN, 0, (struct sockaddr *) &si_other, &slen)) == -1) < die("recvfrom()"); >//print details of the client/peer and the data received printf("Received packet from %s:%d\n", inet_ntoa(si_other.sin_addr), ntohs(si_other.sin_port)); printf("Data: %s\n" , buf); //now reply the client with the same data if (sendto(s, buf, recv_len, 0, (struct sockaddr*) &si_other, slen) == -1) < die("sendto()"); >> close(s); return 0; > Run the above code by doing a gcc server.c && ./a.out at the terminal. Then it will show waiting for data like this
$ gcc server.c && ./a.out Waiting for data.
Next step would be to connect to this server using a client. We shall be making a client program a little later but first for testing this code we can use netcat.
Test the server with netcat
Open another terminal and connect to this udp server using netcat and then send some data. The same data will be send back by the server. Over here we are using the ncat command from the nmap package.
$ ncat -vv localhost 8888 -u Ncat: Version 5.21 ( http://nmap.org/ncat ) Ncat: Connected to 127.0.0.1:8888. hello hello world world
Note : We had to use netcat because the ordinary telnet command does not support udp protocol. The -u option of netcat specifies udp protocol.
Check open port with netstat
The netstat command can be used to check if the udp port is open or not.
$ netstat -u -a Active Internet connections (servers and established) Proto Recv-Q Send-Q Local Address Foreign Address State udp 0 0 localhost:11211 *:* udp 0 0 localhost:domain *:* udp 0 0 localhost:45286 localhost:8888 ESTABLISHED udp 0 0 *:33320 *:* udp 0 0 *:ipp *:* udp 0 0 *:8888 *:* udp 0 0 *:17500 *:* udp 0 0 *:mdns *:* udp 0 0 localhost:54747 localhost:54747 ESTABLISHED udp6 0 0 [::]:60439 [::]:* udp6 0 0 [::]:mdns [::]:*
Note the *:8888 entry of output. Thats our server program.
The entry that has localhost:8888 in «Foreign Address» column, indicates some client connected to it, which is netcat over here.
UDP Client
Now that we have tested our server with netcat, its time to make a client and use it instead of netcat.
The program flow is like
/* Simple udp client */ #include //printf #include //memset #include //exit(0); #include #include #define SERVER "127.0.0.1" #define BUFLEN 512 //Max length of buffer #define PORT 8888 //The port on which to send data void die(char *s) < perror(s); exit(1); >int main(void) < struct sockaddr_in si_other; int s, i, slen=sizeof(si_other); char buf[BUFLEN]; char message[BUFLEN]; if ( (s=socket(AF_INET, SOCK_DGRAM, IPPROTO_UDP)) == -1) < die("socket"); >memset((char *) &si_other, 0, sizeof(si_other)); si_other.sin_family = AF_INET; si_other.sin_port = htons(PORT); if (inet_aton(SERVER , &si_other.sin_addr) == 0) < fprintf(stderr, "inet_aton() failed\n"); exit(1); >while(1) < printf("Enter message : "); gets(message); //send the message if (sendto(s, message, strlen(message) , 0 , (struct sockaddr *) &si_other, slen)==-1) < die("sendto()"); >//receive a reply and print it //clear the buffer by filling null, it might have previously received data memset(buf,'/* Simple udp client */ #include //printf #include //memset #include //exit(0); #include #include #define SERVER "127.0.0.1" #define BUFLEN 512 //Max length of buffer #define PORT 8888 //The port on which to send data void die(char *s) < perror(s); exit(1); >int main(void) < struct sockaddr_in si_other; int s, i, slen=sizeof(si_other); char buf[BUFLEN]; char message[BUFLEN]; if ( (s=socket(AF_INET, SOCK_DGRAM, IPPROTO_UDP)) == -1) < die("socket"); >memset((char *) &si_other, 0, sizeof(si_other)); si_other.sin_family = AF_INET; si_other.sin_port = htons(PORT); if (inet_aton(SERVER , &si_other.sin_addr) == 0) < fprintf(stderr, "inet_aton() failed\n"); exit(1); >while(1) < printf("Enter message : "); gets(message); //send the message if (sendto(s, message, strlen(message) , 0 , (struct sockaddr *) &si_other, slen)==-1) < die("sendto()"); >//receive a reply and print it //clear the buffer by filling null, it might have previously received data memset(buf,'\0', BUFLEN); //try to receive some data, this is a blocking call if (recvfrom(s, buf, BUFLEN, 0, (struct sockaddr *) &si_other, &slen) == -1) < die("recvfrom()"); >puts(buf); > close(s); return 0; > ', BUFLEN); //try to receive some data, this is a blocking call if (recvfrom(s, buf, BUFLEN, 0, (struct sockaddr *) &si_other, &slen) == -1) < die("recvfrom()"); >puts(buf); > close(s); return 0; >
Run the above program and it will ask for some message
$ gcc client.c -o client && ./client Enter message : happy happy
Whatever message the client sends to server, the same comes back as it is and is echoed.
Conclusion
UDP sockets are used by protocols like DNS etc. The main idea behind using UDP is to transfer small amounts of data and where reliability is not a very important issue. UDP is also used in broadcasting/multicasting.
When a file transfer is being done or large amount of data is being transferred in parts the transfer has to be much more reliable for the task to complete. Then the TCP sockets are used.
A Tech Enthusiast, Blogger, Linux Fan and a Software Developer. Writes about Computer hardware, Linux and Open Source software and coding in Python, Php and Javascript. He can be reached at [email protected] .
16 Comments
- Joe June 7, 2021 at 3:03 pm Hello. You seem to have double pasted the second code sample inside itself. THanks for the tutorial
- Silver Moon Post author August 14, 2018 at 4:04 pm i haven’t done sockets for a long time. right now i can think of using multiple threads do things in parallel.
so the main thread could do its background work, and an extra thread could listen to the udp port for incoming messages.
or the other way round.
but i am not sure if that is the best approach. there might be better alternatives.
- Bryan Kelly March 15, 2018 at 4:04 am And ncat used option -vv which on my Ubuntu system means verbose. The captured text does not have the verbose output. My system had five lines of information for each line of typed in data.
Still, I am new to Linux and Ubuntu and this is an unexpected cool way to test the server app.
Thank you.
Send and Receive UDP packets via Linux CLI

We already know about two main transport layer protocols like TCP and UDP. For more information about TCP and UDP, you can check the reference section. In this article, we will learn how to send and receive UDP packets via the Linux command-line interface (CLI) using nc (mainly) command.
Expectations:
Here are the key points to learn from this article
- To understand nc command in Linux.
- Use nc command for sending and receiving UDP packets through network.
- Send some human readable sentences through nc command.
- Capture the UDP packet sent by nc command.
- Check network packet in Wireshark.
- Find out any other command other than netcat for Linux.
Netcat Command:
Netcat(nc) command is installed by default in Linux OS. Open one terminal [Shortcut Alt+Ctrl+t] and use below command to check if nc is present or not.
Here is the expected output
This is nc from the netcat-openbsd package. An alternative nc is available
in the netcat-traditional package.
usage: nc [-46bCDdhjklnrStUuvZz] [-I length] [-i interval] [-O length]
[-P proxy_username] [-p source_port] [-q seconds] [-s source]
[-T toskeyword] [-V rtable] [-w timeout] [-X proxy_protocol]
[-x proxy_address[:port]] [destination] [port]
This means nc command is already exist in Linux.
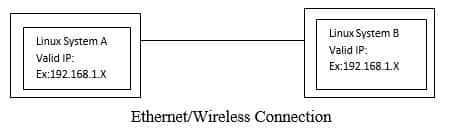
General Set Up Diagram:
Send UDP packet:
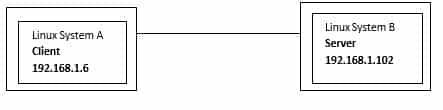
Let’s take an example like we will send UDP packet from System A to System B. So, in server-client concept, we have to run server at System B side and client at System A side.
Also we have valid IP addresses.
Start Server:
To start sever using nc command use below command in System B terminal
This command does not have any output to show as of now. This is just listening mode on port 9999.
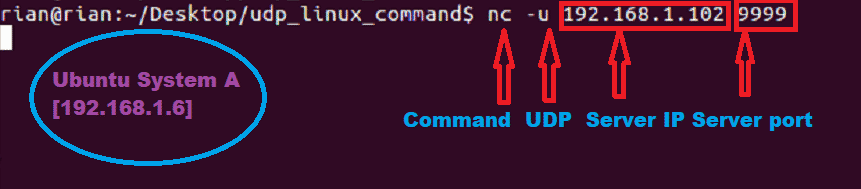
Start Client:
To connect to server using nc command use below command in System A terminal
Now system A has to connect to System B. So we have provided server IP address and port number.
Check Connection:
We can check the below command for the confirmation about client connation to server port.
Send UDP packets:
Now we can send udp packet from System A to B and vice versa.
Now go to system A and send any sentences like
We should able to see this in System B side. Here is the screenshot
We can also send UDP packets from System B to System A.
Go to System B and send sentence like
Here is the screenshot from System B
Here is the screenshot from System A
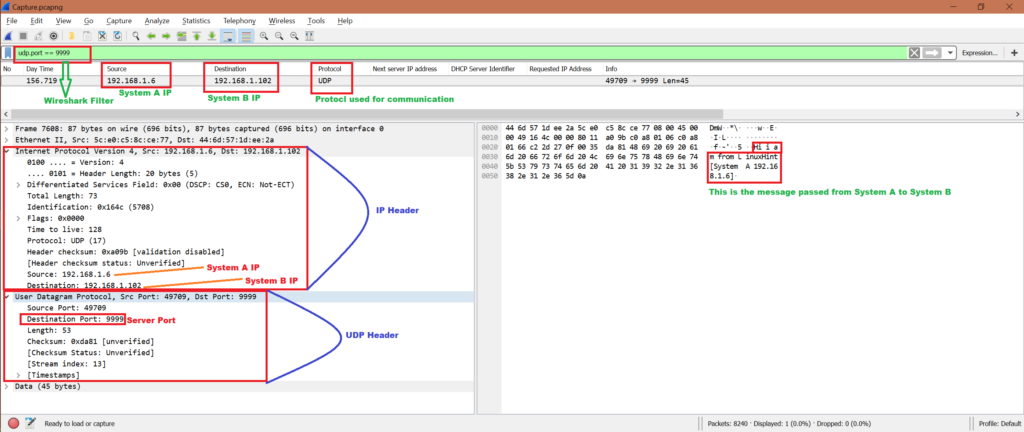
Check packets in Wireshark:
Now while we have been sending UDP packets from System A to System B and vice verse, we can start Wireshark in either System A or System B. Here we have the capture file, let’s do some analysis and confirm if this server and client communication used UDP protocol.
Note that we will only analyze the first communication:
System A has sent:
We will use filter “udp.port == 9999” to get only related packets in Wireshark. Refer below screenshot for analysis from Wireshark capture:
To know how to use Wireshark refer below link
Other command to send UDP packets:
There is another method to send UDP packets
Run below command at System A:
$ echo -n "hello" >/ dev / udp / 192.168.1.102 / 8000
192.168.1.102: System B’s IP
8000 : The server port
Message sent: “hello”
But we are able to send only one time “hello”. If we kill server and rerun then it’s working.
Conclusion:
From the above exercise we have learned the mechanism to send some messages using UDP protocol. And the best method is to use nc command in Linux.
References:
About the author
Bamdeb Ghosh
Bamdeb Ghosh is having hands-on experience in Wireless networking domain.He's an expert in Wireshark capture analysis on Wireless or Wired Networking along with knowledge of Android, Bluetooth, Linux commands and python. Follow his site: wifisharks.com
RELATED LINUX HINT POSTS
Linux Hint LLC, editor@linuxhint.com
1309 S Mary Ave Suite 210, Sunnyvale, CA 94087
Privacy Policy and Terms of Use
Linux TCP/UDP Client & Server Connections using Netcat
Netcat is the most convenient TCP/UDP connection simulation tool that you can find for Linux terminal.
Here is a quick tutorial on simulating UDP and TCP connections on Linux terminal using Netcat (NCat). Netcat package comes bundled with the famous Linux port scanning tool: NMap.
Setup
// for RHEL/CentOS $ sudo yum install nmap -y // for Ubuntu/Debian $ sudo apt-get update $ sudo apt-get install nmap -y


- Next, you can setup one Netcat instance to listen to a certain port either via TCP/UDP transport protocol and setup another Netcat instance to establish a connection to it. Once the connection is established, both instances can send messages to other instances, which will work like a simple chat server and client.
Netcat options
- -l : set to listening state which create a simple HTTP server waiting for the incoming connections
- -p : define local port
- -u : set the UDP mode
UDP
- On a new terminal tab, run below command to create an instant UDP client communicating with the above server. You can input any simple text, click enter , and see it appearing in the server’s output stream.
$ nc -u localhost 30000 Hello world from client! TCP
- On a new terminal tab, run below command to create an instant TCP client communicating with the above server. You can input any simple text, click enter , and see it appearing in the server’s output stream.
$ nc localhost 31000 Hello world from client!
Verify
// TCP $ netstat -nat | grep 31000 // UDP $ netstat -nau | grep 30000
- -v : enable verbose logs
- -n : show numeric host, port or user names
- -a : show both listening and non-listening (for TCP this means established connections) sockets
👉 Any questions? Please comment below.
Updated: January 02, 2020